
Popular categories
Looking for a yarn?


Comments / Questions (98)
![]() Clara wrote:
Clara wrote:
Hej, Jeg er nået hertil i opskriften, bærestykke: "Strik 1 pind ret fra retsiden hvor maskeantallet justeres til (139) 163-175-191-195 (207) masker." Jeg kan ikke gennemskue hvor de 9 indtagninger (fra 184 til 175) skal placeres? Er det jævnt fordelt i vrangmaskerne eller hvordan gør jeg det, for at få det rigtige resultat? På forhånd tak,
14.09.2025 - 22:32DROPS Design answered:
Hei Clara. Maskeantallet skal justeres på en pinne som strikkes rett. Bare fell disse 9 maskene jevnt fordelt på raden. Bruk vår "tag ud / tag ind kalkulator. Du finner den som et ikon nederst til høyre eller rett under Instruktioner (under bildene). mvh DROPS Design
29.09.2025 - 10:46
![]() Alexandra wrote:
Alexandra wrote:
Adoro os vossos modelos!
06.08.2025 - 09:45
![]() Marion Nicholson wrote:
Marion Nicholson wrote:
I would like to download this pattern so I can print it. Is this possible as I have done it before from the download icon but I cannot find this for this pattern. Thank you for your help
04.08.2025 - 14:08DROPS Design answered:
Dear Mrs Nicholson, you will find the icon to print the pattern on the top corner on the left side; to save it as a .pdf you would have to use a virtual printer. Happy knitting!
04.08.2025 - 16:20
![]() Maike wrote:
Maike wrote:
Müssen die Zunahmen an der Halsblende nicht links verschränkt gestrickt werden? In der Anleitung für den Pullover ist es auch so beschrieben
13.07.2025 - 12:29
![]() Edna Schiffres wrote:
Edna Schiffres wrote:
The directions for the ribbed pattern does not reverse. I am working on straight needles. the last three stitches before the 4 garter edge stitches are knits. if i start the a1,a2 pattern,again as the directions say, i get all purll bumps, not the widened rib as shown in the directions. shouldn't i start the next row with 3 purls and end with 3 purls? are there any other spots in the directions that don't work? i've ripped this out already.
24.06.2025 - 00:49DROPS Design answered:
Dear Mrs Schiffres, from the wrong side, follow the diagram text "from wrong side" for the symbols to know how to work them, this means the 3 sts in A.1 will be purled from wrong side while the 3 sts A.2 will be knitted from wrong side. So that you will have K3 inside the front band sts, seen from the right side. Happy knitting!
24.06.2025 - 18:24
![]() Françoise wrote:
Françoise wrote:
Bonjour, pour la manche vous dites de mesurer à partir de la division de quoi parlez- vous ? C’est la première fois que je tricote un gilet par le haut je suis un peu perdue. Merci par avance de votre réponse
08.05.2025 - 21:59DROPS Design answered:
Bonjour Françoise, on mesure la manche à partir de la fin de l'empiècement, lorsque vous avez mis les mailles en attente pour tricoter séparément le dos& les devants, vous reprenez les mailles des manches, mettez un marqueur au milieu de votre rang par exemple et mesurez à partir de ce marqueur. Bon tricot!
09.05.2025 - 08:07
![]() Sara wrote:
Sara wrote:
Buongiorno sto realizzando questo cardigan per una bimba nella taglia 6/9 mesi . Quello che non capisco è nello sprone quando dopo aver aumentato fino a 202 maglie in seguito dice : " aggiustare fino a 191 maglie" ... cioè devo diminuire uniformemente 11 maglie? È questo che intende?
17.03.2025 - 16:10DROPS Design answered:
Buonasera Sara, si esatto, deve raggiungere il numero di maglie indicato. Buon lavoro!
18.03.2025 - 20:29
![]() Angeline wrote:
Angeline wrote:
Bonjour, je vous remercie sincèrement pour votre aide. J aime beaucoup travailler avec vos modèles. Merci beaucoup.
14.03.2025 - 13:52
![]() Angeline wrote:
Angeline wrote:
Bonjour, excusez ma question bête, j ai 2 trous sous les enmanchures au niveau de la 1 et la 8 ieme maille. Dois je reprendre les mailles après le tricot. Merci,je n ai pas l habitude. de travailler de haut en bas. Bonne journée,
13.03.2025 - 12:10DROPS Design answered:
Bonjour Angéline, vous entendez par là sous les manches, après avoir repris les mailles des manches? Si vous avez un petit trou à la transition entre les mailles relevées dans les mailles montées sous la manche et celles de la manche, vous pouvez relever le fil entre la dernière des 8 mailles à relever et la maille suivante (début du tour) ou après la dernière maille de la manche et la 1ère des mailles à relever (fin du tour) et tricotez ce fil torse avec la maille suivante. Si vous avez déjà tricoté la manche, vous pouvez faire quelques points pour les cacher (au moment de rentrer les fils par ex.). Bon tricot!
14.03.2025 - 08:09
![]() Anna Rita Celino wrote:
Anna Rita Celino wrote:
Buongiorno, ho 4 gomitoli di Drops Cotton Merino, posso utilizzarli per questo pattern? Grazie e complimenti
03.03.2025 - 15:19DROPS Design answered:
Buongiorno Anna, per quasi tutte le taglie servono circa 100g di DROPS Sky: deve calcolare il metraggio totale per la sua taglia per vedere se sono sufficienti 4 gomitoli. Buon lavoro!
08.03.2025 - 11:30
|
||||||||||
Sweet Gleam Cardigan#sweetgleamcardigan |
||||||||||
 |
 |
|||||||||
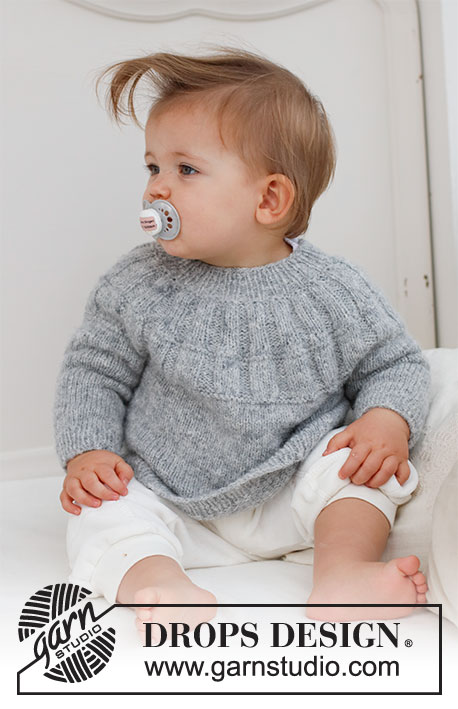
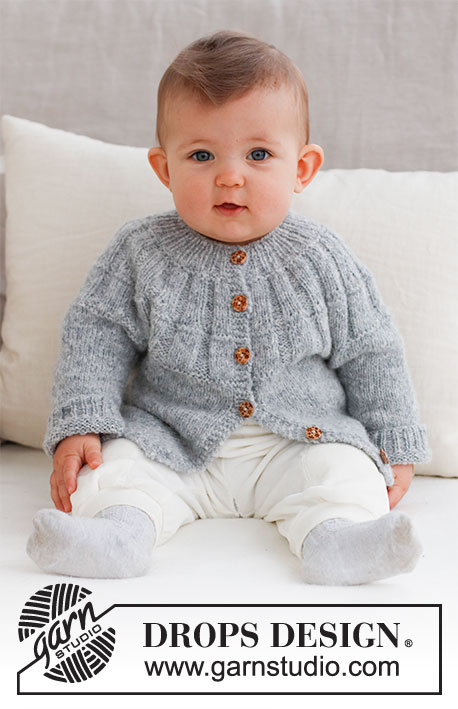
Knitted jacket for baby in DROPS Sky. The piece is worked top down, with round yoke and ribbing on the yoke. Sizes: Premature to 2 years.
DROPS Baby 43-6 |
||||||||||
|
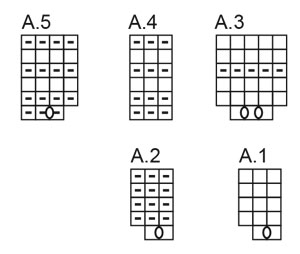
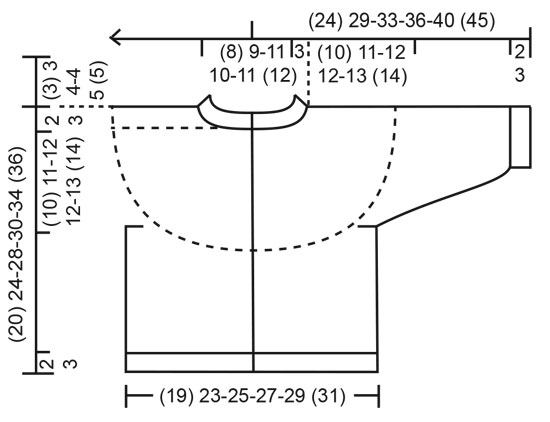
------------------------------------------------------- EXPLANATIONS FOR THE PATTERN: ------------------------------------------------------- RIDGE/GARTER STITCH (worked back and forth): Knit all rows. 1 ridge = knit 2 rows. PATTERN: See diagrams A.1 to A.5. The diagrams show all rows in the pattern from the right side. DECREASE TIP (for sleeves): Start 3 stitches left before the marker, knit 2 together, knit 2 (marker sits between these 2 stitches), slip 1 stitch as if to knit, knit 1 and pass the slipped stitch over the knitted stitch. BUTTONHOLES: Work the buttonholes on the right band (when the garment is worn). Work from the right side when there are 3 stitches left: Make 1 yarn over, knit 2 together and knit 1. On the next row (wrong side) knit the yarn over to leave a hole. The first buttonhole is worked when the neck measures 1½-2 cm, the other (3) 4-5-5-5 (5) buttonholes are worked with (5) 5-5-5-5½ (6) cm between each one. ------------------------------------------------------- START THE PIECE HERE: ------------------------------------------------------- JACKET – SHORT OVERVIEW OF THE PIECE. The neck and yoke are worked back and forth with circular needle, from mid front and top down. The yoke is divided for body and sleeves and the body continued back and forth. The sleeves are worked in the round with double pointed needles. NECK: Cast on (59) 63-71-75-79 (83) stitches with circular needle size 3 mm and DROPS Sky. Purl 1 row from the wrong side, then work the next row as follows: 4 band stitches in GARTER STITCH – read description above, * knit 1, purl 1 *, work from *-* until there are 5 stitches left, knit 1 and 4 band stitches in garter stitch. Work this rib for (2) 2-3-3-4 (4) cm – remember the BUTTONHOLES on the right band – read description above. On the next row from the right side increase every other purl-1 to purl-2 by making 1 yarn over – start to increase in the 2nd purled stitch after the band (knit the yarn overs twisted on the next row to avoid holes) = (12) 13-15-16-17 (18) increased stitches and (71) 76-86-91-96 (101) stitches. Continue the new rib until the neck measures (3) 3-4-4-5 (5) cm. Insert 1 marker after the band; the yoke is measured from this marker! YOKE: Change to circular needle size 4 mm and work 1 ridge over all stitches – AT THE SAME TIME on the first row increase (3) 2-0-3-2 (1) stitches evenly spaced = (74) 78-86-94-98 (102) stitches. After the ridge work as follows from the right side: 4 band stitches in garter stitch, * A.1, A.2 *, work from *-* until there are 6 stitches left, A.1 and 4 band stitches in garter stitch. After the first row there are (107) 113-125-137-143 (149) stitches. Complete A.1 and A.2, then continue with knit 3 /purl 3 until the yoke measures (4) 5-5-5-6 (6) cm from the marker on the neck. Work the next row from the right side as follows: SIZE (<0): 4 band stitches in garter stitch, * A.3, A.4 *, work from *-* until there are 7 stitches left, A.3 and 4 band stitches in garter stitch. SIZES 0/1 – 1/3 – 6/9 – 12/18 months (2 years): 4 band stitches in garter stitch, * A.3, A.5 *, work from *-* until there are 7 stitches left, A.3 and 4 band stitches in garter stitch. After the first row there are (141) 166-184-202-211 (220) stitches. Complete A.3 and A.4/A.5, then continue with knit 5 / purl 3 in size (<0) and knit 5 / purl 4 in the other sizes until the yoke measures (8) 10-10-10-12 (12) cm from the marker. Knit 1 row from the right side where you adjust the number of stitches to (139) 163-175-191-195 (207) stitches. Knit 1 row from the wrong side. Continue with stocking stitch and 4 band stitches in garter stitch on each side until the yoke measures (10) 11-12-12-13 (14) cm from the marker. On the next row divide for the body and sleeves as follows: Work the first (22) 26-28-30-31 (33) stitches as before, place the next (30) 34-36-40-40 (42) stitches on a thread for the sleeve, cast on (4) 4-6-6-8 (8) stitches (in side under sleeve), work (35) 43-47-51-53 (57) stitches, place the next (30) 34-36-40-40 (42) stitches on a thread for the sleeve, cast on (4) 4-6-6-8 (8) stitches (in side under sleeve), work the last (22) 26-28-30-31 (33) stitches. The body and sleeves are finished separately. The piece is now measured from here! BODY: = (87) 103-115-123-131 (139) stitches. Continue with stocking stitch and 4 band stitches in garter stitch on each side for a further (6) 9-12-12-15 (16) cm. Knit 1 row from the right side where you increase (12) 14-16-18-18 (20) stitches evenly spaced = (99) 117-131-141-149 (159) stitches. Change to circular needle size 3 mm and work as follows from the wrong side: 4 band stitches in garter stitch, * purl 1, knit 1 *, work from *-* until there are 5 stitches left, purl 1 and 4 band stitches in garter stitch. Continue this rib for (2) 2-2-3-3 (3) cm. Cast off a little loosely. The jacket measures approx. (20) 24-28-30-34 (36) cm from the shoulder down. SLEEVES: Place the (30) 34-36-40-40 (42) stitches from the thread on the one side of the piece on double pointed needles size 4 mm and knit up 1 stitch in each of the (4) 4-6-6-8 (8) stitches cast on under the sleeve = (34) 38-42-46-48 (50) stitches. Insert a marker in the middle of the (4) 4-6-6-8 (8) stitches under the sleeve. Start at the marker and work stocking stitch in the round for 1 cm. Now decrease 2 stitches under the sleeve (does not apply to sizes <0 and 0/1 month) – read DECREASE TIP. Decrease like this every 4th round a total of (0) 0-1-1-1 (2) times = (34) 38-40-44-46 (46) stitches. Continue working until the sleeve measures (5) 8-10-13-15 (19) cm from the division. There is approx. (2) 2-2-3-3 (3) cm to finished length; try the jacket on and work to desired length. Knit 1 round where you decrease (0) 0-0-4-4 (2) stitches evenly spaced = (34) 38-40-40-42 (44) stitches. Change to double pointed needles size 3 mm and work rib (knit 1, purl 1) for (2) 2-2-3-3 (3) cm. Cast off a little loosely The sleeve measures approx. (7) 10-12-16-18 (22) cm from the division. Work the other sleeve in the same way. ASSEMBLY: Sew the buttons onto the left band. |
||||||||||
Diagram explanations |
||||||||||
|
||||||||||
 |
||||||||||
 |
||||||||||
Have you finished this pattern?Tag your pictures with #dropspattern #sweetgleamcardigan or submit them to the #dropsfan gallery. Do you need help with this pattern?You'll find 30 tutorial videos, a Comments/Questions area and more by visiting the pattern on garnstudio.com. © 1982-2026 DROPS Design A/S. We reserve all rights. This document, including all its sub-sections, has copyrights. Read more about what you can do with our patterns at the bottom of each pattern on our site. |
||||||||||


With over 40 years in knitting and crochet design, DROPS Design offers one of the most extensive collections of free patterns on the internet - translated to 17 languages. As of today we count 324 catalogues and 12290 patterns translated into English (UK/cm). 12290
We work hard to bring you the best knitting and crochet have to offer, inspiration and advice as well as great quality yarns at incredible prices! Would you like to use our patterns for other than personal use? You can read what you are allowed to do in the Copyright text at the bottom of all our patterns. Happy crafting!
Post a comment to pattern DROPS Baby 43-6
We would love to hear what you have to say about this pattern!
If you want to leave a question, please make sure you select the correct category in the form below, to speed up the answering process. Required fields are marked *.