DROPS Merino Extra Fine
100% Wool
from 19.00 RON /50g
Get the yarn to make this pattern from 133.00RON.

The yarn cost is calculated from the pattern’s smallest size and the yarn’s cheapest product type. Looking for an even better price? You might find it on the DROPS Deals!

DROPS Super Sale

North Star

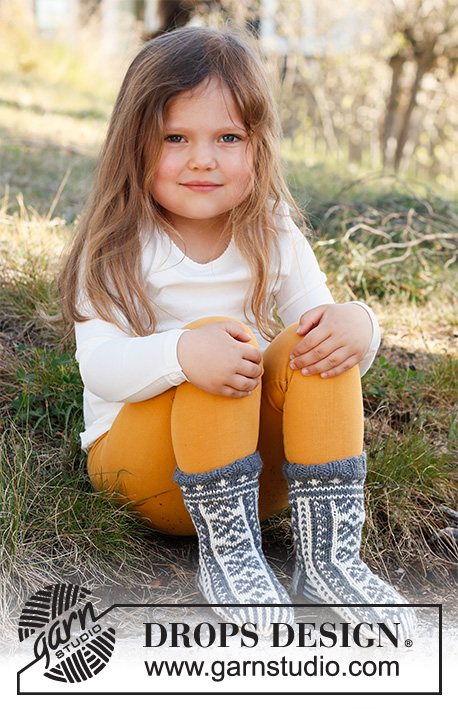
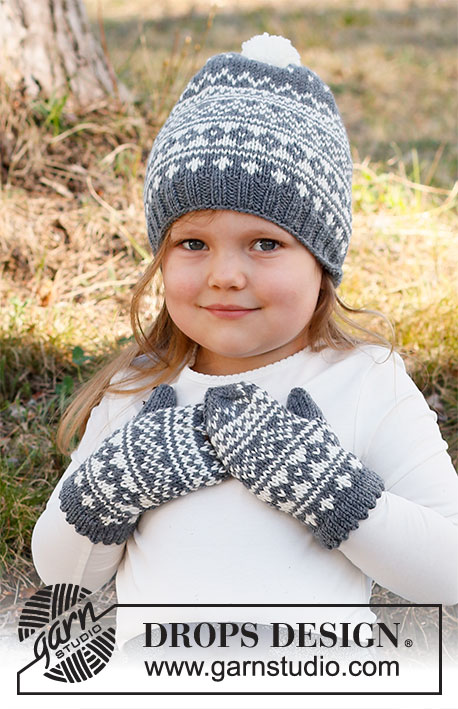
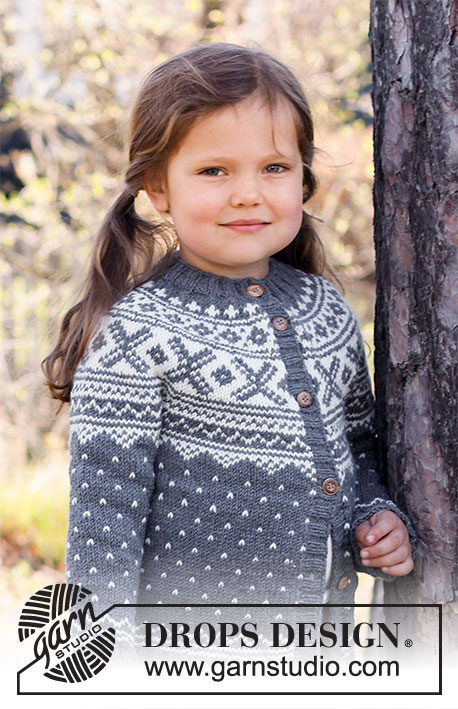
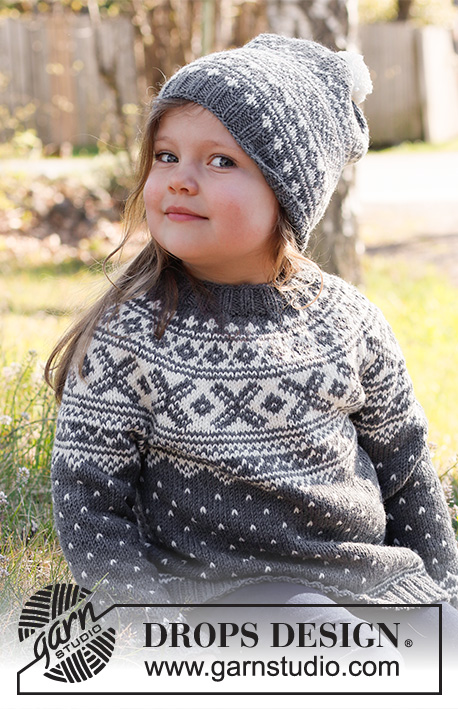
Knitted jumper for children in DROPS Merino Extra Fine. The piece is worked top down, with round yoke and Nordic pattern. Sizes 2 – 12 years.

DROPS Children 37-1
DROPS Design: Pattern no me-064-bn
Yarn group B
-------------------------------------------------------

SIZES:
2 - 3/4 - 5/6 - 7/8 - 9/10 - 11/12 years
The size is approx. equivalent to the child’s height in cm:
92 - 98/104 - 110/116 - 122/128 - 134/140 - 146/152

MATERIALS:
DROPS MERINO EXTRA FINE from Garnstudio (belongs to yarn group B)
250-250-250-300-300-350 g colour 04, medium grey
100-100-100-100-100-150 g colour 01, off white

KNITTING TENSION:
21 stitches in width and 28 rows in height with stocking stitch and Nordic pattern = 10 x 10 cm.

NEEDLES:
DROPS DOUBLE POINTED NEEDLES SIZE 4 MM.
DROPS CIRCULAR NEEDLE SIZE 4 MM: Length 40 cm and 80 cm for stocking stitch.
DROPS DOUBLE POINTED NEEDLES SIZE 3 MM.
DROPS CIRCULAR NEEDLE SIZE 3 MM: Length 40 cm and 80 cm for rib.
Needle size is only a guide. If you get too many stitches on 10 cm, change to a larger needle size. If you get too few stitches on 10 cm, change to a smaller needle size.

-------------------------------------------------------

Alternative Yarn – See how to change yarns here
Yarn Groups A to F – Use the same pattern and change the yarn here
Yarn usage using an alternative yarn – Use our yarn converter here

-------------------------------------------------------

DROPS Merino Extra Fine
100% Wool
from 19.00 RON /50g
Get the yarn to make this pattern from 133.00RON.

The yarn cost is calculated from the pattern’s smallest size and the yarn’s cheapest product type. Looking for an even better price? You might find it on the DROPS Deals!

Pattern instructions

-------------------------------------------------------

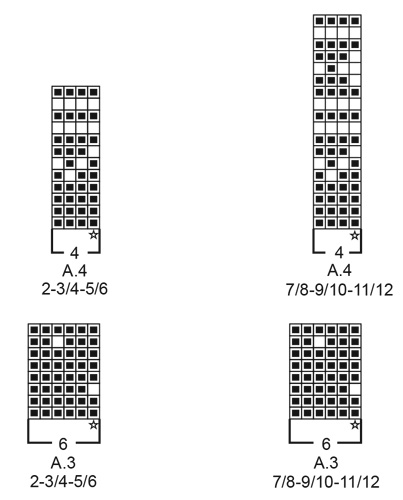
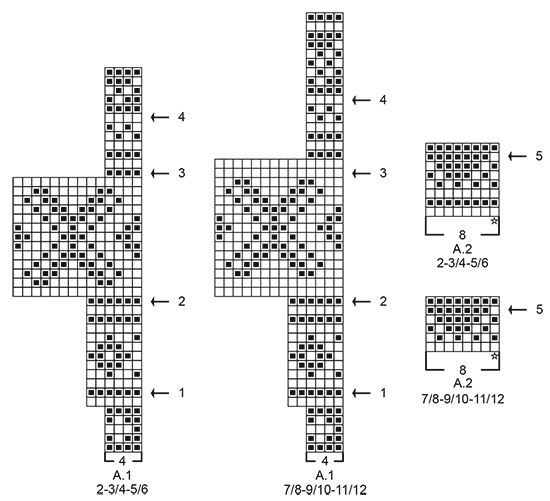
EXPLANATIONS FOR THE PATTERN:

-------------------------------------------------------

INCREASE TIP (evenly spaced):
To work out how to increase evenly, count the total number of stitches on the needle (e.g. 72 stitches) and divide by the number of increases to be made (e.g. 24) = 3. 
In this example, increase by making 1 yarn over after each 3rd stitch. On the next round work the yarn overs twisted to avoid holes.

PATTERN:
See diagrams A.1 to A.4. Choose diagram for your size. The whole pattern is worked in stocking stitch.

KNITTING TIP:
To avoid the garment losing its elasticity when working the pattern, it is important the strands at the back are not tight. Increase a needle size when working pattern if this is a problem.
If the knitting tension is not correct in height and your work is too tight, the garment will be too short and the armholes too small – to adjust for this you can work 1 extra round in the one-coloured sections.
If your work is too loose, the garment will be too long and the armholes too big; to adjust for this, you can work 1 round less in the one-coloured sections.

DECREASE TIP (for mid under sleeves): 
Decrease 1 stitch on each side of the marker-stitch as follows (the 5 next stitches are worked with medium grey): Work until there are 2 stitches left before the marker-stitch, knit 2 together, knit the marker-stitch, knit 2 twisted together (= 2 stitches decreased).

CASTING-OFF TIP:
To avoid the cast-off edge being tight you can cast off with a larger size needle. If the edge is still tight, make 1 yarn over after approx. each 4th stitch at the same time as casting off and the yarn overs are cast off as normal stitches.

-------------------------------------------------------

START THE PIECE HERE:

-------------------------------------------------------

JUMPER – SHORT OVERVIEW OF THE PIECE:
The neck and yoke are worked in the round with circular needle, from mid back and top down. The yoke is divided for the body and sleeves. The body is continued in the round with circular needle. The sleeves are worked in the round with double pointed needles, top down.

NECK:
Cast on 72-72-76-76-80-80 stitches with circular needle size 3 mm and medium grey. Knit 1 round, then work rib (= knit 2 / purl 2) for 3 cm.
Knit 1 round and increase 24-28-28-32-32-36 stitches evenly spaced – read INCREASE TIP = 96-100-104-108-112-116 stitches.
Change to circular needle size 4 mm.
Insert 1 marker at the beginning of the round; the yoke will be measured from this marker!

YOKE:
Work 0-0-2-0-2-4 rounds of stocking stitch with medium grey.
Read KNITTING TIP and then work A.1 in the round (= 24-25-26-27-28-29 repeats of 4 stitches).
Continue this pattern. REMEMBER THE KNITTING TENSION!
AT THE SAME TIME on each row marked with an arrow in A.1, increase stitches evenly spaced as described below – remember INCREASE TIP:
Arrow-1: Increase 30-32-34-36-38-40 stitches evenly spaced = 126-132-138-144-150-156 stitches (there is now room for 21-22-23-24-25-26 repeats of A.1 with 6 stitches).
Arrow-2: Increase 42-36-44-38-46-40 stitches evenly spaced = 168-168-182-182-196-196 stitches (there is now room for 12-12-13-13-14-14 repeats of A.1 with 14 stitches).
Arrow-3: Increase 28-36-34-38-36-44 stitches evenly spaced = 196-204-216-220-232-240 stitches (there is now room for 49-51-54-55-58-60 repeats of A.1 with 4 stitches).
Arrow-4: Increase 16-20-20-20-20-24 stitches evenly spaced = 212-224-236-240-252-264 stitches (there is now room for 53-56-59-60-63-66 repeats of A.1 with 4 stitches).
Continue working until there is 1 round left in A.1.
The piece measures approx. 15-15-16-17-18-19 cm from the marker on the neck.
On the last round in A.1 divide the yoke for the body and sleeves as follows:
Work 31-33-35-36-38-40 stitches as before (= half back piece), place the next 44-46-48-48-50-52 stitches on 1 thread for the sleeve, cast on 6-6-6-8-8-8 new stitches (= in side under the sleeve), work 62-66-70-72-76-80 stitches as before (= front piece), place the next 44-46-48-48-50-52 stitches on 1 thread for the sleeve, cast on 6-6-6-8-8-8 new stitches (= in side under the sleeve) and work the remaining 31-33-35-36-38-40 stitches as before (= half back piece). Body and sleeves are finished separately.
THE PIECE IS NOW MEASURED FROM HERE!

BODY:
= 136-144-152-160-168-176 stitches.
Work A.2 in the round (there is room for 17-18-19-20-21-22 repeats of A.2 with 8 stitches).
AT THE SAME TIME on the row marked with arrow-5 in A.2, increase 8-0-4-8-0-4 stitches evenly spaced = 144-144-156-168-168-180 stitches.
When A.2 has been completed, work A.3 in the same way (there is room for 24-24-26-28-28-30 repeats of A.3 with 6 stitches).
A.3 is repeated in height until the piece measures 12-16-19-19-22-25 cm from the division; there is approx. 7-7-7-10-10-10 cm left to finished length, you can try the jumper on and work to desired length.
Work A.4 in the round (= 36-36-39-42-42-45 repeats of 4 stitches).
Continue until A.4 has been completed.
Knit 1 round with medium grey and increase 32-32-32-36-36-36 stitches evenly spaced on this round = 176-176-188-204-204-216 stitches. This is done to avoid the rib being tight.
Change to circular needle size 3 mm and work rib (= knit 2 / purl 2) for 3-3-3-4-4-4 cm. Cast off with knit over knit and purl over purl – read CASTING-OFF TIP!

SLEEVE:
Place the 44-46-48-48-50-52 stitches from the thread on the one side of the piece on double pointed needles size 4 mm and knit up 1 stitch in each of the 6-6-6-8-8-8 stitches cast on under the sleeve = 50-52-54-56-58-60 stitches. Insert 2 markers in the piece without working the stitches. Start mid under the sleeve in the middle of the 6-6-6-8-8-8 stitches and insert 1 marker in the first stitch after the middle, count 24-25-26-27-28-29 stitches and insert the second marker in the next stitch. Allow the markers to follow your work onwards; the one under the sleeve is used when decreasing and the one on top of the sleeve will be used when starting the pattern. Work PATTERN at the same time as you DECREASE under the sleeve as described below:

PATTERN:
Start the round under the sleeve in the stitch before the marker-stitch and work A.2 in the round – count out from the middle of the sleeve to find where the pattern starts – the second marker-stitch on top of the sleeve should match the stitch marked with a star in A.2, and you will decrease under the sleeve at the same time as you work pattern.
When A.2 has been completed, work A.3 in the same way. A.3 is repeated in height until the sleeve measures 12-17-21-23-26-30 cm, but finish after a round of «spots».
Now work the whole of A.4.

DECREASE:
At the same time, when the sleeve measures 3 cm from the division in all sizes, decrease 2 stitches mid under the sleeve – read DECREASE TIP. Decrease like this every 2-2½-3-4-4½-4½ cm a total of 6-7-7-7-7-8 times.
When A.4 has been completed and the decreases are finished, there are 38-38-40-42-44-44 stitches left on the needles and the sleeve measures approx. 16-21-25-29-32-36 cm from the division. The rest of the sleeve is worked with medium grey.
Knit 1 round where you increase 6-6-8-6-8-8 stitches evenly spaced = 44-44-48-48-52-52 stitches. Change to double pointed needles size 3 mm and work rib (= knit 2 / purl 2) for 3-3-3-4-4-4 cm. Cast off with knit over knit and purl over purl – remember CASTING-OFF TIP. The sleeve measures approx. 19-24-28-33-36-40 cm from the division.
Work the other sleeve in the same way.

Diagram

symbols = off white
symbols = medium grey
symbols = increase-round
symbols = mid-stitch
diagram
diagram
diagram

Each of our patterns has specific tutorial videos to help you.

Do you have a question? See a list of frequently asked questions (FAQ)

Knitting tension is what determines the final measurements of your work, and is usually measured per 10 x 10 cm. It is provided like so: number of stitches in width x number of rows in height - eg: 19 stitches x 26 rows = 10 x 10 cm.

The knitting tension is very individual; some people knit/crochet loosely while others work tightly. You adjust the knitting tension with the needle size, which is why the suggested needle size is only meant as a guide! You need to adjust this (up or down) to ensure that YOUR knitting tension matches the knitting tension provided in the pattern. If you work with a different knitting tension than provided you will have a different yarn consumption, and your work will have different measurements than what the pattern suggests.

The knitting tension also determines which yarns can replace each other. As long as you achieve the same knitting tension you can replace one yarn with another.

See DROPS lesson: How to measure your tension/gauge

See DROPS video: How to make a gauge tension swatch

The required amount of yarn is provided in grams, eg: 450 g. To calculate how many balls you’ll need you first need to know how many grams are in 1 ball (25g, 50g or 100g). This information is available if you click on the individual yarn quality on our pages. Divide the amount required with the amount of each ball. For example, if each ball is 50g (the most common amount), the calculation will be as follows: 450 / 50 = 9 balls.

The important thing when changing from one yarn to another is that the knitting/crochet tension remains the same. This is so that the measurements of the finished piece will be the same as on the sketch provided. It is easier to achieve the same knitting tension using yarns from the same yarn group. It is also possible to work with multiple strands of a thinner yarn to achieve the knitting tension of a thicker one. Please try our yarn converter. We recommend you to always work a test swatch.

Please NOTE: when changing yarn the garment might have a different look and feel to the garment in the photo, due to individual properties and qualities of each yarn.

See DROPS lesson: Can I use a different yarn than the one mentioned in the pattern?

All our yarns are categorised into yarn groups (from A to F) according to thickness and knitting tension – group A contains the thinnest yarns and group F the thickest. This makes it easier for you to find alternative yarns to our patterns, should you wish to switch yarn. All yarns within the same group have a similar knitting tension and can easily replace each other. However, different yarn qualities have different structures and properties which will give the finished work a unique look and feel.

Click here for an overview of the yarns in each yarn group

At the top of all our patterns you’ll find a link to our yarn calculator, which is a helpful tool should you wish to use a different yarn than suggested. By filling in the yarn quality you wish to replace, the amount (in your size) and number of strands, the calculator will present good alternative yarns with the same knitting tension. Additionally it will tell you how much you’ll require in the new qualities and whether you’ll need to work with multiple strands. Most skeins are 50g (some are 25g or 100g).

If the pattern is worked with multiple colours, every colour will have to be calculated separately. Similarly, if the pattern is worked with several strands of different yarns (for example 1 strand Alpaca and 1 strand Kid-Silk) you will have to find alternatives for each, individually.

Click here to see our yarn calculator

Since different yarns have different qualities and textures we have chosen to keep the original yarn in our patterns. However, you can easily find options among our available qualities by using our yarn calculator, or simply pick a yarn from the same yarn group.

It is possible that some retailers still have discontinued yarns in stock, or that someone has a few skeins at home that they would like to find patterns for.

The yarn calculator will provide both alternative yarn as well as required amount in the new quality.

If you think it's hard to decide what size to make, it can be a good idea to measure a garment you own already and like the size of. Then you can pick the size by comparing those measures with the ones available in the pattern's size chart.

You'll find the size chart at the bottom of the pattern.

See DROPS lesson: How to read size chart

The needle size provided in the pattern serves only as a guide, the important thing is to follow the knitting tension. And since knitting tension is very individual, you will have to adjust the needle size to ensure that YOUR tension is the same as in the pattern – maybe you’ll have to adjust 1, or even 2 needle sizes, up or down to achieve the correct tension. For this, we recommend that you work test swatches.

Should you work with a different knitting tension than the one provided, the measurements of the finished garment might deviate from the measurement sketch.

See DROPS lesson: How to measure your tension/gauge

See DROPS video: How to make a tension/gauge swatch

Working a garment top-down provides more flexibility and room for personal adjustment. For example it is easier to try the garment on while working, as well as making adjustments to length of yoke and shoulder caps.

The instructions are carefully explaining every step, in the correct order. Diagrams are adjusted to the knitting direction and are worked as usual.

The diagram depicts all rows/rounds, and every stitch seen from the right side. It is read from bottom to top, from right to left. 1 square = 1 stitch.

When working back and forth, every other row is worked from the right side and every other row is worked from the wrong side. When working from the wrong side, the diagram will have to be worked reversed: from left to right, knit stitches are purled, purl stitches are knit etc.

When working in the round every round is worked from the right side and the diagram are worked from right to left on all rounds.

See DROPS lesson: How to read knitting diagrams

The diagram depicts all rows/rounds, and every stitch seen from the right side. It is worked from bottom to top, from right to left.

When working back and forth every other row is worked from the right side: from right to left and every other row is worked from the wrong side: from left to right.

When working in the round, every row in the diagram are worked from the right side, from right to left.

When working a circular diagram you start in the middle and work your way outwards, counter clockwise, row by row.

The rows usually start with a given number of chain stitches (equivalent to the height of the following stitch), this will either be depicted in the diagram or explained in the pattern.

See DROPS lesson: How to read crochet diagrams

Instructions for working several diagrams after each other on the same row/round, will often be written like so: “work A.1, A.2, A.3 a total of 0-0-2-3-4 times". This means you work A.1 once, then A.2 is worked once, and A.3 is repeated (in width) the number of times provided for your size – in this case like so: S = 0 times, M = 0 times, L=2 times, XL= 3 times and XXL = 4 times.

The diagrams are worked as usual: begin with the first row in A.1, then work the first row in A.2 etc.

See DROPS lesson: How to read knitting diagrams

See DROPS lesson: How to read crochet diagrams

The total width of the garment (from wrist-to-wrist) will be larger in the larger sizes, despite the actual sleeves being shorter. The larger sizes have longer sleeve caps and wider shoulders, so there will be a good fit in all sizes.

The measurement sketch/schematic drawing provides information regarding the full length of the garment. If it’s a jumper or a jacket the length is measured from the highest point on the shoulder closest to the neckline, and straight down to the bottom of the garment. It is NOT measured from the tip of shoulder. Similarly, the length of yoke is measured from the highest point on the shoulder and down to where yoke is split into body and sleeves.

On a jacket measures are never taken along bands, unless specifically stated. Always measure inside band stitches when measuring the length.

See DROPS lesson: How to read a schematic drawing

Diagrams are often repeated on the round or in height. 1 repeat is the diagram the way it appears in the pattern. If it says to work 5 repeats of A.1 in the round, then you work A.1 a total of 5 times after/next to each other in the round. If it says to work 2 repeats of A.1 vertically/in height you work the entire diagram once, then begin again at the start and work the entire diagram one more time.

Chain stitches are slightly narrower than other stitches and to avoid working the cast-on edge too tight, we simply chain more stitches to begin with. The stitch count will be adjusted on the following row to fit the pattern and measurement sketch.

The rib edge is more elastic and will contract slightly compared to, for example, stocking stitch. By increasing before the rib edge, you avoid a visible difference in width between the rib edge and the rest of the body.

It’s very easy to cast off too tightly, and by making yarn overs while casting off (and simultaneously casting these off) you avoid a too tight cast off edge.

See DROPS video: How to bind off with yarn overs (yo)

To achieve an even increase (or decrease) you can increase on, for example: every 3rd and 4th row alternately, like so: work 2 rows and increase on the 3rd row, work 3 rows and increase on the 4th. Repeat this until the increase is complete.

See DROPS lesson: Increase or decrease 1 st on every 3rd and 4th row alternately

Should you prefer to work in the round instead of back and forth, you may of course adjust the pattern. You’ll need to add steeks mid-front (usually 5 stitches), and follow the instructions. When you would normally turn and work from the wrong side, simply work across the steek and continue in the round. At the end you’ll cut the piece open, pick up stitches to work bands, and cover the cut edges.

See DROPS video: How to knit steeks and cut open

Should you prefer to work back and forth instead of in the round, you may of course adjust the pattern so you work the pieces separately and then assemble them at the end. Divide the stitches for the body in 2, add 1 edge stitch in each side (for sewing) and work the front and back pieces separately.

See DROPS lesson: Can I adapt a pattern for circular needles into straight needles?

Pattern repeats can vary slightly in the different sizes, in order to get the correct proportions. If you’re not working the exact same size as the garment in the photo, yours might deviate slightly. This has been carefully developed and adjusted so that the complete impression of the garment is the same in all sizes.

Make sure to follow instructions and diagrams for your size!

If you have found a pattern you like which is available in women’s size it’s not very difficult to convert it to men’s size. The biggest difference will be the length of sleeves and body. Start working on the women size that you think would fit across the chest. The additional length will be worked right before you cast off for the armhole/sleeve cap. If the pattern is worked top-down you can add the length right after the armhole or before the first decrease on sleeve.

Regarding additional yarn amount, this will depend on how much length you add, but it is better with a skein too many than too few.

All yarns will have excess fibres (from production) that might come off as lint or shedding. Brushed yarns (ie hairier yarns) have more of these loose, excess fibres, causing more shedding.

Shedding also depends on what is worn under or over the garment, and whether this pulls at the yarn fibres. It’s therefore not possible to guarantee that there will be no shedding

Below are some tips on how to get the best result when working with hairier yarns:

1. When the garment is finished (before you wash it) shake it vigorously so the looser hairs come off. NOTE: do NOT use a lint roller, brush or any method that pulls at the yarn.

2. Place the garment in a plastic bag and put it in your freezer - the temperature will cause the fibres to become less attached to each other, and excess fibres will come off easier.

3. Leave in the freezer for a few hours before taking it out and shaking it again.

4. Wash the garment according to the instructions on the yarn label.

Pilling is a natural process that happens to even the most exclusive of fibers. It's a natural sign of wear and tear that is hard to avoid, and that is most visible in high friction areas of your garment like a sweater's arms and cuffs.

You can make your garment look as new by removing the pilling, using a fabric comb or a pill/lint remover.

Still can't find the answer you need? Then scroll down and leave your question so one of our experts can try to help you. This will be done normally within 5 to 10 working days.
In the meantime, you can read the questions and answers that others have left to this pattern or join the DROPS Workshop on Facebook to get help from fellow knitters/crocheters!

You might also like...

Post a comment to pattern DROPS Children 37-1

We would love to hear what you have to say about this pattern!

If you want to leave a question, please make sure you select the correct category in the form below, to speed up the answering process. Required fields are marked *.

Comments / Questions (29)

country flag Carmen wrote:

Hallo meine Maschenprobe ist 24 m in der Breite und 32 Reihen gleich 10 x 10 cm Die wolle ist die Joe Anti Pilling von Rellana habe mit nadelsträke 4 gestrickt weil ich so das beste Maschenbild bekomme. Ich weiß aber nicht wie ich das umrechnen kann damit komme ich nicht klar. Können Sie mir bitte helfen Liebe Grüße Carmen W

07.03.2022 - 20:19

DROPS Design answered:

Liebe Carmen, leider können wir nicht jede Anleitung nach jeder Maschenprobe neu umrechnen, am besten wenden Sie sich bitte an Ihrem Wollladen oder ein Strickforum, dort wird man Ihnen gerne weiterhelfen. Danke im voraus für Ihr Verständnis. Viel Spaß beim stricken!

08.03.2022 - 11:03

country flag Diana wrote:

Ik brei voor het eerst op een ronbreinaald. Bv 1 naald rood dan 1 naald wit. Dan loopt de kleur scheef . Hoe kan ik een doorlopen kleur krijgen.

16.01.2022 - 17:22

country flag Margherita wrote:

Buongiorno, devo iniziare la manica e ho dei quesiti da porvi: - riprendo 48 m. in sospeso, riprendo le 6 m. sotto la manica e diventano 54 m. in totale, il motivo A2 è fatto di 8 m. , 54 m. non è divisibile per 8? - non capisco come devo posizionare i 2 segnapunti e da dove far partire il giro? Grazie

28.11.2021 - 10:28

DROPS Design answered:

Buonasera Margherita, deve inserire i segnapunti nella manica e poi procedere a lavorare come indicato seguendo le indicazioni. Buon lavoro!

08.12.2021 - 19:37

country flag Christinco wrote:

Hallo! Hilfe, ich möchte ein Pullover mit Rundpasse (ein anderes Motiv als hier) für 3/4 Jahre stricken. Die Maschenprobe Motiv (25 Maschen in 16 Reihen) das 10x im Rundpasse passt: 10cm=26 Maschen 10cm=32 Reihen Wie rechne ich nun die Maschenangaben von Ihre Anleitung aus meine Maschenprobe um?

03.11.2021 - 09:16

DROPS Design answered:

Liebe Christinco, leider können wir jeder Anleitung nach jedem individuellen Frage anpassen und einzelne Modelle auf individuellen Wunsch hin umrechnen. Wenn sie Hilfe damit brauchen, wenden Sie sich bitte an dem Laden wo Sie die Wolle gekauft haben, dort hilft man Ihnen gerne weiter. Danke im voraus für Ihr Verständnis. Viel Spaß beim stricken!

03.11.2021 - 12:17

country flag Marieluise wrote:

Wo finde ich das Diagramm für das Muster für diesen Pullover?

11.10.2021 - 10:25

DROPS Design answered:

Liebe Marieluise, Manchmal haben wir derzeit Probleme mit der Anzeige der Bilder. Versuchen Sie, die Seite zu aktualisieren und den Browser-Cache zu leeren. Wenn die Fotos erneut auf der Website angezeigt werden, können Sie die Anleitung ausdrucken. Viel Spaß beim Stricken!

11.10.2021 - 11:31

country flag Margherita Navarra wrote:

Buongiorno, vorrei provare a fare questo progetto (North Star) ma mi sono già bloccata sul campione!!! Non capisco quali diagramma devo tenere in considerazione per fare il campione di 21 maglie in larghezza e 28 ferri in altezza a maglia rasata e seguendo il motivo jacquard nordico = 10 x 10 cm. Ringrazio e porgo cordiali saluti.

25.09.2021 - 14:05

DROPS Design answered:

Buonasera Margherita, può lavorare il campione seguendo il motivo A.1. Buon lavoro!

26.09.2021 - 21:01

country flag Aurélie wrote:

Oubliez ma question c'est moi qui ait mélangé les graphes... Merci !

16.02.2021 - 23:50

country flag Aurélie wrote:

Bonsoir Je ne comprend pas : j'ai tricoté le col (avec une aiguille plus grosse car il m'a semblé bien trop serré avec l'aiguille 3) et j'ai enchaîné sur le diagramme A1 pour l'empiècement. Mais quand j'essaie de voir à quoi cela correspond sur la photo du pull, cela ne rend absolument pas l'ordre des motifs de la photo. Je ne sais absolument pas ce que je suis en train de tricoter 😅 pouvez vous m'expliquer le principe ? La taille est 3/4 ans Merci !

16.02.2021 - 23:48

DROPS Design answered:

Bonjour Aurélie, difficile de vous dire ce qui se passe... en 3/4 ans vous commencez le diagramme sur 100 m et répétez 25 fois en largeur les 4 m au début de A.1 - à la 1ère flèche, vous augmentez 32 m = 132, vous pouvez maintenant répéter 22 motifs de 6 mailles (ils ne vont pas s'aligner au-dessus des 4 m précédentes, répétez juste les 6 m tout le tour), et ainsi de suite. Est-ce plus clair ainsi? En cas de doute, apportez votre pull à votre magasin (ou bien envoyez-lui une photo par mail), ce sera ainsi plus simple pour eux de pouvoir vous aider en voyant ce que vous avez fait. Bonne continuation!

17.02.2021 - 08:16

country flag Aurélie wrote:

Bonsoir, Pour celui ci je vais faire un échantillon :) Mais du coup, comment puis je procéder? Dois je utiliser un diagramme? lequel? que fais je avec l'échantillon ensuite? Je le détricote pour récupérer la laine? Merci

05.02.2021 - 23:04

DROPS Design answered:

Bonjour Aurelie, vous devez faire l'echantillon sur les aiguilles n°4, je vous conseille d'en faire 2, l'un en jersey. et l'autre en jacquard. Jetez aussi un coup d’oeil ICI et sur la liste des questions fréquentes (FAQ) en bas de modele (voir question 1). Bon tricot!

06.02.2021 - 19:43

country flag Marita wrote:

Vedr. A1 og pil nr 1: Skal ikke denne pilen plasseres i omg. 5 og ikke i omg. 7? Hvis det ikke ökes i omg. 5 hvordan kan da 4 masker i omg. 5 bli til 6 masker i omg. 6 (= en rapport i mönsteret)?

01.02.2021 - 15:50

DROPS Design answered:

Hei Marita. Nå er det jo ikke en mønsterrapport som skal gå opp i 5. og 6. omgang, men det strikkes ensfarget. Når du da kommer til 7. omgang / 1. pil er det også ensfarget og her skal det økes slik at mønsteret vil stemme med en rapport på 6 masker når du skal strikke 9. omgang. Det sammen gjelder også ved de andre pilene. God Fornøyelse!

08.02.2021 - 11:12