DROPS Children 49 · Lots of new kid designs!
Product image DROPS Karisma yarn
DROPS Karisma
100% Wool
from 13.00 RON /50g
Get the yarn to make this pattern from 78.00RON.

The yarn cost is calculated from the pattern’s smallest size and the yarn’s cheapest product type. Looking for an even better price? You might find it on the DROPS Deals!

DROPS AW2425

Boston Vest

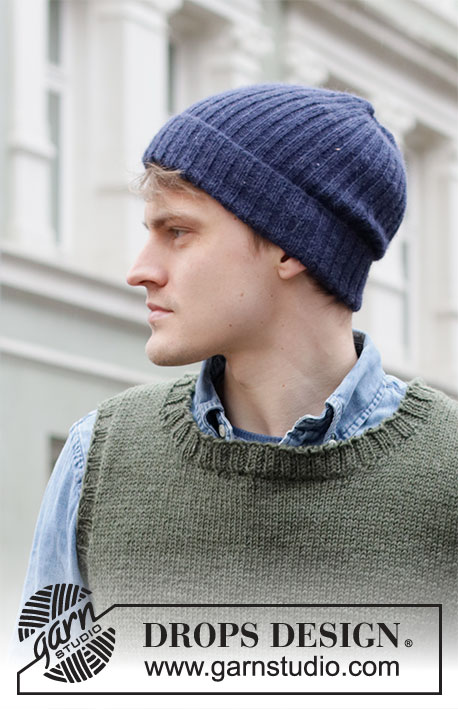
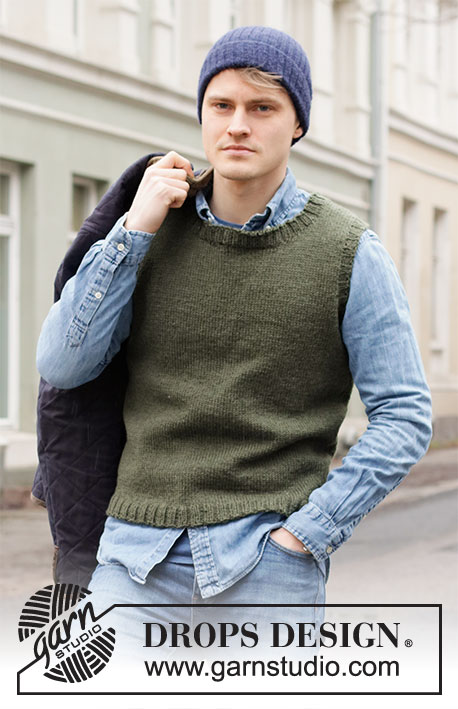
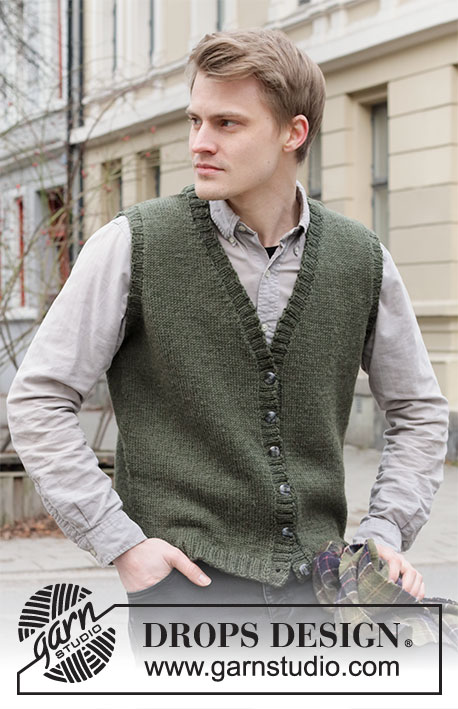
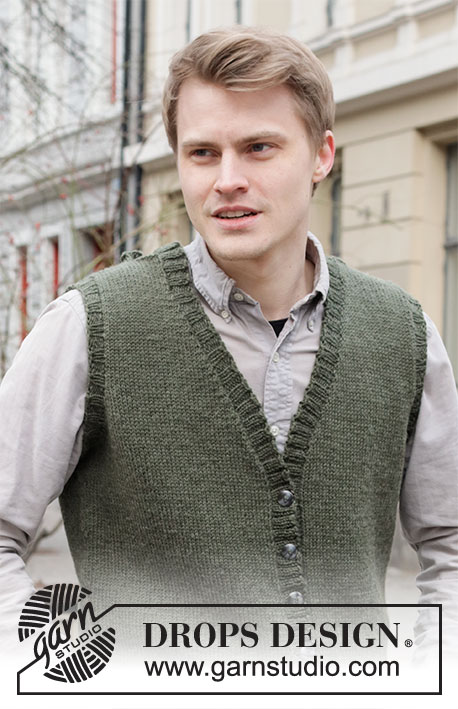
Knitted vest for men in DROPS Karisma or DROPS Soft Tweed. The piece is worked top down with V-neck and ribbed edges. Sizes S - XXXL.

Highlight Size:
DROPS 219-3

#bostonvest

DROPS Design: Pattern no u-899
Yarn group B
-------------------------------------------------------

SIZES:
S - M - L - XL - XXL - XXXL

MATERIALS:
DROPS KARISMA from Garnstudio (belongs to yarn group B)
300-350-400-400-450-500 g colour 57, olive
or use:
DROPS SOFT TWEED from Garnstudio (belongs to yarn group B)
250-300-350-350-400-400 g colour 17, spinach pie

KNITTING TENSION:
21 stitches in width and 28 rows in height with stocking stitch = 10 x 10 cm.

NEEDLES:
DROPS CIRCULAR NEEDLE SIZE 4 MM: Length 80 cm for stocking stitch.
DROPS CIRCULAR NEEDLE SIZE 3 MM: Length 40 and 80 cm for rib.
Needle size is only a guide. If you get too many stitches on 10 cm, change to a larger needle size. If you get too few stitches on 10 cm, change to a smaller needle size.

DROPS BUTTONS, Mocha NO 623: 6 items in all sizes.

-------------------------------------------------------

Alternative Yarn – See how to change yarns here
Yarn Groups A to F – Use the same pattern and change the yarn here
Yarn usage using an alternative yarn – Use our yarn converter here

-------------------------------------------------------

You might also like...

Product image DROPS Karisma
DROPS Karisma
100% Wool
from 13.00 RON /50g
Get the yarn to make this pattern from 78.00RON.

The yarn cost is calculated from the pattern’s smallest size and the yarn’s cheapest product type. Looking for an even better price? You might find it on the DROPS Deals!

Pattern instructions

-------------------------------------------------------

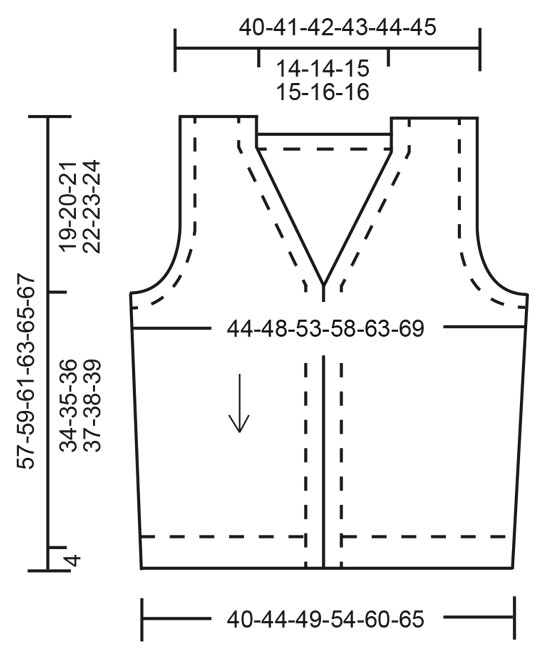
EXPLANATIONS FOR THE PATTERN:

-------------------------------------------------------

RIDGE/GARTER STITCH (worked back and forth):
Knit all rows.
1 ridge in height = Knit 2 rows.

INCREASE TIP (for V-neck):
Make 1 yarn over between 2 stitches. On the next row, work the yarn over twisted to avoid a hole.

DECREASE TIP (for sides of body): 
Decrease 1 stitch on each side of the stitch with the marker thread as follows: Work until there are 3 stitches left before the stitch with the marker thread, knit 2 together, knit 2, slip 1 stitch as if to knit, knit 1 and pass the slipped stitch over the knitted stitch.

BUTTONHOLES:
Work buttonholes from the right side and on the right band. The bottom buttonhole is worked approx. 2 cm from the bottom edge, the top buttonhole approx.1 cm from the beginning of the v-neck (approx. 32-33-34-35-36-37 cm measured from the bottom of the vest). Work a total of 6 buttonholes with approx. 6-6-6½-6½-7-7 cm between each one.
Position them in the purled sections (seen from the right side).
1 buttonhole = purl 2 together, 1 yarn over. On the next row (wrong side) knit the yarn to leave a hole.

CASTING-OFF TIP:
To avoid the cast-off edge being tight you can cast off with a larger size needle. If the edge is still tight, make 1 yarn over after approx. each 4th stitch at the same time as casting off; the yarn overs are cast off as normal stitches.

-------------------------------------------------------

START THE PIECE HERE:

-------------------------------------------------------

VEST – SHORT OVERVIEW OF THE PIECE:
The vest is worked top down. Each shoulder is worked separately, back and forth, and stitches are increased/cast on for the V-neck and armholes. Then all pieces are joined together and the body finished working back and forth. Stiches are picked up for the neck, sleeve edges and bands, which are worked in rib to finish.

FRONT PIECES:

Right front piece:
Cast on 20-21-21-22-22-23 stitches (including 1 edge stitch on each side) using circular needle size 4 mm and Karisma or Soft Tweed. Work 1 edge stitch in GARTER STITCH – read description above, work stocking stitch until there is 1 stitch left on the row and then 1 edge stitch in garter stitch. Continue like this back and forth.
When the piece measures 4-5-5-6-6-7 cm, start to increase for the V-neck and when the piece measures 18-18-18-17-17-16 cm, increase for the armholes, read description below:
V-neck:
Increase 1 stitch inside the last 2 stitches on the next row from the right side – read INCREASE TIP. Increase like this alternately every 2nd and 4th row a total of 19-19-20-20-21-21 times (increases for the V-neck are not finished when the armhole is finished, but are continued on the body). REMEMBER THE KNITTING TENSION!
Armhole:
Increase 1 stitch inside the first 2 stitches on every row from the right side 2-1-1-3-4-4 times, then cast on new stitches at the end of every row from the wrong side as follows: Cast on 2 stitches 0-2-2-3-3-4 times and 3 stitches 0-0-1-1-2-3 times (= a total of 2-5-8-12-16-21 stitches increased). Lay the piece to one side and work the left front piece.

Left front piece:
Cast on 20-21-21-22-22-23 stitches (including 1 edge stitch on each side) using circular needle size 4 mm and Karisma or Soft Tweed. Work 1 edge stitch in garter stitch, stocking stitch until there is 1 stitch left on the row and then 1 edge stitch in garter stitch. Continue like this back and forth.
When the piece measures 4-5-5-6-6-7 cm, start to increase for the V-neck and when the piece measures 18-18-18-17-17-16 cm, increase for the armholes, read description below:
V-neck:
Increase 1 stitch inside the first 2 stitches on the next row from the right side – remember INCREASE TIP. Increase like this alternately every 2nd and 4th row a total of 19-19-20-20-21-21 times.
Armhole:
Increase 1 stitch inside the last 2 stitches on each row from the right side 2-1-1-3-4-4 times, then cast on new stitches at the end of every row from the right side as follows: Cast on 2 stitches 0-2-2-3-3-4 times and 3 stitches 0-0-1-1-2-3 times (= a total of 2-5-8-12-16-21 stitches increased). Lay the piece to one side and work the back piece.

BACK PIECE:
Each shoulder is worked separately before being joined together.

Right shoulder:
Cast on 20-21-21-22-22-23 stitches (including 1 edge stitch on each side) using circular needle size 4 mm and Karisma or Soft Tweed. Work 1 edge stitch in garter stitch, stocking stitch until there is 1 stitch left on the row and then 1 edge stitch in garter stitch. Continue like this back and forth.
When the piece measures 4 cm increase 1 stitch inside the first 2 stitches on the next row from the right side = 21-22-22-23-23-24 stitches. Work 1 row back from the wrong side. Lay the piece to one side and work the left shoulder.

Left shoulder:
Cast on 20-21-21-22-22-23 stitches (including 1 edge stitch on each side) using circular needle size 4 mm and Karisma or Soft Tweed. Work 1 edge stitch in garter stitch, stocking stitch until there is 1 stitch left on the row and then 1 edge stitch in garter stitch. Continue like this back and forth.
When the piece measures 4 cm increase 1 stitch inside the last 2 stitches on the next row from the right side = 21-22-22-23-23-24 stitches. Work 1 row back from the wrong side.

Now work the 2 shoulders together as follows: Work the 21-22-22-23-23-24 stitches from the left shoulder as before, cast on 36-36-38-38-40-40 stitches (= neck) work the 21-22-22-23-23-24 stitches from the right shoulder as before = 78-80-82-84-86-88 stitches. Work stocking stitch back and forth with 1 stitch in garter stitch on each side.
When the piece measures 18-18-18-17-17-16 cm, increase/cast on stitches on each side of the piece for the armholes, in the same way as on the front pieces (= a total of 2-5-8-12-16-21 stitches increased for each armhole) = 82-90-98-108-118-130 stitches.
When all the increases are finished, work the body. THE PIECE IS NOW MEASURED FROM HERE!

BODY:
Now join all the pieces together from the right side as follows:
Starting with the left front piece, work 1 edge stitch in garter stitch and stocking stitch as before, then cast on 11-11-13-13-15-15 new stitches (= in side under sleeve), stocking stitch over the 82-90-98-108-118-130 stitches on the back piece, cast on 11-11-13-13-15-15 new stitches (= in side under sleeve), stocking stitch over the right front piece until there is 1 stitch left and finish with 1 edge stitch in garter stitch. The number of stitches on the needle is dependent on how many increases still remain for the V-neck.
Insert 1 marker in the middle stitch of the 11-11-13-13-15-15 new stitches in each side. Allow the markers to follow your work onwards; stitches will later be decreased on each side of both markers.
When all the increases for the V-neck are finished there are = 186-202-222-242-266-290 stitches on the needle.
When the piece measures 5 cm, decrease on both sides of each marker – read DECREASE TIP (= 4 stitches decreased). Decrease like this every 9-9-10-10-10-11 cm a total of 4 times = 170-186-206-226-250-274 stitches. When the piece measures 34-35-36-37-38-39 cm increase 26-26-30-34-38-42 stitches evenly spaced = 196-212-236-260-288-316 stitches. Change to circular needle size 3 mm and work rib, starting from the right side (= knit 2 / purl 2) with 1 edge stitch in garter stitch on each side until the rib measures 4 cm. Cast off with knit over knit and purl over purl – read CASTING-OFF TIP. The vest measures approx.57-59-61-63-65-67 cm from the shoulder down.

ASSEMBLY:
Sew the shoulder seams with grafting stitches.

ARMHOLE EDGE:
Knit up 88-132 stitches inside the 1 edge stitch around the armhole with short circular needle size 3 mm and Karisma or Soft Tweed; adjust so the number of stitches is divisible by 4. Work rib in the round (= knit 2 / purl 2) for 2 cm. Cast off with knit over knit and purl over purl – remember CASTING-OFF TIP! Work the other sleeve edge in the same way.

RIGHT BAND AND NECK:
Starting from the right side at the bottom of the right front piece, knit up 144-172 stitches with short circular needle size 3 mm and Karisma or Soft Tweed, inside the 1 edge stitch, and as far as mid-back of the neck. Adjust so the number of stitches is divisible by 4.
Purl 1 row from the wrong side and increase using yarn overs just where the V-neck finishes (i.e. the point, approx. 33-34-35-36-37-38 cm from the cast-off edge upwards), * purl 1, 1 yarn over *, work from *-* a total of 4 times (= 4 stitches increased).
On the next row from the right side work as follows: 2 edge stitches in garter stitch, then rib (= knit 2 / purl 2) to end of row (yarn overs worked twisted to avoid holes). Make sure the band is neither too tight nor too loose for the length of the front piece; knit up more/less stitches if necessary. When the band measures 1 cm work the BUTTONHOLES – read description above.
When the band/neck measures 2½ cm, Cast off with knit over knit and purl over purl – remember CASTING-OFF TIP.

LEFT BAND AND NECK:
Starting mid-back of neck with circular needle size 3 mm and Karisma or Soft Tweed and working from the right side, knit up the same number of stitches as on the right band and neck inside the 1 edge stitch down the left front piece.
Purl 1 row from the wrong side and increase with yarn overs just where the V-neck finishes (i.e. the point, approx. 33-34-35-36-37-38 cm from the cast-off edge upwards), * purl 1, 1 yarn over *, work from *-* a total of 4 times (= 4 stitches increased).
On the next row from the right side work as follows: Work rib (= knit 2 / purl 2) until there are 2 stitches left and finish with 2 stitches in garter stitch (yarn overs worked twisted to avoid holes). When the band/neck measures 2½ cm, Cast off with knit over knit and purl over purl – remember CASTING-OFF TIP.

ASSEMBLY:
Sew buttons onto the left band.

Diagram

knitting direction = knitting direction
Diagram for DROPS 219-3
Do you have a question? See a list of frequently asked questions (FAQ)

Knitting tension is what determines the final measurements of your work, and is usually measured per 10 x 10 cm. It is provided like so: number of stitches in width x number of rows in height - eg: 19 stitches x 26 rows = 10 x 10 cm.

The knitting tension is very individual; some people knit/crochet loosely while others work tightly. You adjust the knitting tension with the needle size, which is why the suggested needle size is only meant as a guide! You need to adjust this (up or down) to ensure that YOUR knitting tension matches the knitting tension provided in the pattern. If you work with a different knitting tension than provided you will have a different yarn consumption, and your work will have different measurements than what the pattern suggests.

The knitting tension also determines which yarns can replace each other. As long as you achieve the same knitting tension you can replace one yarn with another.

See DROPS lesson: How to measure your tension/gauge

See DROPS video: How to make a gauge tension swatch

The required amount of yarn is provided in grams, eg: 450 g. To calculate how many balls you’ll need you first need to know how many grams are in 1 ball (25g, 50g or 100g). This information is available if you click on the individual yarn quality on our pages. Divide the amount required with the amount of each ball. For example, if each ball is 50g (the most common amount), the calculation will be as follows: 450 / 50 = 9 balls.

The important thing when changing from one yarn to another is that the knitting/crochet tension remains the same. This is so that the measurements of the finished piece will be the same as on the sketch provided. It is easier to achieve the same knitting tension using yarns from the same yarn group. It is also possible to work with multiple strands of a thinner yarn to achieve the knitting tension of a thicker one. Please try our yarn converter. We recommend you to always work a test swatch.

Please NOTE: when changing yarn the garment might have a different look and feel to the garment in the photo, due to individual properties and qualities of each yarn.

See DROPS lesson: Can I use a different yarn than the one mentioned in the pattern?

All our yarns are categorised into yarn groups (from A to F) according to thickness and knitting tension – group A contains the thinnest yarns and group F the thickest. This makes it easier for you to find alternative yarns to our patterns, should you wish to switch yarn. All yarns within the same group have a similar knitting tension and can easily replace each other. However, different yarn qualities have different structures and properties which will give the finished work a unique look and feel.

Click here for an overview of the yarns in each yarn group

At the top of all our patterns you’ll find a link to our yarn calculator, which is a helpful tool should you wish to use a different yarn than suggested. By filling in the yarn quality you wish to replace, the amount (in your size) and number of strands, the calculator will present good alternative yarns with the same knitting tension. Additionally it will tell you how much you’ll require in the new qualities and whether you’ll need to work with multiple strands. Most skeins are 50g (some are 25g or 100g).

If the pattern is worked with multiple colours, every colour will have to be calculated separately. Similarly, if the pattern is worked with several strands of different yarns (for example 1 strand Alpaca and 1 strand Kid-Silk) you will have to find alternatives for each, individually.

Click here to see our yarn calculator

Since different yarns have different qualities and textures we have chosen to keep the original yarn in our patterns. However, you can easily find options among our available qualities by using our yarn calculator, or simply pick a yarn from the same yarn group.

It is possible that some retailers still have discontinued yarns in stock, or that someone has a few skeins at home that they would like to find patterns for.

The yarn calculator will provide both alternative yarn as well as required amount in the new quality.

If you think it's hard to decide what size to make, it can be a good idea to measure a garment you own already and like the size of. Then you can pick the size by comparing those measures with the ones available in the pattern's size chart.

You'll find the size chart at the bottom of the pattern.

See DROPS lesson: How to read size chart

The needle size provided in the pattern serves only as a guide, the important thing is to follow the knitting tension. And since knitting tension is very individual, you will have to adjust the needle size to ensure that YOUR tension is the same as in the pattern – maybe you’ll have to adjust 1, or even 2 needle sizes, up or down to achieve the correct tension. For this, we recommend that you work test swatches.

Should you work with a different knitting tension than the one provided, the measurements of the finished garment might deviate from the measurement sketch.

See DROPS lesson: How to measure your tension/gauge

See DROPS video: How to make a tension/gauge swatch

Working a garment top-down provides more flexibility and room for personal adjustment. For example it is easier to try the garment on while working, as well as making adjustments to length of yoke and shoulder caps.

The instructions are carefully explaining every step, in the correct order. Diagrams are adjusted to the knitting direction and are worked as usual.

The diagram depicts all rows/rounds, and every stitch seen from the right side. It is read from bottom to top, from right to left. 1 square = 1 stitch.

When working back and forth, every other row is worked from the right side and every other row is worked from the wrong side. When working from the wrong side, the diagram will have to be worked reversed: from left to right, knit stitches are purled, purl stitches are knit etc.

When working in the round every round is worked from the right side and the diagram are worked from right to left on all rounds.

See DROPS lesson: How to read knitting diagrams

The diagram depicts all rows/rounds, and every stitch seen from the right side. It is worked from bottom to top, from right to left.

When working back and forth every other row is worked from the right side: from right to left and every other row is worked from the wrong side: from left to right.

When working in the round, every row in the diagram are worked from the right side, from right to left.

When working a circular diagram you start in the middle and work your way outwards, counter clockwise, row by row.

The rows usually start with a given number of chain stitches (equivalent to the height of the following stitch), this will either be depicted in the diagram or explained in the pattern.

See DROPS lesson: How to read crochet diagrams

Instructions for working several diagrams after each other on the same row/round, will often be written like so: “work A.1, A.2, A.3 a total of 0-0-2-3-4 times". This means you work A.1 once, then A.2 is worked once, and A.3 is repeated (in width) the number of times provided for your size – in this case like so: S = 0 times, M = 0 times, L=2 times, XL= 3 times and XXL = 4 times.

The diagrams are worked as usual: begin with the first row in A.1, then work the first row in A.2 etc.

See DROPS lesson: How to read knitting diagrams

See DROPS lesson: How to read crochet diagrams

The total width of the garment (from wrist-to-wrist) will be larger in the larger sizes, despite the actual sleeves being shorter. The larger sizes have longer sleeve caps and wider shoulders, so there will be a good fit in all sizes.

The measurement sketch/schematic drawing provides information regarding the full length of the garment. If it’s a jumper or a jacket the length is measured from the highest point on the shoulder closest to the neckline, and straight down to the bottom of the garment. It is NOT measured from the tip of shoulder. Similarly, the length of yoke is measured from the highest point on the shoulder and down to where yoke is split into body and sleeves.

On a jacket measures are never taken along bands, unless specifically stated. Always measure inside band stitches when measuring the length.

See DROPS lesson: How to read a schematic drawing

Diagrams are often repeated on the round or in height. 1 repeat is the diagram the way it appears in the pattern. If it says to work 5 repeats of A.1 in the round, then you work A.1 a total of 5 times after/next to each other in the round. If it says to work 2 repeats of A.1 vertically/in height you work the entire diagram once, then begin again at the start and work the entire diagram one more time.

Chain stitches are slightly narrower than other stitches and to avoid working the cast-on edge too tight, we simply chain more stitches to begin with. The stitch count will be adjusted on the following row to fit the pattern and measurement sketch.

The rib edge is more elastic and will contract slightly compared to, for example, stocking stitch. By increasing before the rib edge, you avoid a visible difference in width between the rib edge and the rest of the body.

It’s very easy to cast off too tightly, and by making yarn overs while casting off (and simultaneously casting these off) you avoid a too tight cast off edge.

See DROPS video: How to bind off with yarn overs (yo)

To achieve an even increase (or decrease) you can increase on, for example: every 3rd and 4th row alternately, like so: work 2 rows and increase on the 3rd row, work 3 rows and increase on the 4th. Repeat this until the increase is complete.

See DROPS lesson: Increase or decrease 1 st on every 3rd and 4th row alternately

Should you prefer to work in the round instead of back and forth, you may of course adjust the pattern. You’ll need to add steeks mid-front (usually 5 stitches), and follow the instructions. When you would normally turn and work from the wrong side, simply work across the steek and continue in the round. At the end you’ll cut the piece open, pick up stitches to work bands, and cover the cut edges.

See DROPS video: How to knit steeks and cut open

Should you prefer to work back and forth instead of in the round, you may of course adjust the pattern so you work the pieces separately and then assemble them at the end. Divide the stitches for the body in 2, add 1 edge stitch in each side (for sewing) and work the front and back pieces separately.

See DROPS lesson: Can I adapt a pattern for circular needles into straight needles?

Pattern repeats can vary slightly in the different sizes, in order to get the correct proportions. If you’re not working the exact same size as the garment in the photo, yours might deviate slightly. This has been carefully developed and adjusted so that the complete impression of the garment is the same in all sizes.

Make sure to follow instructions and diagrams for your size!

If you have found a pattern you like which is available in women’s size it’s not very difficult to convert it to men’s size. The biggest difference will be the length of sleeves and body. Start working on the women size that you think would fit across the chest. The additional length will be worked right before you cast off for the armhole/sleeve cap. If the pattern is worked top-down you can add the length right after the armhole or before the first decrease on sleeve.

Regarding additional yarn amount, this will depend on how much length you add, but it is better with a skein too many than too few.

All yarns will have excess fibres (from production) that might come off as lint or shedding. Brushed yarns (ie hairier yarns) have more of these loose, excess fibres, causing more shedding.

Shedding also depends on what is worn under or over the garment, and whether this pulls at the yarn fibres. It’s therefore not possible to guarantee that there will be no shedding

Below are some tips on how to get the best result when working with hairier yarns:

1. When the garment is finished (before you wash it) shake it vigorously so the looser hairs come off. NOTE: do NOT use a lint roller, brush or any method that pulls at the yarn.

2. Place the garment in a plastic bag and put it in your freezer - the temperature will cause the fibres to become less attached to each other, and excess fibres will come off easier.

3. Leave in the freezer for a few hours before taking it out and shaking it again.

4. Wash the garment according to the instructions on the yarn label.

Pilling is a natural process that happens to even the most exclusive of fibers. It's a natural sign of wear and tear that is hard to avoid, and that is most visible in high friction areas of your garment like a sweater's arms and cuffs.

You can make your garment look as new by removing the pilling, using a fabric comb or a pill/lint remover.

Still can't find the answer you need? Then scroll down and leave your question so one of our experts can try to help you. This will be done normally within 5 to 10 working days.
In the meantime, you can read the questions and answers that others have left to this pattern or join the DROPS Workshop on Facebook to get help from fellow knitters/crocheters!

Post a comment to pattern DROPS 219-3

We would love to hear what you have to say about this pattern!

If you want to leave a question, please make sure you select the correct category in the form below, to speed up the answering process. Required fields are marked *.

Comments / Questions (86)

country flag Karen Hamilton wrote:

Is there a way to convert this pattern from top down to bottom up and if so, please advise me. Thank you

23.04.2025 - 00:46

DROPS Design answered:

Dear Mrs Hamilton, maybe one of these patterns could be helpful? they are worked bottom up. Happy knitting!

23.04.2025 - 08:11

country flag Lone Marrup wrote:

Jeg savner at oplysning om hvor mange masker der er på forstykket, når alle man er færdig med udtagning. (Str M)\r\nOg måske også på ryggen. Synes det er en dårlig beskrivelse i opskriften. \r\nJeg plejer ikke have problemer med opskrifterne, men denne opskrift bøvler jeg med.\r\nHilsen Line

20.04.2025 - 19:56

DROPS Design answered:

Hej Lone, du starter med 21 masker, tager 19 masker ud til V-hals og 5 til ærmegab = 45 på hvert forstykke og du skal have 90 masker på bagstykket efter hals og ærmegab :)

30.04.2025 - 12:01

country flag Bonnie Banfield wrote:

Yes, very helpful! Thank you sooo much. I really appreciate your ongoing assistance and your very prompt responses! I couldn’t have gotten this far without your help. Your instructions are much clearer than those given in the pattern.

17.02.2025 - 16:07

country flag Bonnie Banfield wrote:

I must be the thickest person knitting this vest! ;-) Another question - and I hope my last - Purling back from picking up stitches for the button band, where do the extra stitches go? Do you do all the purl stitches and yarn overs go in the same stitch or start like two stitches before the actual pivot and do you purl one, yarn over in each of the two stitches before and after. If you can make any sense of what I’m asking. You’ve been VERY helpful and I so appreciate it. Thank you!

17.02.2025 - 10:19

DROPS Design answered:

Dear Mrs Banfield, after you have picked up stitches from RS, purl 1 row increasing where V-increases rises on the front piece, ie at the "tip" after last increase for V-neck, increasing 4 sts to make the V-neck nicer. So in the one stitch just work (P1, YO, P1, YO, P1) = you have now 5 stitches instead of just one on left needle (4 sts increased). Can this help? Happy knitting!

17.02.2025 - 14:32

country flag Nancy Kremin wrote:

Hi…. I’m confused… when I put together the 2 shoulders, each of them are about 5 cm. I put the left stitches on the needle and then cast on for the neck and then put the stitches for the right shoulder on. How do the neck stitches catch up in length with the right and left back? I hope this question makes sense. Thanks so much, Nancy

12.02.2025 - 16:26

DROPS Design answered:

Dear Nancy, at the beginning you will have a 5cm neck depth in the back but, after working the right/left bands with rib, the neck will be pulled upwards and will be much less deeper (as shown in the size chart). Happy knitting!

17.02.2025 - 01:21

country flag Maja Tuncel wrote:

Jag vill sticka Boston väst 219-3, men när jag läser stick beskrivningen förstår jag inte hur man stickar framstycket i 2 delar efter V-halsen. Jag hittar bara beskrivning till västen utan knappar/knapphål.

11.02.2025 - 11:36

DROPS Design answered:

Hej Maja, du starter med at vælge størrelse, slår det antal masker op som står under højre forstykke, nu er det bare at følge opskriften. Hvis noget er uklart skriver du hvilken størrelse du strikker og nøjagtig hvor du er i opskriften og hvad du ikke forstår :)

12.02.2025 - 15:13

country flag Nancy Kremin wrote:

My question is: when you cast on 22 stitches for the right front piece including 1edge stitch on each side, does this mean a total of 24 stitches or does the 22 stitches include the the edge stitches? Thank you, Nancy

08.02.2025 - 13:07

DROPS Design answered:

Dear Nancy, the 22 stitches include the edge stitches. Happy knitting!

09.02.2025 - 13:42

country flag Bonnie Banfield wrote:

Hi! Bonnie again - re stitch count. XXL instructions begin w 22 sts per each front side, adding 1 st per side every 2nd and 4th row for the V and 16 sts total per side for underarms. My calculations: 22+42+16 = 80 sts ea front side, 118 sts for the back, plus 5 sts ea side after decreases on the 15 added underarm sts. That’s 160+118+10, which equals 288 stitches. I’m way off - again! Please help. Thanks

19.01.2025 - 20:26

DROPS Design answered:

Dear Bonnie, you have 118 stitches for the back and 15 stitches cast on under each arm. You also had 16 sts increased for each armhole. However, you increase 1 stitch every 2nd and 4th row alternately 21 times in total. This means that the total number of increases is 21 and you increase 11 times every 2nd row and 10 every 4th (or viceversa, alternating between them). So that would be: Front piece (22 sts + 21 V-neck increases + 16 armhole increases) x 2 (for each front piece) + 15 sts cast on for each sleeve (30 in total) + 118 back piece stitches = 59x2 (=118) +30 + 118 = 266 sts. Happy knitting!

19.01.2025 - 23:23

country flag Bonnie Banfield wrote:

Hi! Thanks so much for responding to my previous question!\r\nI’m back with more questions. Which might take 2 emails. The first is: I’m knitting the XXL size and I’m at about 14cm from the underarm cast-on sts. I still have about 10 more Vneck increases left. According to the diagram that is way off. It shows those increases completed by 23cm around the start of the underarm. I’ve been increasing on the 2nd and 4th rows as instructed. Where have I gone wrong? Help! ;-) Thanks!

19.01.2025 - 20:03

DROPS Design answered:

Dear Bonnie, you start at 6cm the V-neck increases. Then you work approx. 62 rows with V-neck increases. The 6cm and V-neck total increases should be approx. 78 rows (if you calculate it with the gauge) and 64 rows for the armhole (23 cm as in the size chart). So, in those 14 rows difference (78-64 = 14), you could have at max around 5 more increases for the V-neck left when you finish the armhole increases. But not 10. Check the number of worked rows and if you have increased alternately correctly (increase, 1 normal row, increase, 3 normal rows; repeat these 6 rows) Happy knitting!

19.01.2025 - 23:11

country flag Bonnie Banfield wrote:

I am knitting the XXL size. After joining the back and shoulder pieces the pattern says to start decreases when piece measures 5cm. Is this 5cm after joining, or 5cm after all of the increases for the V-neck are completed? Since the instruction comes after it says what the stitch count should be when all V-neck increases are complete, I’m not sure where to start the decreases. Thanks!

13.01.2025 - 18:45

DROPS Design answered:

Dear Mrs Banfield, under BODY measure the 5 cm from after the division, ie from the new stitches cast on on each side for armhole. Happy knitting!

14.01.2025 - 10:14