
Popular categories
Looking for a yarn?


Comments / Questions (30)
![]() Chatarina wrote:
Chatarina wrote:
He Jag har svår att förstå varv 3 på mönster A finns det någon video på det
06.01.2026 - 19:53
![]() Miriam wrote:
Miriam wrote:
Ich komme in der 3.Reihe vom Muster A1 auf nur 5 Maschen statt 6. Von links nach rechts: linke, rechte, rechte, linke, linke. Wo entgeht mir die 6. Masche? Danke!
28.06.2025 - 16:00DROPS Design answered:
Siehe unten :)
30.06.2025 - 08:17
![]() Miriam wrote:
Miriam wrote:
Ich komme in der 3.Reihe vom Muster A1 auf nur 5 Maschen statt 6. Von links nach rechts: linke, rechte, rechte, linke, linke. Wo entgeht mir die 6. Masche? Danke!
28.06.2025 - 15:30DROPS Design answered:
Liebe Miriam, so ist es richtig, bei der nächsten Runde sie es nur noch 2 Maschen rechts in der Mitte (= 2 links, 2 rechts, 1 links), bei der nächsten Runde stricken Sie 1 Umschlag zwischen den 2 rechten Maschen (= 2 li, 1 re, 1 Umschlag, 1 re, 1 li), so sind es wieder 6 Maschen. So haben Sie ein kleine Zopf gestrickt; hier sehen Sie, wie man ein ähnliches Zopf strickt. Viel Spaß beim Stricken!
30.06.2025 - 08:17
![]() Bridget wrote:
Bridget wrote:
Habe ich das richtig verstanden, daß an den Ärmelunterseiten auch das Muster A2 gestrickt wird?
12.02.2025 - 22:23DROPS Design answered:
Liebe Bridget, ja richtig. Viel Spaß beim Stricken!
13.02.2025 - 10:04
![]() Catherine De Souza Dias wrote:
Catherine De Souza Dias wrote:
La différence sur le rendu final
20.02.2023 - 10:52
![]() Catherine De Souza Dias wrote:
Catherine De Souza Dias wrote:
La différence sur le rendu final
20.02.2023 - 10:52
![]() Catherine De Souza Dias wrote:
Catherine De Souza Dias wrote:
La différence sur le rendu final
20.02.2023 - 10:51
![]() Catherine De Souza Dias wrote:
Catherine De Souza Dias wrote:
Bonjour et merci pour votre réponse.Je vois que j'ai donc le choix entre couper le fil et faire glisser ou continuer mais comme dans presque tous vos modèles vous préconisez de couper le fil c'est qu'il y a une bonne raison puisque naturellement c'est moins pratique et je voudrais comprendre la fissure le rendu final de l'ouvrage .en un mot je voudrais apprendre à bien faire grâce à vos précieux conseils .Encore un grand merci , grâce à vous je progresse peu à peu . cordialement
20.02.2023 - 10:49DROPS Design answered:
Bonjouir Mme De Sousa Dias, dans certains modèles, ce sera indispensable, dans d'autres moins, c'est parfois également un choix de la styliste, vous pouvez ainsi suivre les explications et couper le fil comme indiqué ou bien continuer - et faire les adaptations éventuelles si besoin. Bon tricot!
20.02.2023 - 10:59
![]() Catherine De Souza Dias wrote:
Catherine De Souza Dias wrote:
Bonjour, pourquoi faut il couper le fil à la fin de la division de l'empiècement ? Avant d'arriver 4 mailles avant les mailles montées il y a les mailles du premier milieu dos sur l'aiguille gauche .Faut il les glisser dans les tricoter sur l'aiguille droite ? Pourquoi ne pas continuer de tricoter simplement jusqu'aux 4 mailles avant le marqueur c'est à dire sous la première manche ? Merci pour votre réponse, cordialement
19.02.2023 - 14:13DROPS Design answered:
Bonjour Mme De Souza Dias, on va effectivement glisser les mailles sans les tricoter jusqu'à arriver à 4 mailles avant celle avec le marqueur, le début des tours commencer ici. Vous pouvez aussi fort probablement tricoter de la moitié du dos jusqu'à ces 4 mailles avant le marqueur pour éviter de couper le fil et continuer à partir de là. Bon tricot!
20.02.2023 - 10:06
![]() Catherine wrote:
Catherine wrote:
Catherine wrote: Bonjour , pour ce modèle Wild Mint vous ne proposez pas de faire une réhausse comme sur d\'autres modèles . Est ce un oubli ou bien est ce que cela n\'irait pas pour ce modèle ? Si c\'est un oubli pouvez vous me donner les indications pour taille S . D\'avance merci , catherine
16.01.2023 - 14:21DROPS Design answered:
Bonjour Catherine, c'est un choix de la styliste, vous pouvez probablement en faire une si vous le souhaitez - inspirez-vous alors d'un modèle de tension similaire avec une réhausse. Bon tricot!
16.01.2023 - 16:32
|
||||||||||||||||||||||||||||||||||
Wild Mint#wildminttop |
||||||||||||||||||||||||||||||||||
 |
 |
|||||||||||||||||||||||||||||||||
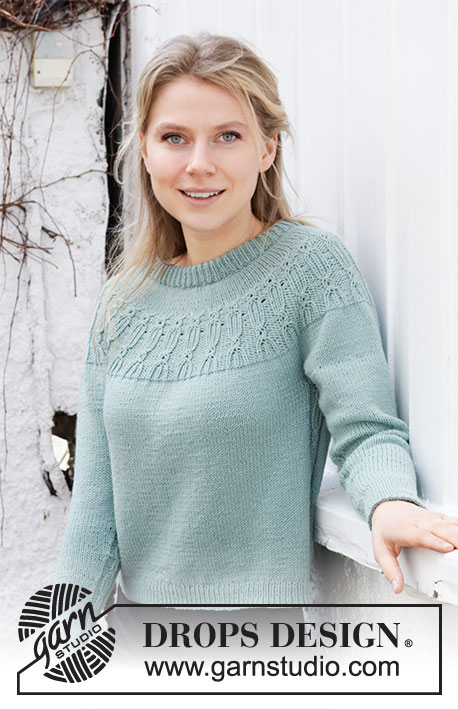
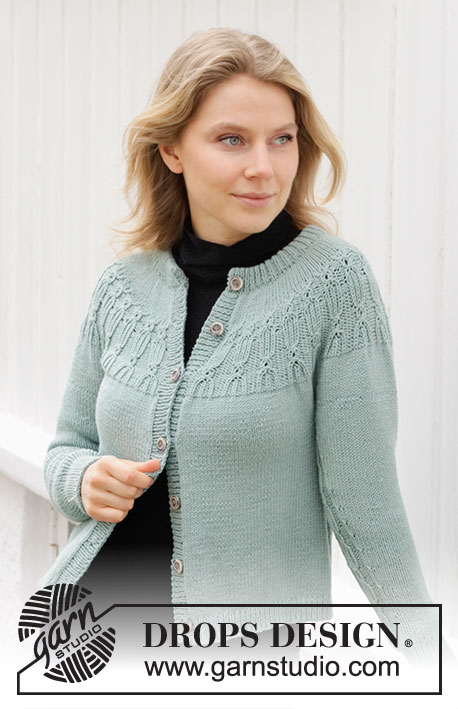
Knitted jumper with short sleeves in DROPS Merino Extra Fine. Piece is knitted top down with textured pattern on yoke and in the sides. Size: S - XXXL
DROPS 210-32 |
||||||||||||||||||||||||||||||||||
|
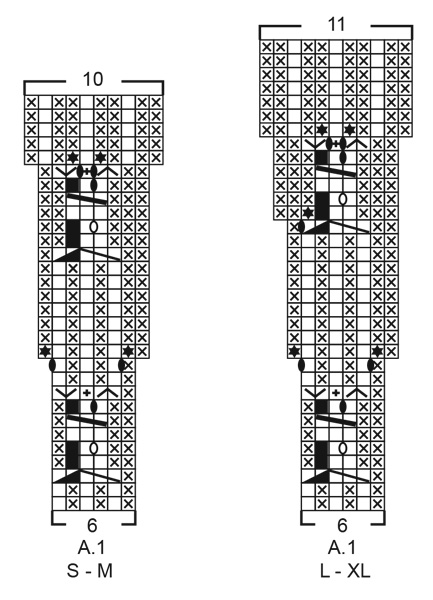
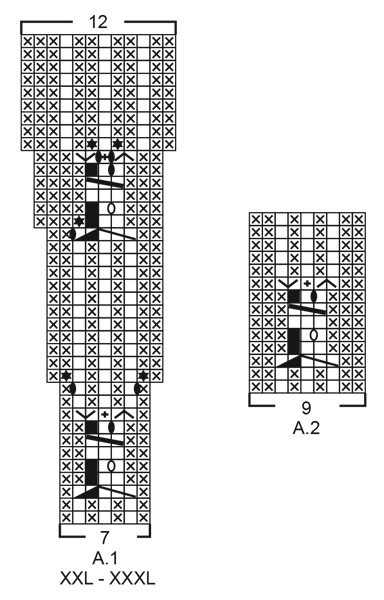
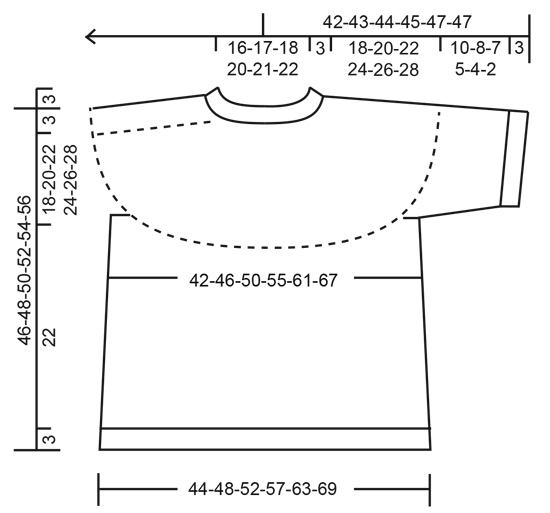
---------------------------------------------------------- EXPLANATION FOR THE PATTERN: ---------------------------------------------------------- PATTERN: See diagrams A.1 and A.2. Choose diagram for your size (applies to A.1). INCREASE TIP-1 (evenly): To calculate how to increase evenly, use the total number of stitches on row (e.g. 94 stitches) and divide stitches by number of increases to be done (e.g. 32) = 2.9. In this example increase by making 1 yarn over after approx. every 3rd stitch. On next round knit yarns over twisted to avoid holes. INCREASE TIP-2 (applies to sides of body): Increase 1 stitch on each side of A.2 in each side on body, i.e. increase as follows: Work until 1 stitch remains before A.2, make 1 yarn over, work 1 stitch in stocking stitch, work A.2 (= 9 stitches), work 1 stitch in stocking stitch, and make 1 yarn over (= 2 stitches increased in the side and 4 stitches increased in total on round.) On next round knit yarn overs twisted to avoid holes. Then work the new stitches in stocking stitch. DECREASE TIP (applies to mid under sleeves): Decrease 1 stitch on each side of A.2 mid under sleeve, i.e. work as follows: Work A.2 as before over the first 9 stitches, slip 1 stitch knitwise, knit 1, pass slipped stitch over stitch worked, work in stocking stitch until 2 stitches remain before A.2, knit 2 together (= 2 stitches decreased). CAST-OFF TIP: To avoid a tight cast-off edge you may use a larger needle size. If this also is too tight, work a 1 yarn over after approx. every 6th stitch while casting off (cast off yarn overs as regular stitches). ---------------------------------------------------------- START THE PIECE HERE: ---------------------------------------------------------- JUMPER - SHORT OVERVIEW OF THE PIECE: Work neck edge and yoke in the round on circular needle from mid back, top down. Now divide yoke for body and sleeves. Body is worked in the round on circular needle, top down. Work sleeves in the round on double pointed needles/short circular needle, top down. NECK EDGE: Cast on 94-98-102-108-112-116 stitches on a short circular needle size 3 mm with Merino Extra Fine. Knit 1 round. Then work rib in the round (= knit 1/purl 1) for 3 cm. Knit 1 round while increasing 32-32-34-36-38-38 stitches evenly - read INCREASE TIP-1 = 126-130-136-144-150-154 stitches. Insert 1 marker in the middle of round (= mid front). Measure yoke from this marker. Then work yoke as explained below. YOKE: Switch to circular needle size 4 mm and work in stocking stitch in the round. REMEMBER THE KNITTING TENSION! When piece measures 4 cm from marker in all sizes, increase 42-32-34-36-50-52 stitches evenly – remember INCREASE TIP-1 = 168-162-170-180-200-206 stitches. Continue until piece measures 4-5-6-7-7-8 cm - increase at the same time 0-18-10-18-31-39 stitches evenly on last round = 168-180-180-198-231-245 stitches. Now work A.1 in the round (= 28-30-30-33-33-35 repetitions of 6-6-6-6-7-7 stitches). When A.1 has been worked vertically, there are 280-300-330-363-396-420 stitches on row and piece measures approx. 15-16-18-19-21-22 cm from marker by the neck. Continue in stocking stitch - increase at the same time 4-8-2-9-0-8 stitches evenly on first round = 284-308-332-372-396-428 stitches. When piece measures 18-20-22-24-26-28 cm from marker at the neck, divide yoke for body and sleeves. I.e. work next round as follows from mid back: Work 41-45-48-53-59-65 stitches in stocking stitch (= ½ back piece), slip the next 60-64-70-80-80-84 stitches on 1 stitch holder for sleeve, cast on 7-7-9-9-11-11 new stitches on needle (= in the side under sleeve), work 82-90-96-106-118-130 stitches in stocking stitch (= front piece), slip the next 60-64-70-80-80-84 stitches on 1 stitch holder for sleeve, cast on 7-7-9-9-11-11 new stitches on needle (= in the side under sleeve), and work the remaining 41-45-48-53-59-65 stitches in stocking stitch as before (= ½ back piece). Cut the yarn. Finish body and sleeves separately! NOW MEASURE PIECE FROM HERE! BODY: = 178-194-210-230-258-282 stitches. Insert 1 marker in each side on body - in the middle of the 7-7-9-9-11-11 stitches cast on under each sleeve. Begin round 4 stitches before stitch with marker, in one side of body, work A.2 (= 9 stitches – marker is in the middle of these 9 stitches), work 80-88-96-106-120-132 stitches in stocking stitch, work A.2 (= 9 stitches – marker is in the middle of these 9 stitches), work 80-88-96-106-120-132 stitches in stocking stitch. Continue pattern like this. When piece measures 7 cm from division in all sizes, increase 2 stitches in each side on body - read INCREASE TIP (= 4 stitches increased). Repeat increase when piece measures 14 cm from division = 186-202-218-238-266-290 stitches. Work until piece measures 22 cm from division (approx. 3 cm remain until finished measurements, try the jumper on and work to desired length). On next round increase stitches evenly, i.e. work next round as follows: Work A.2 as before, work 84-92-100-110-124-136 stitches in stocking stitch and increase at the same time 17-19-21-23-25-27 stitches evenly over these stitches in stocking stitch, work A.2 as before, work 84-92-100-110-124-136 stitches in stocking stitch and increase at the same time 17-19-21-23-25-27 stitches evenly over these stitches in stocking stitch = 220-240-260-284-316-344 stitches. NOTE! Increase to avoid the rib to be worked from contracting the piece. Switch to circular needle size 3 mm. Work next round as follows: Work A.2 as before over the first 9 stitches, * knit 1, purl 1 *, work from *-* until 1 stitch remains before A.2 in the other side of piece, knit 1, work A.2 as before over the next 9 stitches, * knit 1, purl 1 *, work from *-* until 1 stitch remains on round, and finish with knit 1. Continue rib like this for 3 cm. Cast off with knit over knit and purl over purl - read CAST-OFF TIP. Jumper measures approx. 46-48-50-52-54-56 cm from shoulder and down. SLEEVES: Slip the 60-64-70-80-80-84 stitches from stitch holder in one side of piece on double pointed needles or a short circular needle size 4 mm and pick in addition up 1 stitch in each of the 7-7-9-9-11-11 new stitches cast on under sleeve = 67-71-79-89-91-95 stitches. Insert 1 marker in the middle of the 7-7-9-9-11-11 stitches. Begin round 4 stitches before stitch with marker, work A.2 (= 9 stitches – marker is in the middle of these 9 stitches), work the remaining stitches in stocking stitch. Continue pattern like this. When sleeve measures 2-2-2-1-1-1 cm from division, decrease 1 stitch on each side of A.2- read DECREASE TIP (= 2 stitches decreased). Decrease like this every 2-1½-1½-1-1-1 cm 4-4-4-4-3-1 times in total = 59-63-71-81-85-93 stitches. Work until sleeve measures 10-8-7-5-4-2 cm from division (approx. 3 cm remain until finished measurements, try the jumper on and work to desired length). Knit 1 round and decrease at the same time 3 stitches evenly – continue A.2 as before and do not decrease over stitches in A.2 = 56-60-68-78-82-90 stitches. Switch to double pointed needles or short circular needle size 3 mm. Work next round as follows: Work A.2 over the first 9 stitches, * knit 1, purl 1 *, work from *-* until 1 stitch remains before A.2 and finish with knit 1. Continue rib like this for 3 cm. Cast off with knit over knit and purl over purl - read CAST-OFF TIP. Work the other sleeve the same way. |
||||||||||||||||||||||||||||||||||
Diagram explanations |
||||||||||||||||||||||||||||||||||
|
||||||||||||||||||||||||||||||||||
 |
||||||||||||||||||||||||||||||||||
 |
||||||||||||||||||||||||||||||||||
 |
||||||||||||||||||||||||||||||||||
Have you finished this pattern?Tag your pictures with #dropspattern #wildminttop or submit them to the #dropsfan gallery. Do you need help with this pattern?You'll find 28 tutorial videos, a Comments/Questions area and more by visiting the pattern on garnstudio.com. © 1982-2026 DROPS Design A/S. We reserve all rights. This document, including all its sub-sections, has copyrights. Read more about what you can do with our patterns at the bottom of each pattern on our site. |
||||||||||||||||||||||||||||||||||


With over 40 years in knitting and crochet design, DROPS Design offers one of the most extensive collections of free patterns on the internet - translated to 17 languages. As of today we count 325 catalogues and 12298 patterns translated into English (UK/cm). 12298
We work hard to bring you the best knitting and crochet have to offer, inspiration and advice as well as great quality yarns at incredible prices! Would you like to use our patterns for other than personal use? You can read what you are allowed to do in the Copyright text at the bottom of all our patterns. Happy crafting!
Post a comment to pattern DROPS 210-32
We would love to hear what you have to say about this pattern!
If you want to leave a question, please make sure you select the correct category in the form below, to speed up the answering process. Required fields are marked *.