
Popular categories
Looking for a yarn?


Comments / Questions (109)
![]() Frederike wrote:
Frederike wrote:
Mooi patroon! kan ik ook kiezen voor 2 draden kid silk voor een iets meer zacht/fluffy/pluizig gevoel?
29.06.2021 - 10:39DROPS Design answered:
Dag Frederike,
Jazeker, dat kan! Maak wel altijd een proeflapje en pas eventueel de naalddikte aan om op de juiste stekenverhouding te komen.
02.07.2021 - 09:37
![]() Anna wrote:
Anna wrote:
J'ai de nouveau suivi vos i structions suite a ma question. Pour le devant droit le diagramme A 2 se terminant par ub jete je fais 3 m end (emmanchure) puis 2 m jersey (corps du devant) puis 17 m de motif et la je me retrouve avec un jete dans le vide donc il y a un probleme
02.06.2021 - 11:24DROPS Design answered:
Bonjour Anna, le diagramme A.2 se tricote sur le devant gauche ainsi, sur l'endroit: 17 m (= en terminant par 1 jeté au 1er rang), 2 m jersey et 3 m point mousse. Pour le devant droit, vous tricoterez: 3 m point mousse, 2 m jersey, A.1 (= 17 m au 1er rang en commençant par 1 jeté). Bon tricot!
02.06.2021 - 13:10
![]() Anna wrote:
Anna wrote:
Bonjour, il me semble qu'il faut inverser les explications piur le debut des devants : on commence par les rangs ajoures sur 17 m puis 2 m end et enfin 3 mailles miysse piur les avou au niveau des emmanchures. Faut-il inverser les explcations du pint ajoure ?. Sinon on se trouve avec les 3 lailles non pas a droure mais a gauche .
22.05.2021 - 20:33DROPS Design answered:
Bonjour Anna, les devants se tricotent de haut en bas, ainsi, pour le devant droit, on doit augmenter avant A.1 sur l'endroit = avant les mailles de bordure d'encolure et on monte les mailles de l'emmanchure en fin de rang sur l'envers = à droite, vu sur l'endroit. Bon tricot!
25.05.2021 - 07:46
![]() Birgit Everbeck wrote:
Birgit Everbeck wrote:
Wenn ich die Jacke mit nur einem Garn stricken möchte, welche Garnstärke benötige ich?
05.05.2021 - 14:00DROPS Design answered:
Liebe Frau Everbeck, 2 Fäden von der Garngruppe A werden durch 1 Faden der Garngruppe C ersetzt werden- hier lesen Sie mehr. Viel Spaß beim stricken!
05.05.2021 - 14:26
![]() Rita Harang Andersen wrote:
Rita Harang Andersen wrote:
Skal det være hull både i høyre og venstre side for å tre knytebånd? For meg virker det logisk med hull kun på høyre side for å tre det lengste båndet gjennom.
26.04.2021 - 18:56DROPS Design answered:
Hei Rita. Jo, om du vil ha det slik du ser det på bilde trenger du bare 1 hull. Men om du vil ha flere muligheter til å knyte bådet kan du ha 2 hull. mvh DROPS design
03.05.2021 - 12:02
![]() Tine wrote:
Tine wrote:
Hej. Er strikkeprøven strikket med p 4 eller 5 ?
24.04.2021 - 14:23DROPS Design answered:
Hei Tine. På pinne 5. mvh DROPS design
26.04.2021 - 15:32
![]() Patricia Paduvan wrote:
Patricia Paduvan wrote:
Bonjour, je ne trouve pas dans les explications le sens de lecture des diagrammes. Lit on de gauche à droite ou de droite a gauche. Merci pour votre aide.
22.04.2021 - 21:20DROPS Design answered:
Bonjour Mme Paduvan, les diagrammes se lisent de bas en haut en commençant sur l'endroit dans le coin à droite, on les lit de droite à gauche sur l'endroit et de gauche à droite sur l'envers - retrouvez ici plus d'infos sur les diagrammes. Bon tricot!
23.04.2021 - 08:03
![]() Hanneke wrote:
Hanneke wrote:
Ik heb 22 steken ,naald 4 , bij proef lapje, neem ik ‘n dikkere naald dan wordt het breiwerk veel te los. Ik moet maat m hebben, zal ik nu ‘n grotere maat breien of klopt het patroon dan niet meer? Hoe kan 8k dit oplossen?
14.04.2021 - 09:35DROPS Design answered:
Dag Hanneke,
Wat vooral van belang is, is dat je 17 steken in de breedte op 10 cm hebt. Als je minder dan 17 steken hebt, kun je nog een kleinere naald gebruiken. De hoogte kun je namelijk makkelijk aanpassen door extra naalden te breien.
15.04.2021 - 11:10
![]() Anne wrote:
Anne wrote:
Olisiko ohjeessa syytä mainita etukappaleen ohjeessa, että silmukoiden lisäykset ennen joustinneuletta pitäisi tehdä sileällä osuudella, eikä tasaisesti, kuten nyt mainitaan? Varmaankin näin on ollut ajatus, mutta se ei käy ohjeesta ilmi. Toinenkin asia, miksi sivureunoihin pitää jättä aukko molemmille puolille?
14.04.2021 - 09:25
![]() Inger-Lise wrote:
Inger-Lise wrote:
Hei. Skal strikke denne og leser oppskriften og lurer på dette er riktig mål på bakstykket rett etter at skuldrene er satt dammen? Skal strikke str L. Når arbeidet måler 17-14-8-12-10-7 cm, økes det 1 maske i hver side til ermehull – les ØKETIPS-1. Er det riktig med 8 cm i str L når M og XL er flere cm lenger?
28.03.2021 - 20:38DROPS Design answered:
Hei Inger-Lise, Du skal øke flere ganger i de større størrelsene, og det er derfor målet er kortere i L før du øker første gangen. God fornøyelse!
29.03.2021 - 07:52
|
||||||||||||||||||||||
Pearl Pointe#pearlpointewrap |
||||||||||||||||||||||
 |
 |
|||||||||||||||||||||
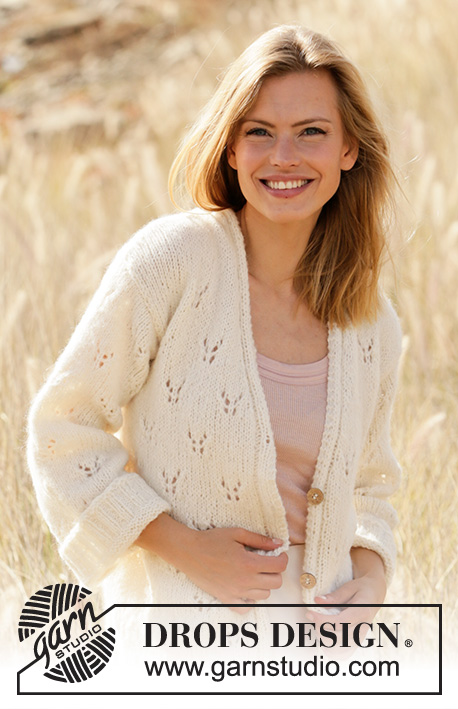
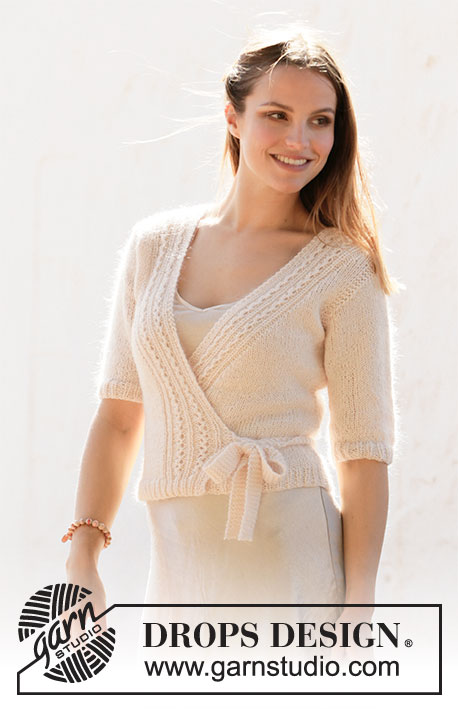
Knitted wrap-around jacket in DROPS BabyAlpaca Silk and DROPS Kid-Silk or DROPS BabyMerino and DROPS Kid-Silk. The piece is worked top down with lace pattern. Sizes S - XXXL.
DROPS 212-9 |
||||||||||||||||||||||
|
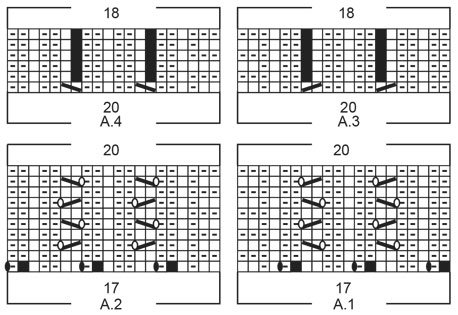
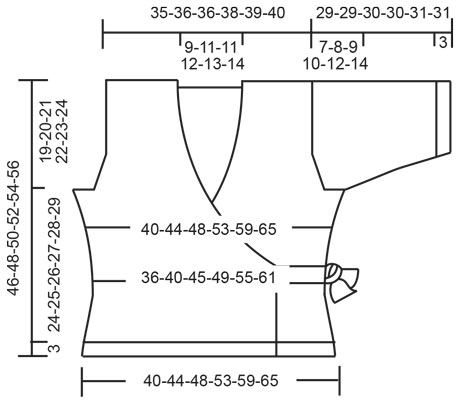
------------------------------------------------------- EXPLANATIONS FOR THE PATTERN: ------------------------------------------------------- RIDGE/GARTER STITCH (worked back and forth): Knit all rows. 1 ridge in height = Knit 2 rows. PATTERN: See diagrams A.1 to A.4. The diagrams show all rows in the pattern seen from the right side. INCREASE TIP-1 (for armholes): All increases are worked from the right side! Increase on the inside of the 3 edge stitches in garter stitch. Increase 1 stitch by making 1 yarn over. On the next row (wrong side) purl the yarn over twisted to avoid a hole. Then work the increased stitch in stocking stitch. INCREASE TIP-2 (for front neck): Increase for the neck inside the 20 stitches in A.1/A.2. Increase 1 stitch by making 1 yarn over. On the next row (wrong side) purl the yarn over twisted to avoid a hole. Then work the increased stitch in stocking stitch. INCREASE TIP-3 (for sides of body): Increase 1 stitch inside the 1 edge stitch in garter stitch by making 1 yarn over. On the next row (wrong side) purl the yarn over twisted to avoid a hole. DECREASE TIP-1 (for sides of body): All decreases are worked from the right side! Decrease on the inside of the 1 edge stitch in garter stitch. Decrease as follows after the 1 edge stitch in garter stitch: Slip 1 stitch as if to knit, knit 1, pass the slipped stitch over the knitted stitch (= 1 stitch decreased). Decrease as follows before the 1 edge stitch in garter stitch: Work until there are 2 stitches left before the edge stitch and knit 2 together (= 1 stitch decreased). DECREASE TIP-2 (for mid under sleeve): Work until there are 3 stitches left before the marker thread, knit 2 together, knit 2 (marker thread sits between these 2 stitches), slip 1 stitch as if to knit, knit 1 and pass the slipped stitch over the knitted stitch (= 2 stitches decreased). CASTING-OFF TIP: To avoid the cast-off edge being tight you can cast off with a larger size needle. If the edge is still tight, make 1 yarn over after approx. each 4th stitch at the same time as casting off and the yarn overs are cast off as normal stitches. ------------------------------------------------------- START THE PIECE HERE: ------------------------------------------------------- WRAP-AROUND JACKET – SHORT OVERVIEW OF THE PIECE: The front and back pieces are worked back and forth with circular needle, top down. Stitches are knitted up for the ties. The sleeve caps are worked back and forth with circular needle, top down. Then the rest of the sleeve is worked in the round with circular needle/double pointed needles, top down. BACK RIGHT SHOULDER (when garment is worn): Cast on 22-22-22-22-22-22 stitches with circular needle size 4 mm and 1 strand BabyAlpaca Silk or BabyMerino + 1 strand Kid-Silk (= 2 strands). Work 1 RIDGE – read description above. Change to circular needle size 5 mm and continue with garter stitch until the piece measures approx. 2 cm; on the last row from the wrong side cast on 16-18-18-20-22-24 new stitches on the needle = 38-40-40-42-44-46 stitches. Lay the piece to one side and work the back left shoulder. BACK LEFT SHOULDER (when garment is worn): Cast on 22-22-22-22-22-22 stitches with circular needle size 4 mm and 1 strand BabyAlpaca Silk or BabyMerino + 1 strand Kid-Silk (= 2 strands). Work 1 ridge. Change to circular needle size 5 mm and continue with garter stitch until the piece measures approx. 2 cm; adjust so the last row is worked from the wrong side. Now place the parts together and work the back piece as described below. BACK PIECE: Place the right and left shoulders on the same circular needle size 5 mm with the 16-18-18-20-22-24 cast-on-stitches in the middle = 60-62-62-64-66-68 stitches. Start from the right side and work 3 ridges over all stitches. Then work stocking stitch with 3 edge stitches in garter stitch towards the armholes. When the piece measures 17-14-8-12-10-7 cm increase 1 stitch on each side towards the armholes – read INCREASE TIP-1. Increase like this every 4th-4th-4th-2nd-2nd-2nd row a total of 2-4-8-11-15-19 times on each side. Continue working until the piece measures 19-20-21-22-23-24 cm. Now cast on 3 new stitches for the armholes at the end of the next 2 rows = 70-76-84-92-102-112 stitches. The piece is now measured from here! Work 4 rows of stocking stitch with 6 edge stitches in garter stitch on each side. Then work stocking stitch with 1 edge stitch in garter stitch on each side. When the piece measures 4 cm from the armhole decrease 1 stitch on each side – read DECREASE TIP-1 (= 2 stitches decrease). Repeat the decrease when the piece measures 8-8-9-9-10-10 and 12-13-14-15-16-17 cm = 64-70-78-86-96-106 stitches. When the piece measures 15-16-17-18-19-20 cm increase 1 stitch inside the 1 edge stitch in garter stitch on each side – read INCREASE TIP-3. Repeat the increase when the piece measures 19-20-21-22-23-24 cm and 23-24-25-26-27-28 cm = 70-76-84-92-102-112 stitches. Continue working until the piece measures 24-25-26-27-28-29 cm from the armholes and increase at the same time 8-8-9-10-12-14 stitches evenly spaced on the last row from the wrong side = 78-84-93-102-114-126 stitches. Change to circular needle size 4 mm and work the next row from the right side as follows: 1 edge stitch in garter stitch, * knit 1, purl 2 *, work from *-* until there are 2 stitches left on the row, knit 1, 1 edge stitch in garter stitch. Continue this rib for 3 cm. Cast off with knit over knit and purl over purl – read CASTING-OFF TIP. The back piece measures approx. 46-48-50-52-54-56 cm from the shoulder. RIGHT FRONT PIECE (when the piece is worn): Cast on 22-22-22-22-22-22 stitches with circular needle size 4 mm and 1 strand BabyAlpaca Silk or BabyMerino + 1 strand Kid-Silk (= 2 strands). Work 1 ridge. Change to circular needle size 5 mm and work the next row from the right side as follows: 3 edge stitches in garter stitch towards the armhole, 2-2-2-2-2-2 stitches in stocking stitch, A.1 (= 17 stitches on the first row) = 25-25-25-25-25-25 stitches when the first row in A.1 has been worked. Continue this pattern back and forth, repeat A.1 in height from 3rd row. When the piece measures 4 cm increase for the neck-line on the inside of A.1 towards mid front – read INCREASE TIP-2. Increase like this every 4th row (i.e. every 2nd row from the right side) a total of 8-8-9-11-12-13 times, every 2nd row (i.e. every row from the right side) a total of 14-16-15-14-14-14 times and finally every 4th row 2-2-2-2-2-2 times. At the same time, when the piece measures 17-14-8-12-10-7 cm, increase 1 stitch in the side for the armhole – continue to increase in the same way as on the back piece. Continue working until the piece measures 19-20-21-22-23-24 cm and cast on 3 new stitches at the end of the next row from the wrong side. Continue as before with A.1 towards mid front, increases for neck-line and stocking stitch but, over the outermost 6 stitches towards the side, work 2 ridges (i.e. on the next 4 rows). Then continue with stocking stitch and 1 edge stitch in garter stitch towards the side and A.1 towards mid front (increases continued as before). When the piece measures 4 cm from the armhole, decrease 1 stitch in the side – remember DECREASE TIP-1. Repeat the decrease when the piece measures 8-8-9-9-10-10 and 12-13-14-15-16-17 cm. When the piece measures 15-16-17-18-19-20 cm, increase 1 stitch inside the 1 edge stitch in garter stitch on the side – remember INCREASE TIP-3. Repeat the increase when the piece measures 19-20-21-22-23-24 cm and 23-24-25-26-27-28 cm. When all the increases on the inside of A.1 are finished continue the pattern as before until the increases in the side are finished. When all the increases are finished there are 54-58-62-66-71-76 stitches on the needle. Continue working until the piece measures 24-25-26-27-28-29 cm from the armhole and increase 6-8-7-6-7-8 stitches evenly spaced = 60-66-69-72-78-84 stitches. Change to circular needle size 4 mm and work rib as follows: 1 edge stitch in garter stitch, * purl 2, knit 1 *, work from *-* until there are 20 stitches left on the row, work A.3 over the last 20 stitches (2 stitches are decreased in the diagram = 18 stitches) = 58-64-67-70-76-82 stitches. Continue the rib for 3 cm. Cast off with knit over knit and purl over purl – remember CASTING-OFF TIP. The front piece measures approx. 46-48-50-52-54-56 cm from the shoulder. LEFT FRONT PIECE (when garment is worn): Cast on 22-22-22-22-22-22 stitches with circular needle size 4 mm and 1 strand BabyAlpaca Silk or BabyMerino + 1 strand Kid-Silk (= 2 strands). Work 1 ridge. Change to circular needle size 5 mm and work the next row from the right side as follows: Work A.2 (= 17 stitches on the first row), work 2-2-2-2-2-2 stitches in stocking stitch and finish with 3 edge stitches in garter stitch towards the armhole = 25-25-25-25-25-25 stitches when the first row in A.2 has been completed. Continue this pattern back and forth, repeat A.2 in height from 3rd row. When the piece measures 4 cm increase for the neck-line on the inside of A.2 towards mid front – remember INCREASE TIP-2. Increase like this every 4th row (i.e. every 2nd row from the right side) a total of 8-8-9-11-12-13 times, every 2nd row (i.e. every row from the right side) a total of 14-16-15-14-14-14 times and finally every 4th row 2-2-2-2-2-2 times. At the same time, when the piece measures 17-14-8-12-10-7 cm, increase 1 stitch in the side for the armhole – Continue to increase in the same way as on the back and right front piece. Continue working until the piece measures 19-20-21-22-23-24 cm and cast on 3 new stitches at the end of the next row from the right side. Continue as before with A.2 towards mid front, increases to neck-line and stocking stitch but, over the outermost 6 stitches towards the side, work 2 ridges (i.e. on the next 4 rows). Then continue with stocking stitch, 1 edge stitch in garter stitch towards the side and A.2 towards mid front (increases continue as before). When the piece measures 4 cm from the armhole decrease 1 stitch in the side – remember DECREASE TIP-1. Repeat the decrease when the piece measures 8-8-9-9-10-10 and 12-13-14-15-16-17 cm. When the piece measures 15-16-17-18-19-20 cm, increase 1 stitch inside the 1 edge stitch in garter stitch on the side – remember INCREASE TIP-3. Repeat the increase when the piece measures 19-20-21-22-23-24 cm and 23-24-25-26-27-28 cm. When all the increases inside A.2 are finished continue the pattern as before until the increases in the side are finished. When all increases are finished there are 54-58-62-66-71-76 stitches on the needle. Continue working until the piece measures 24-25-26-27-28-29 cm from the armhole and increase 6-8-7-6-7-8 stitches evenly on the row = 60-66-69-72-78-84 stitches. Change to circular needle size 4 mm and work rib as follows: A.4 over the first 20 stitches (2 stitches are decreased in the diagram = 18 stitches), * knit 1, purl 2 *, work from *-* until there are 2 stitches left on the row, knit 1, 1 edge stitch in garter stitch = 58-64-67-70-76-82 stitches. Continue the rib for 3 cm. Cast off with knit over knit and purl over purl – remember CASTING-OFF TIP. The front piece measures approx. 46-48-50-52-54-56 cm from the shoulder. SLEEVE: Cast on 22-24-26-28-24-26 stitches with circular needle size 5 mm and 1 strand BabyAlpaca Silk or BabyMerino + 1 strand Kid-Silk. Work stocking stitch back and forth for the sleeve cap and, at the same time, cast on new stitches at the end of every row as follows: Cast on 3 stitches 1 time on each side, 2 stitches 3-3-3-3-4-4 times on each side, 1 stitch 0-1-2-3-3-5 times on each side, 2 stitches 3-3-3-3-4-4 times on each side and finally 3 stitches 1 time on each side = 58-62-66-70-74-80 stitches. Join the piece together and continue in the round with double pointed needles/short circular needle. Insert 1 marker thread at the join = mid under sleeve. The thread will be used when decreasing under the sleeve. Work stocking stitch in the round. When the piece measures 4 cm from where it was joined, decrease 2 stitches mid under sleeve – read DECREASE TIP-2. Decrease like this every 4-3-2-1½-1-1 cm a total of 3-4-5-6-7-9 times = 52-54-56-58-60-62 stitches. Continue working until the piece measures 19-18-18-17-16-14 cm from the join. Knit 1 round where you increase 2-0-1-2-0-1 stitches evenly on the round = 54-54-57-60-60-63 stitches. Change to double pointed needles size 4 mm and work rib in the round (= knit 1 / purl 2) for 3 cm. Loosely cast off with knit over knit and purl over purl. The sleeve measures approx. 29-29-30-30-31-31 cm from the cast-on edge down. Work one more sleeve in the same way. ASSEMBLY: Sew the shoulder seams inside the cast-on edge. Sew the side seams inside the 1 edge stitch but leave openings on the right side to thread the left tie through – the opening should be 8 cm from the bottom edge and 2½–3 cm in width. Lay the sleeves under the garter stitch edge along the armholes and sew neatly from the right side (there should not be a loose edge after sewing; sew in the outermost garter stitch from the right side so the edge lies neatly outside the sleeve). TIES: Knit up using needle size 4 mm and 1 strand of each quality: Approx. 6-7 stitches along the ribbed edge in front; 8 cm from the bottom cast-off edge up to the first of the 6-7 stitches. On the right front piece work garter stitch back and forth until the tie measures approx. 40 cm. Cast off. On the left front piece work garter stitch back and forth until the tie measures approx. 84-94 cm. Cast off. |
||||||||||||||||||||||
Diagram explanations |
||||||||||||||||||||||
|
||||||||||||||||||||||
 |
||||||||||||||||||||||
 |
||||||||||||||||||||||
Have you finished this pattern?Tag your pictures with #dropspattern #pearlpointewrap or submit them to the #dropsfan gallery. Do you need help with this pattern?You'll find 28 tutorial videos, a Comments/Questions area and more by visiting the pattern on garnstudio.com. © 1982-2026 DROPS Design A/S. We reserve all rights. This document, including all its sub-sections, has copyrights. Read more about what you can do with our patterns at the bottom of each pattern on our site. |
||||||||||||||||||||||


With over 40 years in knitting and crochet design, DROPS Design offers one of the most extensive collections of free patterns on the internet - translated to 17 languages. As of today we count 324 catalogues and 12290 patterns translated into English (UK/cm). 12290
We work hard to bring you the best knitting and crochet have to offer, inspiration and advice as well as great quality yarns at incredible prices! Would you like to use our patterns for other than personal use? You can read what you are allowed to do in the Copyright text at the bottom of all our patterns. Happy crafting!
Post a comment to pattern DROPS 212-9
We would love to hear what you have to say about this pattern!
If you want to leave a question, please make sure you select the correct category in the form below, to speed up the answering process. Required fields are marked *.