
Popular categories
Looking for a yarn?


Comments / Questions (105)
![]() Sabine Herschel Rothe wrote:
Sabine Herschel Rothe wrote:
Wenn ich das rechte Vorderteil stricke und A1 einfüge, muss ich ab 4 cm für den Halsausschnitt zunehmen, aber dann verändert sich das Muster A1 ja , auf dem Foto sieht es so aus, dass A1 am Rand ohne Zunahmen entlangläuft. Oder wird A1 breiter durch die Zunahmen am inneren Rand?
05.05.2025 - 21:02DROPS Design answered:
Liebe Frau Herschel Rothe, die Zunahmen für den Halsausschnitt werden beim rechten Vordertil vor A.1 gestrickt, so stricken Sie bis die 20 Maschen A.1 übrig sind, dann nehmen Sie für den Halsausschnitt zu und stricken Sie die restlichen 20 M A.1 wie zuvor - A.1 wird nicht zunehmen, beim linken Vorderteil nehmen Sie dann nach diesen 20 M A.1 vor. Viel Spaß beim Stricken!
06.05.2025 - 09:41
![]() Anne wrote:
Anne wrote:
Jeg strikker omslagsjakka Pearl Pointe, skjønner ikke hvor jeg tar opp masker til båndene.. Skal masker til begge båndene tas opp på høyre forstykke
10.03.2025 - 21:32DROPS Design answered:
Hei Anne, Nei, du strikker et knytebånd på hver forstykke, 8 cm ovenfor avfellingskant nederst. Strikke opp 6-7 masker langs kanten av forstykke og strikke båndet som beskrevet i teksten (forskjellig lengde på høyre og venstre siden). God fornøyelse!
11.03.2025 - 06:28
![]() Julia wrote:
Julia wrote:
Welche Seite ist bei A1 innen wenn man auf die Zeichnung schaut, links oder rechts?
06.03.2025 - 15:25DROPS Design answered:
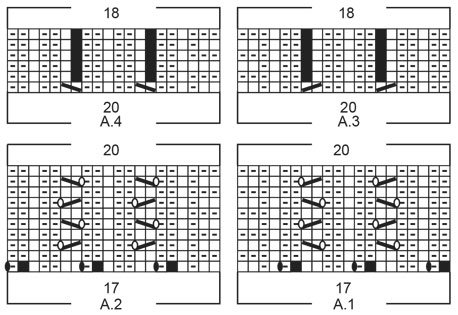
Liebe Julia, die Diagramme zeigen alle Reihen, dh die Hin- sowie die Rückreihen. Die erste A.1 (und alle diagramme) sind eine Hin-Reihe, die liest man rechts nach links. Die Rückreihen werden links nach rechts gelesen. Viel Spaß beim Stricken!
06.03.2025 - 16:17
![]() Caroline wrote:
Caroline wrote:
Als het werk 17-14-8-12-10-7 cm meet, meerder dan 1 steek aan elke kant richting de armsgaten – Vanaf waar gemeten??? Schouder of de middelste steken???
01.02.2025 - 15:05DROPS Design answered:
Dag Caroline,
Dit is vanaf het opzetten van de schouder.
05.02.2025 - 20:20
![]() Rania wrote:
Rania wrote:
Hello. I'm having trouble with A1. I'm making the large size. Do I start from right to left or left to right? Also it says to start with 3 edge stitches in garter, then 2 stocking stitches. But on the return row there is one missing stitch. Thank you.
14.01.2025 - 07:33DROPS Design answered:
Dear Rania, diagram is worked from bottom up, read right side rows (1,3,5 etc) from the right towards the left and wrong side rows (2,4,6, etc) from the left towards the right. From the wrong side, the 2 sts in stocking stitch will be purled and the 3 sts garter stitch will be knitted. Happy knitting!
14.01.2025 - 10:38
![]() Lone Mørch wrote:
Lone Mørch wrote:
Hej - jeg har noget drops melody tilovers. Kan jeg på nogen måde bruge det til den her opskrift? evt med en kidsilk i?
03.01.2025 - 12:46DROPS Design answered:
Hei Lone. Du kan evnt strikke en prøvelapp og se om du får den oppgitte strikkefastheten som er i oppskriften, men DROPS Melody er nok litt for tykt til denne modellen (enda tykkere om den strikkes sammen med Kid-Silk). mvh DROPS Design
07.01.2025 - 13:35
![]() CHRISTINE C wrote:
CHRISTINE C wrote:
Bonjour, très joli ce modèle. Mais je n'arrive pas à voir la correction du 09.12.2024 concernant l'assemblage.... Pouvez vous m'aider ? Merci
22.12.2024 - 09:39DROPS Design answered:
Bonjour, CHRISTINE C ! La correction fait déjà partie du texte que vous voyez sur le site web, alors suivez les instructions du manuel. Bon tricot!
29.12.2024 - 11:38
![]() Kathe Kristiansen wrote:
Kathe Kristiansen wrote:
Hei! Har strikket denne omslags jakken! Lurer på hvordan jeg skal tre inn knytebåndene, siden det skal være åpning i begge sider🤔 Føler jeg skal tre høyre inn i venstre side, men hva med høyre side🙈
04.12.2024 - 08:28DROPS Design answered:
Hei Kathe. Her er det nok tenkt at har man hull i begge sider, kan man variere hvilket forstykke som skal ligge fremst. Men siden knytebåndene har ulike lengder er det kun høyre forstykke (kortest bånd) som kan ligge fremst og da trenger man bare hull i høyre side (som venstre knytebånd tres inn i). Takk for at du gjorde oss oppmerksom på dette. mvh DROPS Design
09.12.2024 - 09:22
![]() Ponzanelli Marusca wrote:
Ponzanelli Marusca wrote:
Buongiorno bellissimi i vs capi le spiegazioni non sono di mio gradimento mai riuscita a farne uno
07.11.2024 - 22:41
![]() Ponzanelli Marusca wrote:
Ponzanelli Marusca wrote:
Bellissimi i vs lavori anzi direi capolavori non sono di mio gradimento le spiegazioni infatti non sono mai riuscita a fare un vs capo a maglia
07.11.2024 - 22:40
|
||||||||||||||||||||||
Pearl Pointe#pearlpointewrap |
||||||||||||||||||||||
 |
 |
|||||||||||||||||||||
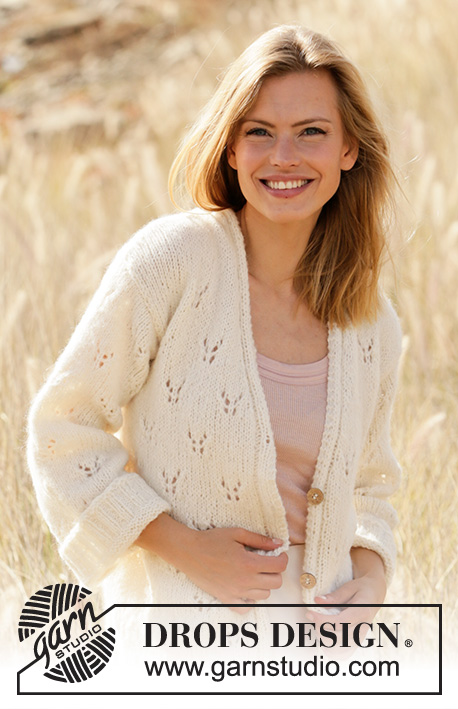
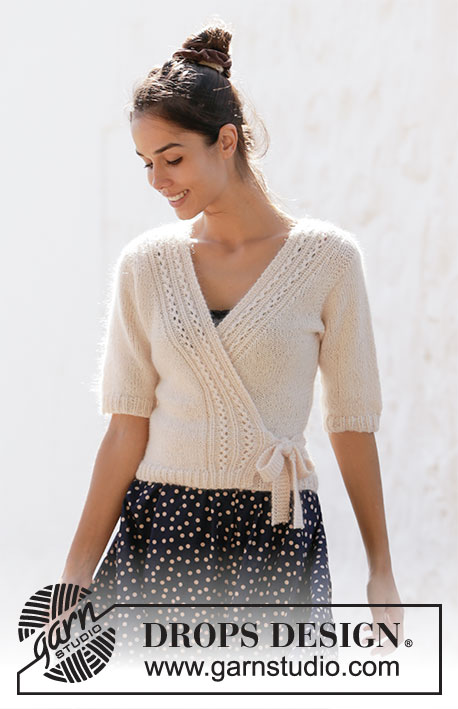
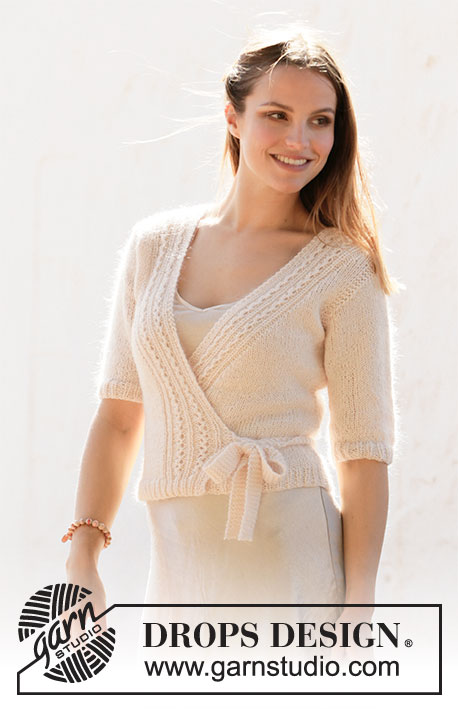
Knitted wrap-around jacket in DROPS BabyAlpaca Silk and DROPS Kid-Silk or DROPS BabyMerino and DROPS Kid-Silk. The piece is worked top down with lace pattern. Sizes S - XXXL.
DROPS 212-9 |
||||||||||||||||||||||
|
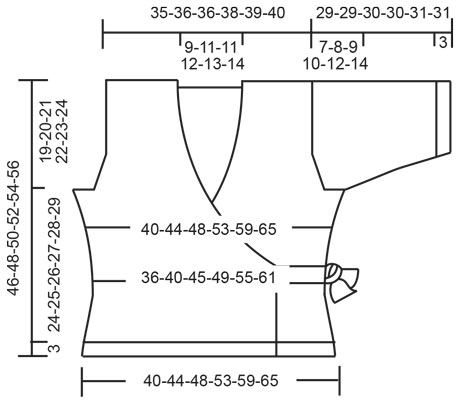
------------------------------------------------------- EXPLANATIONS FOR THE PATTERN: ------------------------------------------------------- RIDGE/GARTER STITCH (worked back and forth): Knit all rows. 1 ridge in height = Knit 2 rows. PATTERN: See diagrams A.1 to A.4. The diagrams show all rows in the pattern seen from the right side. INCREASE TIP-1 (for armholes): All increases are worked from the right side! Increase on the inside of the 3 edge stitches in garter stitch. Increase 1 stitch by making 1 yarn over. On the next row (wrong side) purl the yarn over twisted to avoid a hole. Then work the increased stitch in stocking stitch. INCREASE TIP-2 (for front neck): Increase for the neck inside the 20 stitches in A.1/A.2. Increase 1 stitch by making 1 yarn over. On the next row (wrong side) purl the yarn over twisted to avoid a hole. Then work the increased stitch in stocking stitch. INCREASE TIP-3 (for sides of body): Increase 1 stitch inside the 1 edge stitch in garter stitch by making 1 yarn over. On the next row (wrong side) purl the yarn over twisted to avoid a hole. DECREASE TIP-1 (for sides of body): All decreases are worked from the right side! Decrease on the inside of the 1 edge stitch in garter stitch. Decrease as follows after the 1 edge stitch in garter stitch: Slip 1 stitch as if to knit, knit 1, pass the slipped stitch over the knitted stitch (= 1 stitch decreased). Decrease as follows before the 1 edge stitch in garter stitch: Work until there are 2 stitches left before the edge stitch and knit 2 together (= 1 stitch decreased). DECREASE TIP-2 (for mid under sleeve): Work until there are 3 stitches left before the marker thread, knit 2 together, knit 2 (marker thread sits between these 2 stitches), slip 1 stitch as if to knit, knit 1 and pass the slipped stitch over the knitted stitch (= 2 stitches decreased). CASTING-OFF TIP: To avoid the cast-off edge being tight you can cast off with a larger size needle. If the edge is still tight, make 1 yarn over after approx. each 4th stitch at the same time as casting off and the yarn overs are cast off as normal stitches. ------------------------------------------------------- START THE PIECE HERE: ------------------------------------------------------- WRAP-AROUND JACKET – SHORT OVERVIEW OF THE PIECE: The front and back pieces are worked back and forth with circular needle, top down. Stitches are knitted up for the ties. The sleeve caps are worked back and forth with circular needle, top down. Then the rest of the sleeve is worked in the round with circular needle/double pointed needles, top down. BACK RIGHT SHOULDER (when garment is worn): Cast on 22-22-22-22-22-22 stitches with circular needle size 4 mm and 1 strand BabyAlpaca Silk or BabyMerino + 1 strand Kid-Silk (= 2 strands). Work 1 RIDGE – read description above. Change to circular needle size 5 mm and continue with garter stitch until the piece measures approx. 2 cm; on the last row from the wrong side cast on 16-18-18-20-22-24 new stitches on the needle = 38-40-40-42-44-46 stitches. Lay the piece to one side and work the back left shoulder. BACK LEFT SHOULDER (when garment is worn): Cast on 22-22-22-22-22-22 stitches with circular needle size 4 mm and 1 strand BabyAlpaca Silk or BabyMerino + 1 strand Kid-Silk (= 2 strands). Work 1 ridge. Change to circular needle size 5 mm and continue with garter stitch until the piece measures approx. 2 cm; adjust so the last row is worked from the wrong side. Now place the parts together and work the back piece as described below. BACK PIECE: Place the right and left shoulders on the same circular needle size 5 mm with the 16-18-18-20-22-24 cast-on-stitches in the middle = 60-62-62-64-66-68 stitches. Start from the right side and work 3 ridges over all stitches. Then work stocking stitch with 3 edge stitches in garter stitch towards the armholes. When the piece measures 17-14-8-12-10-7 cm increase 1 stitch on each side towards the armholes – read INCREASE TIP-1. Increase like this every 4th-4th-4th-2nd-2nd-2nd row a total of 2-4-8-11-15-19 times on each side. Continue working until the piece measures 19-20-21-22-23-24 cm. Now cast on 3 new stitches for the armholes at the end of the next 2 rows = 70-76-84-92-102-112 stitches. The piece is now measured from here! Work 4 rows of stocking stitch with 6 edge stitches in garter stitch on each side. Then work stocking stitch with 1 edge stitch in garter stitch on each side. When the piece measures 4 cm from the armhole decrease 1 stitch on each side – read DECREASE TIP-1 (= 2 stitches decrease). Repeat the decrease when the piece measures 8-8-9-9-10-10 and 12-13-14-15-16-17 cm = 64-70-78-86-96-106 stitches. When the piece measures 15-16-17-18-19-20 cm increase 1 stitch inside the 1 edge stitch in garter stitch on each side – read INCREASE TIP-3. Repeat the increase when the piece measures 19-20-21-22-23-24 cm and 23-24-25-26-27-28 cm = 70-76-84-92-102-112 stitches. Continue working until the piece measures 24-25-26-27-28-29 cm from the armholes and increase at the same time 8-8-9-10-12-14 stitches evenly spaced on the last row from the wrong side = 78-84-93-102-114-126 stitches. Change to circular needle size 4 mm and work the next row from the right side as follows: 1 edge stitch in garter stitch, * knit 1, purl 2 *, work from *-* until there are 2 stitches left on the row, knit 1, 1 edge stitch in garter stitch. Continue this rib for 3 cm. Cast off with knit over knit and purl over purl – read CASTING-OFF TIP. The back piece measures approx. 46-48-50-52-54-56 cm from the shoulder. RIGHT FRONT PIECE (when the piece is worn): Cast on 22-22-22-22-22-22 stitches with circular needle size 4 mm and 1 strand BabyAlpaca Silk or BabyMerino + 1 strand Kid-Silk (= 2 strands). Work 1 ridge. Change to circular needle size 5 mm and work the next row from the right side as follows: 3 edge stitches in garter stitch towards the armhole, 2-2-2-2-2-2 stitches in stocking stitch, A.1 (= 17 stitches on the first row) = 25-25-25-25-25-25 stitches when the first row in A.1 has been worked. Continue this pattern back and forth, repeat A.1 in height from 3rd row. When the piece measures 4 cm increase for the neck-line on the inside of A.1 towards mid front – read INCREASE TIP-2. Increase like this every 4th row (i.e. every 2nd row from the right side) a total of 8-8-9-11-12-13 times, every 2nd row (i.e. every row from the right side) a total of 14-16-15-14-14-14 times and finally every 4th row 2-2-2-2-2-2 times. At the same time, when the piece measures 17-14-8-12-10-7 cm, increase 1 stitch in the side for the armhole – continue to increase in the same way as on the back piece. Continue working until the piece measures 19-20-21-22-23-24 cm and cast on 3 new stitches at the end of the next row from the wrong side. Continue as before with A.1 towards mid front, increases for neck-line and stocking stitch but, over the outermost 6 stitches towards the side, work 2 ridges (i.e. on the next 4 rows). Then continue with stocking stitch and 1 edge stitch in garter stitch towards the side and A.1 towards mid front (increases continued as before). When the piece measures 4 cm from the armhole, decrease 1 stitch in the side – remember DECREASE TIP-1. Repeat the decrease when the piece measures 8-8-9-9-10-10 and 12-13-14-15-16-17 cm. When the piece measures 15-16-17-18-19-20 cm, increase 1 stitch inside the 1 edge stitch in garter stitch on the side – remember INCREASE TIP-3. Repeat the increase when the piece measures 19-20-21-22-23-24 cm and 23-24-25-26-27-28 cm. When all the increases on the inside of A.1 are finished continue the pattern as before until the increases in the side are finished. When all the increases are finished there are 54-58-62-66-71-76 stitches on the needle. Continue working until the piece measures 24-25-26-27-28-29 cm from the armhole and increase 6-8-7-6-7-8 stitches evenly spaced = 60-66-69-72-78-84 stitches. Change to circular needle size 4 mm and work rib as follows: 1 edge stitch in garter stitch, * purl 2, knit 1 *, work from *-* until there are 20 stitches left on the row, work A.3 over the last 20 stitches (2 stitches are decreased in the diagram = 18 stitches) = 58-64-67-70-76-82 stitches. Continue the rib for 3 cm. Cast off with knit over knit and purl over purl – remember CASTING-OFF TIP. The front piece measures approx. 46-48-50-52-54-56 cm from the shoulder. LEFT FRONT PIECE (when garment is worn): Cast on 22-22-22-22-22-22 stitches with circular needle size 4 mm and 1 strand BabyAlpaca Silk or BabyMerino + 1 strand Kid-Silk (= 2 strands). Work 1 ridge. Change to circular needle size 5 mm and work the next row from the right side as follows: Work A.2 (= 17 stitches on the first row), work 2-2-2-2-2-2 stitches in stocking stitch and finish with 3 edge stitches in garter stitch towards the armhole = 25-25-25-25-25-25 stitches when the first row in A.2 has been completed. Continue this pattern back and forth, repeat A.2 in height from 3rd row. When the piece measures 4 cm increase for the neck-line on the inside of A.2 towards mid front – remember INCREASE TIP-2. Increase like this every 4th row (i.e. every 2nd row from the right side) a total of 8-8-9-11-12-13 times, every 2nd row (i.e. every row from the right side) a total of 14-16-15-14-14-14 times and finally every 4th row 2-2-2-2-2-2 times. At the same time, when the piece measures 17-14-8-12-10-7 cm, increase 1 stitch in the side for the armhole – Continue to increase in the same way as on the back and right front piece. Continue working until the piece measures 19-20-21-22-23-24 cm and cast on 3 new stitches at the end of the next row from the right side. Continue as before with A.2 towards mid front, increases to neck-line and stocking stitch but, over the outermost 6 stitches towards the side, work 2 ridges (i.e. on the next 4 rows). Then continue with stocking stitch, 1 edge stitch in garter stitch towards the side and A.2 towards mid front (increases continue as before). When the piece measures 4 cm from the armhole decrease 1 stitch in the side – remember DECREASE TIP-1. Repeat the decrease when the piece measures 8-8-9-9-10-10 and 12-13-14-15-16-17 cm. When the piece measures 15-16-17-18-19-20 cm, increase 1 stitch inside the 1 edge stitch in garter stitch on the side – remember INCREASE TIP-3. Repeat the increase when the piece measures 19-20-21-22-23-24 cm and 23-24-25-26-27-28 cm. When all the increases inside A.2 are finished continue the pattern as before until the increases in the side are finished. When all increases are finished there are 54-58-62-66-71-76 stitches on the needle. Continue working until the piece measures 24-25-26-27-28-29 cm from the armhole and increase 6-8-7-6-7-8 stitches evenly on the row = 60-66-69-72-78-84 stitches. Change to circular needle size 4 mm and work rib as follows: A.4 over the first 20 stitches (2 stitches are decreased in the diagram = 18 stitches), * knit 1, purl 2 *, work from *-* until there are 2 stitches left on the row, knit 1, 1 edge stitch in garter stitch = 58-64-67-70-76-82 stitches. Continue the rib for 3 cm. Cast off with knit over knit and purl over purl – remember CASTING-OFF TIP. The front piece measures approx. 46-48-50-52-54-56 cm from the shoulder. SLEEVE: Cast on 22-24-26-28-24-26 stitches with circular needle size 5 mm and 1 strand BabyAlpaca Silk or BabyMerino + 1 strand Kid-Silk. Work stocking stitch back and forth for the sleeve cap and, at the same time, cast on new stitches at the end of every row as follows: Cast on 3 stitches 1 time on each side, 2 stitches 3-3-3-3-4-4 times on each side, 1 stitch 0-1-2-3-3-5 times on each side, 2 stitches 3-3-3-3-4-4 times on each side and finally 3 stitches 1 time on each side = 58-62-66-70-74-80 stitches. Join the piece together and continue in the round with double pointed needles/short circular needle. Insert 1 marker thread at the join = mid under sleeve. The thread will be used when decreasing under the sleeve. Work stocking stitch in the round. When the piece measures 4 cm from where it was joined, decrease 2 stitches mid under sleeve – read DECREASE TIP-2. Decrease like this every 4-3-2-1½-1-1 cm a total of 3-4-5-6-7-9 times = 52-54-56-58-60-62 stitches. Continue working until the piece measures 19-18-18-17-16-14 cm from the join. Knit 1 round where you increase 2-0-1-2-0-1 stitches evenly on the round = 54-54-57-60-60-63 stitches. Change to double pointed needles size 4 mm and work rib in the round (= knit 1 / purl 2) for 3 cm. Loosely cast off with knit over knit and purl over purl. The sleeve measures approx. 29-29-30-30-31-31 cm from the cast-on edge down. Work one more sleeve in the same way. ASSEMBLY: Sew the shoulder seams inside the cast-on edge. Sew the side seams inside the 1 edge stitch but leave openings on the right side to thread the left tie through – the opening should be 8 cm from the bottom edge and 2½–3 cm in width. Lay the sleeves under the garter stitch edge along the armholes and sew neatly from the right side (there should not be a loose edge after sewing; sew in the outermost garter stitch from the right side so the edge lies neatly outside the sleeve). TIES: Knit up using needle size 4 mm and 1 strand of each quality: Approx. 6-7 stitches along the ribbed edge in front; 8 cm from the bottom cast-off edge up to the first of the 6-7 stitches. On the right front piece work garter stitch back and forth until the tie measures approx. 40 cm. Cast off. On the left front piece work garter stitch back and forth until the tie measures approx. 84-94 cm. Cast off. |
||||||||||||||||||||||
Diagram explanations |
||||||||||||||||||||||
|
||||||||||||||||||||||
|
||||||||||||||||||||||
|
||||||||||||||||||||||
Have you finished this pattern?Tag your pictures with #dropspattern #pearlpointewrap or submit them to the #dropsfan gallery. Do you need help with this pattern?You'll find 28 tutorial videos, a Comments/Questions area and more by visiting the pattern on garnstudio.com. © 1982-2025 DROPS Design A/S. We reserve all rights. This document, including all its sub-sections, has copyrights. Read more about what you can do with our patterns at the bottom of each pattern on our site. |
||||||||||||||||||||||


With over 40 years in knitting and crochet design, DROPS Design offers one of the most extensive collections of free patterns on the internet - translated to 17 languages. As of today we count 314 catalogues and 11822 patterns translated into English (UK/cm).
We work hard to bring you the best knitting and crochet have to offer, inspiration and advice as well as great quality yarns at incredible prices! Would you like to use our patterns for other than personal use? You can read what you are allowed to do in the Copyright text at the bottom of all our patterns. Happy crafting!
Post a comment to pattern DROPS 212-9
We would love to hear what you have to say about this pattern!
If you want to leave a question, please make sure you select the correct category in the form below, to speed up the answering process. Required fields are marked *.