
Popular categories
Looking for a yarn?


Comments / Questions (5)
![]() Gurli wrote:
Gurli wrote:
BÆRESTYKKE: 102 masker er 1 m. for lidt
06.03.2023 - 11:40
![]() Jane Quille wrote:
Jane Quille wrote:
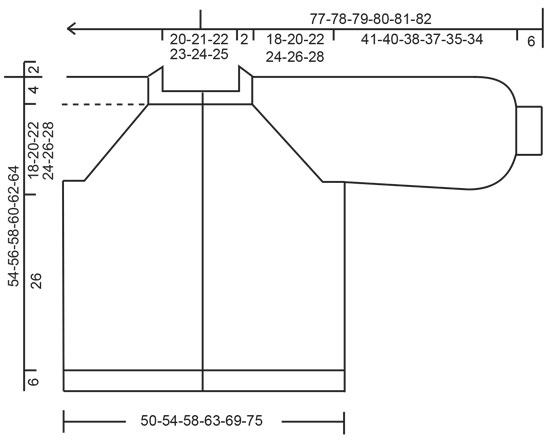
Oppskrift 207-39. Str L . 22 cm ned til armfelling, 26 cm ned til start vrangbord = 48 cm. 6 cm vrangbord = 54 cm hel lengde. Ikke 58 cm som det står i oppskriften?.
17.10.2021 - 15:20DROPS Design answered:
Hei Janne. De 4 cm du ser øverst på målskissen (under 2/halskant) er dypden på halsutringningen som må legges til (6+26+22+4 =58). I fremtidige oppskrifter skal man kunne se hvor målene er tatt fra (forstykket, midt på og/eller med inkl halsutringningen). mvh DROPS Design
18.10.2021 - 11:57
![]() Inge wrote:
Inge wrote:
Hoi, ik kom deze waarschuwing vaker tegen: DENK OM DE STEKENVERHOUDING! Wat wordt daar nou eigenlijk precies mee bedoeld? Want als je volgens een patroon breit, waarom en hoe moet je daar dan om denken of rekening mee houden? Alvast dank!
27.10.2020 - 15:06DROPS Design answered:
Dag Inge,
In het begin van het patroon, bij de materialen staat aangegeven welke stekenverhouding je nodig hebt voor de juiste maten. Het zou kunnen zijn dat je gaandeweg het breien wat strakker of losser gaat breien, dus het is de bedoeling dat je in de gaten houdt of de stekenverhouding nog steeds klopt.
27.10.2020 - 22:49
![]() Anette Bruun Rasmussen wrote:
Anette Bruun Rasmussen wrote:
Vil meget gerne have opskriften på denne, men kan ikke gennemskue hvordan? 🤔
10.08.2019 - 10:39
![]() Marina wrote:
Marina wrote:
I like it very much.
08.08.2019 - 18:58
|
|
Row by Row Jacket#rowbyrowjacket |
|
 |
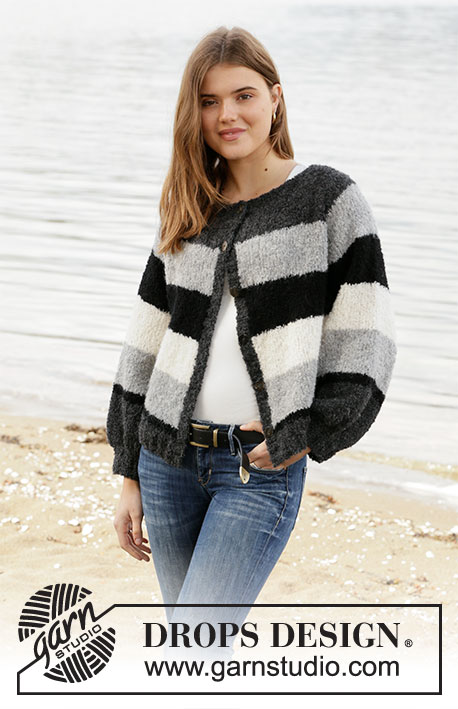 |
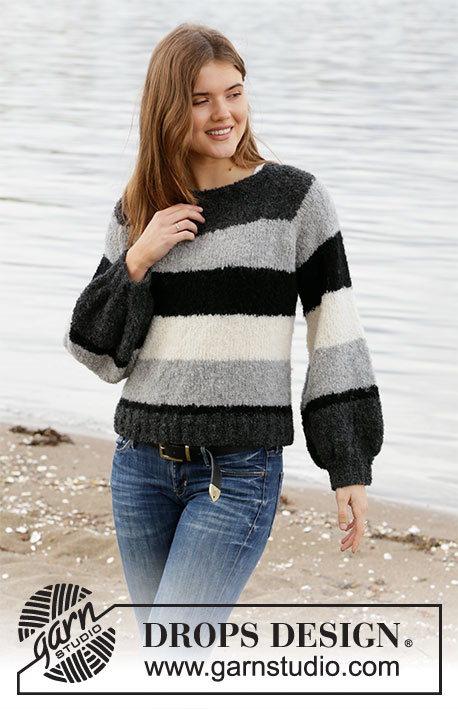
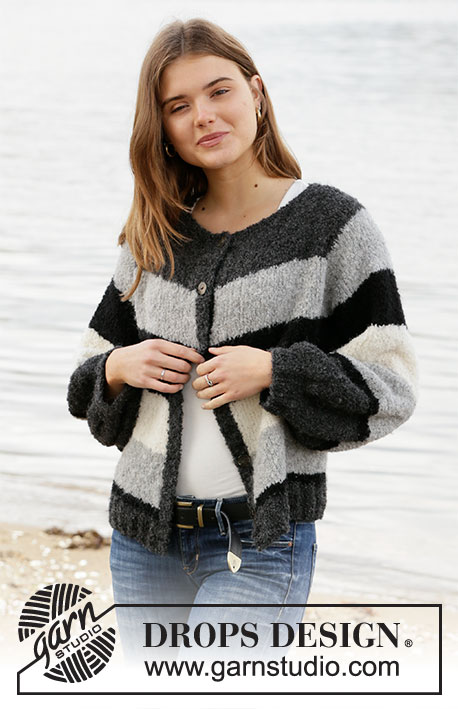
Knitted jacket with stripes in DROPS Alpaca Bouclé. Worked top down. Size: S - XXXL
DROPS 207-39 |
|
|
---------------------------------------------------------- EXPLANATION FOR THE PATTERN: ---------------------------------------------------------- GARTER STITCH (back and forth): Knit all rows. 1 ridge vertically = knit 2 rows. STRIPES: 8 cm with dark grey (measured from cast-on edge) 8 cm with light grey 8 cm with black 8 cm with off white 8 cm with light grey 2 cm with black Work until finished measurements with dark grey. RAGLAN: All increases are done from the right side. Increase for raglan on each side of the 4 markers in every transition between sleeves and body as follows: Work until 1 stitch remains before marker, make 1 yarn over, knit 2 (marker is between these 2 stitches), make 1 yarn over (= 1 stitch increased on each side of marker and 8 stitches increased in total on row.) On next row (wrong side) purl yarn overs twisted to avoid holes. Then work the new stitches in stocking stitch. INCREASE TIP (applies to mid under sleeves): Work until 2 stitches remain before marker thread, make 1 yarn over, knit 4 (marker thread is in the middle of these 4 stitches), make 1 yarn over = 2 stitches increased. On next round knit yarn overs twisted to avoid holes. Then work the new stitches in stocking stitch. DECREASE TIP (evenly): To calculate how to decrease evenly, use the total number of stitches on row (e.g. 112 stitches), minus edge stitches (2 stitches) and divide the remaining stitches by number of decreases to be done (e.g. 26) = 4.2. In this example decrease by working approx. every 3rd and 4th stitch together. KNITTING TIP (applies to sleeve length): Lent on sleeves can be adjusted according to desired length but note that the sleeve length should be a bit longer than usual to make the sleeve baggy at the bottom. ---------------------------------------------------------- START THE PIECE HERE: ---------------------------------------------------------- JACKET - SHORT OVERVIEW OF THE PIECE: Worked top down. Work yoke back and forth on circular needle until piece is divided into body and sleeves. Work the body back and forth on circular needle and work sleeves in the round on a short circular needle or double pointed needles. Work bands mid front and finish with a neck edge. YOKE: Read all of the following section on yoke before working! Cast on 102-106-114-114-118-126 stitches (including 1 edge stitch in each side towards mid front) on circular needle size 5.5 mm with dark grey. Purl 1 row (= wrong side). Insert 4 marker in piece as follows (without working the stitches): Count 20-21-22-22-23-25 stitches (= front piece), insert 1 marker before next stitch, count 12-12-14-14-14-14 stitches (= sleeve), insert 1 marker before next stitch, count 38-40-42-42-44-48 stitches (= back piece), insert 1 marker before next stitch, count 12-12-14-14-14-14 stitches (= sleeve), insert 1 marker before next stitch. There are 20-21-22-22-23-25 stitches after last marker on front piece. Work STRIPES in stocking stitch with 1 edge stitch in GARTER STITCH in each side towards mid front - read explanation above. REMEMBER THE KNITTING TENSION! AT THE SAME TIME on first row from right side increase for RAGLAN – see explanation above. Increase for raglan like this on every other row (i.e. every row from right side) 18-20-21-24-26-28 times in total = 246-266-282-306-326-350 stitches. After last increase piece measures approx. 18-20-22-24-26-28 cm from cast-on edge mid front. If the garment is shorter than this, continue until correct measurements. Work next row as follows from wrong side: Work 38-41-43-47-51-56 stitches as before (= front piece), slip the next 48-52-56-60-62-64 stitches on 1 stitch holder for sleeve, cast on 6-6-8-8-10-10 new stitches on row (= in the side under sleeve), work 74-80-84-92-100-110 stitches as before (= back piece), slip the next 48-52-56-60-62-64 stitches on 1 stitch holder for sleeve, cast on 6-6-8-8-10-10 new stitches on row (= in the side under sleeve) and work the remaining 38-41-43-47-51-56 stitches as before (= front piece). Finish body and sleeves separately. NOW MEASURE THE PIECE FROM HERE! BODY: = 162-174-186-202-222-242 stitches. Continue in stocking stitch and stripes with 1 edge stitch in garter stitch in each side towards mid front. When piece measures 26 cm from division in all sizes, knit 1 row from wrong side while increasing 2 stitches evenly in all sizes = 164-176-188-204-224-244 stitches. Switch to circular needle size 4.5 mm. Work next row as follows from right side: 1 edge stitch in garter stitch, * knit 2, purl 2 *, repeat from *-* until 3 stitches remain on needle, knit 2 and finish with 1 edge stitch in garter stitch. Continue rib like this for 6 cm. Loosely cast off stitches with knit over knit and purl over purl. To avoid a tight cast-off edge you may use circular needle size 5.5 mm. Jacket measures approx. 54-56-58-60-62-64 cm from shoulder and down. SLEEVE: Slip the 48-52-56-60-62-64 stitches from stitch holder in one side of piece double pointed needles/a short circular needle size 5.5 mm and pick in addition up 1 stitch in each of the 6-6-8-8-10-10 new stitches cast on under sleeve = 54-58-64-68-72-74 stitches. Insert 1 marker thread at beginning of round (= mid under sleeve). Use marker thread later when increasing under sleeve. Continue with stocking stitch and stripes - AT THE SAME TIME when piece measures 4 cm from division in all sizes, increase 2 stitches mid under sleeve - READ INCREASE TIP. Increase like this every 3½-3½-3½-3-3-3 cm 9-9-8-8-8-8 times in total = 72-76-80-84-88-90 stitches. Continue to work until sleeve measures approx. 40-39-37-36-34-33 cm from division (approx. 7 cm remain until finished measurements - read KNITTING TIP). NOTE: Shorter measurements in the larger sizes because of wider neck and longer yoke. Knit 1 round while decreasing 0-4-0-4-0-2 stitches evenly = 72-72-80-80-88-88 stitches. On next round knit all stitches together 2 by 2 = 36-36-40-40-44-44 stitches. Switch to double pointed needles size 4.5 mm. Work rib in the round = knit 2/purl 2 for 6 cm. To avoid a tight cast-off edge you may use needles size 5.5 mm - cast off stitches with knit over knit and purl over purl. Sleeve measures approx. 47-46-44-43-41-40 cm from division. Work the other sleeve the same way. LEFT BAND: Pick up from right side inside 1 edge stitch in garter stitch, approx. 85 to 109 stitches along left front piece on circular needle size 4.5 mm with dark grey (number of stitches should be divisible by 4 + 1). Work first row as follows from wrong side: 2 edge stitches in garter stitch, * purl 2, knit 2 *, repeat from *-* until 3 stitches remain on needle, purl 2 and finish with 1 edge stitch in garter stitch. Continue rib like this for 2½-3 cm. Loosely cast off stitches with knit over knit and purl over purl. RIGHT BAND: Pick up from right side inside 1 edge stitch in garter stitch, approx. 85 to 109 stitches along right front piece on circular needle size 4.5 mm with dark grey (number of stitches should be divisible by 4 + 1). Work first row as follows from wrong side: 1 edge stitch in garter stitch, * purl 2, knit 2 *, repeat from *-* until 4 stitches remain on needle, purl 2 and finish with 2 edge stitches in garter stitch. Continue rib like this but after approx. 1-1½ cm decrease evenly for 5-5-5-6-6-6 buttonholes. Bottom buttonhole should be approx. 2 cm from bottom edge, and top buttonhole approx. 5-6 cm from neck edge. 1 buttonhole = work 2 stitches together and make 1 yarn over - Note: Decreasing in the purl sections will look more pretty (from right side). Continue rib until it measure the same as left band. Loosely cast off stitches with knit over knit and purl over purl. NECK EDGE: Pick up from right side approx. 112-116-124-124-128-136 stitches along the entire neck on circular needle size 4.5 mm with dark grey. Purl 1 row from wrong side while decreasing evenly to 86-90-94-98-102-106 stitches – read DECREASE TIP! Work next row as follows from right side: 2 edge stitches in garter stitch, * knit 2, purl 2 *, repeat from *-* until 4 stitches remain on needle, knit 2 and finish with 2 edge stitches in garter stitch. Continue rib like this but after approx. 1-1½ cm cast off for 1 buttonhole over the other holes on right band. Continue until neck edge measures approx. 2 cm, cast off with knit over knit and purl over purl. ASSEMBLY: Sew the buttons on to the left band. |
|
 |
|
Have you finished this pattern?Tag your pictures with #dropspattern #rowbyrowjacket or submit them to the #dropsfan gallery. Do you need help with this pattern?You'll find 29 tutorial videos, a Comments/Questions area and more by visiting the pattern on garnstudio.com. © 1982-2026 DROPS Design A/S. We reserve all rights. This document, including all its sub-sections, has copyrights. Read more about what you can do with our patterns at the bottom of each pattern on our site. |
|


With over 40 years in knitting and crochet design, DROPS Design offers one of the most extensive collections of free patterns on the internet - translated to 17 languages. As of today we count 324 catalogues and 12290 patterns translated into English (UK/cm). 12290
We work hard to bring you the best knitting and crochet have to offer, inspiration and advice as well as great quality yarns at incredible prices! Would you like to use our patterns for other than personal use? You can read what you are allowed to do in the Copyright text at the bottom of all our patterns. Happy crafting!
Post a comment to pattern DROPS 207-39
We would love to hear what you have to say about this pattern!
If you want to leave a question, please make sure you select the correct category in the form below, to speed up the answering process. Required fields are marked *.