
Popular categories
Looking for a yarn?


Comments / Questions (98)
![]() Donatella DeCicco wrote:
Donatella DeCicco wrote:
Can you please send the written version instead of the chart?
26.09.2023 - 01:55DROPS Design answered:
Dear Mrs DeCicco, we only have diagrams to this pattern, but this lesson might help you understanding how to read diagrams. Happy knitting!
26.09.2023 - 11:41
![]() Céline wrote:
Céline wrote:
Bonjour, concernant les jetés en début et fin de rang au début du châle, près des mailles de point mousse, doivent -ils être tricotés de façon à faire des trous?Je n'en vois pas sur la photo a cette endroit et me demande si je n'aurai pas dû faire des augmentations classiques... merci pour votre réponse
16.09.2023 - 10:09DROPS Design answered:
Bonjour Céline, tout à fait, ils doivent former des trous et ainsi donner suffisamment de souplesse à l'ouvrage; on ne voit pas bien ces jetés sur la photo car ils se trouvent en haut, au niveau des côtés, ce qui correspond à l'envergure. Bon tricot!
18.09.2023 - 08:08
![]() Patricia wrote:
Patricia wrote:
Hallo, ich versuche gerade das Tuch zu Stricken. Nach den ersten Schritten hatte ich 119 Maschen auf der Nadel, dann habe ich mit dem Diagramm A 1A-A 2C begonnen. Auf dem Foto schaut es so aus, als wäre es ein Linksrechts Muster, aber bei mir ergibt es jetzt ein kleines Perlenmuster. Leider ist die Anleitung sehr kompliziert geschrieben. Soll es ein Perlenmuster sein oder ein Linksrechts Muster?
23.05.2023 - 07:45DROPS Design answered:
Liebe Patricia, A.1-A1.C sowie A.2A-A2C sind ein Rippenmuster 1 Masche rechts/ 1 Masche links, und die zugenommenen Maschen werden dann nach und nach im Rippenmuster gestrickt; die 2 letzten Reihen sind 2 Reihen glatt links (links bei der Hinreihe, rechts bei der Rückreihe). Viel Spaß beim stricken!
23.05.2023 - 08:53
![]() Jette wrote:
Jette wrote:
Hejsa I slutningen af første afsnit, kan jeg ikke få maskeantallet til at gå op, der står at man har 83 masker og skal tilføje 34. Det giver kun 117 men der står der skal være 119, er det fordi ser skal tilføjes 18 i stedet for?
10.01.2023 - 22:44DROPS Design answered:
Hej Jette, du skal også tage de 2 masker du du gjorde ifølge 4.pind :)
12.01.2023 - 14:39
![]() Marie wrote:
Marie wrote:
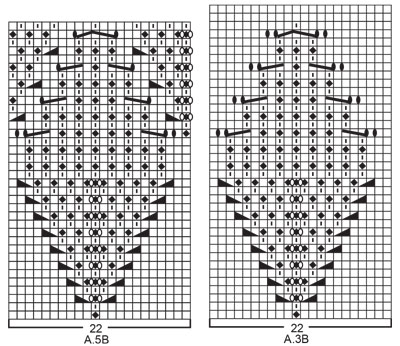
Bonjour, je voudrais tricoter le bonnet mais je ne suis pas sûre de comprendre le diagramme A.3B. Il se lit bien en rond ? Donc on tricote les rangs impairs (rang 1,3,5,etc. du diagramme) sur un fond de mailles envers et les rangs envers (rangs 2,4,6, etc. du diagramme) sur un fond de mailles endroit.
14.12.2022 - 22:49DROPS Design answered:
Bonjour Marie, pour tricoter A.3B en rond, lisez tous les rangs de droite à gauche en commençant en bas à droite, mais chaque rang devra se tricoter comme indiqué par les symboles, autrement dit, les rangs pairs ne sont pas tous tricotés en mailles endroit (= case blanche) mais aussi avec des mailles envers (cf 2ème symbole de la légende). Bon tricot!
15.12.2022 - 08:46
![]() Ellen Christensen wrote:
Ellen Christensen wrote:
Er alle fejl rettet i diagrammerne nu? Hilsen Ellen Christensen
07.11.2022 - 14:23DROPS Design answered:
Hej Ellen, ja alt er rettet :)
08.11.2022 - 13:27
![]() Lena wrote:
Lena wrote:
Der er en fejl i opskriften på Dansk. I diagramforklaringen for at tage to masker ind til venstre står der noget og et omslag hvilket overhovedet ikke giver mening. Er det ikke sådan man skal løfte en maske over, strikke to ret sammen og så løfte masken tilbage over dem der er strikket sammen? Mvh Lena
19.08.2022 - 15:35DROPS Design answered:
Hei Lena. Ja, her var det feil i den danske teksten. Vi skal fikse dette asap. Takk for at du gjorde oss oppmeksom på dette. mvh DROPS design
22.08.2022 - 11:50
![]() Marlies wrote:
Marlies wrote:
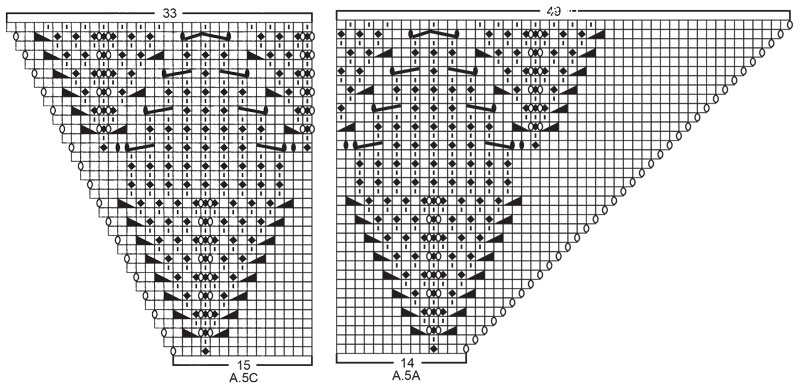
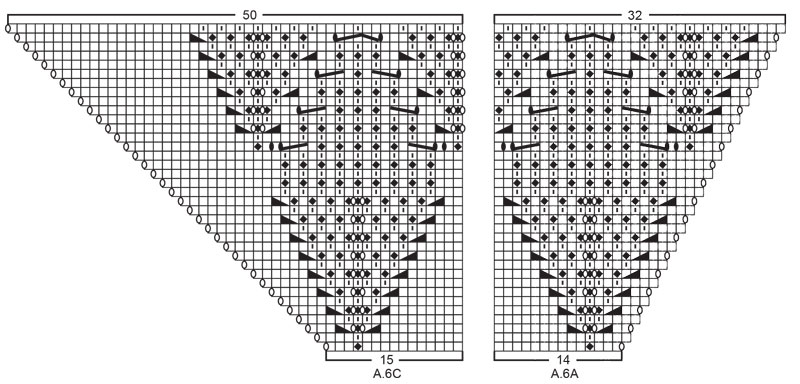
Müsste im Muster nicht die Maschenanzahl von 5a (Reihenanfang 14 Machen) mit 6c (Reihenende 15 Maschen) übereinstimmen? Beim stricken der Rückreihe ist eine Masche zu viel. Viele Grüße
23.06.2022 - 23:05DROPS Design answered:
Liebe Marlies, A.5A ist 14 Maschen und A.5C 15 Maschen, und ist A.6A 14 Maschen und A.6C is 15 Maschen, so sind beide Muster gleich. Viel Spaß beim stricken!
24.06.2022 - 08:51
![]() Anne Hägg wrote:
Anne Hägg wrote:
Hej, Finns det någon video på hur man, från RÄTSIDAN, stickar "2 maskor vridet aviga tillsammans" och "2 maskor aviga tillsammans"?
19.03.2022 - 13:11DROPS Design answered:
Hej Anne. I denna video ser du hur man stickar 2 maskor aviga tillsammans och i denna video ser du hur man stickar 2 maskor vridet aviga tillsammans. Mvh DROPS Design
22.03.2022 - 10:54
![]() BN wrote:
BN wrote:
Bonjour, Une fois A7 et A8 tricotés et les 739 mailles obtenues peut-on remplacer les diagrammes A1 et A2 par des côtes anglaises ? Dans ce cas doit-on prévoir plus de mailles ? Merci d'avance BN
18.03.2022 - 11:29DROPS Design answered:
Bonjour BN, probablement, pensez juste à bien augmenter comme avant (et comme dans les diagrammes) autrement dit comme dans A.1A, et A.1C et comme dans A.2A et A.2C. Il vous suffit à priori juste de tricoter ces mailles en côtes anglaises au lieu des côtes 1/1. Bon tricot!
18.03.2022 - 15:35
|
|||||||||||||||||||||||||||||||
Lacey Laurels#laceylaurelsshawl |
|||||||||||||||||||||||||||||||
 |
 |
||||||||||||||||||||||||||||||
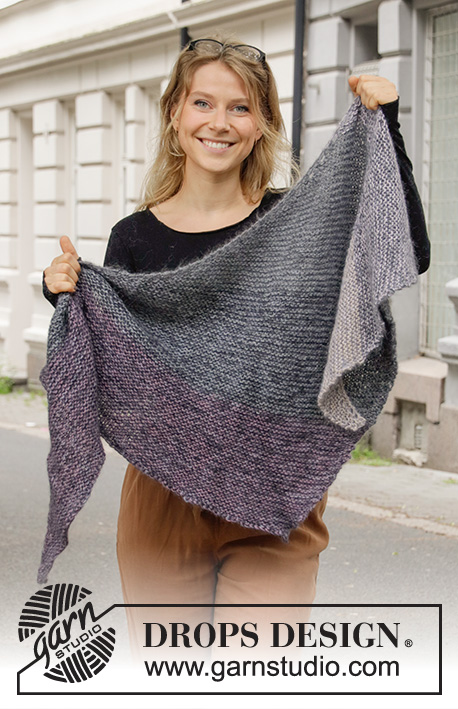
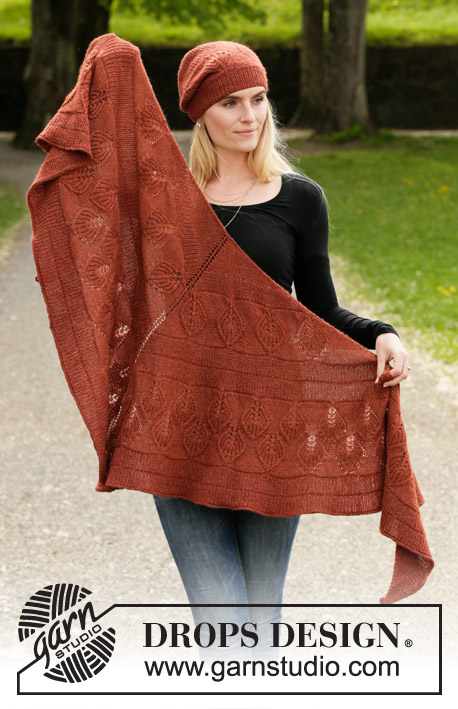
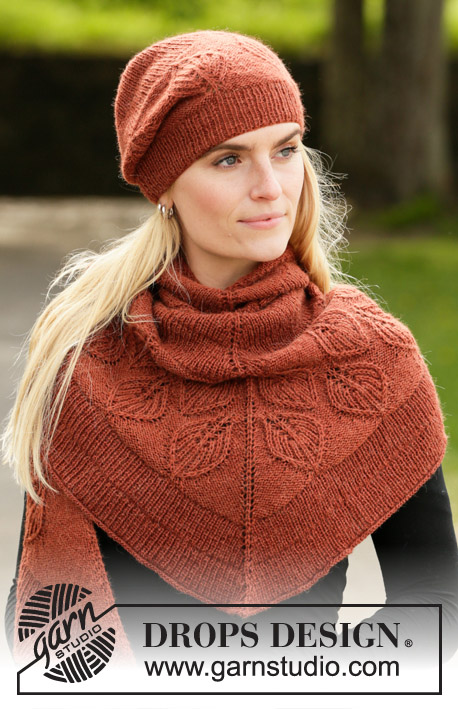
Knitted hat and shawl in DROPS Alpaca. The piece is worked with rib and leaf pattern in Fisherman’s rib.
DROPS 203-14 |
|||||||||||||||||||||||||||||||
|
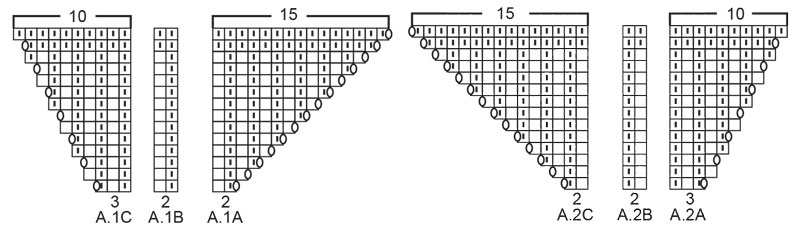
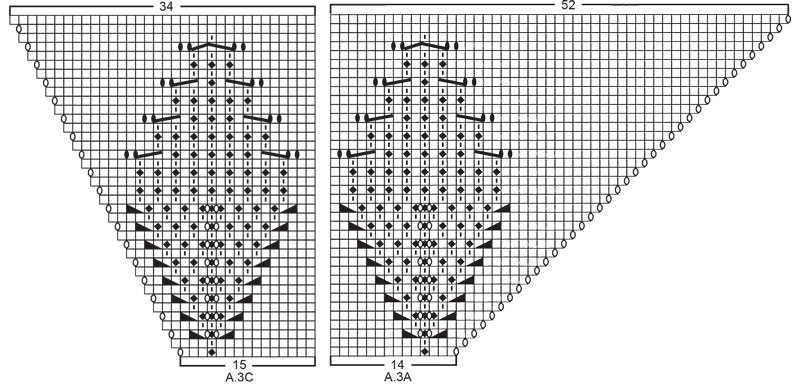
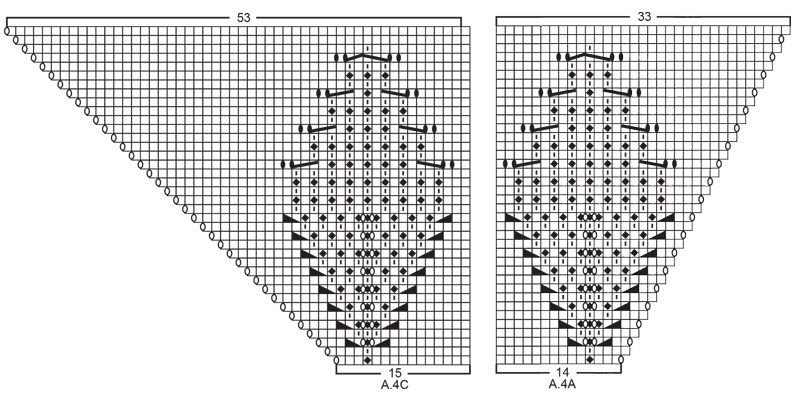
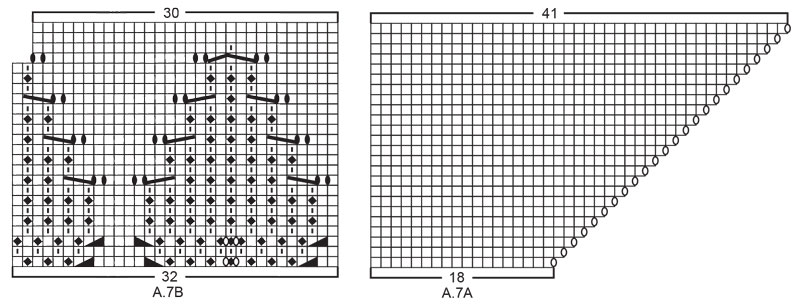
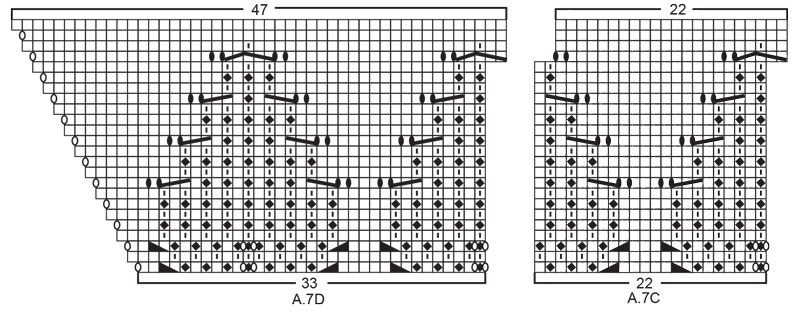
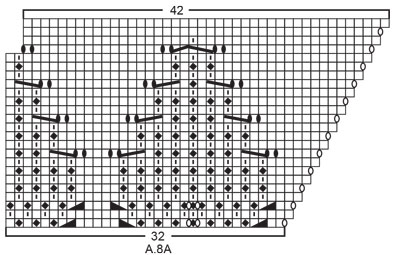
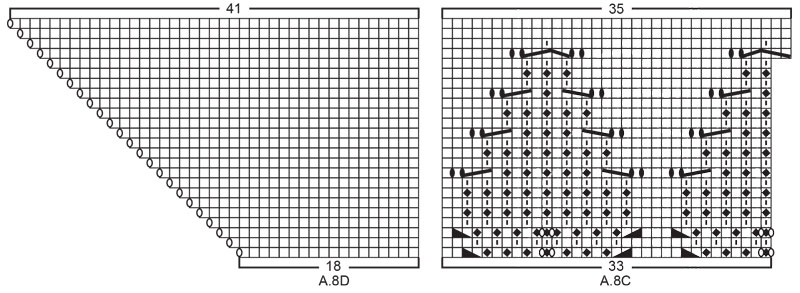
------------------------------------------------------- EXPLANATIONS FOR THE PATTERN: ------------------------------------------------------- RIDGE/GARTER STITCH (worked back and forth): Knit all rows. 1 ridge in height = Knit 2 rows. PATTERN: Hat: See diagrams A.1B and A.3B. Shawl: See diagrams A.1 to A.8. The diagrams show all rows in the pattern seen from the right side. DIAGRAM TIP: This pattern contains many diagrams; it might be a good idea to cut out all the diagrams and arrange them in the right order (see the order given in the text). INCREASE/DECREASE TIP (evenly spaced on hat): To work out how to increase/decrease evenly, count the total number of stitches on needle (e.g. 122 stitches) and divide by the number of increases/decreases to be made (e.g. 10) = 12.2. In this example, increase by making 1 yarn over after approx. each 12th stitch. On the next round work the yarn overs twisted to avoid holes. When decreasing, work together approx. each 11th and 12th stitch. INCREASE/DECREASE TIP (evenly spaced on shawl): To work out how to increase/decrease evenly on each side of the middle stitch, count the total number of stitches on needle (e.g. 81 stitches) minus the edge stitches and middle stitch (5 stitches) and divide the remaining stitches by 2 ( to find the number of stitches on each side of the middle stitch). Then divide these stitches by the number of increases/decreases to be made on each side (e.g. 18) = 2.1. In this example, increase by making 1 yarn over after approx. each 2nd stitch. Do not increase over edge stitches or middle stitch. When decreasing, work approximately all stitches together 2 and 2. ------------------------------------------------------- START THE PIECE HERE: ------------------------------------------------------- HAT – SHORT OVERVIEW OF THE PIECE: The piece is worked in the round with short circular needle, bottom up. Change to double pointed needles when necessary. HAT: Cast on 120-126 stitches with short circular needle size 2.5 mm and Alpaca. Knit 1 round. Then work rib in the round (= knit 1 / purl 1) for 5-6 cm. Knit 1 round where you increase 12-28 stitches evenly spaced – read INCREASE/DECREASE TIP = 132-154 stitches. Change to circular needle size 3 mm and work A.3B in the round (= 6-7 repeats of 22 stitches). REMEMBER THE KNITTING TENSION! When A.3B has been completed the piece measures approx. 16-17 cm from the cast-on edge. Knit 1 round where you increase 12-14 stitches evenly spaced = 144-168 stitches. Work A.1B. AT THE SAME TIME on the last round in A.1B decrease 16-24 stitches evenly spaced = 128-144 stitches. Work A.1B one more time in height. AT THE SAME TIME on the last round in A.1B knit all stitches together 2 and 2 = 64-72 stitches. Then work stocking stitch. AT THE SAME TIME, on every 2nd round, knit all stitches together 2 and 2 until there are 8 stitches left. Cut the strand, pull it through the remaining stitches, tighten and fasten well. The hat measures approx. 26-27 cm from the top down. ------------------------------------------------------- SHAWL - SHORT OVERVIEW OF THE PIECE: The piece is worked back and forth with circular needle, top down. Due to the number of stitches it might be a good idea to divide the piece onto several needles of the same size. SHAWL: Cast on 7 stitches with circular needle size 3 mm and Alpaca. Knit 1 row (= wrong side). Then work and increase as follows: ROW 1 (= right side): Work 2 edge stitches in GARTER STITCH – read description above, 1 yarn over, work 1 stitch in stocking stitch, 1 yarn over, 1 stitch in stocking stitch (= middle stitch), 1 yarn over, 1 stitch in stocking stitch, 1 yarn over and finish with2 edge stitches in garter stitch (= 4 stitches increased). ROW 2 (= wrong side): Work 2 edge stitches in garter stitch, 1 yarn over, work stocking stitch until there are 2 stitches left on the row (yarn overs purled to leave holes), 1 yarn over and finish with 2 edge stitches in garter stitch (= 2 stitches increased). ROW 3 (= right side): 2 edge stitches in garter stitch, 1 yarn over, work stocking stitch as far as the middle stitch, 1 yarn over, 1 stitch in stocking stitch (= middle stitch), 1 yarn over, work stocking stitch until there are 2 stitches left on the row, 1 yarn over and finish with 2 edge stitches in garter stitch (= 4 stitches increased). ROW 4 (= wrong side): 2 edge stitches in garter stitch, 1 yarn over, work stocking stitch until there are 2 stitches left on the row (yarn overs purled to leave holes), 1 yarn over and finish with 2 edge stitches in garter stitch (= 2 stitches increased). Repeat rows 3 and 4 until there are 83 stitches on the needle and the last row was worked from the right side. REMEMBER THE KNITTING TENSION! Work the next row in the same way as row 4 (= wrong side) and increase at the same time 17 stitches evenly spaced on each side of the middle stitch (34 stitches increased on row in addition to the increase worked inside the 2 edge stitches on each side) – read INCREASE/DECREASE TIP = 119 stitches on the needle. Work diagrams A.1 and A.2 as follows from the right side: Work 2 edge stitches in garter stitch, A.1A over 2 stitches (1 time in width), A.1B over 52 stitches (26 times in width), A.1C over 3 stitches (1 time in width), 1 stitch in stocking stitch (= middle stitch), work A.2A over 3 stitches, A.2B over 52 stitches (26 times in width), A.2C over 2 stitches and finish with 2 edge stitches in garter stitch. Continue this pattern. When the last row in A.1 and A.2 remains there are 159 stitches on the needle. Work the last row and at the same time decrease 5 stitches evenly spaced on each side of the middle stitch (10 stitches decreased evenly + 2 stitches increased in diagrams) – read INCREASE/DECREASE TIP = 151 stitches. Work diagrams A.3 and A.4 as follows from the right side: Work 2 edge stitches in garter stitch, A.3A over 14 stitches (1 time in width), A.3B over 44 stitches (2 times in width), work A.3C over 15 stitches (1 time in width), 1 stitch in stocking stitch (= middle stitch), work A.4A over 14 stitches, A.3B over 44 stitches (2 times in width), A.4C over 15 stitches and finish with 2 edge stitches in garter stitch. Continue this pattern. When the last row in A.3 and A.4 remains there are 263 stitches on the needle. Work the last row and, at the same time, increase 43 stitches evenly spaced on each side of the middle stitch (86 stitches increased evenly and 2 stitches increased in diagrams) = 351 stitches. Work diagrams A.1 and A.2 as follows from the right side: Work 2 edge stitches in garter stitch, A.1A over 2 stitches (1 time in width), A.1B over 168 stitches (84 times in width), work A.1C over 3 stitches (1 time in width), 1 stitch in stocking stitch (= middle stitch), A.2A over 3 stitches, A.2B over 168 stitches (84 times in width), work A.2C over 2 stitches and finish with 2 edge stitches in garter stitch. Continue this pattern. When the last row in A.1 and A.2 remains there are 391 stitches on the needle. Work the last row and increase at the same time 1 stitch on each side of the middle stitch (2 stitches increased evenly and 2 stitches increased in diagrams) = 395 stitches. Now work A.1 and A.2 one more time in height; i.e. work the next row from the right side as follows: 2 edge stitches in garter stitch, A.1A over 2 stitches (1 time in width), A.1B over 190 stitches (95 times in width), work A.1C over 3 stitches (1 time in width), 1 stitch in stocking stitch (= middle stitch), A.2A over 3 stitches, A.2B over 190 stitches (95 times in width), A.2C over 2 stitches and finish with 2 edge stitches in garter stitch. Continue this pattern. When the last row in A.1 and A.2 remains there are 435 stitches on the needle. Work the last row and decrease at the same time 11 stitches evenly spaced on each side of the middle stitch (22 stitches decreased evenly + 2 stitches increased in diagrams) = 415 stitches. Work diagrams A.5 and A.6 as follows from the right side: 2 edge stitches in garter stitch, A.5A over 14 stitches (1 time in width), work A.5B over 176 stitches (8 times in width), A.5C over 15 stitches (1 time in width), 1 stitch in stocking stitch (= middle stitch), A.6A over 14 stitches, A.5B over 176 stitches (8 times in width), A.6C over 15 stitches and finish with 2 edge stitches in garter stitch. Continue this pattern. When the last row in A.5 and A.6 is finished there are 523 stitches on the row. Work diagrams A.7 and A.8 as follows from the right side: 2 edge stitches in garter stitch, A.7A over 18 stitches (1 time in width), A.7B over 32 stitches (1 time in width), A.7C over 176 stitches (8 times in width), work A.7D over 33 stitches (1 time in width), 1 stitch in stocking stitch (= middle stitch), A.8A over 32 stitches, A.7C over 176 stitches (8 times in width), A.8C over 33 stitches, A.8D over 18 stitches and finish with 2 edge stitches in garter stitch. Continue this pattern. When the last row in A.7 and A.8 remain there are 593 stitches on the needle. Work the last row and increase at the same time 72 stitches evenly spaced on each side of the middle stitch (144 stitches increased evenly and 2 stitches increased in diagrams) = 739 stitches. Work diagrams A.1 and A.2 as follows from the right side: 2 edge stitches in garter stitch, A.1A over 2 stitches (1 time in width), A.1B over 362 stitches (181 times in width), A.1C over 3 stitches (1 time in width), 1 stitch in stocking stitch (= middle stitch), A.2A over 3 stitches, work A.2B over 362 stitches (181 times in width), A.2C over 2 stitches and finish with 2 edge stitches in garter stitch. Continue this pattern. When the last row in A.1 and A.2 remains there are 779 stitches on the row. Work the last row and increase at the same time 1 on each side of the middle stitch (2 stitches increased evenly and 2 stitches increased in diagrams) = 783 stitches. Now work A.1 and A.2 one more time in height; i.e. work as follows from the right side: 2 edge stitches in garter stitch, A.1A over 2 stitches (1 time in width), A.1B over 384 stitches (192 times in width), A.1C over 3 stitches (1 time in width), 1 stitch in stocking stitch (= middle stitch), A.2A over 3 stitches, work A.2B over 384 stitches (192 times in width), A.2C over 2 stitches and finish with 2 edge stitches in garter stitch. Continue this pattern. When the last row in A.1 and A.2 has been completed there are 825 stitches on the row. The piece measures approx. 65 cm measured along the middle stitch. Cast off as described below. ELASTIC CAST-OFF EDGE: To avoid the cast-off edge being tight, cast off with knit from the right side as follows: Knit 2, * insert the left needle in the 2 stitches on the right needle, from left to right and knit them together, knit 1 *, work from *-* until there is 1 stitch left on the row. Cut the strand and pull it through the last stitch. Fasten strands. SHAPING TIP: Moisten the piece and shape to the right measurements. |
|||||||||||||||||||||||||||||||
Diagram explanations |
|||||||||||||||||||||||||||||||
|
|||||||||||||||||||||||||||||||
 |
|||||||||||||||||||||||||||||||
 |
|||||||||||||||||||||||||||||||
 |
|||||||||||||||||||||||||||||||
 |
|||||||||||||||||||||||||||||||
 |
|||||||||||||||||||||||||||||||
 |
|||||||||||||||||||||||||||||||
 |
|||||||||||||||||||||||||||||||
 |
|||||||||||||||||||||||||||||||
 |
|||||||||||||||||||||||||||||||
 |
|||||||||||||||||||||||||||||||
Have you finished this pattern?Tag your pictures with #dropspattern #laceylaurelsshawl or submit them to the #dropsfan gallery. Do you need help with this pattern?You'll find 17 tutorial videos, a Comments/Questions area and more by visiting the pattern on garnstudio.com. © 1982-2026 DROPS Design A/S. We reserve all rights. This document, including all its sub-sections, has copyrights. Read more about what you can do with our patterns at the bottom of each pattern on our site. |
|||||||||||||||||||||||||||||||


With over 40 years in knitting and crochet design, DROPS Design offers one of the most extensive collections of free patterns on the internet - translated to 17 languages. As of today we count 324 catalogues and 12290 patterns translated into English (UK/cm). 12290
We work hard to bring you the best knitting and crochet have to offer, inspiration and advice as well as great quality yarns at incredible prices! Would you like to use our patterns for other than personal use? You can read what you are allowed to do in the Copyright text at the bottom of all our patterns. Happy crafting!
Post a comment to pattern DROPS 203-14
We would love to hear what you have to say about this pattern!
If you want to leave a question, please make sure you select the correct category in the form below, to speed up the answering process. Required fields are marked *.