
Popular categories
Looking for a yarn?


Comments / Questions (16)
![]() Daisie wrote:
Daisie wrote:
Please photograph your model standing up so that we can see the garment better. Thank you:)
16.08.2021 - 05:03
![]() Marie wrote:
Marie wrote:
Uppdatera gärna texten att det ska maskas av till armhål även på bakstycket. Det är otydligt. Står att man ska sticka tills arbetet mäter 67 cm. Då tror man att man bara ska sticka på tills dess. Otydligt!
22.04.2021 - 08:12
![]() Mira wrote:
Mira wrote:
UND wie macht sich das bei der Gesamtmenge Garn bemerkbar? Brauche ich dann mehr Garn als angegeben oder weniger?
07.03.2021 - 23:15DROPS Design answered:
siehe Antwort unten :)
08.03.2021 - 09:35
![]() Mira wrote:
Mira wrote:
Kann ich diesen Pullover auch mit dem Garn Drops Brushed Alpaca Silk stricken? Was muss ich bei der Maschenanzahl etc beachten?
07.03.2021 - 23:12DROPS Design answered:
Liebe Mira, 1 Faden Melody können Sie durch 2 Fäden Brushed Alpaca Silk ersetzen (versuchen Sie unseren Garnumrechner um die neue Garnmenge kalkulieren zu lassen), und stricken Sie dann mit der gleichen Maschenprobe in beiden Fällen. Viel Spaß beim stricken!
08.03.2021 - 09:35
![]() Ingrid wrote:
Ingrid wrote:
Hei! Kjempefin genser og flott mønster. Men jeg er litt forvirret over den tvunnede tråden. Det står at man skal klippe to ~3 m lange tråder, tvinne de sammen, og deretter sette perler på hver av trådene. Skal man tvinne de to trådene separat eller sammen?
15.04.2020 - 16:36DROPS Design answered:
Hej De ska tvinnas separat så att du får två stycken som sedan festes ytterst i hver side. Mvh DROPS design
16.04.2020 - 10:29
![]() Claudia wrote:
Claudia wrote:
For the sleeves, is there no need to cast-off/decrease for the armholes, as in the back and front pieces?
17.03.2020 - 11:34DROPS Design answered:
Dear Claudia, yes you do, when sleeve measures 51-50-49-48-46-44 cm, you will start to cast off for sleeve cap in each side every other row ( = 3 stitches 1-1-1-2-2-2 times, 2 stitches 2-1-2-2-3-3 times and 1 stitch 3-3-3-2-3-4 times). Happy knitting!
17.03.2020 - 11:55
![]() Vana wrote:
Vana wrote:
Hello! I would like to know if there is a pattern for the beautiful hat as well. Thank you
13.07.2019 - 08:30DROPS Design answered:
Dear Vana, we do not have any pattern for the hat, it's not a handmade hat sorry. Happy knitting!
15.07.2019 - 09:03
![]() Carin wrote:
Carin wrote:
Dålig bild
09.06.2019 - 18:35
![]() Claudia wrote:
Claudia wrote:
I don't think the instructions for the back are correct. There are not enough worked stitches. I'm working the smallest size. I cast on 62 stitches. After knitting over these for 65cm the instructions say 14 stiches for right shoulder, 20 for center, and 14 for left shoulder, that's 48 stitches, not 62. What's happened to the other 14 stitches?
31.05.2019 - 10:34DROPS Design answered:
Dear Claudia, you cast on 62 sts and work as on front piece = you will cast off and decrease for the armholes on each side when piece measures 48 cm: 3 sts 1 time and 1 st 4 times (= 7 sts x 2 sides = 14 sts cast off and decreased for the armholes), so that you have: 62 - 14= 48 sts. Happy knitting!
31.05.2019 - 11:07
![]() Diana wrote:
Diana wrote:
Super leuk model
10.02.2019 - 01:38
|
|
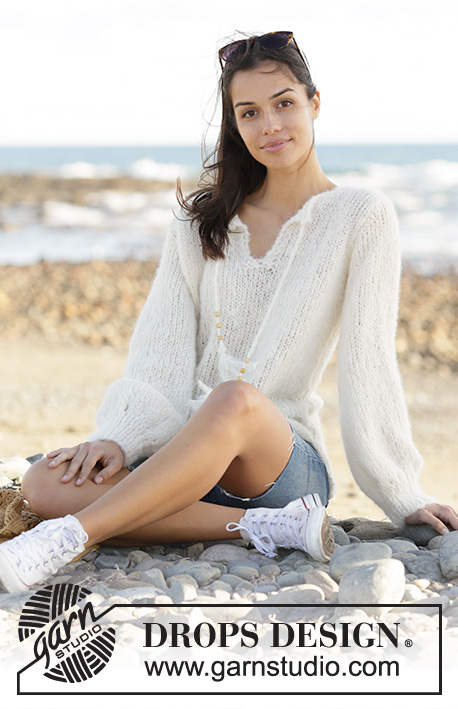
White Feather#whitefeathersweater |
|
 |
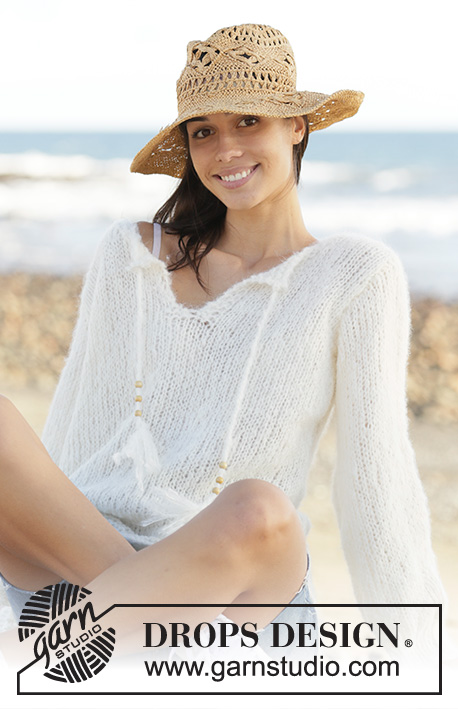 |
Knitted jumper in DROPS Melody. Size: S - XXXL
DROPS 199-43 |
|
|
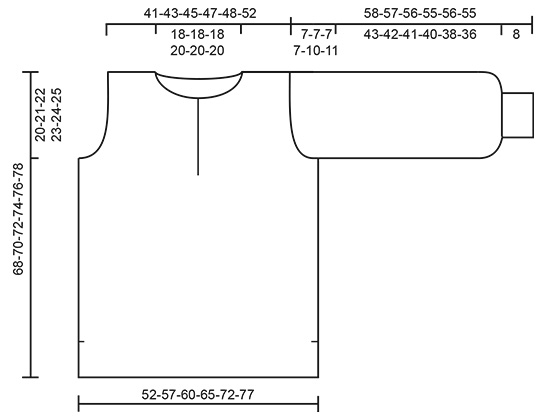
---------------------------------------------------------- EXPLANATION FOR THE PATTERN: ---------------------------------------------------------- GARTER STITCH (back and forth): Knit all rows. 1 ridge vertically = knit 2 rows. ---------------------------------------------------------- START THE PIECE HERE: ---------------------------------------------------------- JUMPER - SHORT OVERVIEW OF THE PIECE: Work front and back piece back and forth on needle. Divide the front piece into a vent mid front at the neck and then work in 2 parts up to shoulders. Work sleeves back and forth on needle. FRONT PIECE: Cast on 62-68-72-78-86-92 stitches on needle size 8 mm with Melody. Work 2 ridges in GARTER STITCH - see explanation above. Then work in stocking stitch with 2 edge stitches in garter stitch in each side. REMEMBER THE KNITTING TENSION! When piece measures 12 cm in all sizes, continue with stocking stitch over all stitches until piece measures 44-45-46-47-48-49 cm. Work in stocking stitch over the first 28-31-33-36-40-43 stitches, garter stitch over the next 6 stitches and stocking stitch over the last 28-31-33-36-40-43 stitches. Work like this until 2 ridges have been work over the 6 middle stitches. Now divide the piece in the middle to form a vent in the neck, slip half of the stitches on a stitch holder. Now work right and left part of front pieces separately = 31-34-36-39-43-46 stitches on each part. RIGHT FRONT PIECE: Work in stocking stitch with 3 stitches in garter stitch towards the middle until piece measures 48-49-50-51-52-53 cm, now cast off for armhole in the side as follows on every row from wrong side: Cast off 3 stitches 1-1-1-2-2-2 times, 2 stitches 0-1-2-2-3-3 times and 1 stitch 4-3-2-1-2-3 times. There are 24-26-27-28-29-31 stitches on needle. Work in stocking stitch with 3 stitches in garter stitch towards the middle until piece measures 60-62-64-66-68-70 cm and next row is from right side. Now slip stitches and cast off for neck mid front as follows: Work 3 stitches in garter stitch and 3 stitches in stocking stitch, then slip these 6 stitches on a stitch holder. Work the rest of row and purl 1 row from wrong side. Now cast off stitches as follows on every other row from right side: Cast off 2 stitches 1 time, cast off 1 stitch 3-3-3-4-4-4 times. There are 13-15-16-16-17-19 stitches on needle for shoulder. Cast off all stitches when piece measures 68-70-72-74-76-78 cm. LEFT FRONT PIECE: Work in stocking stitch with 3 stitches in garter stitch towards the middle until piece measures 48-49-50-51-52-53 cm, now cast off for armhole in the side as follows on every row from right side: Cast off 3 stitches 1-1-1-2-2-2 times, 2 stitches 0-1-2-2-3-3 times and 1 stitch 4-3-2-1-2-3 times. There are 24-26-27-28-29-31 stitches on needle. Work in stocking stitch with 3 stitches in garter stitch towards the middle until piece measures 60-62-64-66-68-70 cm and next row is from wrong side. Now slip stitches and cast off for neck mid front as follows: Work 3 stitches in garter stitch and 3 stitches in stocking stitch, then slip these 6 stitches on a stitch holder. Work in stocking stitch the rest of row and knit 1 row from right side. Now cast off stitches as follows on every other row: Cast off 2 stitches 1 time, cast off 1 stitch 3-3-3-4-4-4 times. There are 13-15-16-16-17-19 stitches on needle for shoulder. Cast off all stitches when piece measures 68-70-72-74-76-78 cm. BACK PIECE: Work as front piece (but now without dividing for vent) until piece measures 65-67-69-71-73-75 cm. Now cast off stitches for neck in the middle as follows from right side: Work 14-16-17-17-18-20 stitches in stocking stitch (right shoulder), cast off the next 20-20-20-22-22-22 stitches and work 14-16-17-17-18-20 stitches in stocking stitch (left shoulder). Turn and purl over the first 14-16-17-17-18-20 stitches, turn and knit 2 together and knit the rest of row = 13-15-16-16-17-19 stitches. Turn and purl 1 row from wrong side and cast off by knitting on next row from right side. Left shoulder is now done. Cut the yarn, now work and cast off on right shoulder, the stitches are still on the needle. Begin from wrong side, purl 1 row from wrong side. Turn and knit from right side until 2 stitches remain on needle, knit these 2 together. Turn and purl 1 row from wrong side. Turn and cast off knitting from right side. Right shoulder is now done. SLEEVE: Cast on 36-38-40-42-44-46 stitches on needle size 6 mm with Melody. Work rib back and forth with knit 1/purl 1 until piece measures 8 cm in all sizes. Switch to needle size 8 mm, work 1 row in stocking stitch while increasing 12 stitches evenly = 48-50-52-54-56-58 stitches on needle. Work in stocking stitch until piece measures 14 cm. Now decrease 1 stitch in each side by knitting the 2 outermost stitches together from right side. Repeat decrease when piece measures 27-27-26-26-25-24 and 40-40-38-38-36-34 cm = 42-44-46-48-50-52 stitches on needle. Continue in stocking stitch until piece measures 51-50-49-48-46-44 cm, now cast off for sleeve cap in each side every other row as follows: 3 stitches 1-1-1-2-2-2 times, 2 stitches 2-1-2-2-3-3 times and 1 stitch 3-3-3-2-3-4 times. Then cast off all stitches. ASSEMBLY: Sew shoulder seams, sew edge to edge to avoid a chunky seam. NECK EDGE: Work an edge around the neck, begin by slipping stitches from right front piece on to needle size 8 mm without working them, pick up approx. 50-58 stitches around the next, slip stitches from left front piece on a needle and work over these stitches. There are approx. 62-70 stitches on needle. Work in garter stitch back and forth over all stitches until 2 ridges have been worked. Cast off on next row from right side, cut and fasten the yarn. ASSEMBLY: Sew in sleeves, sew edge to edge with neat little stitches. Sew seam under sleeve. Begin at rib and sew up to armhole, then sew side seam down until 12 cm remain at the bottom for vent. Repeat under the other sleeve and along the other side. Cut and fasten the yarn. TWINED STRING: Cut 2 lengths of 3 metres each. Twine the strands together until they make resistance, fold the string double and it will twines itself again. Thread 3 small beads on the end of each string, and tie a knot so that the string remains twined and the beads stay on. Make 2 small tassels and attach one to the end of each string, below the beads, like so: Cut 8 strands of approx. 20 cm, keep the strands together and fold in the middle. Tie another strand approx. 1-2 cm below fold to fasten the tassel. Attach tassel to the string by pulling string through loop at the top of tassel and make a knot. Then fasten string at the edge in each side of neck edge mid front. |
|
 |
|
Have you finished this pattern?Tag your pictures with #dropspattern #whitefeathersweater or submit them to the #dropsfan gallery. Do you need help with this pattern?You'll find 27 tutorial videos, a Comments/Questions area and more by visiting the pattern on garnstudio.com. © 1982-2026 DROPS Design A/S. We reserve all rights. This document, including all its sub-sections, has copyrights. Read more about what you can do with our patterns at the bottom of each pattern on our site. |
|


With over 40 years in knitting and crochet design, DROPS Design offers one of the most extensive collections of free patterns on the internet - translated to 17 languages. As of today we count 324 catalogues and 12290 patterns translated into English (UK/cm). 12290
We work hard to bring you the best knitting and crochet have to offer, inspiration and advice as well as great quality yarns at incredible prices! Would you like to use our patterns for other than personal use? You can read what you are allowed to do in the Copyright text at the bottom of all our patterns. Happy crafting!
Post a comment to pattern DROPS 199-43
We would love to hear what you have to say about this pattern!
If you want to leave a question, please make sure you select the correct category in the form below, to speed up the answering process. Required fields are marked *.