
Popular categories
Looking for a yarn?


Comments / Questions (24)
![]() Kathy wrote:
Kathy wrote:
I've been knitting sweaters since I was a child and this is the most incomprehensible pattern I have ever tried. I'm unravelling for a second time. I'll give it one more go, before giving up but there are much easier ways to write a pattern.
08.09.2025 - 22:28
![]() Jäger Gabriella wrote:
Jäger Gabriella wrote:
Hi! In Hungarian translation at the last increasing (body) the number of increase-stitches are wrong. Instead of 44, 48 etc it is only 10, 8, 5.... I have read the english version. Please correct the hungarian.
05.05.2024 - 20:20DROPS Design answered:
Dear Gabriella, thank you for pointing out the mistake, that has been corrected. Happy Crafting!
05.05.2024 - 21:32
![]() Jäger Gabriella wrote:
Jäger Gabriella wrote:
Testrész utolsó szaporítás a bordás szegély előtt (kiindulás 212-232-252-276-304-332 szem): 10-8-5-10-8-7 szemet = 252-276-300-328-364-396 szem. A leírt szaporítással nem jó a matek, nem jön ki a végeredmény! Nekem L-es méretben 252+5=257, ami páratlan szám, így a 2 fordított 2 sima bordás kötéshez páros szemszám kéne... Nem értem!
05.05.2024 - 18:31DROPS Design answered:
Kedves Gabriella, a minta javításra került. Szeretném felhívni a figyelmét, hogy, ha bejegyzésére választ vár, akkor "Comment" helyett "question" (kérdés)-re érdemes kategorizálnia. Ugyanakkor, hasonló probléma esetén a Facebook "Magyar Drops csoport" csoportjában is kérdezhet. Sikeres kézimunkázást!
05.05.2024 - 21:31
![]() Suzanne Des Rochers wrote:
Suzanne Des Rochers wrote:
J’aimerais savoir la différence entre mettre une marqueur après un certain nombre de mailles et mettre un fil marqueur dans une maille? J’ai l’habitude de mettre un marqueur de plastique et de le faire suivre mais non pas DANS une maille. Merci de mIaider
04.03.2024 - 07:21DROPS Design answered:
Bonjour Mme Des Rochers, tout dépend des modèles et des raisons, mais on peut parfois avoir besoin de marquer une maille précisément et dans ce cas, on devra probablement faire suivre ce marqueur à chaque tour/rang pour ne pas perdre le fil. On peut aussi utiliser des marqueurs ou des fils marqueurs (comme ici) en les plaçant entre 2 mailles. Bon tricot!
04.03.2024 - 10:00
![]() Anne-Marie wrote:
Anne-Marie wrote:
Det står under OK att man ska sätta 4 markörer i arbetet utan att sticka maskorna. Ska dessa maskor inte stickas i nästa varv?
26.09.2023 - 09:54DROPS Design answered:
Hej Anne-Marie, jo det er når du sætter markørerne at du ikke strikker ... Alle masker skal strikkes når du har sat markørerne :)
26.09.2023 - 15:50
![]() Mirjam wrote:
Mirjam wrote:
Moet je bij de pas voor de raglan de ene tour meerderen, en de volgende toer alleen rondbreien? Of iedere tour meerderen?
13.04.2023 - 16:17DROPS Design answered:
Dag Mirjam,
Klopt je meerdert de ene naald wel en de andere naald niet. Om de naald dus.
14.04.2023 - 21:16
![]() Valencia wrote:
Valencia wrote:
After placing markers - what length of 3mm needles do you switch to?
22.08.2022 - 02:00DROPS Design answered:
Hi Valencia, Depending on the size you are working, you could continue with a short circular needle and switch to a longer needle when necessary, or change to a longer circular needle straight away. If the stitches are stretched when working in the round it is a good ides to keep using a shorter needle. Happy knitting!
22.08.2022 - 06:59
![]() Valencia wrote:
Valencia wrote:
After placing the 4 markers the pattern states to switch to size 3mm needles but does not state what length. Is it the 40cm or 60/80 cm?
22.08.2022 - 01:58DROPS Design answered:
Dear Valencia, change to the shorter needle, ie 40 cm, you will then use the 60/80 cm later when you will have increased enough stitches. Happy knitting!
22.08.2022 - 10:06
![]() Martina wrote:
Martina wrote:
Can you tell me what the purpose is for increasing that many Stiches one row before the rib 2 knit 2 purl?
08.06.2021 - 01:12DROPS Design answered:
Dear Martina, the stitches are increased so the ribbing would not pull the piece in so much. Happy Knitting!
08.06.2021 - 03:41
![]() Hennie wrote:
Hennie wrote:
Goedemorgen, Als beginnend breister kom ik niet uit de volgende beschrijving bij het switchen naar naald 3 mm: Brei in tricotsteek in de rondte, Begin TEGELIJKERTIJD op de 2e naald met meerderen voor de RAGLAN‘ Mijn vraag: begin ik gelijk met 3 mm met meerderen of pas na een ‘gewone’ naald op de 2e naald. Vriendelijke groet, Hennie
24.04.2021 - 10:59DROPS Design answered:
Dag Hennie,
Je breit eerst 1 naald met 3 mm, Dan op de tweede naald waarin je de 3 mm naald gebruikt, begin je met het meerderen voor de RAGLAN. Je breit dus eerst 1 naald zonder meerderingen.
25.04.2021 - 18:01
|
|
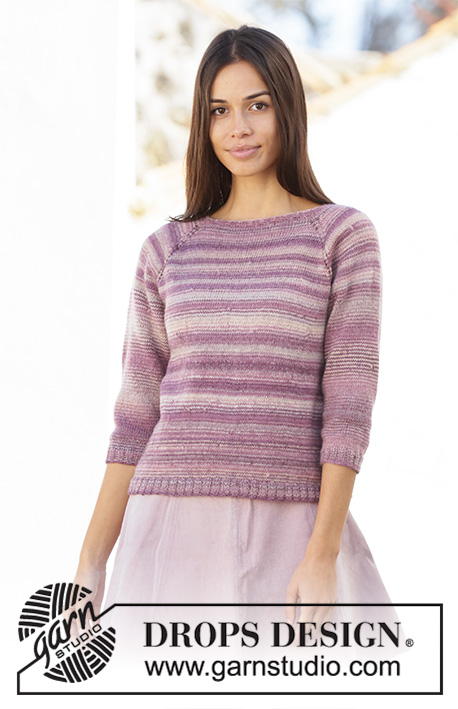
Lonely Horizon#lonelyhorizontop |
|
 |
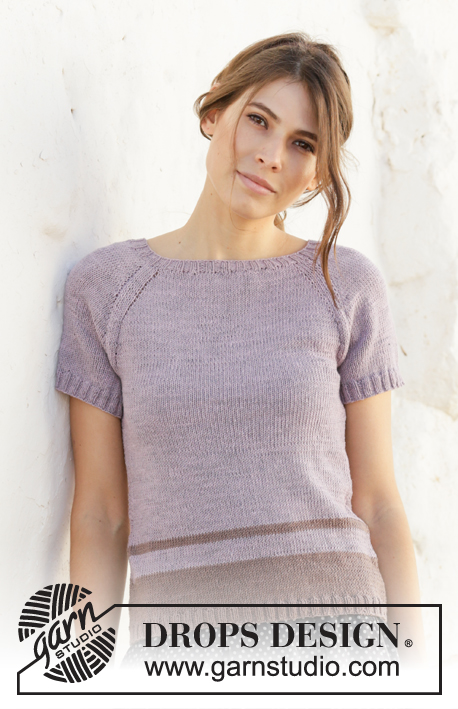 |
Knitted top in DROPS BabyMerino. Piece is knitted top down with raglan and stripes. Size: S - XXXL
DROPS 201-15 |
|
|
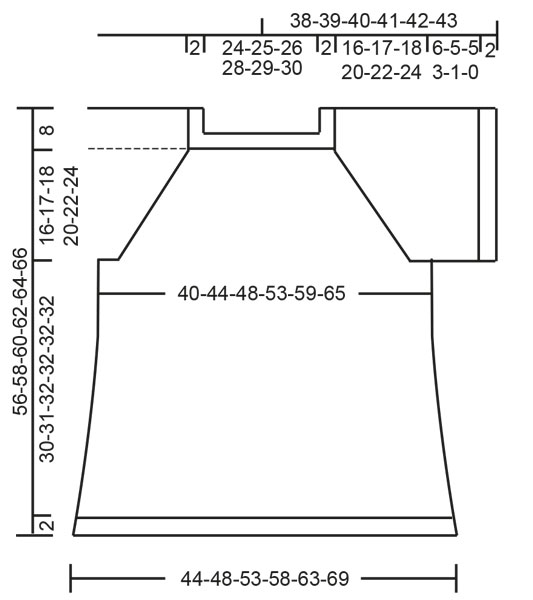
---------------------------------------------------------- EXPLANATION FOR THE PATTERN: ---------------------------------------------------------- INCREASE TIP-1 (evenly): To calculate how to increase evenly, use the total number of stitches on row (e.g. 144 stitches) and divide stitches by number of increases to be done (e.g. 8) = 18. In this example increase by making 1 yarn over after every 18th stitch. On next round knit yarn over twisted to avoid holes. RAGLAN: Increase for raglan in every transition between sleeves and body as follows: Work until 2 stitches remain before marker thread, make 1 yarn over, knit 4 (marker thread is in the middle of these 4 stitches), make 1 yarn over (= 2 stitches increased). On next round knit yarn overs twisted to avoid holes. Then work the new stitches in stocking stitch. Increase 8 stitches in total on every increase round. INCREASE TIP-2 (applies to increase in the sides of body): Work until 2 stitches remain before marker, make 1 yarn over, knit 4 (marker thread is in the middle of these 4 stitches), make 1 yarn over (= 2 stitches increased). On next round knit yarn overs twisted to avoid holes. Then work the increased stitches in stocking stitch. Increase 4 stitches in total on every increase round. STRIPES: 4-4-4-5-5-5 rounds with beige. 10-10-10-10-12-12 rounds with purple orchid. Then work with beige until finished measurements. ---------------------------------------------------------- START THE PIECE HERE: ---------------------------------------------------------- TOP - SHORT OVERVIEW OF THE PIECE: Yoke and body are worked in the round on circular needle, top down. Work sleeve edge in the round on double pointed needles/a short circular needle, top down. YOKE: Cast on 144-148-156-160-168-176 stitches on a short circular needle size 2.5 mm with purple orchid. Knit 1 round. Work rib = knit 2/purl 2 for 2 cm. Then knit 1 round while increasing 8-4-4-8-4-4 stitches evenly - read INCREASE TIP-1 = 152-152-160-168-172-180 stitches. Insert 4 marker threads in piece without working stitches as follows: First marker thread at beginning of round, second marker thread after 48-48-52-56-58-62 stitches (= back piece), third marker thread after another 28 stitches (= sleeve), fourth marker thread after 48-48-52-56-58-62 stitches (= front piece), 28 stitches now remain until first marker thread (= sleeve). Switch to circular needle size 3 mm. Work in stocking stitch in the round, AT THE SAME TIME on 2nd round begin increase for RAGLAN – see explanation above. Increase like this every other round 18-23-26-29-32-36 times in total. REMEMBER THE KNITTING TENSION! After last increase there are 296-336-368-400-428-468 stitches on needle. Work without increases until piece measures 18-19-20-22-24-26 cm from cast-on edge. Work next round as follows: Knit 85-95-104-115-125-138 (= back piece), slip the next 62-72-80-84-86-92 stitches on 1 stitch holder for sleeve, cast on 10-10-12-12-14-14 new stitches on needle (= in the side under sleeve), knit 86-96-104-116-128-142 (= front piece), slip the next 62-72-80-84-86-92 stitches on 1 stitch holder for sleeve, cast on 10-10-12-12-14-14 new stitches on needle (= in the side under sleeve) and work the last 1-1-0-1-3-4 stitches (= back piece). Cut the yarn. Finish body and sleeves separately. NOW MEASURE THE PIECE FROM HERE! BODY: = 192-212-232-256-284-312 stitches. Insert 1 marker thread in each side, in the middle of the 10-10-12-12-14-14 stitches that were cast on under each sleeve. Move the marker threads upwards when working; they should be used for increase later. Begin round at one of the marker threads and continue in stocking stitch. When piece measures 12-13-14-14-14-14 cm from division, increase 1 stitch on each side of both marker threads - read INCREASE TIP-2. Increase like this every 4 cm 5 times in total = 212-232-252-276-304-332 stitches. AT THE SAME TIME when piece measures 20-21-21-21-20-20 cm from division, work STRIPES - read explanation above. When piece measures 30-31-32-32-32-32 cm from division, increase 40-44-48-52-60-64 stitches evenly = 252-276-300-328-364-396 stitches. Switch to circular needle size 2.5 mm. Work rib = knit 2/purl 2 for 2 cm. Loosely cast off stitches with knit over knit and purl over purl. To avoid a tight cast-off edge you may use circular needle size 3 mm. Top measures approx. 56-58-60-62-64-66 cm from shoulder and down. SLEEVE EDGE: Slip the 62-72-80-84-86-92 stitches from stitch holder in one side of piece on a short circular needle/double pointed needles size 3 mm and pick in addition up 1 stitch in each of the 10-10-12-12-14-14 stitches cast on under sleeve = 72-82-92-96-100-106 stitches. Insert 1 marker thread in the middle of the 10-10-12-12-14-14 stitches under sleeve and move the marker thread upwards when working. Marker thread marks the beginning of round. Begin round at the marker thread and work stocking stitch in the round with purple orchid. When piece measures 6-5-5-3-1-0 cm from division, increase 12-14-16-16-20-18 stitches evenly = 84-96-108-112-120-124 stitches. Switch to circular needle size 2.5 mm. Work rib = knit 2/purl 2 for 2 cm. Loosely cast off stitches with knit over knit and purl over purl. To avoid a tight cast-off edge you may use needles size 3 mm. Work the other sleeve edge the same way. |
|
 |
|
Have you finished this pattern?Tag your pictures with #dropspattern #lonelyhorizontop or submit them to the #dropsfan gallery. Do you need help with this pattern?You'll find 23 tutorial videos, a Comments/Questions area and more by visiting the pattern on garnstudio.com. © 1982-2026 DROPS Design A/S. We reserve all rights. This document, including all its sub-sections, has copyrights. Read more about what you can do with our patterns at the bottom of each pattern on our site. |
|


With over 40 years in knitting and crochet design, DROPS Design offers one of the most extensive collections of free patterns on the internet - translated to 17 languages. As of today we count 324 catalogues and 12290 patterns translated into English (UK/cm). 12290
We work hard to bring you the best knitting and crochet have to offer, inspiration and advice as well as great quality yarns at incredible prices! Would you like to use our patterns for other than personal use? You can read what you are allowed to do in the Copyright text at the bottom of all our patterns. Happy crafting!
Post a comment to pattern DROPS 201-15
We would love to hear what you have to say about this pattern!
If you want to leave a question, please make sure you select the correct category in the form below, to speed up the answering process. Required fields are marked *.