
Popular categories
Looking for a yarn?


Comments / Questions (79)
![]() Connie wrote:
Connie wrote:
Hej. Jeg strikker den i str xxl. Skal mønstre A2+A3+A4 strikkes 2 gange i højden ? Eller skal det kun strikkes en gang i højden ?
02.08.2021 - 19:48DROPS Design answered:
Hej Connie, du strikker A2, A3, A4 2 gange i højden, så du har 93 masker inden du strikker A5, A6 og A7 :)
05.08.2021 - 13:26
![]() Lill Ann wrote:
Lill Ann wrote:
Temmelig tungvint forklaring på mønsteret,fra a5-7,må da kunne gjøre dette enklere å forstå, med andre skisser osv😏😏😏
01.08.2021 - 15:15
![]() Heid Hanssen wrote:
Heid Hanssen wrote:
Strikker str.L-XL. Holder på med mønster A5-A3x4-A7. Når jeg er ferdig med omgang 14 i mønster A5 og A7 så er jeg ferdig med raglanøkningene, og da begynner jeg med det fell og hullmønsteret i starten av av omgang A5 og i slutten av A7. Det står ingenting i mønsteret om hvorvidt denne starten og slutten skal gjøres også på front og bakstykke der det er glattstrikking, men jeg vil anta at det også skal gjøres der eller tar jeg feil ?
07.07.2021 - 23:00DROPS Design answered:
Hej Heid, jo samtidig som du strikker sidste pind i A.7 (glatstrik i din størrelse) strikkes omgangen ifølge ALLE STØRRELSER og arbejdet deles så ærmemaskerne sættes på en tråd. God fornøjelse!
14.07.2021 - 10:43
![]() Susanne Hansen wrote:
Susanne Hansen wrote:
Er det korrekt at diagram A5 starter i raglanudtagningen ?
05.07.2021 - 09:27DROPS Design answered:
Hej Susanne, nej du bør være færdig med raglanudtagningerne når du starter A.5 og A.7. God fornøjelse!
07.07.2021 - 08:15
![]() Susanne Hansen wrote:
Susanne Hansen wrote:
A3 skal da kun strikkes over 12 m, ikke 24 m ? (Hulmønster ærme str S)
30.06.2021 - 11:11
![]() Susanne Hansen wrote:
Susanne Hansen wrote:
Strikker str S. Hulmønster ærme: A3 strikkes over 2 rapporter. Er dette ikke kun gældende på første p, ellers kommer der da til at mangle 12 m ?
30.06.2021 - 10:52DROPS Design answered:
Hej Susanne, yderste maske i hver side af de 23 masker indgår i raglan forklaringen. De øvrige 21 masker strikkes som første pind i A.1. På næste omgang har du fået en ny maske (fra raglanudtagningen) det er den du ser i hver side af 2.pind i A.1 (du starter diagrammet fra nederste højre hjørne) God fornøjelse!
30.06.2021 - 13:37
![]() Astrid wrote:
Astrid wrote:
Hei! Strikker i str S, og ved A5-A7 skal man være ferdig med raglan. På starten og slutten av ermene er det felling og hullmønster. På bildet ser det ut som det fortsett er hullmønster på starten og slutten av bak-og forstykket også, men ser ikke noe i oppskriften om det. Skal jeg da ordne hull, også felle rett etterpå der også? Slik at det blir hullmønster på hver side av merkemaskene.
10.06.2021 - 19:35DROPS Design answered:
Hei Astrid. Raglan: Det økes 2 masker ved hver merketråd og totalt 8 masker på omgangen. På neste omgang strikkes kastene rett slik at det blir hull = Hullmønster på hver side av "raglanlinjen", i tillegg kommer hullmønstret fra diagrammene. mvh DROPS design
14.06.2021 - 10:20
![]() Griet wrote:
Griet wrote:
Heel veel bedankt!
15.05.2021 - 21:51
![]() Griet wrote:
Griet wrote:
Sorry, maar ik begrijp nog niet goed of ik elke naald een raglanmeerdering moet maken of niet. Als ik het telpatroon bekijk is het eerst 21 st , dan 2 maal 23 st enz. Dus vermoed ik dat ik om de tweede naald pas een meerdering moet doen.
13.05.2021 - 19:45DROPS Design answered:
Dag Griet,
Je meerdert op iedere andere naald (dus de ene naald wel en de andere naald niet) voor de raglan en dat doe je 25-25-31-31-37-37 keer in totaal.
15.05.2021 - 14:57
![]() Griet wrote:
Griet wrote:
Je moet 23 steken voor de mouw markeren en daarna over 21 steken het patroon A1 breien, dan heb je er toch 2 teveel? En het meerderen voor de raglan, is dit elke naald of telkens een naald overslaan? Alvast bedankt
10.05.2021 - 12:14DROPS Design answered:
Dag Griet,
Je meerdert aan het begin en het einde ook voor de raglan, waardoor je die 2 steken nodig hebt. Dus 1 recht, 1 omslag (= meerdering voor de raglan), 21 steken in patroon, 1 omslag, 1 recht (= raglanmeerdering).
12.05.2021 - 20:54
|
|||||||||||||
Rivage Top#rivagetop |
|||||||||||||
 |
 |
||||||||||||
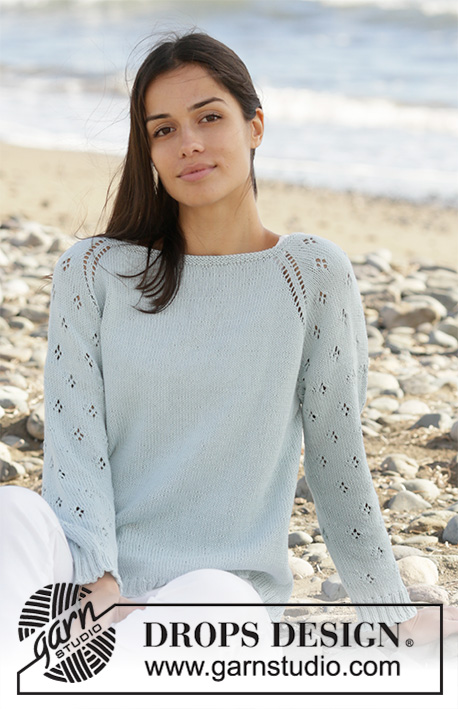
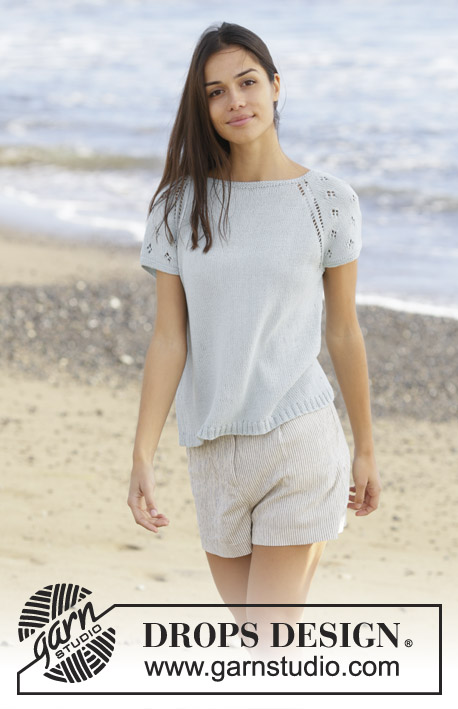
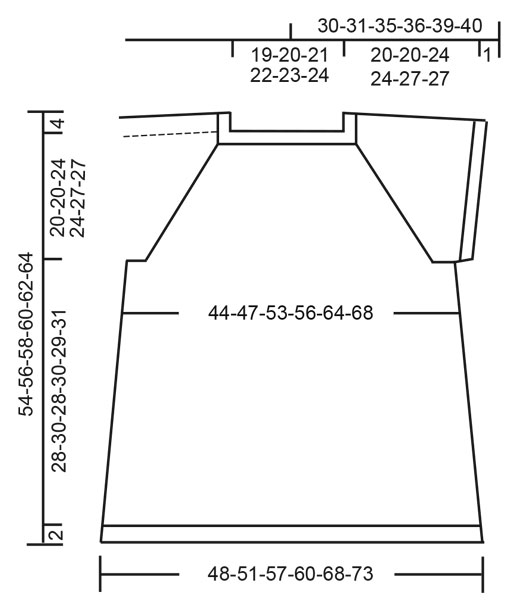
Knitted top with raglan in DROPS Safran. Piece is knitted top down with lace pattern on sleeves. Size: S - XXXL
DROPS 199-23 |
|||||||||||||
|
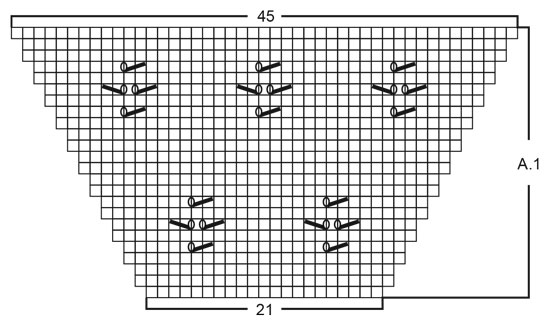
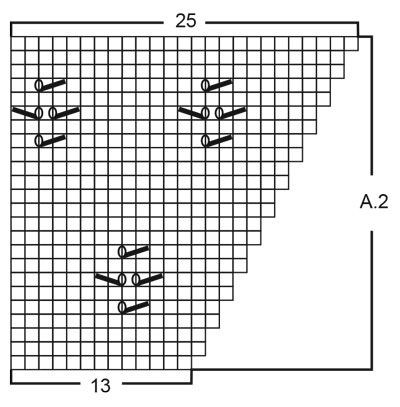
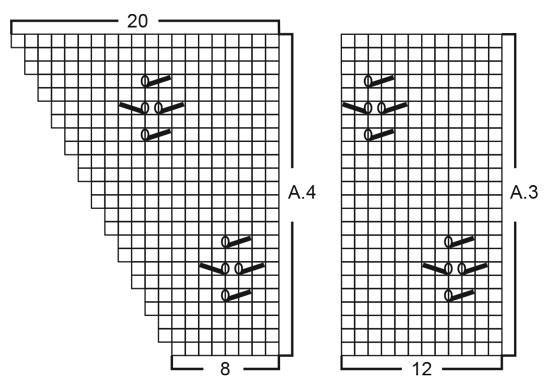
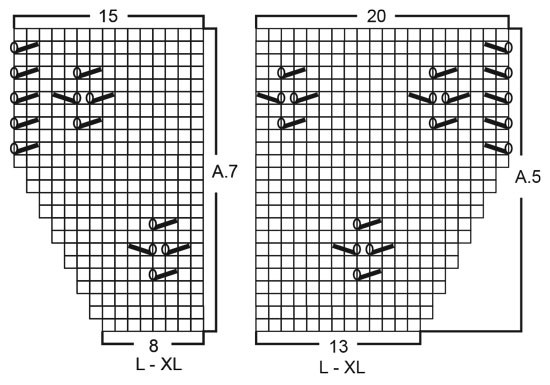
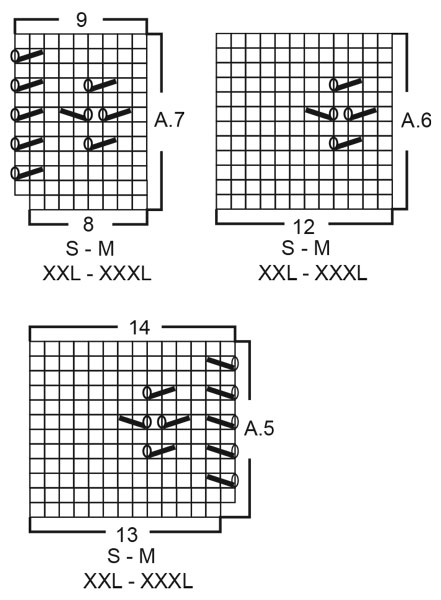
---------------------------------------------------------- EXPLANATION FOR THE PATTERN: ---------------------------------------------------------- GARTER STITCH (worked in the round): 1 ridge vertically = 2 rounds, i.e. knit 1 round and purl 1 round. PATTERN: See diagrams A.1 to A.7. Choose diagram for your size (applies to A.5, A.6 and A.7). INCREASE TIP-1 (evenly): To calculate how to increase evenly, use the total number of stitches on row (e.g. 124 stitches) and divide stitches by number of increases to be done (e.g. 26) = 4.8. In this example increase by making 1 yarn over after approx. every 5th stitch. On next round knit yarn overs twisted to avoid holes. RAGLAN: Increase for raglan in every transition between front/back piece and sleeves as explained below: Increase after the marker thread like this: knit 1, make 1 yarn over. Increase before the marker thread like this: work until 1 stich remain before the marker thread, make 1 yarn over, knit 1. You increase 2 stitches at each marked thread, and a total of 8 stitches on the round. On next round knit the yarn overs to make holes. Then work the new stitch in stocking stitch on body and in lace pattern on sleeves. INCREASE TIP-2 (applies to sides of body): Work until 3 stitches remain before marker thread, make 1 yarn over, knit 6 (marker thread is in the middle of these 6 stitches), make 1 yarn over (= 2 stitches increased at the marker thread and 4 stitches increased in total on round.) On next round knit yarn overs twisted to avoid holes. Then work the new stitches in stocking stitch. ---------------------------------------------------------- START THE PIECE HERE: ---------------------------------------------------------- TOP - SHORT OVERVIEW OF THE PIECE: Neck edge and yoke are worked in the round on circular needle, top down. Divide yoke for body and sleeve edges. Continue body in the round, top down. Work sleeve edges in the round on double pointed needles, top down. NECK EDGE: Cast on 120-124-128-132-138-146 stitches on circular needle size 2.5 mm with Safran. Work 3 ridges in GARTER STITCH in the round - read explanation above. Knit 1 round while increasing 6-26-22-38-32-44 stitches evenly - read INCREASE TIP-1 = 126-150-150-170-170-190 stitches. Knit 1 round (knit yarn overs twisted). Then work yoke as explained below. YOKE: Switch to circular needle size 3 mm. Insert 4 marker threads in piece as explained below (without working the stitches). Use marker threads later when increasing for raglan. Insert 1 marker thread at beginning of round, count 23 stitches (= sleeve), insert 1 marker before next stitch, count 40-52-52-62-62-72 stitches (= front piece), insert 1 marker thread before next stitch, count 23 stitches (= sleeve), insert 1 marker thread before next stitch. There are 40-52-52-62-62-72 stitches after last marker thread on back piece. Work first round as follows: increase for RAGLAN after the marker thread – read explanation above, work A.1 over the next 21 stitches (= sleeve), increase for raglan on each side of marker thread, work in stocking stitch until 1 stitch remains before next marker thread (= front piece), increase for raglan on each side of marker thread, work A.1 over the 21 stitches (= sleeve), increase for raglan on each side of marker thread, work in stocking stitch until 1 stitch remain before marker thread at the beginning of round (=back piece), increase for raglan before marker thread. Continue pattern like this in stocking stitch on front and back piece and A.1 on sleeves. REMEMBER THE KNITTING TENSION! AT THE SAME TIME continue increase for raglan every other round until increase has been done 25-25-31-31-37-37 times in total at every marker thread (including increase explained on first round). Work the new stitch in stocking stitch on front and back piece and in lace pattern the way diagrams show on sleeves. When A.1 has been worked 1 time vertically, continue lace pattern on sleeves as explained below: LACE PATTERN SLEEVE: SIZE S and M: When A.1 has been worked 1 time vertically, work next round as follows over stitches on sleeves: Work A.2 (= 13 stitches), work A.3 over the next 24 stitches (= 2 repetition of 12 stitches), and finish with A.4 (= 8 stitches). When A.2 to A.4 have been worked 1 time vertically, work next round as follows over stitches on sleeves: Work A.5 (= 13 stitches), work A.6 over the next 48 stitches (= 4 repetition of 12 stitches), and finish with A.7 (= 8 stitches). When last row in A.5 to A.7 remain, divide yoke for body and sleeves as explained below ALL SIZES. SIZE L and XL: When A.1 has been worked 1 time vertically, work next round as follows over stitches on sleeves: Work A.2 (= 13 stitches), work A.3 over the next 24 stitches (= 2 repetition of 12 stitches), and finish with A.4 (= 8 stitches). When A.2 to A.4 have been worked 1 time vertically, work next round as follows over stitches on sleeves: Work A.5 (= 13 stitches), work A.3 over the next 48 stitches (= 4 repetition of 12 stitches), and finish with A.7 (= 8 stitches). When last row in A.5 to A.7 remain, divide yoke for body and sleeves as explained below ALL SIZES. SIZE XXL and XXXL: When A.1 has been worked 1 time vertically, work next round as follows over stitches on sleeves: Work A.2 (= 13 stitches), work A.3 over the next 24 stitches (= 2 repetition of 12 stitches), and finish with A.4 (= 8 stitches). When A.2 to A.4 have been worked 1 time vertically, work next round as follows over stitches on sleeves: Work A.2 (= 13 stitches), work A.3 over the next 48 stitches (= 4 repetition of 12 stitches), and finish with A.4 (= 8 stitches). When A.2 to A.4 have been worked, work next round as follows over stitches on sleeves: Work A.5 (= 13 stitches), work A.6 over the next 72 stitches (= 6 repetition of 12 stitches), and finish with A.7 (= 8 stitches). When last row in A.5 to A.7 remain, divide yoke for body and sleeves as explained below ALL SIZES. ALL SIZES: When increases for raglan are done, there are 326-350-398-418-466-486 stitches on round. Continue lace pattern as explained above until last row in A.5 and A.7 remains. Now divide yoke for body and sleeves and work last round as follows: Knit 4-1-2-0-4-3, slip the next 65-71-81-85-89-91 stitches on 1 stitch holder for sleeve, cast on 8-8-8-10-10-12 new stitches on needle (= in the side under sleeve), knit the next 98-104-118-124-144-152 stitches (= front piece), slip the next 65-71-81-85-89-91 stitches on 1 stitch holder for sleeve, cast on 8-8-8-10-10-12 new stitches on needle (= in the side under sleeve) and knit the remaining 94-103-116-124-140-149 stitches (= back piece). Yoke measures now approx. 20-20-24-24-27-27 cm from cast-on edge mid front. Remove all marker threads in piece and cut the yarn. Now finish body and sleeves separately. NOW MEASURE THE PIECE FROM HERE! BODY: = 212-224-252-268-308-328 stitches. Insert 1 marker thread in each side on body, in the middle of the 8-8-8-10-10-12 stitches that were cast on under sleeves. Move marker threads upwards when working. Use them later when increasing in the sides. Begin round at one of the marker threads and work stocking stitch in the round. When piece measures 4 cm from division in all sizes, increase 1 stitch on each side of both markers - READ INCREASE TIP-2 (= 4 stitches increased). Increase like this every 5 cm 5 times in total in all sizes = 232-244-272-288-328-348 stitches. Work until piece measures approx. 28-30-28-30-29-31 cm from division (or desired length, approx. 2 cm remain until finished measurements). Knit 1 round while increasing 56-60-68-72-80-84 stitches evenly = 288-304-340-360-408-432 stitches. This is done to avoid the rib to be worked, from contracting. Switch to circular needle size 2.5 mm. Work rib in the round = knit 2/purl 2 for 2 cm. Cast off stitches with knit over knit and purl over purl. Top measures approx. 54-56-58-60-62-64 cm from shoulder and down. SLEEVE EDGES: Slip the 65-71-81-85-89-91 stitches from stitch holder in one side of piece on double pointed needles size 2.5 mm and pick in addition up 1 stitch in each of the 8-8-8-10-10-12 new stitches cast on under sleeve = 73-79-89-95-99-103 stitches. Work 3 ridges in the round. Cast off by knitting. Work the other sleeve edge the same way. |
|||||||||||||
Diagram explanations |
|||||||||||||
|
|||||||||||||
 |
|||||||||||||
 |
|||||||||||||
 |
|||||||||||||
 |
|||||||||||||
 |
|||||||||||||
 |
|||||||||||||
Have you finished this pattern?Tag your pictures with #dropspattern #rivagetop or submit them to the #dropsfan gallery. Do you need help with this pattern?You'll find 23 tutorial videos, a Comments/Questions area and more by visiting the pattern on garnstudio.com. © 1982-2026 DROPS Design A/S. We reserve all rights. This document, including all its sub-sections, has copyrights. Read more about what you can do with our patterns at the bottom of each pattern on our site. |
|||||||||||||


With over 40 years in knitting and crochet design, DROPS Design offers one of the most extensive collections of free patterns on the internet - translated to 17 languages. As of today we count 324 catalogues and 12245 patterns translated into English (UK/cm). 12245
We work hard to bring you the best knitting and crochet have to offer, inspiration and advice as well as great quality yarns at incredible prices! Would you like to use our patterns for other than personal use? You can read what you are allowed to do in the Copyright text at the bottom of all our patterns. Happy crafting!
Post a comment to pattern DROPS 199-23
We would love to hear what you have to say about this pattern!
If you want to leave a question, please make sure you select the correct category in the form below, to speed up the answering process. Required fields are marked *.