
Popular categories
Looking for a yarn?


Comments / Questions (79)
![]() Anneke Hommersom wrote:
Anneke Hommersom wrote:
Vraagje: moet er voor de raglan elke naald gemeerderd worden of om de naald? Dat kan ik niet goed vinden bij de uitleg.
31.05.2025 - 13:29DROPS Design answered:
Dag Anneke,
Je meerdert voor de raglan om de naald, dus de ene naald wel en de andere naald niet.
01.06.2025 - 10:05
![]() Eleni Andreopoulou wrote:
Eleni Andreopoulou wrote:
How do i knit this pattern with straight needles?
29.05.2025 - 07:56DROPS Design answered:
Dear Mrs Andreopoulou, you will find some explanation on how to adapt a pattern for straight needles here. Happy knitting!
30.05.2025 - 08:41
![]() Ilona wrote:
Ilona wrote:
Po dodaniu 37 o reglanu z każdej strony tyłu i przodu / mam 37 dziurek/, liczba oczek tylu/ przodu wynosi 144 a liczba oczek rękawów to 95. Na tyl/przód mam mieć po 152 oczka. Nawet jak na tyl/przód "zabiorę" z rękawów po 4 oczka / bo na rękawy mam zdjąć po 91 oczek/ to i tak brakuje mi 4 oczka do tylu/przodu. Wyjściowa liczba oczek się zgadza, bo zgodnie z opisem umieściłam markery Pozdrawiam Ilona
15.05.2025 - 15:36DROPS Design answered:
Witaj Ilono, to wygląda jakby zabrakło 1 okrążenia z dodawaniem oczek na reglan. Jak karczek nie jest zbyt długi, to ja bym dodała 8 o. w okrążeniu i byłoby już ok. Pozdrawiam!
15.05.2025 - 17:26
![]() Ilona wrote:
Ilona wrote:
Powinno być zakończone, ale nie mam odpowiedniej liczby oczek na tył/ przód 😭. Spróbuję jeszcze raz zrobić od początku. Bardzo dziękuję za odpowiedź. Pozdrawiam
15.05.2025 - 11:02DROPS Design answered:
Ilono, ile oczek Ci brakuje?
15.05.2025 - 11:16
![]() Ilona wrote:
Ilona wrote:
Xxl-xxxl
15.05.2025 - 09:12DROPS Design answered:
Witaj Ilono, ze schematów wynika, że jak zaczynasz przerabiać 3-ci rząd schematów A.5-A.7, to dodawanie oczek na reglan jest już zakończone (37 powtórzeń). Już nie dodajesz oczka za markerem na początku okrążenia i dalej w miejscu nitek markerów, tylko przerabiasz schematy jak w opisie. Pozdrawiamy!
15.05.2025 - 10:17
![]() Ilona wrote:
Ilona wrote:
Czy zaczynając 3 rząd schematu A5 narzut jest po 1 oczku reglanu? Mam odpowiednią liczbę oczek /95/ i jak robię 1o reglanu, narzut, 2o razem itd wg schematu, to na końcu rzędu rękawa brakuje mi oczek Dziękuję i pozdrawiam Ilona
15.05.2025 - 00:00DROPS Design answered:
Witaj Ilono, który rozmiar wykonujesz?
15.05.2025 - 08:35
![]() Susan Habegger wrote:
Susan Habegger wrote:
Where are the videos to help k it this?
07.05.2025 - 04:07DROPS Design answered:
Hi Susan, All our videos are listed under Tips and Help at the top of the page. They are not always specific to one pattern but show all the techniques (such as working raglan) you will need to complete your project. Regards, Drops Team
07.05.2025 - 06:36
![]() Susan Habegger wrote:
Susan Habegger wrote:
Where are the videos to help on this top?
07.05.2025 - 04:06
![]() Susan Habegger wrote:
Susan Habegger wrote:
Where are the tutorial videos for pattern 199-23
06.05.2025 - 22:09DROPS Design answered:
Dear Mrs Habegger, find free pattern in English with measurements in inches/cm here. You'll find some videos related to this pattern unter tab "Videos" next to the tab "Pattern", note that there is no specific video to that pattern. Happy knitting!
07.05.2025 - 09:02
![]() Susanne Moosmann wrote:
Susanne Moosmann wrote:
Hallo! Wenn im Ärmel der Abschnitt A.5 bis A.7 gestrickt wird, wird dann auf den 2 Rumpfelementen immer noch zugenommen oder nur noch rechts gestrickt? Danke für eine Antwort. Schöne Grüße Susanne
04.05.2025 - 21:42DROPS Design answered:
Liebe Frau Moosmann, am Anfang A.5 und A.7 wird es noch zugenommen (nur einmal in S, M, XXL und XXXL und mehr in L und XL), aber bei den letzten Reihen A.5/A.7 wird es nicht mehr zugenommen da die Zunahmen für die Ärmel fertig sind, so strickt man aber das Lochmuster am Anfang A.5/am Ende A.7 damit das Lochmuster vom Raglan forsetzt. Viel Spaß beim Stricken!
05.05.2025 - 08:42
|
|||||||||||||
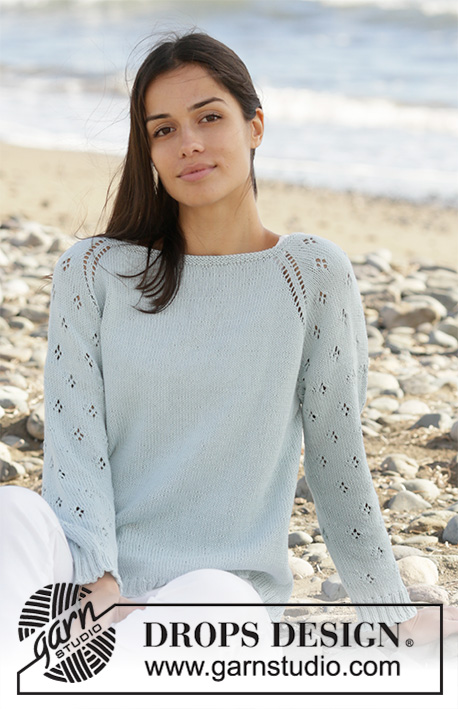
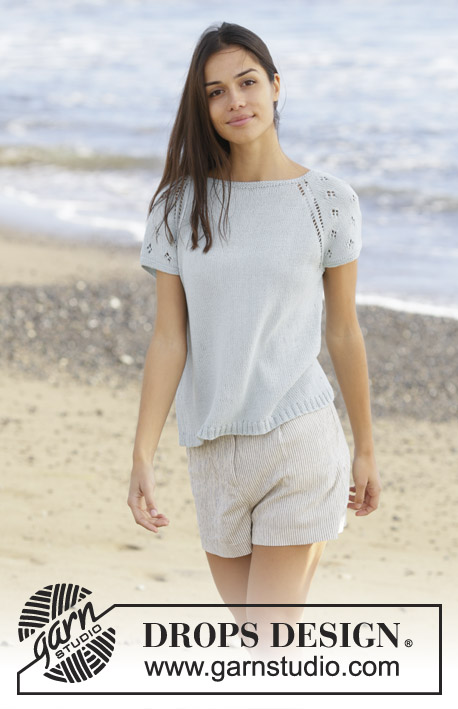
Rivage Top#rivagetop |
|||||||||||||
 |
 |
||||||||||||
Knitted top with raglan in DROPS Safran. Piece is knitted top down with lace pattern on sleeves. Size: S - XXXL
DROPS 199-23 |
|||||||||||||
|
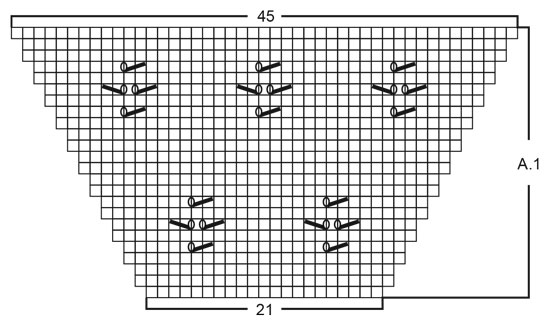
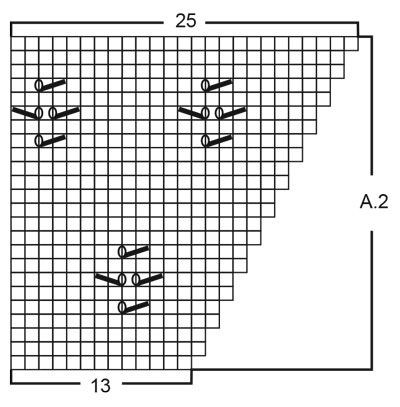
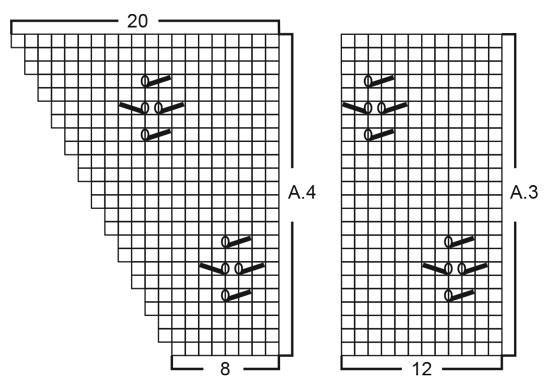
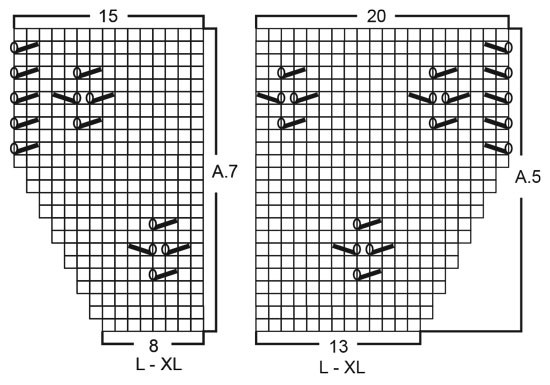
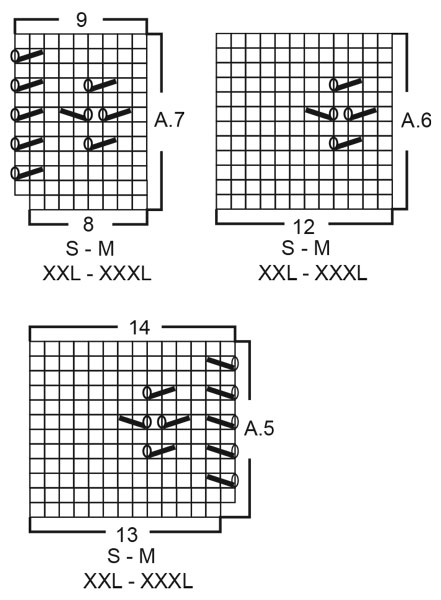
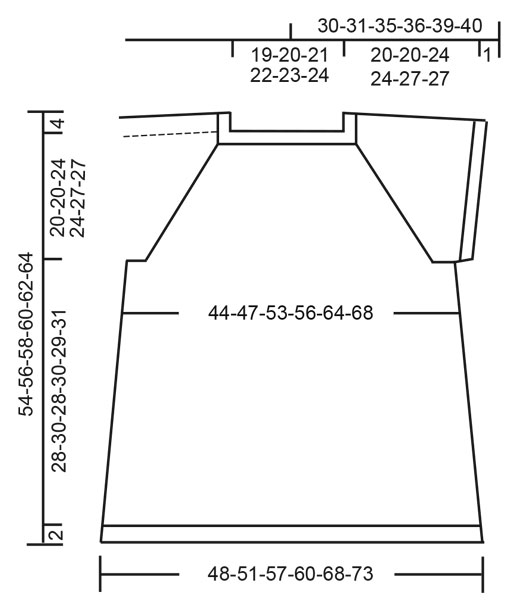
---------------------------------------------------------- EXPLANATION FOR THE PATTERN: ---------------------------------------------------------- GARTER STITCH (worked in the round): 1 ridge vertically = 2 rounds, i.e. knit 1 round and purl 1 round. PATTERN: See diagrams A.1 to A.7. Choose diagram for your size (applies to A.5, A.6 and A.7). INCREASE TIP-1 (evenly): To calculate how to increase evenly, use the total number of stitches on row (e.g. 124 stitches) and divide stitches by number of increases to be done (e.g. 26) = 4.8. In this example increase by making 1 yarn over after approx. every 5th stitch. On next round knit yarn overs twisted to avoid holes. RAGLAN: Increase for raglan in every transition between front/back piece and sleeves as explained below: Increase after the marker thread like this: knit 1, make 1 yarn over. Increase before the marker thread like this: work until 1 stich remain before the marker thread, make 1 yarn over, knit 1. You increase 2 stitches at each marked thread, and a total of 8 stitches on the round. On next round knit the yarn overs to make holes. Then work the new stitch in stocking stitch on body and in lace pattern on sleeves. INCREASE TIP-2 (applies to sides of body): Work until 3 stitches remain before marker thread, make 1 yarn over, knit 6 (marker thread is in the middle of these 6 stitches), make 1 yarn over (= 2 stitches increased at the marker thread and 4 stitches increased in total on round.) On next round knit yarn overs twisted to avoid holes. Then work the new stitches in stocking stitch. ---------------------------------------------------------- START THE PIECE HERE: ---------------------------------------------------------- TOP - SHORT OVERVIEW OF THE PIECE: Neck edge and yoke are worked in the round on circular needle, top down. Divide yoke for body and sleeve edges. Continue body in the round, top down. Work sleeve edges in the round on double pointed needles, top down. NECK EDGE: Cast on 120-124-128-132-138-146 stitches on circular needle size 2.5 mm with Safran. Work 3 ridges in GARTER STITCH in the round - read explanation above. Knit 1 round while increasing 6-26-22-38-32-44 stitches evenly - read INCREASE TIP-1 = 126-150-150-170-170-190 stitches. Knit 1 round (knit yarn overs twisted). Then work yoke as explained below. YOKE: Switch to circular needle size 3 mm. Insert 4 marker threads in piece as explained below (without working the stitches). Use marker threads later when increasing for raglan. Insert 1 marker thread at beginning of round, count 23 stitches (= sleeve), insert 1 marker before next stitch, count 40-52-52-62-62-72 stitches (= front piece), insert 1 marker thread before next stitch, count 23 stitches (= sleeve), insert 1 marker thread before next stitch. There are 40-52-52-62-62-72 stitches after last marker thread on back piece. Work first round as follows: increase for RAGLAN after the marker thread – read explanation above, work A.1 over the next 21 stitches (= sleeve), increase for raglan on each side of marker thread, work in stocking stitch until 1 stitch remains before next marker thread (= front piece), increase for raglan on each side of marker thread, work A.1 over the 21 stitches (= sleeve), increase for raglan on each side of marker thread, work in stocking stitch until 1 stitch remain before marker thread at the beginning of round (=back piece), increase for raglan before marker thread. Continue pattern like this in stocking stitch on front and back piece and A.1 on sleeves. REMEMBER THE KNITTING TENSION! AT THE SAME TIME continue increase for raglan every other round until increase has been done 25-25-31-31-37-37 times in total at every marker thread (including increase explained on first round). Work the new stitch in stocking stitch on front and back piece and in lace pattern the way diagrams show on sleeves. When A.1 has been worked 1 time vertically, continue lace pattern on sleeves as explained below: LACE PATTERN SLEEVE: SIZE S and M: When A.1 has been worked 1 time vertically, work next round as follows over stitches on sleeves: Work A.2 (= 13 stitches), work A.3 over the next 24 stitches (= 2 repetition of 12 stitches), and finish with A.4 (= 8 stitches). When A.2 to A.4 have been worked 1 time vertically, work next round as follows over stitches on sleeves: Work A.5 (= 13 stitches), work A.6 over the next 48 stitches (= 4 repetition of 12 stitches), and finish with A.7 (= 8 stitches). When last row in A.5 to A.7 remain, divide yoke for body and sleeves as explained below ALL SIZES. SIZE L and XL: When A.1 has been worked 1 time vertically, work next round as follows over stitches on sleeves: Work A.2 (= 13 stitches), work A.3 over the next 24 stitches (= 2 repetition of 12 stitches), and finish with A.4 (= 8 stitches). When A.2 to A.4 have been worked 1 time vertically, work next round as follows over stitches on sleeves: Work A.5 (= 13 stitches), work A.3 over the next 48 stitches (= 4 repetition of 12 stitches), and finish with A.7 (= 8 stitches). When last row in A.5 to A.7 remain, divide yoke for body and sleeves as explained below ALL SIZES. SIZE XXL and XXXL: When A.1 has been worked 1 time vertically, work next round as follows over stitches on sleeves: Work A.2 (= 13 stitches), work A.3 over the next 24 stitches (= 2 repetition of 12 stitches), and finish with A.4 (= 8 stitches). When A.2 to A.4 have been worked 1 time vertically, work next round as follows over stitches on sleeves: Work A.2 (= 13 stitches), work A.3 over the next 48 stitches (= 4 repetition of 12 stitches), and finish with A.4 (= 8 stitches). When A.2 to A.4 have been worked, work next round as follows over stitches on sleeves: Work A.5 (= 13 stitches), work A.6 over the next 72 stitches (= 6 repetition of 12 stitches), and finish with A.7 (= 8 stitches). When last row in A.5 to A.7 remain, divide yoke for body and sleeves as explained below ALL SIZES. ALL SIZES: When increases for raglan are done, there are 326-350-398-418-466-486 stitches on round. Continue lace pattern as explained above until last row in A.5 and A.7 remains. Now divide yoke for body and sleeves and work last round as follows: Knit 4-1-2-0-4-3, slip the next 65-71-81-85-89-91 stitches on 1 stitch holder for sleeve, cast on 8-8-8-10-10-12 new stitches on needle (= in the side under sleeve), knit the next 98-104-118-124-144-152 stitches (= front piece), slip the next 65-71-81-85-89-91 stitches on 1 stitch holder for sleeve, cast on 8-8-8-10-10-12 new stitches on needle (= in the side under sleeve) and knit the remaining 94-103-116-124-140-149 stitches (= back piece). Yoke measures now approx. 20-20-24-24-27-27 cm from cast-on edge mid front. Remove all marker threads in piece and cut the yarn. Now finish body and sleeves separately. NOW MEASURE THE PIECE FROM HERE! BODY: = 212-224-252-268-308-328 stitches. Insert 1 marker thread in each side on body, in the middle of the 8-8-8-10-10-12 stitches that were cast on under sleeves. Move marker threads upwards when working. Use them later when increasing in the sides. Begin round at one of the marker threads and work stocking stitch in the round. When piece measures 4 cm from division in all sizes, increase 1 stitch on each side of both markers - READ INCREASE TIP-2 (= 4 stitches increased). Increase like this every 5 cm 5 times in total in all sizes = 232-244-272-288-328-348 stitches. Work until piece measures approx. 28-30-28-30-29-31 cm from division (or desired length, approx. 2 cm remain until finished measurements). Knit 1 round while increasing 56-60-68-72-80-84 stitches evenly = 288-304-340-360-408-432 stitches. This is done to avoid the rib to be worked, from contracting. Switch to circular needle size 2.5 mm. Work rib in the round = knit 2/purl 2 for 2 cm. Cast off stitches with knit over knit and purl over purl. Top measures approx. 54-56-58-60-62-64 cm from shoulder and down. SLEEVE EDGES: Slip the 65-71-81-85-89-91 stitches from stitch holder in one side of piece on double pointed needles size 2.5 mm and pick in addition up 1 stitch in each of the 8-8-8-10-10-12 new stitches cast on under sleeve = 73-79-89-95-99-103 stitches. Work 3 ridges in the round. Cast off by knitting. Work the other sleeve edge the same way. |
|||||||||||||
Diagram explanations |
|||||||||||||
|
|||||||||||||
 |
|||||||||||||
 |
|||||||||||||
 |
|||||||||||||
 |
|||||||||||||
 |
|||||||||||||
 |
|||||||||||||
Have you finished this pattern?Tag your pictures with #dropspattern #rivagetop or submit them to the #dropsfan gallery. Do you need help with this pattern?You'll find 23 tutorial videos, a Comments/Questions area and more by visiting the pattern on garnstudio.com. © 1982-2026 DROPS Design A/S. We reserve all rights. This document, including all its sub-sections, has copyrights. Read more about what you can do with our patterns at the bottom of each pattern on our site. |
|||||||||||||


With over 40 years in knitting and crochet design, DROPS Design offers one of the most extensive collections of free patterns on the internet - translated to 17 languages. As of today we count 324 catalogues and 12245 patterns translated into English (UK/cm). 12245
We work hard to bring you the best knitting and crochet have to offer, inspiration and advice as well as great quality yarns at incredible prices! Would you like to use our patterns for other than personal use? You can read what you are allowed to do in the Copyright text at the bottom of all our patterns. Happy crafting!
Post a comment to pattern DROPS 199-23
We would love to hear what you have to say about this pattern!
If you want to leave a question, please make sure you select the correct category in the form below, to speed up the answering process. Required fields are marked *.