
Popular categories
Looking for a yarn?


Comments / Questions (55)
![]() Maria wrote:
Maria wrote:
Ik begrijp het patroon na de top helemaal niet. Het begint met maten m, l en xxl. Ik brei met een rondbreinaald.
10.04.2026 - 15:26DROPS Design answered:
Dag Maria,
Helaas begrijp ik je vraag niet helemaal. Welke maat ben je aan het breien en bij welke paragraaf ben je precies? Je ze het aantal steken op voor jouw maat op rondbreinaald 2.5 mm.
11.04.2026 - 09:42
![]() Chantal wrote:
Chantal wrote:
Empiècement taille L je trouve 390 mailles et non 396 : A2 : 12 jetés ou augm. sur le 1er rang A3 : 8 fois 6 jetés ou augm. = 48 augm. Total : 60 augm. 330 +60 augmentations = 390 mailles Où se trouvent les 6 autres augm. Puisque le A4 n' en a pas ? Merci
16.03.2026 - 11:44DROPS Design answered:
Bonjour Chantal, avez vous pensé à augmenter dans les 11 premières mailles de A.3 et dans les 11 dernières mailles de A.3? Ainsi vous aurez bien: 2xA.2 (= 48 m) +4x A.3 (=4x28=112)+ 14 m de A.3 + 3 x A.2 (=24x3=72) + 14 m de A.3 + 4x A.3 (=4x28=112)+ 24 m de A.2 = 48+112+14+72+14+112+24=396 mailles. Bon tricot!
16.03.2026 - 16:33
![]() Maria wrote:
Maria wrote:
Geldt elk vakje van het patroon voor 2 naalden breien? Is er ook een video van de patroon of een gedeelte van het patroon?
14.03.2026 - 14:37DROPS Design answered:
Dag Maria,
Nee, alle naalden zijn aangegeven in het telpatroon, 1 vakje is dus 1 steek en 1 rij is 1 naald. Er is niet specifiek van dit patroon een video, maar bij het patroon staan wel video's waarin de verschillende technieken uitgelegd worden.
15.03.2026 - 10:08
![]() Ginette wrote:
Ginette wrote:
Comment faire pour que le tricot n'ai pas tendence a tourner vers la gauche lors du tricot en rond?
22.02.2026 - 14:38DROPS Design answered:
Bonjour Ginette, retrouvez en vidéo comment tricoter du jersey en rond, méthode nordique, US/anglaise ou continentale, cela pourra peut-être vous aider? Bon tricot!
23.02.2026 - 08:56
![]() Mousse wrote:
Mousse wrote:
Dès le début je suis perdue, je fais une taille M, vous dites de monter 153 m puis s’ajuster à 150m et pour ce faire rajouter 2m pour moi ça fait 155m. Des que je fais A1 le nombre de mailles ne collent pas
06.11.2025 - 18:05DROPS Design answered:
Bonjour Mousse, vous montez 153 m (en L, en M vous montez 148 m et vous augmenterez 2 m, cf. phrase suivante) et vous devez diminuer 2 m, je cite: en taille S, L et XL on diminue 4-3-1 mailles , la taille L est ici la 2ème taille, vous allez diminuer 3 m = il reste 150 m. Vous. A.1 se tricote sur 10 mailles, vous avez ainsi 150 mailles et vous pouvez tricoter 15 fois les 10 mailes de A.1. Bon tricot!
07.11.2025 - 08:00
![]() Schwarz Maria wrote:
Schwarz Maria wrote:
Wie kann ich dieses Top mit verkürzten Reihen am Halsausschnitt stricken. Dankeschön
27.06.2025 - 11:34DROPS Design answered:
Liebe Frau Schwarz, ja sicher, dieses Video kann Ihnen inspirieren. Viel Spaß beim Stricken!
27.06.2025 - 13:21
![]() Päivi wrote:
Päivi wrote:
Hei! Käytän yleensä vaatteissa kokoa XL. Voinko vaan valita ohjeesta koon XL?
19.06.2025 - 13:00DROPS Design answered:
Hei, löydät valmiin neuleen mitat ohjeen alareunassa olevasta mittapiirroksesta.
19.06.2025 - 17:45
![]() Danuta wrote:
Danuta wrote:
In size S, in the second paragraph under YOKE....what does it mean in line 6 when you say " When A.3 has been completed " ? Do you mean to say when Row 3 is completed ? I already have 328 stitches after completing Row 2 ie. A2/ A3,A3,A3,A3/ A2,A2,A2/ A3,A3,A3,A3/ A2,A2
18.06.2025 - 02:40DROPS Design answered:
Dear Danuta, on the first row A.2/A.3/A.4 you will increase 2 sts in each A.2 and 1 stitch in each A.3, so that you will increase 12 sts (2 sts in each of the 6 repeats of A.2) + 8 sts (1 stitch in each of the 4 repeats of A.3); there were 308 sts + 20=328 sts in total. Now owrk A.4 over previous A.2 and stocking stitch over previous A.3. Happy knitting!
19.06.2025 - 11:13
![]() Henriette Groth wrote:
Henriette Groth wrote:
Ich stricke das Modell in L. Die Machenzahl ist nach den ersten 14 cm 330 Maschen. das folgende Muster hat aber nur 308 M. Was stimmt da nicht?
09.05.2025 - 19:54DROPS Design answered:
Liebe Frau Groth, wenn A.1 fertig ist, sind es 22 Maschen in den jeweiligen M.1 der Runde, so sind es 22 Maschen x 15 Rapporte in der Runde = 330 Maschen. Viel Spaß beim Stricken!
12.05.2025 - 07:23
![]() Edry wrote:
Edry wrote:
Bonjour Madame, Le fil drops safran noir est impossible à travailler . J’ai essayé les aiguilles double pointe et les aiguilles circulaires sans résultat. Le fil reste collé aux aiguilles.
26.03.2025 - 18:44
|
|||||||||||||||||||
Spring Melt Top#springmelttop |
|||||||||||||||||||
 |
 |
||||||||||||||||||
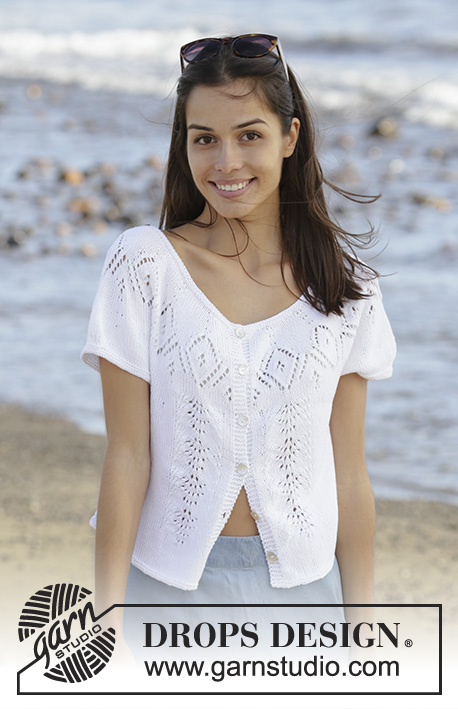
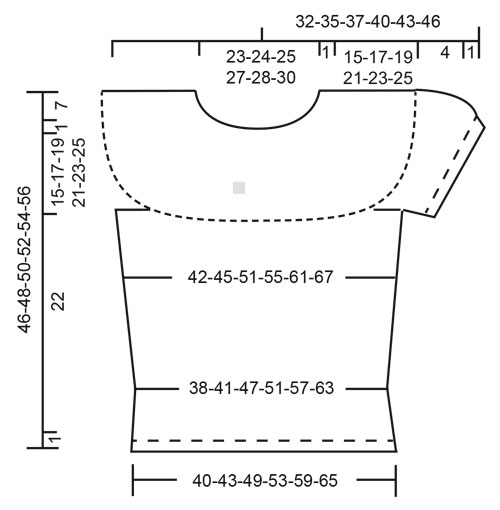
Knitted top with round yoke in DROPS Safran. The piece is worked top down with lace pattern and short sleeves. Sizes S - XXXL.
DROPS 199-42 |
|||||||||||||||||||
|
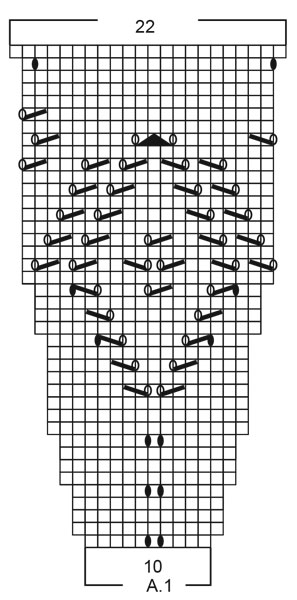
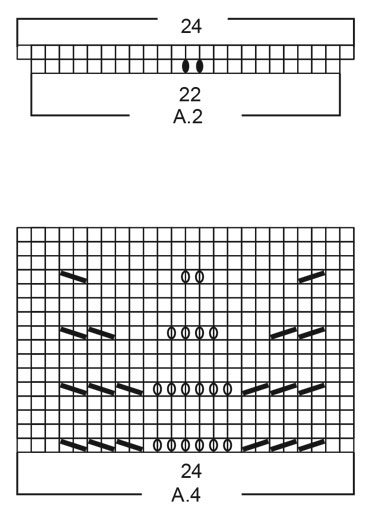
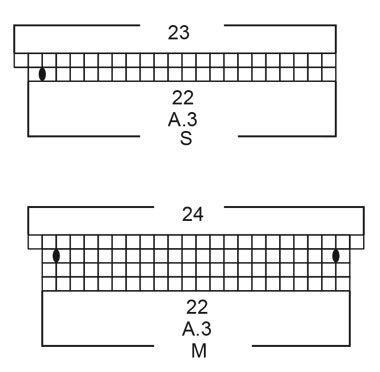
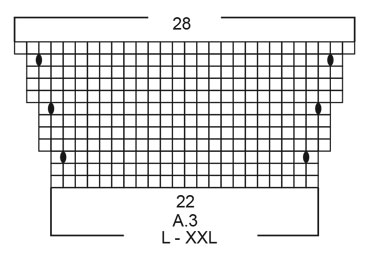
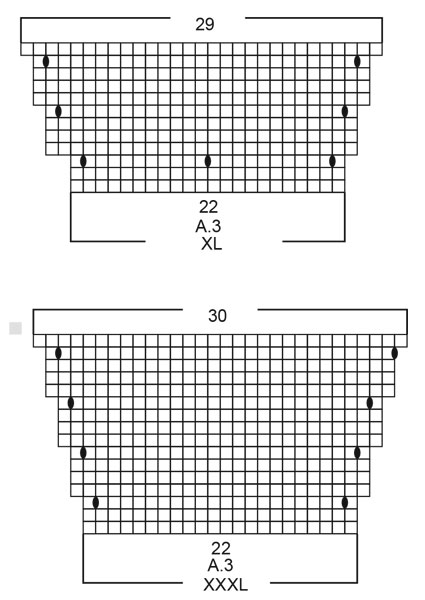
------------------------------------------------------- EXPLANATIONS FOR THE PATTERN: ------------------------------------------------------- RIDGE/GARTER STITCH (worked in the round): 1 ridge in height = 2 rounds; knit 1 round and purl 1 round. PATTERN: See diagrams A.1 to A.4. Choose diagram for your size (applies to A.3). The diagrams show all rows in the pattern seen from the right side. INCREASE/DECREASE TIP (evenly spaced): To work out how to increase/decrease evenly, count the total number of stitches on the needle (e.g. 144 stitches) and divide by the number of increases/decreases to be made (e.g. 4) = 36. In this example increase by making 1 yarn over after each 36th stitch. On the next round work the yarn overs twisted to avoid holes. When decreasing knit approx. each 35th and 36th stitch together. DECREASE TIP: Decrease 1 stitch on each side of the marker thread as follows: Work until there are 3 stitches left, knit 2 together, knit 2 (marker thread sits between these stitches), slip 1 stitch as if to knit, knit 1 and pass the slipped stitch over the knitted stitch. ------------------------------------------------------- START THE PIECE HERE: ------------------------------------------------------- TOP - SHORT OVERVIEW OF THE PIECE: The piece is worked in the round with circular needle, top down. The sleeves are worked in the round with short circular needle/double pointed needles. NOTE! There are different numbers of repeats of A.1 on the yoke in the different sizes. In sizes S, XL and XXXL there is an even number of repeats of A.1 and the pattern is the same on front and back pieces. In sizes M, L and XXL there is an odd number of repeats and the pattern therefore is displaced by half a repeat on the back piece and the pattern differs on the front and back pieces. TOP: YOKE: Cast on 144-148-153-161-168-173 stitches with circular needle size 2.5 mm and Safran. Work 2 RIDGES – read description above. Change to circular needle size 3 mm. Then knit 1 round where the number of stitches is adjusted to 140-150-150-160-170-180 stitches (i.e. in sizes S, L and XL decrease 4-3-1 stitches and in sizes M, XXL and XXXL increase 2-2-7 stitches) – read INCREASE/DECREASE TIP. Knit 1 round. Now work pattern as follows: Work A.1 (= 10 stitches) a total of 14-15-15-16-17-18 times on the round. Continue like this. REMEMBER THE KNITTING TENSION! When A.1 has been completed there are 308-330-330-352-374-396 stitches on the round and the piece measures approx. 14 cm from the cast-on edge. Now continue with pattern in the different sizes as follows: Sizes S, XL and XXXL: Knit 11. Insert a marker thread here. This will now be the start of the round! Next round worked as follows: Work A.2 (= 22 stitches), A.3 over the next 88-110-132 stitches (= 4-5-6 repeats in width), A.2 over the next 66 stitches (= 3 repeats), A.3 over the next 88-110-132 stitches (= 4-5-6 repeats in width), A.2 over the remaining 44 stitches (= 2 repeats). Continue in the round like this. When A.2 has been completed work A.4 over each repeat of A.2; i.e. work 3 repeats of A.4 on both front and back pieces. When A.3 has been completed there are 328-434-504 stitches on the needle. Continue with stocking stitch and A.4 until the piece measures 15-21-25 cm. Sizes M, L and XXL: The next round is worked as follows: Work A.2 (= 22 stitches) over the first 44 stitches, A.3 over the next 88-88-110 stitches (=4-4-5 repeats), work the first 11 stitches in A.3, A.2 over the next 66 stitches (= 3 repeats), work the last 11 stitches in A.3, A.3 over the next 88-88-110 stitches (= 4-4-5 repeats), A.2 over the remaining 22 stitches. Continue like this. When A.2 has been completed work A.4 over each repeat of A.2, i.e. work 3 repeats of A.4 on both front and back pieces. When A.3 has been completed there are 360-396-452 stitches on the round. Continue with stocking stitch and A.4 until the piece measures 17-19-23 cm. All sizes: The next round is worked as follows (from the right side): Work pattern with A.4 as before over the first 24-48-48-24-48-24 stitches, knit the next 92-108-126-145-154-180 stitches and increase at the same time 6-5-9-4-15-12 stitches evenly spaced, work pattern with A.4 as before over the next 72 stitches, knit the next 92-108-126-145-154-180 stitches and increase at the same time 6-5-9-4-15-12 stitches evenly spaced, work pattern with A.4 as before over the remaining 48-24-24-48-24-48 stitches = 340-370-414-442-482-528 stitches. Work the last row on the yoke as follows: Work pattern as before over the first 37-65-71-52-82-65 stitches, place the next 72-79-89-93-101-110 stitches on a thread for sleeve and cast on 8-8-10-10-12-12 new stitches on the needle, work the next 98-106-118-128-140-154 stitches with pattern as before, place the next 72-79-89-93-101-110 stitches on a thread for sleeve and cast on 8-8-10-10-12-12 new stitches on the needle, work the remaining 61-41-47-76-58-89 stitches with pattern as before. BODY: = 212-228-256-276-304-332 stitches. Insert a marker thread in the middle of the 8-8-10-10-12-12 new stitches cast on under the sleeve on each side (= 4-4-5-5-6-6 new stitches on each side of the marker thread). Continue in the round with stocking stitch and 3 repeats of A.4 on front and back pieces. When the piece measures 4 cm decrease 1 stitch on each side of both marker threads – read DECREASE TIP. Decrease like this every 2 cm a total of 5 times = 192-208-236-256-284-312 stitches. When the piece measures 17 cm – adjust so that you finish after a complete repeat of A.4 in height (there are now approx. 6 cm left to finished length), continue with stocking stitch: when the piece measures 22 cm change to circular needle size 2.5 mm. Work 2 ridges over all stitches. Cast off, but to avoid the cast-off edge being tight make 1 yarn over after each 6th stitch. Yarn overs cast off as normal stitches. SLEEVE: Place the 72-79-89-93-101-110 stitches from the thread on the one side of the piece on short circular needle/double pointed needles size 3 mm and knit up 1 stitch in each of the 8-8-10-10-12-12 new stitches cast on under the sleeve = 80-87-99-103-113-122 stitches. Work stocking stitch in the round for 3 cm. Now decrease stitches mid top of sleeve as follows: Work the first 30-33-35-37-41-45 stitches, knit 2 and 2 stitches together over the next 20-20-28-28-30-32 stitches (= 10-10-14-14-15-16 stitches decreased), knit the next 30-34-36-38-42-45 stitches = 70-77-85-89-98-106 stitches. Work 2 rounds stocking stitch. Change to double pointed needles size 2.5 mm and work 3 ridges. Cast off. Work the other sleeve in the same way. |
|||||||||||||||||||
Diagram explanations |
|||||||||||||||||||
|
|||||||||||||||||||
 |
|||||||||||||||||||
 |
|||||||||||||||||||
 |
|||||||||||||||||||
 |
|||||||||||||||||||
 |
|||||||||||||||||||
 |
|||||||||||||||||||
Have you finished this pattern?Tag your pictures with #dropspattern #springmelttop or submit them to the #dropsfan gallery. Do you need help with this pattern?You'll find 25 tutorial videos, a Comments/Questions area and more by visiting the pattern on garnstudio.com. © 1982-2026 DROPS Design A/S. We reserve all rights. This document, including all its sub-sections, has copyrights. Read more about what you can do with our patterns at the bottom of each pattern on our site. |
|||||||||||||||||||


With over 40 years in knitting and crochet design, DROPS Design offers one of the most extensive collections of free patterns on the internet - translated to 17 languages. As of today we count 324 catalogues and 12290 patterns translated into English (UK/cm). 12290
We work hard to bring you the best knitting and crochet have to offer, inspiration and advice as well as great quality yarns at incredible prices! Would you like to use our patterns for other than personal use? You can read what you are allowed to do in the Copyright text at the bottom of all our patterns. Happy crafting!
Post a comment to pattern DROPS 199-42
We would love to hear what you have to say about this pattern!
If you want to leave a question, please make sure you select the correct category in the form below, to speed up the answering process. Required fields are marked *.