
Popular categories
Looking for a yarn?


Comments / Questions (19)
![]() June wrote:
June wrote:
Why not use a regular chrochet diagram? It would be so much faster to read if I didn't have to look up every single stitch in your diagram explanations! Why are all drops patterns written this way? I don't know how anyone who isn't familiar with diagrams could follow this.
10.03.2025 - 23:54
![]() Noema wrote:
Noema wrote:
It's Very beautiful .
18.01.2025 - 14:21
![]() Anja Nielsen wrote:
Anja Nielsen wrote:
Hej. Jeg problemer med at gennemskue de sidste 2 rækker i A2/A3 mønstret. Jeg mangler forklaringer til hvordan begyndelse og afslutning af rækkerne skal laves og jeg synes ikke jeg kan finde nogle video guides omkring dette. Kan I måske i ord forklare de "masker der er vandrette" og hvad den store bue betyder ?
23.09.2024 - 13:59DROPS Design answered:
Hei Anja. Diagram A.1 viser hvordan omgangene til A.2 og A.3 starter og slutter. Nest siste omgang i A.2 består kun av x (= 1 fastmaske i masken), mens i A.3 hekles det 2 fastmasker om 3 luftmaske buen fra forrige omgang + 3 luftmasker + 2 fastmasker i samme 3 luftmaske buen fra forrige omgang. Så gjentas A.2+A.3 omgangen rundt. Siste omgang av A.2 består av luftmasker og staver, mens A.3 består av 1 stav om luftmaskebuen + 5 luftmasker (store buen) + 1 stav om luftmaskebuen. Så gjentas A.2+A.3 omgangen rundt. Forklaringer til diagramikonene finner du over diagrammene. mvh DROPS Design
07.10.2024 - 08:39
![]() Caroline wrote:
Caroline wrote:
Bonjour J'ai 2 questions Je viens de commencer la bordure mais je ne comprend pas ou se crochète A7. Avant l'arceau du coin? Dans l'arceau du coin? Et pour A4, au premier tour de bordure il faut juste faire une maille serrée et 5 mailles en l'air? Sur les 4 coins du 1er tour de bordure? Merci d'avance
23.03.2023 - 17:55DROPS Design answered:
Bonjour Caroline, on commence dans un coin de la couverture par *A.4 (=1 ms, 5 ml, 1 ms au 1er rang), puis on crochète A.5 jusqu'au coin suivant de la couverture, et là on va crocheter A.7 (=1 ms, 2 ml au 1er rang)*, et on répète de *à*, ainsi chaque coin commence par A.4 (arceau au milieu du coin + mailles suivantes) et se termine par A.7 (mailles avant le coin) puis on ferme le tour par 1 mc dans la ms de A.4. Bon crochet!
24.03.2023 - 08:22
![]() Jeanne Mooren wrote:
Jeanne Mooren wrote:
IK kan de start van het patroon niet maken. Loopt steeds vast bij de eerste toer vanaf het begin. Na de lus begin ik met 3 losse, 2 sokjes, 3 lossen (A1). Dan 3x A2 en A3 (is 3 stokjes, 3 lossen, 3 stokjes is 18 stokjes!! in patroon staat 24 stokjes en 8 lossenlussen??? Dan vervolgens in eerste toer de laatste 3 stokjes overslaan?????? Ik begrijp er geen snars van!!
05.04.2022 - 14:09DROPS Design answered:
Dag Jeanne,
In de eerste toer van A.3 zitten zo te zien geen stokjes (wel 3 lossen). Dus het komt er op neer dat je 3 keer A.2 haakt en dat zijn in totaal 18 stokjes. Maar voordat je 3 keer A.2 haakt, haak je eerst 1 keer A.1 en op het eindig nog een keer met1 keer A.2 waarbij je op d eerste toer de laatste 3 stokjes van A.2 overslaat. Samenvattend: 3 stokjes van A.1, 3 keer A.2 = 18 stokjes, en 3 stokjes van A.2. In totaal dus 24 stokjes.
07.04.2022 - 23:37
![]() ANITA wrote:
ANITA wrote:
Sorry kan iemand mij helpen bij de opstart van dit patroon ???
26.10.2021 - 17:34DROPS Design answered:
Dag Anita,
Heb je een proeflapje gehaakt om de stekenverhouding te controleren en eventueel de naalddikte aangepast om op de juiste stekenverhouding te krijgen? Dan kun je beginnen bij 'Begin het werk hier' en beginnen met het haken van een vierkant. Je haakt eerst 5 lossen en deze vorm je tot een ring met 1 halve vaste. Vervolgens haak je de telpatronen. Bekijk ook de video's en de lijst met veel gestelde vragen.
29.10.2021 - 13:21
![]() El Achkar wrote:
El Achkar wrote:
Hallo Dropsteam,könnten Sie mir sagen wieviel Garn ich für eine Tagesdecke in den Massen 180cm×200 plus Rand 25cm brauche. Lg.
10.04.2021 - 09:28DROPS Design answered:
Liebr Frau El Achkar, leider können wir jeder Anleitung nach jedem individuellen Frage anpassen und einzelne Modelle auf individuellen Wunsch hin umrechnen. Wenn sie Hilfe damit brauchen, wenden Sie sich bitte an Ihrem DROPS Laden - auch telefonisch oder per E-Mail, dort hilft man Ihnen gerne weiter. Viel Spaß beim häkeln!
12.04.2021 - 07:45
![]() Randi Lauridsen wrote:
Randi Lauridsen wrote:
Er i gang med at hækle tæppet til et diamant bryllup. Har I et forslag til hvordan jeg hækle eller på anden måde inddrage diamanter på tæppet
24.10.2020 - 16:02DROPS Design answered:
Hei Randi. Du kan f.eks før du begynner ditt arbeid, trer du så mange perler inn på garnet som du vil bruke med hjelp av en synål. Skyv perlene inn på tråden og hekle luftmasker som vanlig. Hekle til du vil begynne å sette perler inn i arbeidet. Se evnt video: "Hvordan hekle perler inn i arbeidet" mvh DROPS design
26.10.2020 - 09:00
![]() Gabi Reinhold wrote:
Gabi Reinhold wrote:
Hallo, kann ich die Anleitung auf meine e_mail Adresse gesendet bekommen? Vielen Dank und liebe grüße von Gabi
29.08.2020 - 19:53DROPS Design answered:
Liebe Frau Reihnhold, unsere Anleitungen können nur gedruckt werden, wenn Sie aber mit einer virtuellen Drucker wählen, dann können Sie die Anleitung als .PDF speichern. Viel Spaß beim häkeln!
31.08.2020 - 09:29
![]() Maureen wrote:
Maureen wrote:
Hello. I have just opened a Faebook page for The Cape Guild of Weavers Crocheters to encourage members to make something amazing for our Guild's 70th anniversary in September. Are you alright with me putting a link to your website for them to get inspiration?
17.01.2020 - 13:28DROPS Design answered:
Dear Maureen, you are welcome to link our website and/or our patterns - should you need any further informations about the copyright, you'll find them at the bottom of the page. Thank you, enjoy!
17.01.2020 - 14:32
|
|||||||||||||||||||||||||||||||||||||||||||||||||||||||
Asta#astablanket |
|||||||||||||||||||||||||||||||||||||||||||||||||||||||
 |
 |
||||||||||||||||||||||||||||||||||||||||||||||||||||||
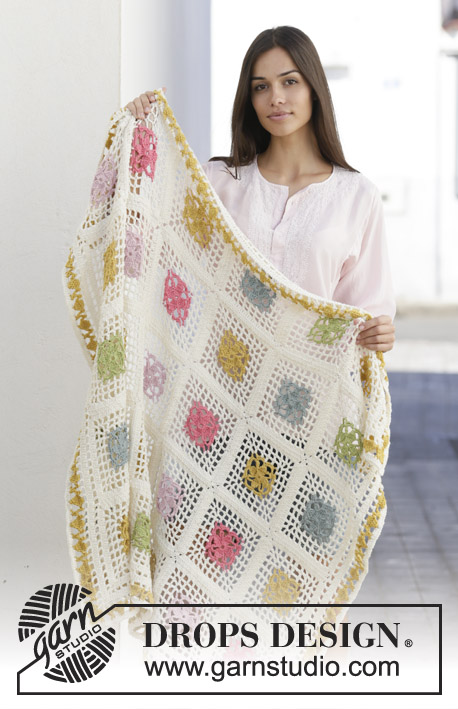
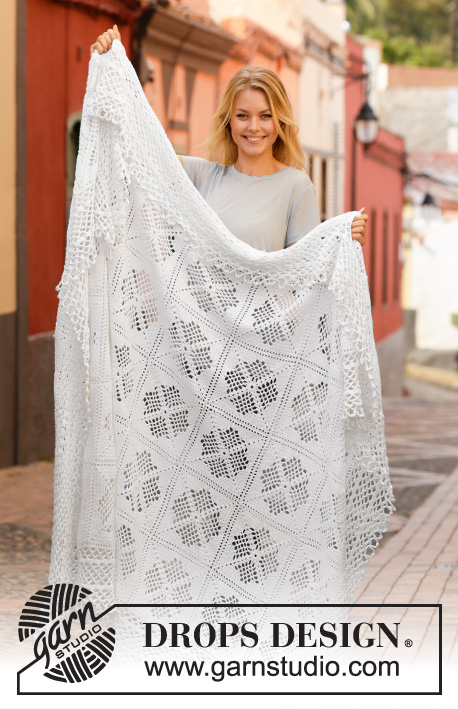
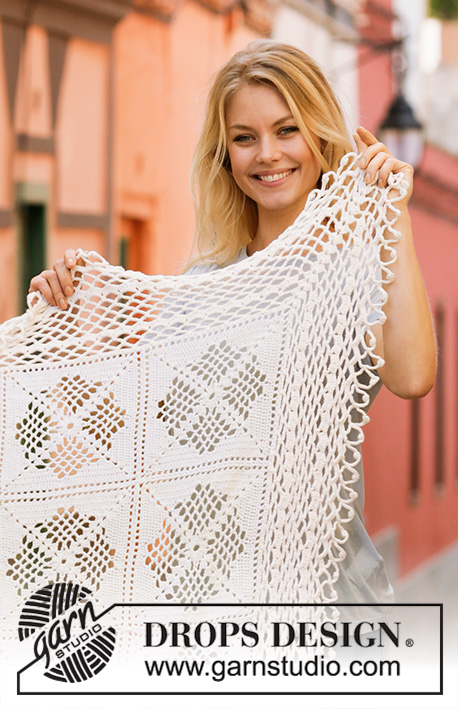
Crocheted blanket in DROPS Safran. The piece is worked with lace pattern and squares.
DROPS 198-4 |
|||||||||||||||||||||||||||||||||||||||||||||||||||||||
|
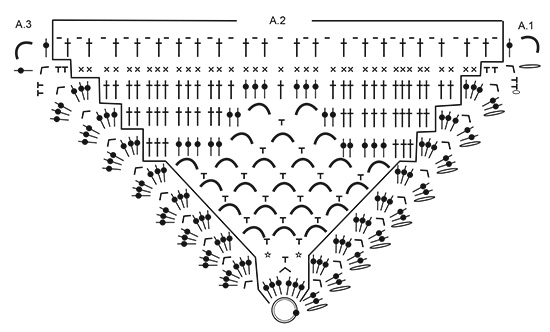
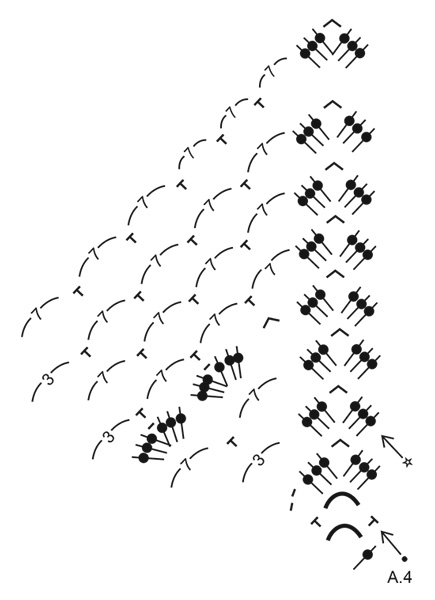
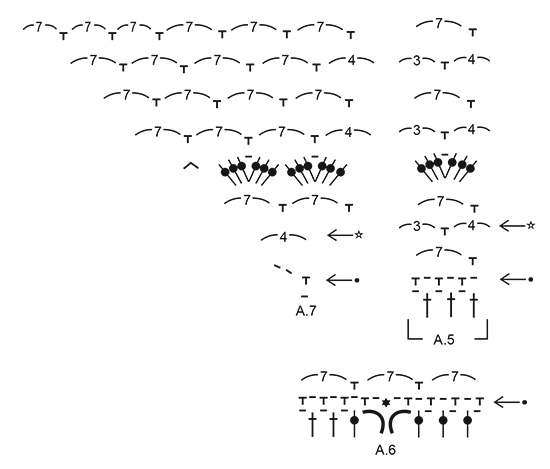
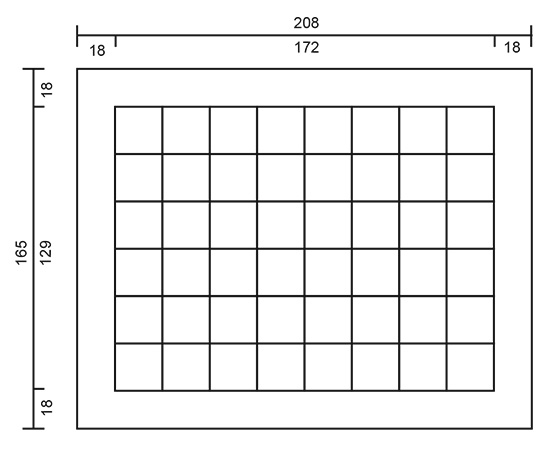
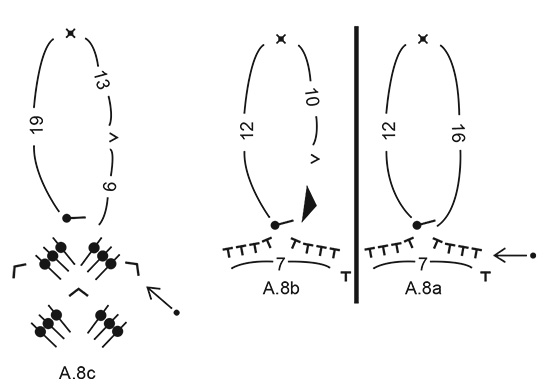
------------------------------------------------------- EXPLANATIONS FOR THE PATTERN: ------------------------------------------------------- PATTERN: See diagrams A.1 to A.8. CROCHET INFORMATION (for edge): The first round when working the edge is finished with 1 slip stitch in the first double crochet on the round, and then slip stitches are worked to the first chain-space in the corner. At the beginning of the other rounds in diagram A.4, you work 3 chain stitches (replace the first treble crochet) and finish the round with 1 slip stitch in the 3rd chain stitch on the round and then work slip stitches to the first chain-space in the corner. ------------------------------------------------------- START THE PIECE HERE: ------------------------------------------------------- BLANKET - SHORT OVERVIEW OF THE PIECE: There are 48 crochet squares worked and then sewn together. You work an edge around the whole blanket to finish. CROCHET SQUARE: Work 5 chain stitches with hook size 3.5 mm and Safran and form them into a ring with 1 slip stitch in the first chain stitch. Then work pattern in the round as follows: A.1 (shows how the rounds start and finish), * A.2, A.3 *, work from *-* a total of 3 times and finish with A.2, but on the first round: skip the last 3 treble crochets = 24 treble crochets and 8 chain spaces. REMEMBER THE CROCHET TENSION. When A.1 to A.3 have been completed in height, the square measures approx. 21.5 cm x 21.5 cm. Work a total of 48 squares. ASSEMBLY: Sew the blanket together with 6 crochet squares in width and 8 in length. Sew each square together in the outermost loop of the outermost stitch, first lengthwise and then across. EDGE: Start around the chain-space in one corner of the blanket and work the edge as follows – read CROCHET INFORMATION: Work * A.4 around the chain-space in the corner, A.5 to the next corner, but in the transition between each square work 1 double crochet in the seam as shown in diagram A.6 (see black star), work A.7 *, work from *-* a total of 4 times on the round. When the diagrams have been completed in height, repeat the pattern from the arrow with a white star one more time in height and until there is 1 round left in the diagrams. The last round (= next to last round in diagrams) finishes with 1 slip stitch in the 3rd chain stitch at the beginning of the round. Cut the strand. Now work a finishing edge as follows: Start in the first chain-space after one of the corners and work A.8a around this chain-space, * A.8b to the next corner, A.8c in the corner *, work from *-* a total of 4 times on the round and finish with 1 slip stitch in the first double crochet on the round. Cut and fasten the strand. When is finished, the edge should measure approx. 18 cm. |
|||||||||||||||||||||||||||||||||||||||||||||||||||||||
Diagram explanations |
|||||||||||||||||||||||||||||||||||||||||||||||||||||||
|
|||||||||||||||||||||||||||||||||||||||||||||||||||||||
 |
|||||||||||||||||||||||||||||||||||||||||||||||||||||||
 |
|||||||||||||||||||||||||||||||||||||||||||||||||||||||
 |
|||||||||||||||||||||||||||||||||||||||||||||||||||||||
 |
|||||||||||||||||||||||||||||||||||||||||||||||||||||||
 |
|||||||||||||||||||||||||||||||||||||||||||||||||||||||
Have you finished this pattern?Tag your pictures with #dropspattern #astablanket or submit them to the #dropsfan gallery. Do you need help with this pattern?You'll find 8 tutorial videos, a Comments/Questions area and more by visiting the pattern on garnstudio.com. © 1982-2026 DROPS Design A/S. We reserve all rights. This document, including all its sub-sections, has copyrights. Read more about what you can do with our patterns at the bottom of each pattern on our site. |
|||||||||||||||||||||||||||||||||||||||||||||||||||||||


With over 40 years in knitting and crochet design, DROPS Design offers one of the most extensive collections of free patterns on the internet - translated to 17 languages. As of today we count 324 catalogues and 12290 patterns translated into English (UK/cm). 12290
We work hard to bring you the best knitting and crochet have to offer, inspiration and advice as well as great quality yarns at incredible prices! Would you like to use our patterns for other than personal use? You can read what you are allowed to do in the Copyright text at the bottom of all our patterns. Happy crafting!
Post a comment to pattern DROPS 198-4
We would love to hear what you have to say about this pattern!
If you want to leave a question, please make sure you select the correct category in the form below, to speed up the answering process. Required fields are marked *.