
Popular categories
Looking for a yarn?


Comments / Questions (17)
![]() Lotta Hviden wrote:
Lotta Hviden wrote:
Varför stickas det rätstickning på ok, bak å framstycket, men slätstickning från avigan på ärmarna från ärmhålen och ned? Får inte det att gå ihop riktigt
31.03.2019 - 10:27DROPS Design answered:
Hej Det är för att det är enklare att sticka runt i slätstickning och vända armen efter. Om du tycker att det är lika enkelt att sticka runt i rätstickning från rätsidan istället kan du självklart göra det istället. Lycka till!
05.04.2019 - 10:56
![]() Mia Svensson wrote:
Mia Svensson wrote:
Kan jag ersätta med Drops Alpaca?
17.11.2018 - 22:11DROPS Design answered:
Hei Mia. Alpaca og KId Silk tilhører begge garngruppe A, og skal derfor ha samme strikkefasthet. Så i utgangspunktet skal du helt fint kunne strikke denne i Alpaca. Jeg anbefaler likevel at du lager deg en liten prøvelapp for å forsikre deg om at strikkefastheten blir overholdt. God fornøyelse.
19.11.2018 - 11:43
![]() Isambert wrote:
Isambert wrote:
Pour les boutonnières, il faut faire des mailles envers et non endroit car la bordure se fait au point mousse envers
27.10.2018 - 14:48
![]() Anne Kathrine Steen wrote:
Anne Kathrine Steen wrote:
Er garnmengden riktig? Virker veldig lite.
16.09.2018 - 10:19DROPS Design answered:
Hei Anne Kathrine. Ja, garnmengden stemmer. Kid-Silk kommer i 25 g nøster, så du trenger 5-5-6-6-7-8 nøster til denne gensern. Hvert nøste har en løpelengde på ca 200 meter (som er en del lenger enn andre garn i samme garngruppe). Det er viktig at strikkefastheten blir overholdt, ellers kan det ha innvirkning på garnforbruket. God fornøyelse.
17.09.2018 - 08:16
![]() Els Verheyen wrote:
Els Verheyen wrote:
Zeer mooi en elegant
03.08.2018 - 22:14
![]() Monique wrote:
Monique wrote:
Sehr sehr schön!!!
13.07.2018 - 09:31
![]() Zabeth wrote:
Zabeth wrote:
Dès que l'hiver arrivera, on adoptera la version manches longues. Il me faudra les deux, celui-ci est indissociable de l'autre gilet à manches courtes.
27.06.2018 - 21:35
|
|||||||||||||||||||
Way to Go Jacket#waytogojacket |
|||||||||||||||||||
 |
 |
||||||||||||||||||
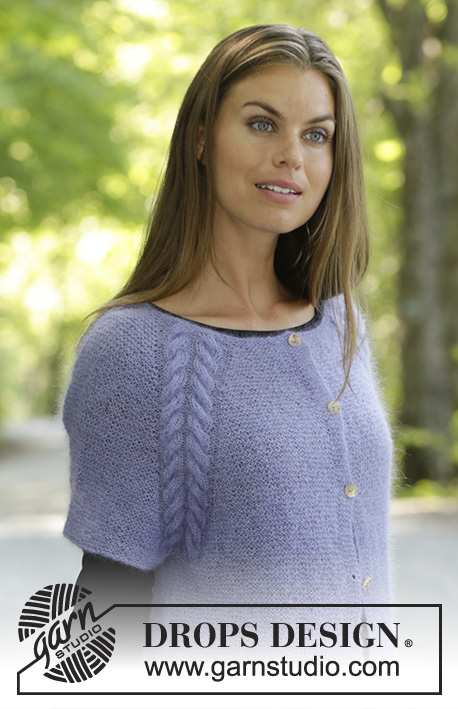
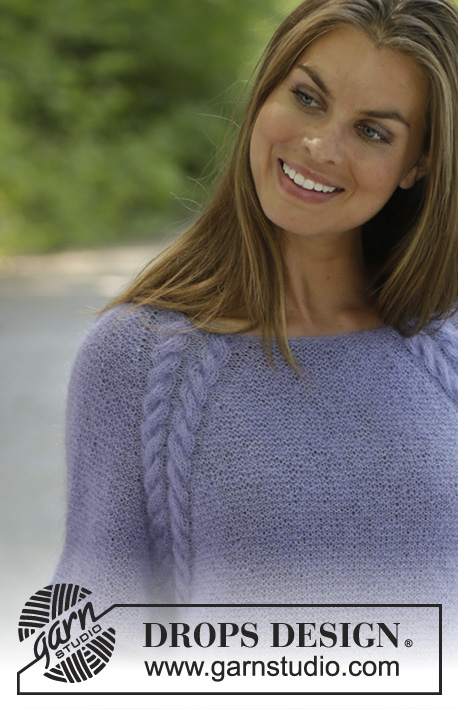
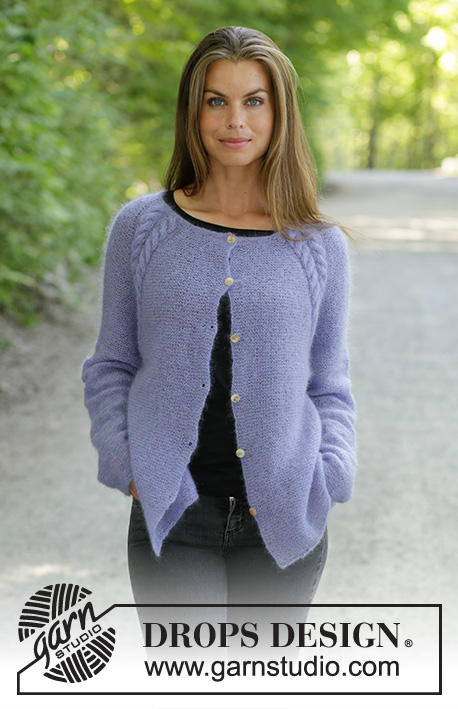
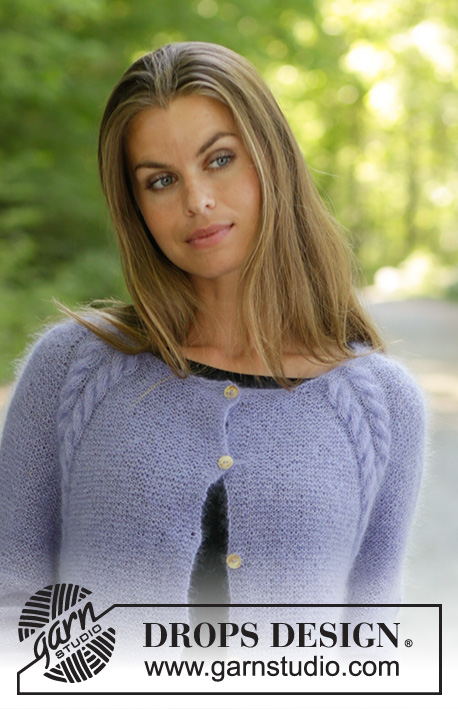
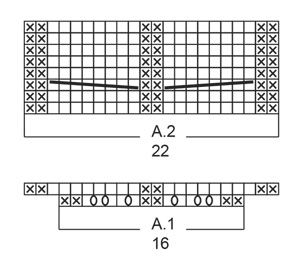
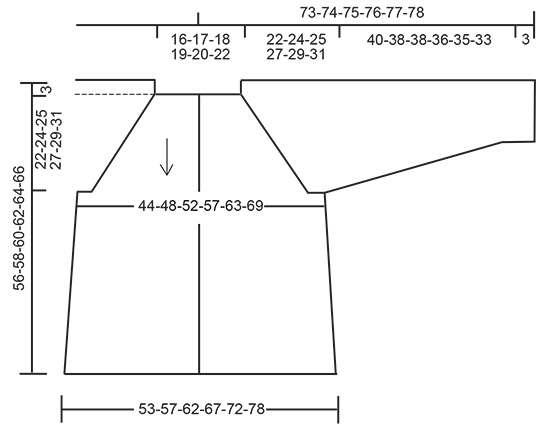
Knitted jacket with raglan in DROPS Kid-Silk. Piece is knitted top down with cables, garter stitch and A-shape. Size: S - XXXL
DROPS 194-31 |
|||||||||||||||||||
|
---------------------------------------------------------- EXPLANATION FOR THE PATTERN: ---------------------------------------------------------- GARTER STITCH (back and forth): 1 ridge = knit 2 rows. GARTER STITCH (worked in the round): 1 ridge = 2 rounds. Knit 1 round and purl 1 round. PATTERN: See diagrams A.1 and A.2. Diagrams show all rows in pattern seen from the right side. INCREASE TIP-1 (evenly): To calculate how to increase evenly, use the total number of stitches on row (e.g. 102 stitches), subtract the band (= 92 stitches) and divide stitches by number of increases to be done (e.g. 12) = 7.66. In this example increase by making 1 yarn over after alternately approx. every 7th and 8th stitch. On next row knit yarn over twisted to avoid holes. INCREASE TIP-2 (applies to sides of body): All increases are done from the right side. Work until 2 stitches remain before marker, 1 yarn over, knit 4 (marker is in the middle of these stitches), 1 yarn over. Increase like this at both markers (= 4 stitches increased in total). On next row knit yarn over twisted to avoid hole. Then work the new stitches in garter stitch. DECREASE TIP (applies to sleeves): Decrease 1 stitch on each side of marker as follows: Work until 3 stitches remain before marker, knit 2 together, knit 2 stitches (marker is between these stitches), slip 1 stitch knitwise, knit 1, pass slipped stitch over stitch worked (= 2 stitches decreased). BUTTONHOLES: Decrease for buttonholes on right band (when garment is worn). Decrease from right side when 3 stitches remain on row as follows: Make 1 yarn over, purl the next 2 stitches together, purl last stitch. On next row purl yarn over to make holes. Decrease first buttonhole when piece measures approx. 1½-2 cm. Then decrease the next 5-5-6-6-7-7 buttonholes, approx. 8-8-7½-7½-7-7 cm between each. ---------------------------------------------------------- START THE PIECE HERE: ---------------------------------------------------------- JACKET - SHORT OVERVIEW OF THE GARMENT: Worked top down. Work the yoke back and forth, then divide the piece into body and sleeves. Continue body back and forth in garter stitch. Work sleeves in the round on double pointed needles either in stocking stitch or reversed stocking stitch. YOKE: Cast on 102-106-110-116-120-128 stitches (including 5 band stitches in each side of piece) on circular needle size 3 mm with Kid-Silk. Purl 5 band stitches, work in GARTER STITCH - read explanation above, until 5 stitches remain and finish with purl 5 band stitches. Purl band on all rows (i.e. opposite of garter stitch) and knit the remaining stitches on all rows. Work 2 ridges in total. Switch to circular needle size 4 mm. Decrease for BUTTONHOLES on right band - read explanation above. Then work as follows from right side: Purl 5 band stitches, knit and increase 12-8-8-14-10-10 stitches evenly until 5 stitches remain - read INCREASE TIP-1 above and finish with purl 5 band stitches = 114-114-118-130-130-138 stitches. Knit 1 row from wrong side inside purl 5 band stitches in each side. Work next row as follows from right side: Purl 5 band stitches, 8-8-9-12-12-14 stitches in garter stitch, A.1 (= 16 stitches), 4 stitches in garter stitch, A.1 over the next 16 stitches, 16-16-18-24-24-28 stitches in garter stitch, A.1 over the next 16 stitches, 4 stitches in garter stitch, A.1 over the next 16 stitches, 8-8-9-12-12-14 stitches in garter stitch and finish with purl 5 band stitches. Purl band on all rows until finished measurements. REMEMBER THE KNITTING TENSION! When A.1 has been worked 1 time vertically, there are 138-138-142-154-154-162 stitches on needle. Now work A.2 (= 22 stitches) over A.1 AT THE SAME TIME increase for raglan on first row in A.2 as follows: Increase with 1 yarn over on each side of every A.2 (= 8 stitches increased). Knit yarn overs twisted on next row and then in garter stitch. Increase like this every other row 10-13-17-18-20-22 times, then every 4th row 13-14-13-14-15-16 times = 322-354-382-410-434-466 stitches. Continue with pattern and in garter stitch until piece measures 22-24-25-27-29-31 cm from cast-on edge. On next row from right side decrease 3 stitches over each cable (i.e. 6 stitches in every A.2 = 24 stitches in total decreased) = 298-330-358-386-410-442 stitches. Knit 1 row from with purl 5 band stitches from wrong side. Now divide piece for body and sleeves as follows: Purl 5 stitches, 42-46-50-55-60-66 stitches in garter stitch, slip the next 60-68-74-78-80-84 stitches on a stitch holder for sleeve and cast on 8-8-10-10-12-12 stitches under sleeve, work 84-92-100-110-120-132 stitches in garter stitch, slip the next 60-68-74-78-80-84 stitches on a stitch holder for sleeve and cast on 8-8-10-10-12-12 stitches under sleeve, work 42-46-50-55-60-66 stitches in garter stitch and finish with purl 5 stitches = 194-210-230-250-274-298 stitches. BODY: Insert 1 marker in the middle of the 8-8-10-10-12-12 new stitches under each sleeve (= 92-100-110-120-132-144 stitches on back piece and 51-55-60-65-71-77 stitches on each front piece). Continue in garter stitch and purl over band as before. When body measures 2 cm from where body was divided for sleeves, increase 1 stitch on each side of every marker - read INCREASE TIP-2 above. Increase like this every 2½ cm 10 times in total = 234-250-270-290-314-338 stitches. Continue in garter stitch until body measures 31-31-32-32-32-32 cm from where body was divided from sleeves. Cast off. Make sure that the cast-off edges are not too tight. Cast off with 1 needle size larger if needed. Piece measures 56-58-60-62-64-66 cm from shoulder. SLEEVE: Slip the 60-68-74-78-80-84 stitches from stitch holder in one side of piece back on double pointed needles size 4 mm and pick up 1 stitch in each of the 8-8-10-10-12-12 stitches cast on under sleeve = 68-76-84-88-92-96 stitches. Insert 1 marker in the middle of the 8-8-10-10-12-12 stitches under sleeve. Continue in either stocking stitch or reversed stocking stitch. If you choose reversed stocking stitch, turn piece and work from wrong side until finished measurements (sleeves will then have wrong side facing outwards). When piece measures 2 cm, decrease 1 stitch on each side of marker - read DECREASE TIP above. Decrease like this every 3-2-1½-1½-1½-1 cm 12-15-18-19-20-21 times in total = 44-46-48-50-52-54 stitches. Continue by knitting from wrong side piece measures 40-38-38-36-35-33 cm from where the sleeve was divided at body. Switch to double pointed needles size 3 mm and work in GARTER STITCH - read explanation above, for 3 cm. Cast off with 2 strands. Make sure to avoid a tight cast-off edge, cast off with 1 needle size larger if needed. Work the other sleeve the same way. ASSEMBLY: Sew on buttons on left band. |
|||||||||||||||||||
Diagram explanations |
|||||||||||||||||||
|
|||||||||||||||||||
 |
|||||||||||||||||||
 |
|||||||||||||||||||
Have you finished this pattern?Tag your pictures with #dropspattern #waytogojacket or submit them to the #dropsfan gallery. Do you need help with this pattern?You'll find 24 tutorial videos, a Comments/Questions area and more by visiting the pattern on garnstudio.com. © 1982-2026 DROPS Design A/S. We reserve all rights. This document, including all its sub-sections, has copyrights. Read more about what you can do with our patterns at the bottom of each pattern on our site. |
|||||||||||||||||||


With over 40 years in knitting and crochet design, DROPS Design offers one of the most extensive collections of free patterns on the internet - translated to 17 languages. As of today we count 324 catalogues and 12291 patterns translated into English (UK/cm). 12291
We work hard to bring you the best knitting and crochet have to offer, inspiration and advice as well as great quality yarns at incredible prices! Would you like to use our patterns for other than personal use? You can read what you are allowed to do in the Copyright text at the bottom of all our patterns. Happy crafting!
Post a comment to pattern DROPS 194-31
We would love to hear what you have to say about this pattern!
If you want to leave a question, please make sure you select the correct category in the form below, to speed up the answering process. Required fields are marked *.