
Popular categories
Looking for a yarn?


Comments / Questions (61)
![]() Maria Hyttel Meyer Schrøder wrote:
Maria Hyttel Meyer Schrøder wrote:
Skal man følge "hækleinfo" når man hækler mønsteret også? Eller er det det, der illustreret med de små lodrette streger i mønstret?
24.10.2018 - 18:36DROPS Design answered:
Hej Maria, Hækleinfo gælder kun første og sidste maske på hver række. Ud over den information skal du følge diagrammerne. God fornøjelse!
30.10.2018 - 10:15
![]() Carmen wrote:
Carmen wrote:
Hace una semana que mandé mi pregunta... lo tengo todo preparado a falta de unir las piezas... POR FAVOR Hola de nuevo, necesito un video sobre como unir o ensamblar las partes delantera y trasera y cómo unir las mangas... he buscado entre los videos explicativos, pero no lo encuentro... Gracias
09.10.2018 - 21:32DROPS Design answered:
Hola Carmen, no se hacen ni envían vídeos personalizados. Sólo están disponibles aquellos que se encuentran en la página web. No tenemos vídeos para todas las explicaciones. En caso de tener algún problema, puedes acudir a la tienda DROPS más cercana, donde te podrán ayudar de manera más personalizada.
09.10.2018 - 23:30
![]() Mia wrote:
Mia wrote:
Hej! Jag får inte ihop femstycket efter att jag gjort de två axlarna. Ska det bara virkas stolpar över höger axel, luftmaskarna vid halsringningen och sedan över vänster axel? Nästa varv ska sedan börjas med mönster som jag förstår det. Men när gör man luftmaskarna som var tredje stolpe i första varvet på mönstret ska ner i?
07.10.2018 - 21:26DROPS Design answered:
Hei Mia. Når du har heklet siste rad med mønster A.1 på venstre skulder hekler du 25-31-25-25-31-31 løse luftmasker på slutten av raden, og fester med med en kjedemaske i høyre skulder (siden mot halsen). Så kutter du tråden, og begynner i motsatt side av høyre skulder. Altså du begynner fra rettsiden og hekler slik: Hekle A.2A (= 2 masker), hekle A.2B over de neste 60-66-72-84-90-102 maskene (resten av maskene på høyre skulder, luftmaskene du la opp til hals og deler av venstre skulder) og avslutt med A.2C (= 7 masker). De stavmaskene de refereres til er første rad av A.2, så du begynner med diagrammet med en gang du har satt delene sammen. God fornøyelse
08.10.2018 - 08:48
![]() Carmen wrote:
Carmen wrote:
Hola de nuevo, necesito un video sobre como unir o ensamblar las partes delantera y trasera y cómo unir las mangas... he buscado entre los videos explicativos, pero no lo encuentro... Gracias
04.10.2018 - 18:27DROPS Design answered:
Hola Carmen, puedes ver la respuesta a tu pregunta arriba.
09.10.2018 - 23:31
![]() Helle wrote:
Helle wrote:
Tak for svar, men jeg blev ikke klogere på, hvornår jeg skal lave stangmaskerne i halskantens luftmasker. Hvis jeg hæfter de 2 skuldre sammen som beskrevet og derefter starter forstykke efter anvisningen, hvordan får jeg så stangmaskerne i halskanten?
01.10.2018 - 13:37DROPS Design answered:
Hei igjen Helle. Etter at du har heklet luftmaskene til halskanten og festet med en kjedemaske i høyre skulder så klipper du tråden. Begynn på neste omgang fra rettsiden på høyre skulder (altså ytterst på høyre skulder) og hekle først over høyre skulder,så over luftmaskene til halsen og så over venstre skulder. Dette hekler du slik: Hekle A.2A (= 2 masker), hekle A.2B over de neste 60-66-72-84-90-102 maskene (= 10-11-12-14-15-17 rapporter à 6 masker) og avslutt med A.2C (= 7 masker). Stavene i A.2 hekles enten i eller om luftmaskene, som symbolene viser. God fornøyelse.
02.10.2018 - 10:58
![]() Helle Hommelgaard wrote:
Helle Hommelgaard wrote:
Jeg går i stå, når de 2 skuldre skal sættes sammen. Der står, at man skal starte med højre skulder foran og derefter skal der hækles stangmasker i luftmaskerne ved halsen og hækl derefter venstre skulder foran: Hækl således ..... Den beskrivelse er jo ikke kun for venstre skulder, det er for samtlige masker. Men hvordan starter man højre skulder? Hvis man starter efter diagrammet, kan man jo ikke lave stangmasker i luftmaskerne til halsen. Jeg forstår det simpelthen ikke.
30.09.2018 - 17:39DROPS Design answered:
Hei Helle. Du har allerede heklet begge skuldrene før du kommer til dene delen av oppskriften. Det første du hekler er høyre skulder, så legger du den til side og hekler venstre skulder.Ppå slutten av siste rad på venstre skulder legger du opp luftmasker til halskanten. Denne luftmaskeraden fester du i høyre skulder med en kjedemaske - slik at skuldrene allerede henger sammen med en luftmaskerad før du begynner på den delen som heter Fortykke. God fornøyelse.
01.10.2018 - 11:48
![]() Carmen Andrade wrote:
Carmen Andrade wrote:
En la manga, me pierdo un poco cuando la labor mide 50cm (para talla s). ¿se vuelve al principio del tejido? Sino no me encaja nada :S No entiendo si el tejido se hace de arriba a abajo o al reves... Cuando la labor mida aprox. 50-49-48-46-45-42 cm (las medidas son más cortas en las tallas más grandes debido a que los hombros son más anchos) trabajar 1 fila de puntos bajos por el lado revés en la que se aumenten 6-6-4-4-8-6 puntos repartidos en la fila. Gracias
28.09.2018 - 19:13DROPS Design answered:
Hola Carmen. La manga se trabaja de arriba abajo de ida y vuelta según el patrón y se cosen al cuerpo para finalizar. Los aumentos en la parte inferior de la manga en la fila por el lado revés se trabajan según el TIP PARA LOS AUMENTOS (para la parte inferior de las mangas) como sigue: aprox. cada 6 puntos bajos trabajar 2 puntos bajos en 1 punto bajo
30.09.2018 - 18:11Ashley wrote:
Hi, I’m struggling with the front piece. I just want to confirm- after the chains at the start of each row, is the next dc put in the same stitch as an increase? I finished the A2 chart and realized that my piece was steadily decreasing... any assistance is greatly appreciated! I can’t wait to finish this! It’s a beautiful sweater!
16.09.2018 - 04:11DROPS Design answered:
Dear Ashley, you should work all stitches as shown in diagrams, ie beg of rows from RS + end of rows from RS are shown in A.2A and end of rows from RS + beg of rows from WS are shown in A.2C, just work the stitches as shown in both diagrams - you can add a marker between each repeat so that you can check your number of sts in each repeat. Happy crocheting!
17.09.2018 - 08:58
![]() Emelie wrote:
Emelie wrote:
När kommer er hemsida fungera korrekt? Diagrammen syns inte längre.
10.09.2018 - 13:41DROPS Design answered:
Hei Emelie. Vi har for øyeblikket tekniske problemer med siden vår, dette medfører at diagrammer og bilder dessverre ikke lastes ordentlig. Vi jobber med å løse problemet, og siden vil være tilbake som normalt så snart som mulig. Du kan følge med på vår twitter eller facebookside for oppdateringer. Beklager dette
10.09.2018 - 14:54
![]() Cecilie Lyngaas wrote:
Cecilie Lyngaas wrote:
Hei. Denne oppskriften sliter jeg med. Det står at skuldrene skal helles frem og tilbake, men hva mener dere med det? Skal man begynne fra høyre side av diagrammet både på retten og vrangen? Og hvis man skal hekle frem og tilbake, fra høyre på retten og venstre på vrangen, hvordan får man da til økningen på de to siste radene i A1D?
09.09.2018 - 20:55DROPS Design answered:
Hej Cecilie, begge skuldre foran (og bagpå) er beskrevet i opskriften, du hækler dem helt ifølge opskriften og diagrammerne. Du starter altid diagrammet i nederste højre hjørne (uanset om det er højre eller ventre skulder du hækler) God fornøjelse!
12.09.2018 - 15:15
|
|||||||||||||||||||||||||
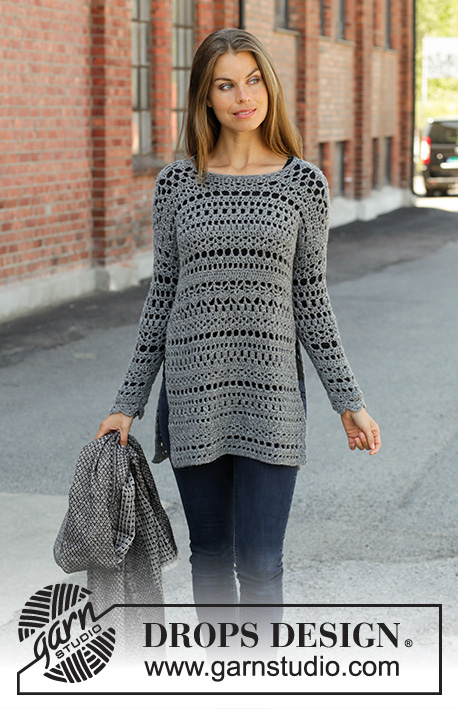
Grey Sparrow#greysparrowtunic |
|||||||||||||||||||||||||
 |
 |
||||||||||||||||||||||||
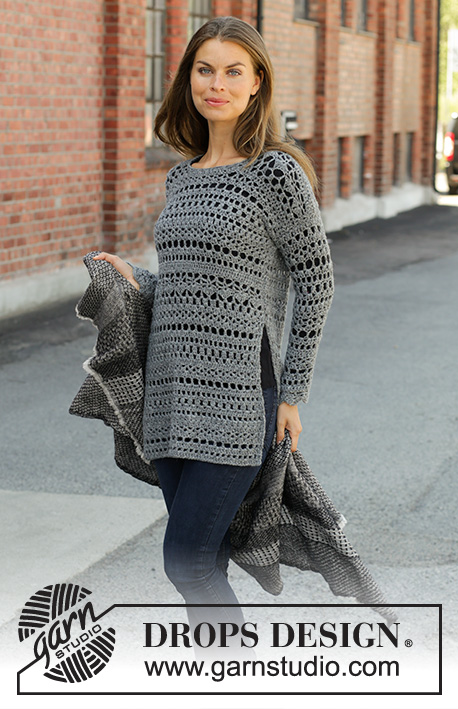
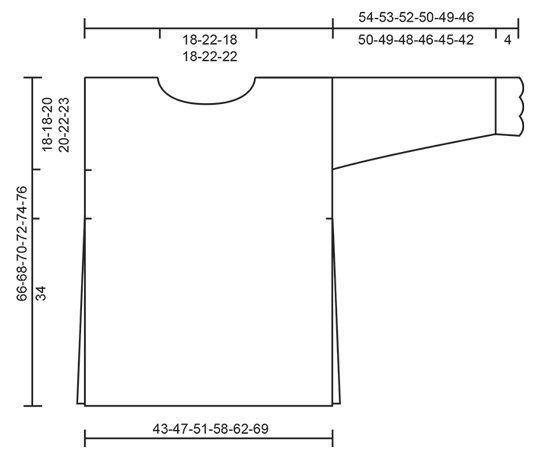
Crocheted jumper in DROPS Sky. The piece is worked top down with lace pattern and long split in the sides. Sizes S - XXXL.
DROPS 195-14 |
|||||||||||||||||||||||||
|
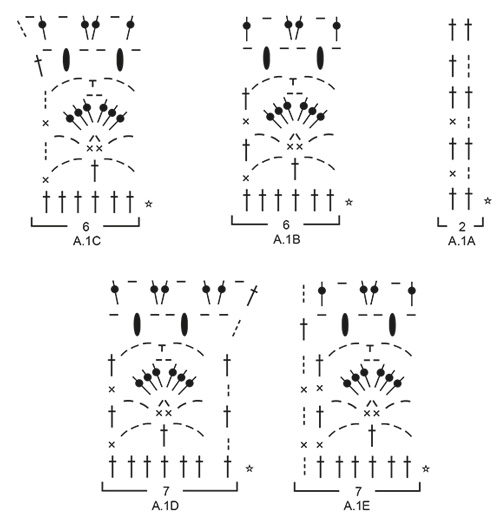
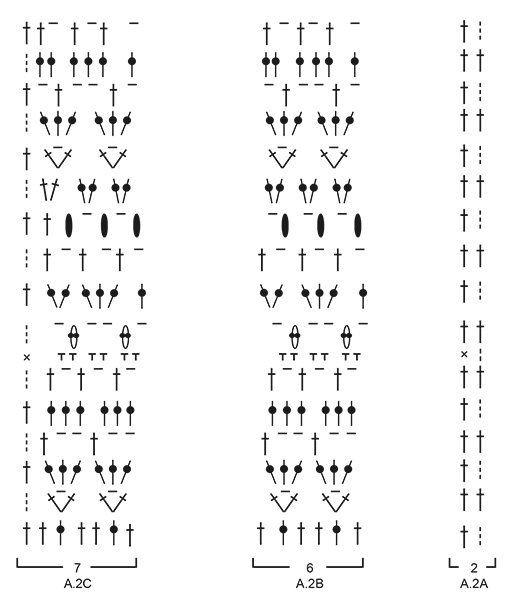
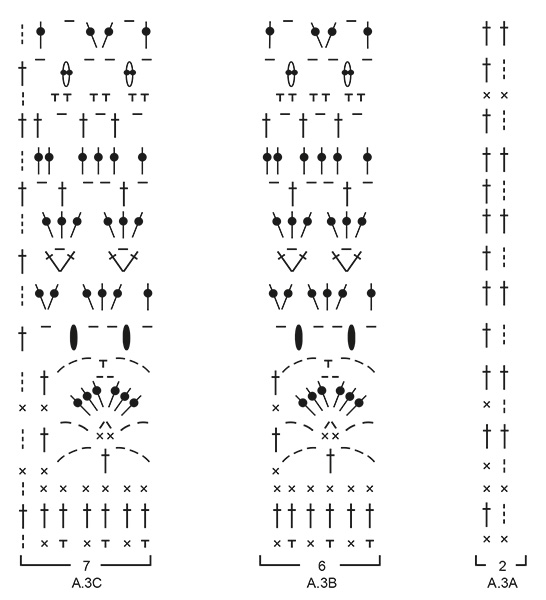
------------------------------------------------------- EXPLANATIONS FOR THE PATTERN: ------------------------------------------------------- CROCHET INFO: At the beginning of each row of treble crochets, the first treble crochet is replaced by 3 chain stitches. The row finishes with 1 treble crochet in the 3rd or 2nd chain stitch from the beginning of the previous row (depending on whether the previous row started with 3 or 2 chain stitches). At the beginning of each row of double crochets, the first double crochet is replaced by 2 chain stitches. The row finishes with 1 double crochet in the 3rd or 2nd chain stitch from the beginning of the previous round. PATTERN: See diagrams A.1 to A.3. DECREASE TIP (for sleeves): Decrease 1 stitch inside of the 2 outermost stitches in each side. Decrease 1 stitch by skipping 1 stitch. It is difficult to say where the decreases will occur in the pattern, but adjust so that you decrease on a row of treble/double crochets (not on a row of large chain-spaces). INCREASE TIP (for bottom of sleeves): Increase 1 stitch by working 2 double crochets in same stitch. ------------------------------------------------------- START THE PIECE HERE: ------------------------------------------------------- JUMPER - QUICK SUMMARY OF THE PIECE: Front and back pieces are worked back and forth separately, top down. You first work the right front shoulder increasing for the neck, then the left shoulder increasing for the neck before the pieces are worked together back and forth to finished length. The back piece is worked in the same way. The sleeves are worked back and forth, top down. The garment is sewn together before working a finishing edge to the neck. RIGHT FRONT SHOULDER (when the garment is worn): Read CROCHET INFO! Work 28-28-36-44-44-52 chain stitches with hook size 4.5 mm and Sky. The first row is worked as follows from the wrong side: Work 1 treble crochet in the 4th chain stitch from the hook, * skip 1 chain stitch, work 1 treble crochet in each of the next 3 chain stitches *, work from *-* to end of row = 20-20-26-32-32-38 treble crochets on the row. The next row is worked as follows from the right side: Work A.1A (= 2 stitches), work A.1B over the next 12-12-18-24-24-30 stitches (= 2-2-3-4-4-5 repeats of 6 stitches) and finish with A.1C (= 6 stitches). Continue this pattern back and forth until A.1 has been completed. REMEMBER THE CROCHET TENSION! Lay the piece to one side and work the left front shoulder as described below. LEFT FRONT SHOULDER (when the garment is worn): Work 28-28-36-44-44-52 chain stitches with hook size 4.5 mm and Sky. The first row is worked as follows from the wrong side: Work 1 treble crochet in the 4th chain stitch from the hook, * skip 1 chain stitch, work 1 treble crochet in each of the next 3 chain stitches *, work from *-* to end of row = 20-20-26-32-32-38 treble crochets on the row. The next row is worked as follows from the right side: Work A.1D (= 7 stitches), work A.1B over the next 6-6-12-18-18-24 stitches (= 1-1-2-3-3-4 repeats of 6 stitches) and finish with A.1E (= 7 stitches). Continue this pattern back and forth until A.1 has been completed. At the end of the last row, work 25-31-25-25-31-31 slightly loose chain stitches for the neck. Fasten the loose chains with 1 slip stitch in the outermost stitch towards the neck on right shoulder on the front (from wrong side). Cut and fasten the strand. Now work the pieces together for the front piece as described below. FRONT PIECE: Start from the right side of the right front shoulder; continue working over the chain stitches for the neck and then work over the stitches on the left front shoulder as follows: Work A.2A (= 2 stitches), work A.2B over the next 60-66-72-84-90-102 stitches (= 10-11-12-14-15-17 repeats of 6 stitches) and finish with A.2C (= 7 stitches). NOTE: When working over the chain stitches for the neckline, work 1 treble crochet in each chain stitch. Continue this pattern back and forth. When A.2 has been worked one time in height, work A.3 one time in height in the same way. Then work A.2 to finished length, NOTE: When A.2 is repeated after itself, the 1st row on the 2nd repeat will be worked from wrong side. The 1st treble crochet on row is replaced with 3 chain stitches as usual. AT THE SAME TIME when the piece measures 18-18-20-20-22-23 cm from the cast-on edge, insert 1 marker in each side to mark the armholes. Continue working as described above until the piece measures approx. 65-67-69-71-73-75 cm. Finish with 1 row of treble crochets – NOTE: Choose a row from one of the diagrams which fits with where you are in the repeat so that you have 69-75-81-93-99-111 treble crochets on the row. Cut and fasten the strands. The front piece measures approx. 66-68-70-72-74-76 cm from the shoulder down. LEFT BACK SHOULDER (when the garment is worn): Work 28-28-36-44-44-52 chain stitches with hook size 4.5 mm and Sky. The first row is worked as follows from the wrong side: Work 1 treble crochet in the 4th chain stitch from the hook, * skip 1 chain stitch, work 1 treble crochet in each of the next 3 chain stitches *, work from *-* to end of row = 20-20-26-32-32-38 treble crochets on the row. Lay the piece to one side and work the right back shoulder as described below. RIGHT BACK SHOULDER (when the garment is worn) Work 28-28-36-44-44-52 chain stitches with hook size 4.5 mm and Sky. The first row is worked as follows from the wrong side: Work 1 treble crochet in the 4th chain stitch from the hook, * skip 1 chain stitch, work 1 treble crochet in each of the next 3 chain stitches *, work from *-* to end of row = 20-20-26-32-32-38 treble crochets on row. At the end of this row, work 29-35-29-29-35-35 slightly loose chain stitches for the neck. Fasten the loose chains with 1 slip stitch in the outermost stitch towards the neck on left shoulder on the back (from wrong side). Cut and fasten the strand.Now work the pieces together for the back piece as described below. BACK PIECE: Start from the right side of the left back shoulder; continue working over the chain stitches for the neck and then over the stitches on the right back shoulder as follows: Work A.1A (= 2 stitches), work A.1B over the next 60-66-72-84-90-102 stitches (= 10-11-12-14-15-17 repeats of 6 stitches) and finish with A.1E (= 7 stitches). Continue this pattern back and forth. When A.1 has been completed, work A.2 in the same way. When A.2 has been worked one time in height, work A.3 one time in height in the same way. Then work A.2 to finished length in the same way as the front piece. AT THE SAME TIME when the piece measures 18-18-20-20-22-23 cm from the cast-on edge, insert 1 marker in each side to mark the armholes. Continue working as described above until the piece measures approx. 65-67-69-71-73-75 cm – adjust to match the front piece. Finish with 1 row of treble crochets in the same way as the front piece. Cut and fasten the strands. The back piece measures approx. 66-68-70-72-74-76 cm from the shoulder down. SLEEVE: Work 77-77-85-85-93-101 chain stitches with hook size 4.5 mm and Sky. The first row is worked as follows from the right side: Work 1 treble crochet in the 4th chain stitch from the hook, work 1 treble crochet in the next chain stitch, * skip 1 chain stitch, work 1 treble crochet in each of the next 3 chain stitches *, work from *-* to end of row = 57-57-63-63-69-75 treble crochets on the row. The next row is worked as follows from the wrong side: 4 chain stitches (equivalent to 1 treble crochet + 1 chain stitch), skip 2 treble crochets, * 2 treble crochets in the space before the next 3 treble crochets, 1 chain stitch * work from *-* until there are 3 treble crochets left on the row, skip 2 treble crochets and finish with 1 treble crochet in the last treble crochet = 57-57-63-63-69-75 stitches on the row. The next row is worked as follows from the right side: Work A.2A (= 2 stitches), work A.2B over the next 48-48-54-54-60-66 stitches (= 8-8-9-9-10-11 repeats of 6 stitches) and finish with A.2C (= 7 stitches). Continue this pattern back and forth. A.2 is repeated in height. AT THE SAME TIME when the piece measures 2 cm in all sizes, decrease 1 stitch in each side – read DECREASE TIP (= 2 stitches decreased). Decrease like this approx. every 5½-5½-4½-4-3½-2½ cm a total of 9-9-11-11-13-15 times in each side = 39-39-41-41-43-45 stitches on the row. When the sleeve measures approx. 50-49-48-46-45-42 cm (shorter measurements in larger sizes due to wider shoulders) work 1 row of double crochets from the wrong side where you increase 6-6-4-4-8-6 stitches evenly on the row - read INCREASE TIP = 45-45-45-45-51-51 double crochets. The next row is worked as follows from the right side: Work A.1A (= 2 stitches), work A.1B over the next 36-36-36-36-42-42 stitches (= 6-6-6-6-7-7 repeats of 6 stitches) and finish with A.1E (= 7 stitches). Continue this pattern, but finish after the 3rd row of A.1. Cut and fasten the strands. The sleeve measures approx. 54-53-52-50-49-46 cm from the top down. Work the other sleeve in the same way. ASSEMBLY: Sew the shoulder seams. Sew in the sleeves between the markers on the front and back pieces. Sew the sleeve and side seams in one go – start at the bottom of the sleeve and sew edge to edge in the outermost stitch, but finish the seam when there is still 34 cm left, leaving a split in each side. NECK: Start on the one shoulder and work the first round as follows with hook size 4.5 mm: Work 1 double crochet in the first stitch, * 3 chain stitches, 1 double crochet around the next row/chain-space *, work from *-* around the whole neck, finish with 3 chain stitches and 1 slip stitch in the first double crochet at the beginning of the round. Work slip stitches to the middle of the first chain-space, work 3 chain stitches, * 1 double crochet around the next chain-space, 2 chain stitches *, work from *-* to end of round, finish with 1 slip stitch in the first chain stitch at the beginning of the round. Cut and fasten the strand. |
|||||||||||||||||||||||||
Diagram explanations |
|||||||||||||||||||||||||
|
|||||||||||||||||||||||||
 |
|||||||||||||||||||||||||
 |
|||||||||||||||||||||||||
 |
|||||||||||||||||||||||||
 |
|||||||||||||||||||||||||
Have you finished this pattern?Tag your pictures with #dropspattern #greysparrowtunic or submit them to the #dropsfan gallery. Do you need help with this pattern?You'll find 13 tutorial videos, a Comments/Questions area and more by visiting the pattern on garnstudio.com. © 1982-2026 DROPS Design A/S. We reserve all rights. This document, including all its sub-sections, has copyrights. Read more about what you can do with our patterns at the bottom of each pattern on our site. |
|||||||||||||||||||||||||


With over 40 years in knitting and crochet design, DROPS Design offers one of the most extensive collections of free patterns on the internet - translated to 17 languages. As of today we count 324 catalogues and 12290 patterns translated into English (UK/cm). 12290
We work hard to bring you the best knitting and crochet have to offer, inspiration and advice as well as great quality yarns at incredible prices! Would you like to use our patterns for other than personal use? You can read what you are allowed to do in the Copyright text at the bottom of all our patterns. Happy crafting!
Post a comment to pattern DROPS 195-14
We would love to hear what you have to say about this pattern!
If you want to leave a question, please make sure you select the correct category in the form below, to speed up the answering process. Required fields are marked *.