Comments / Questions (160)
![]() Amber Sarno wrote:
Amber Sarno wrote:
Hello, I would love to have this Sheep Happens pattern in crochet. Is it possible to convert it? Thanks!
14.03.2023 - 09:06DROPS Design answered:
Dear Mrs Sarno, it might be possible, but we unfortunately are not able to adapt every pattern to every request, please contact your yarn store or any crochet forum for any individual assistance. Thanks for your comprehension.
14.03.2023 - 10:14
![]() Eva Callaghan wrote:
Eva Callaghan wrote:
The sheep happens pattern in cm or inches what size is XXXL
16.02.2023 - 01:55
![]() Marie Louise wrote:
Marie Louise wrote:
Bonjour Je cherche le chauffe épaules avec l intégration des moutons est-ce que vous pouvez me référer le numéro, serait grandement apprécié merci
01.01.2023 - 20:04DROPS Design answered:
Bonjour Marie-Louise, nous n'avons pas ce type de modèles, si vous l'avez vu réalisé, contactez directement la personne qui l'a tricoté, elle pourra probablement vous aider. Bon tricot!
02.01.2023 - 15:57
![]() Margitta wrote:
Margitta wrote:
Liebest Drops Team, ich stricke eure Anleitungen unheimlich gerne vor allem weil man wirklich immer Hilfe bekommt. Dafür möchte ich euch danken. Ich wünsche euch ein schönes Weihnachtsfest und alles gute fürs neue Jahr 🥂viele Grüße Margitta
17.12.2022 - 06:02
![]() Margitta wrote:
Margitta wrote:
Liebes Drops Team,wenn die Diagramme 2x bzw 8 x hintereinander gestrickt werden .wie hier z.b. A1 .werden dann auch jeweils die Zunahmen jeweils wiederholt.wenn es also heißt 8x ,dann werden auch 8 Zunahmen gemacht? Ich Danke euch im vorraus und liebe Grüße
16.12.2022 - 16:15DROPS Design answered:
Liebe Margitta, die Diagramme sollen Sie genau wie beschrieben stricken und wiederholen, dh wenn A.1 2 Mal gestrickt wird, stricken Sie jedes A.1 mit den jeweilgen Zunahmen und wenn A.2 8 x wiederholt muss, dann stricken Sie das Diagram genau wie beschrieben und 8x (dh mit den jeweiligen Zunahmen), bei jedem Diagram sollen Sie dieselbe Maschenanzahl bei jeder Runde haben. Viel Spaß beim stricken!
16.12.2022 - 16:21
![]() Mo wrote:
Mo wrote:
Thanks for your quick reply. Can you advise if there is a comparable pattern (top-down with round yoke) with an elevated back that I can use as guidance? I have tried searching but haven’t found anything, and there are so many patterns. Thanks
28.11.2022 - 11:05DROPS Design answered:
Dear Mo, please find all our jumpers worked top down with a yarn group B (such as this one) here - including jumpers with or without elevation (and yarn group B). Happy knitting!
28.11.2022 - 11:28
![]() Mo wrote:
Mo wrote:
I’d like to make this jumper, but with a slightly different neckline, one that is higher at the back, not symmetrical front/back. Can you advise how I can do that, or point me at a pattern that I can use as an example? Thanks,
27.11.2022 - 23:27DROPS Design answered:
Dear Mo, we are unfortunately not able to adjust every pattern to every single request, please feel free to ask your DROPS store or any knitting forum for an individual assistance. Thanks for your comprehension. Happy knitting!
28.11.2022 - 10:16
![]() Doris wrote:
Doris wrote:
Vielen Dank für die schnelle Antwort! Es beruhigt mich sehr, dass es nicht nur mir so geht, sondern generell schwierig ist. Doris
18.11.2022 - 07:56
![]() Doris wrote:
Doris wrote:
Hallo, gibt es einen Trick, wie man das Verdrehen des Bündchens beim Zusammenschließen zu einer Runde verhindern kann? ich habe es mehrmals versucht, irgendetwas mache ich falsch. Vielen Dank! Doris
15.11.2022 - 16:09DROPS Design answered:
Liebe Doris, leider kenne ich selber keinen Trick, bei der 1. Runde muss man immer sehr vorsichtig sein, damit die Runde am Ende dieser 1. Runde verdreht wird. Vielleicht hat aber Ihr Wollladen irgendeinen Tipp. Viel Spaß beim stricken!
16.11.2022 - 09:07
![]() Salla wrote:
Salla wrote:
Hi. I would love to use this pattern but I would like to do this sweatshirt for a male person. Is this suitable for male also or only women? Is it hard to modify this pattern to fit male since its designed for female? Thank you!
12.09.2022 - 21:56DROPS Design answered:
Dear Salla, you will find under our FAQ here how to convert a women's size jacket into a men's size one. Happy knitting!
13.09.2022 - 09:45
Sheep Happens!#sheephappenssweater |
||||||||||||||||
|
|
||||||||||||||||
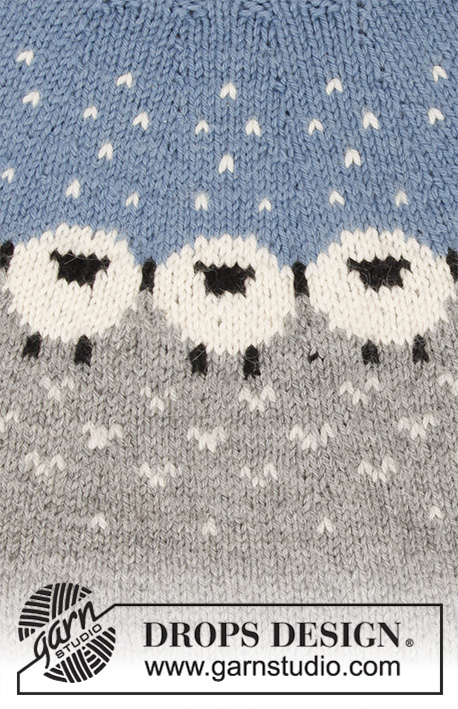
Knitted jumper with round yoke in DROPS Merino Extra Fine or Lima. The piece is worked top down in Nordic pattern with sheep S - XXXL.
DROPS 194-2 |
||||||||||||||||
|
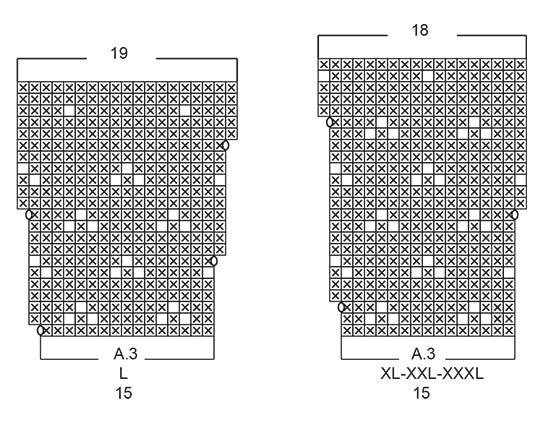
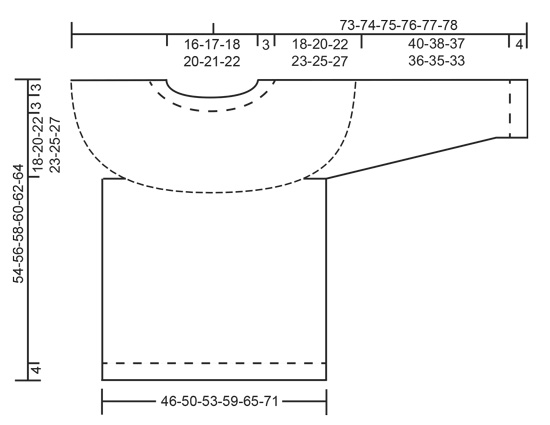
EXPLANATIONS FOR THE PATTERN: ------------------------------------------------------- PATTERN: See diagrams A.1 to A.3. Choose diagram for your size. The diagrams are worked in stocking stitch. As there are long spaces between colour changes, you should twist the strands together approx. every 7th stitch to avoid having long, loose strands at the back. INCREASE TIP (evenly spaced): To work out how to increase evenly, count the total number of stitches on the row (e.g. 90 stitches) and divide these stitches by the number of increases to be made (e.g. 31) = 2.9. In this example, make 1 yarn over after approx. each 3rd stitch. On the next row work the yarn overs twisted to avoid holes. DECREASE TIP (for sleeves): Decrease 1 stitch on each side of the marker thread as follows: Work until there are 3 stitches left before the marker thread, knit 2 together, knit 2 (the marker thread sits in the middle of these 2 stitches), slip 1 stitch as if to knit, knit 1, pass the slipped stitch over the knitted stitch (= 2 stitches decreased). ------------------------------------------------------- START THE PIECE HERE: ------------------------------------------------------- JUMPER - SHORT OVERVIEW OF THE PIECE: The yoke is worked in the round with circular needle, top down. The yoke is divided for body and sleeves and the body is continued in the round. The sleeves are worked in the round with double pointed needles. YOKE: Cast on 92-96-100-104-112-120 stitches with circular needle size 3 mm and light grey blue. Knit 1 round. Then work rib (= knit 2 / purl 2). Work rib for 3 cm. Change to circular needle size 4 mm. Knit 1 round and increase 28-24-32-30-32-34 stitches evenly spaced – read INCREASE TIP = 120-120-132-134-144-154 stitches. Then work pattern as follows (the round starts mid back): Work A.1 (= 6-6-6-5-5-5 stitches) over the first 12-12-12-10-10-10 stitches (= a total of 2 times), A.2 (= 12 stitches), A.1 over the next 42-42-48-50-55-60 stitches (= a total of 7-7-8-10-11-12 times), A.2 over the next 12 stitches, A.1 over the last 42-42-48-50-55-60 stitches (= a total of 7-7-8-10-11-12 times). REMEMBER THE KNITTING TENSION! When A.1 and A.2 have been worked 1 time in height there are 244-244-270-322-348-374 stitches on the needle. The piece measures approx. 16 cm (including the rib). Knit 1 round with light grey and increase 11-11-15-8-12-1 stitches evenly on round = 255-255-285-330-360-375 stitches. Work A.3 (= 15 stitches) over all stitches (= a total of 17-17-19-22-24-25 times in width). When A.3 has been worked 1 time in height there are 306-340-361-396-432-450 stitches on the needle. The piece is now worked with light grey to finished length. Work stocking stitch until the piece measures 21-23-25-26-28-30 cm (including the rib). Then divide the piece for body and sleeves as follows: Work 44-48-50-56-62-67 stitches stocking stitch (= half back piece), place the next 64-72-79-84-90-90 stitches on a thread for sleeve and cast on 8-8-10-10-10-14 new stitches under the sleeve, work 89-99-102-115-127-135 stitches stocking stitch (= front piece), place the next 64-72-79-84-90-90 stitches on a thread for sleeve and cast on 8-8-10-10-10-14 new stitches under the sleeve, finally work 45-49-51-57-63-68 stitches stocking stitch (= half back piece) = 194-212-223-248-272-298 stitches. BODY: Continue working in stocking stitch. When the piece measures 26-26-26-27-27-27 cm from where the body was divided from the sleeves, increase 26-32-33-32-40-42 stitches evenly on next round = 220-244-256-280-312-340 stitches. Change to circular needle size 3 mm and work rib (= knit 2 / purl 2) over all stitches (the yarn overs are worked twisted to avoid holes). Cast off with knit when the rib measures 4 cm (i.e. the piece measures a total of approx. 30-30-30-31-31-31 cm from where the body was divided from the sleeves). The jacket measures a total of 54-56-58-60-62-64 cm, measured from the shoulder. SLEEVE: Place the 64-72-79-84-90-90 stitches from the thread on the one side of the piece on double pointed needles size 4 mm and knit up 1 stitch in each of the 8-8-10-10-10-14 stitches cast on under the sleeve = 72-80-89-94-100-104 stitches. Insert 1 marker thread in the middle of the 8-8-10-10-10-14 stitches (= mid under sleeve). Work stocking stitch in the round with light grey. When the piece measures 1 cm from where the sleeve was divided from the body, decrease 2 stitches mid under sleeve – read DECREASE TIP. Decrease like this every 3-2-1½-1½-1½-1 cm a total of 11-15-18-19-22-23 times = 50-50-53-56-56-58 stitches. When the sleeve measures 40-38-37-36-35-33 cm from where the sleeve was divided from the body, increase 2-2-3-0-4-2 evenly on round = 52-52-56-56-60-60 stitches. Change to double pointed needles size 3 mm. Work rib in the round (= knit 2 / purl 2). Cast off with knit when the piece measures 44-42-41-40-39-37 cm from where the sleeve was divided from the body (approx. 4 cm rib). Work the other sleeve in the same way. |
||||||||||||||||
Diagram explanations |
||||||||||||||||
|
||||||||||||||||
 |
||||||||||||||||
 |
||||||||||||||||
 |
||||||||||||||||
 |
||||||||||||||||
 |
||||||||||||||||
Have you finished this pattern?Tag your pictures with #dropspattern #sheephappenssweater or submit them to the #dropsfan gallery. Do you need help with this pattern?You'll find 24 tutorial videos, a Comments/Questions area and more by visiting the pattern on garnstudio.com. © 1982-2026 DROPS Design A/S. We reserve all rights. This document, including all its sub-sections, has copyrights. Read more about what you can do with our patterns at the bottom of each pattern on our site. |
||||||||||||||||


Post a comment to pattern DROPS 194-2
We would love to hear what you have to say about this pattern!
If you want to leave a question, please make sure you select the correct category in the form below, to speed up the answering process. Required fields are marked *.