
Popular categories
Looking for a yarn?


Comments / Questions (51)
![]() Warteeeesa wrote:
Warteeeesa wrote:
Hello i am new user thanks for approved :)
10.03.2019 - 22:51
![]() Sharon wrote:
Sharon wrote:
Oh, good! It was driving me crazy trying to figure it out. Thanks so much, its so good to know you guys are behind these webpages to resolve puzzles for those of us who havent knitted these kinds of things before.
04.03.2019 - 23:40
![]() Sharon wrote:
Sharon wrote:
"Correction made to yoke: Work 4-3-4-5-7-7 stitches in stocking stitch (= on back piece)...work in stocking stitch over the last 76-85-90-99-107-119 stitches (= back piece)" Is this the same as saying "work 80 stitches in stocking "? (for small size). And where does this correction belong? Which instruction is it replacing?
04.03.2019 - 12:55DROPS Design answered:
Dear Sharon, if you printed the pattern after the correction has been added, the pattern has already been edited, should you have printed the pattern before, then this applies to the yoke part - the first 4 sts on this round are first worked for back piece, then the last 76 sts on the round also belong to back piece, so that you will have 80 sts for back piece in size S (as for front piece) but these 80 sts are worked in 2 times (beg + end of round). Happy knitting!
04.03.2019 - 13:19
![]() Sharon wrote:
Sharon wrote:
Sleeve/body increases on every row or every-other row as is normal? Thanks
04.03.2019 - 11:56DROPS Design answered:
Dear Sharon, you increase for raglan every other round 23-27-29-32-34-39 times in total (= 1 round with increase, 1 round without increase, repeat these 2 rounds the number of times applying to your size). Happy knitting!
04.03.2019 - 13:14
![]() Lea Nielsen wrote:
Lea Nielsen wrote:
Har fundet ud af det. Jeg har troet at min første mærketråd var også der min omgang startede. Så det var min egen fejl. Omgangen starter jo 3 masker før første mærketråd. BINGO!! Så stemmer det hele og jeg beklager mange gange. Hilsen en glad Lea
04.02.2019 - 21:28
![]() Lea Nielsen wrote:
Lea Nielsen wrote:
Hej. Jeg er ved at strikke modellen i XXL. Når bærestykket er færdig har jeg 380 masker som beskrevet i opskriften. Så er der en rettelse som jeg ikke kan hitte ud af. Skal der være 107 masker foran og 114 masker bag? Det vil nemlig stemme. Men ifgl rettelsen står der 107 masker foran og 107 bag. Ærmerne kommer til at sidde lidt forskud, ifht midt under ærmet, fremmod? Venlig hilsen Lea
04.02.2019 - 11:49DROPS Design answered:
Hei Lea. Så flott at du fant ut av det. God fornøyelse videre
08.02.2019 - 13:25
![]() Turid wrote:
Turid wrote:
Skal jeg bruke samme størrelse på strikke pinne som beskrevet på mønster hvis jeg bruker Cotton merino? Bør jeg strikke den 1 størrelse større?
01.02.2019 - 08:44DROPS Design answered:
Hei Turid. Igjen, så er det strikkefastheten som avgjør hvilken pinnestørrelse du må bruke. Derfor står det alltid at pinnestørrelsen kun er veiledende. Du må selv justere pinnestørrelsen opp eller ned slik at du får den angitte strikkefasteheten - derfor råder vi alltid til å strikke en prøvelapp. Om ikke strikkefastheten blir overholdt blir målene på plagget annerledes enn på målskissen. Dette er en smal modell, så det er lurt å se på målskissen når du velger størrelse. Overholder du strikkefastheten blir målene som på skissen, uavhengig av hvilket garn du bruker. God fornøyelse.
01.02.2019 - 08:58
![]() Turid wrote:
Turid wrote:
Kan du bruke cotton merino på denne genseren?
31.01.2019 - 22:05DROPS Design answered:
Hei Turid. Ja, Cotton Merino og Sky har samme strikkefasthet så du kan bytte de med hverandre. Strikk deg likevel en prøvelapp så du er sikker på du får den angitte strikkefastheten. Vær obs på at Cotton merino ikke er like elastisk som Sky. God fornøyelse.
01.02.2019 - 08:28
![]() Lene Øst wrote:
Lene Øst wrote:
Det er mig med silkemohair garnet, jeg glemte min mail. Mvh Lene Øst
27.01.2019 - 14:24
![]() Lene Øst wrote:
Lene Øst wrote:
Jeg vil gerne strikke denne model. Jeg har 5 nøgler silkemohair jeg vil kombinere med en uldgarn fra jer. Hvad vælger jeg så det passer til opskriften og pindene. Den garn jeg har, beskrives med 210 m/25g og pinde 3,5 til 4. Og 23 masker X 36 pinde måler 10x10 cm.
27.01.2019 - 14:22DROPS Design answered:
Hei Lene. Det som er viktig ved bytte av garn er at den angitte strikkefastheten bli overholdt. I denne oppskriften er det 20 masker i bredden og 26 pinner i høyden med glattstrikk = 10 x 10 cm. Det kan virke som det garnet du har er for tykt til å kunne kombineres med et annet garn for å få denne strikkefastheten, samtidig som det er for tynt til å kunne strikkes med alene. Denne modellen er strikket med Sky, som tilhører garngruppe B - våre nest tynneste garn. Å bytte dette med 2 tråder av andre garn blir derfor vanskelig ettersom strikkefastheten er såpass tett. Du kan selvfølgelig prøve deg frem og se om du får det til likevel. God fornøyesle.
29.01.2019 - 13:27
|
|
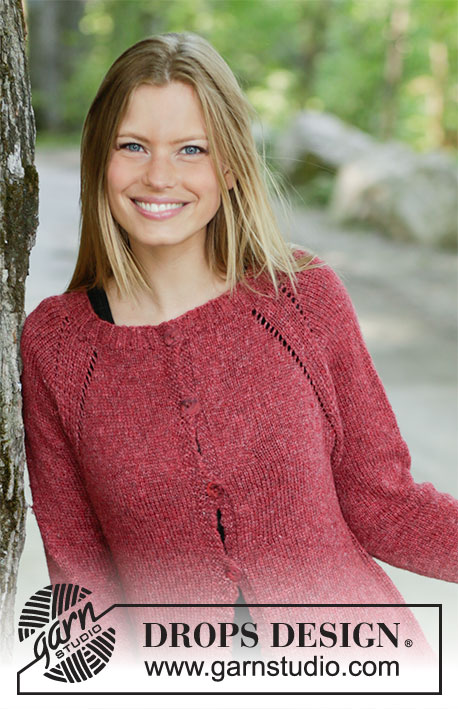
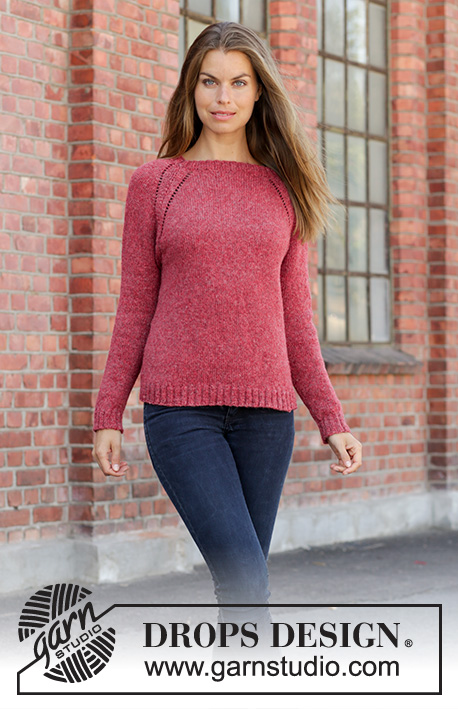
Red Sky#redskysweater |
|
 |
 |
Knitted jumper with raglan in DROPS Sky. Piece is knitted top down. Size: S - XXXL
DROPS 197-23 |
|
|
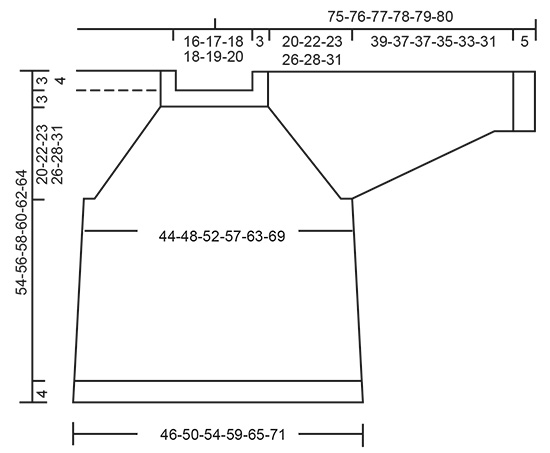
EXPLANATION FOR THE PATTERN: ---------------------------------------------------------- DECREASE/INCREASE TIP (evenly): To calculate how to decrease/increase evenly, use the total number of stitches to be decreased/increased over (e.g. 96 stitches) and divide stitches by number of decreases/increases to be done (e.g. 8) = 12. In this example decrease by knitting every 11th and 12th stitch together. When increasing evenly make 1 yarn over after every 12th stitch. On next round knit yarn over twisted to avoid holes. RAGLAN: Increase 2 stitches in every transition between body and sleeves as follows: Work until 3 stitches remain before marker thread, 1 yarn over, knit 6 (marker thread is in the middle of these stitches), 1 yarn over. On next round knit the yarn overs to make holes. Then work the new stitches in stocking stitch. INCREASE TIP (applies to sides of body): Work until 2 stitches remain before marker thread, 1 yarn over, knit 4 (marker thread is in the middle of these stitches), 1 yarn over. On next round knit yarn over twisted to avoid holes. Then work the new stitches in stocking stitch. DECREASE TIP (applies to sleeves): Decrease 1 stitch on each side of marker thread as follows: Work until 3 stitches remain before marker thread and knit 2 together, knit 2 (marker thread is between these stitches), slip 1 stitch knitwise, knit 1, pass slipped stitch over stitch worked. ---------------------------------------------------------- START THE PIECE HERE: ---------------------------------------------------------- JUMPER - SHORT OVERVIEW OF THE PIECE: Worked in the round on circular needle, top down. An elevation in the back of neck can be worked to get a better fit so that yoke is somewhat higher in the neck. This elevation can be skipped, to make the neck the same at the front and back - see explanation on elevation in pattern. After yoke work body in the round on circular needle. Work sleeves in the round on double pointed needles/a short circular needle. NECK EDGE: Cast on 96-100-104-112-120-124 stitches on circular needle size 3.5 mm with Sky. Knit 1 round. Then work rib (= knit 2/purl 2) for 3 cm. Knit 1 round while decreasing 8-8-8-12-12-12 stitches evenly - read DECREASE/INCREASE TIP = 88-92-96-100-108-112 stitches. Switch to circular needle size 4.5 mm. Now work elevation in the back of neck or start to work the yoke if you don’t want an elevation. ELEVATION IN BACK OF NECK: Skip this paragraph if you do not want an elevation. Insert 1 marker at beginning of round = mid back. Begin from right side and knit 6-6-7-7-8-8 stitches past marker, turn, tighten yarn and purl 12-12-14-14-16-16 stitches from wrong side, turn, tighten yarn and knit 18-18-21-21-24-24 stitches, turn, tighten yarn and purl 24-24-28-28-32-32 stitches, turn, tighten yarn and knit 30-30-35-35-40-40 stitches, turn, tighten yarn and purl 36-36-42-42-48-48 stitches, turn, tighten yarn and knit 42-42-49-49-56-56 stitches, turn, tighten yarn and purl 48-48-56-56-64-64 stitches, turn, tighten yarn and knit until mid back. Cut the yarn. Begin next round (i.e. yoke) after the first 13-14-14-15-16-17 stitches on round. YOKE: Insert 1 marker here - NOW MEASURE PIECE FROM HERE! Now insert 4 marker threads in the piece while working in stocking stitch in the round as follows: Knit 3 stitches (= 3 stitches on back piece), insert 1 marker thread here, knit the next 12-12-14-14-16-16 stitches (= sleeve), insert 1 marker thread here, knit the next 32-34-34-36-38-40 stitches (= front piece), insert 1 marker thread here, knit 12-12-14-14-16-16 stitches (= sleeve), insert 1 marker thread here, knit the last 29-31-31-33-35-37 stitches (= back piece) after last marker (3 stitches remain before first marker thread). Work next round as follows: Knit 6 (marker is in the middle of these 6 stitches), make 1 yarn over, knit 6-6-8-8-10-10 (= sleeve), make 1 yarn over, knit 6 (marker thread is in the middle of these 6 stitches), make 1 yarn over, knit 26-28-28-30-32-34 (= front piece), make 1 yarn over, knit 6 (marker is in the middle of these 6 stitches), make 1 yarn over, knit 6-6-8-8-10-10 (= sleeve), make 1 yarn over, knit 6 (marker thread is in the middle of these 6 stitches), make 1 yarn over, knit 26-28-28-30-32-34 (= back piece), make 1 yarn over. First increase for RAGLAN - read explanation above, is now done (= 8 stitches increased on round). Continue with stocking stitch and increase every other round 23-27-29-32-34-39 times in total (including first increase explained above). After last increase for raglan there are 272-308-328-356-380-424 stitches on needle. Continue in stocking stitch without increases until piece measures 20-22-23-26-28-31 cm from marker at the beginning of yoke. Work next round as follows: Work 4-3-4-5-7-7 stitches in stocking stitch (= on back piece), slip the next 56-66-70-74-76-86 stitches on 1 stitch holder for sleeve, cast on 8-8-10-10-12-12 new stitches on needle (= in the side under sleeve), work in stocking stitch over the next 80-88-94-104-114-126 stitches (= front piece), slip the next 56-66-70-74-76-86 stitches on 1 stitch holder for sleeve, cast on 8-8-10-10-12-12 new stitches on needle (= in the side under sleeve), work in stocking stitch over the last 76-85-90-99-107-119 stitches (= back piece). Finish body and sleeves separately. NOW MEASURE PIECE FROM HERE! BODY: = 176-192-208-228-252-276 stitches. Insert 1 marker thread in the middle of the 8-8-10-10-12-12 new stitches that were cast on under sleeve in each side. Begin round at one of the marker thread and move the marker threads when working. Continue in stocking stitch. When piece measures 8 cm from division, increase 1 stitch on each side of both marker threads - read INCREASE TIP (= 4 stitches increased). Repeat increase when piece measures 17 cm from division = 184-200-216-236-260-284 stitches. When piece measures 27-27-28-26-26-25 cm from division (approx. 50-52-54-56-58-60 cm from shoulder), knit 1 round while increasing 36-40-44-48-52-56 stitches evenly = 220-240-260-284-312-340 stitches. Switch to circular needle size 3.5 mm and work rib = knit 2/purl 2 for 4 cm. Cast off with knit over knit and purl over purl (to avoid a tight cast-off edge use needle size 4.5 mm). Jumper measures approx. 54-56-58-60-62-64 cm from shoulder. SLEEVE: Slip the 56-66-70-74-76-86 stitches from stitch holder in one side of piece on circular needle/double pointed needles size 4.5 mm and pick in addition up 1 stitch in each of the 8-8-10-10-12-12 new stitches cast on under sleeve = 64-74-80-84-88-98 stitches. Insert 1 marker thread in the middle of the 8-8-10-10-12-12 stitches under sleeve and begin round here. Work in stocking stitch in the round. When piece measures 2 cm from division, decrease 2 stitches mid under sleeve - read DECREASE TIP. Decrease like this every 7th-5th-4th-4th-3rd-3rd round 13-17-19-20-21-25 times in total = 38-40-42-44-46-48 stitches. Continue until sleeve measures 39-37-37-35-33-31 cm from division (shorter measurements in the larger sizes because of longer yoke). Knit 1 round while increasing 6-4-6-8-6-8 stitches evenly = 44-44-48-52-52-56 stitches. Switch to double pointed needles size 3.5 mm and work rib = knit 2/purl 2 for 5 cm. Sleeve measures approx. 44-42-42-40-38-36 cm from division. Cast off with knit over knit and purl over purl (to avoid a tight cast-off edge use needle size 4.5 mm). Work the other sleeve the same way. |
|
 |
|
Have you finished this pattern?Tag your pictures with #dropspattern #redskysweater or submit them to the #dropsfan gallery. Do you need help with this pattern?You'll find 29 tutorial videos, a Comments/Questions area and more by visiting the pattern on garnstudio.com. © 1982-2026 DROPS Design A/S. We reserve all rights. This document, including all its sub-sections, has copyrights. Read more about what you can do with our patterns at the bottom of each pattern on our site. |
|


With over 40 years in knitting and crochet design, DROPS Design offers one of the most extensive collections of free patterns on the internet - translated to 17 languages. As of today we count 324 catalogues and 12290 patterns translated into English (UK/cm). 12290
We work hard to bring you the best knitting and crochet have to offer, inspiration and advice as well as great quality yarns at incredible prices! Would you like to use our patterns for other than personal use? You can read what you are allowed to do in the Copyright text at the bottom of all our patterns. Happy crafting!
Post a comment to pattern DROPS 197-23
We would love to hear what you have to say about this pattern!
If you want to leave a question, please make sure you select the correct category in the form below, to speed up the answering process. Required fields are marked *.