
Popular categories
Looking for a yarn?


Comments / Questions (6)
![]() Stefania Formica wrote:
Stefania Formica wrote:
Si può fare con i ferri lineari. Grazie
26.11.2024 - 10:54DROPS Design answered:
Buonasera Stefania, questo modello è lavorato in parte in piano e in parte in tondo. Se vuole lavorarlo tutto in piano, deve riadattare le spiegazioni. Buon lavoro!
27.11.2024 - 00:03
![]() Anna Auriemma wrote:
Anna Auriemma wrote:
Buonasera io ho provato a seguire l'ho schema ma non viene il punto pavone come nel modello grazie
21.11.2021 - 18:59DROPS Design answered:
Buonasera, i diagrammi si leggono da destra a sinistra e dall'alto in basso: in quale punto ha riscontrato difficoltà? Buon lavoro!
21.11.2021 - 21:51Ginny wrote:
Question: (for M size) in the sleeve decreases before the ribbing you re supposed to k2together all stitches and 18 stitches are left.... How? Since from the previous dec row 34 are left... 34/2=17. Plus, there's a note that you should start the decreases after and before the edge stitches, so that leaves us with 32 to k2together. I should have 16 stitches at the end. What am I missing?
05.03.2018 - 00:39DROPS Design answered:
Dear Ginny, you will work 1 edge st, (K2 tog a total of 16 times), 1 edge st = 18 sts remain. Happy knitting!
05.03.2018 - 09:24Sanne Bøhvad wrote:
Er mønsterrappoerterne kun vist fra retsiden ?
21.02.2018 - 16:51DROPS Design answered:
Hej Sanne, du ser diagrammerne fra retsiden, men hver 2. pind strikkes fra retsiden og hver 2. fra vrangen. Sørg for at få mønsterpinden fra retsiden. God fornøjelse!
22.02.2018 - 08:33
![]() Ludmila wrote:
Ludmila wrote:
Will it also be in Czech? :-)
20.01.2018 - 21:09
![]() Doris wrote:
Doris wrote:
Das Wellenmuster mit der Air. Genial, sieht super aus und wird nicht so schwer. Bitte die Anleitung veröffentlichen!
19.12.2017 - 08:07
|
|||||||||||||||||||||||||
Segovia#segoviasweater |
|||||||||||||||||||||||||
 |
 |
||||||||||||||||||||||||
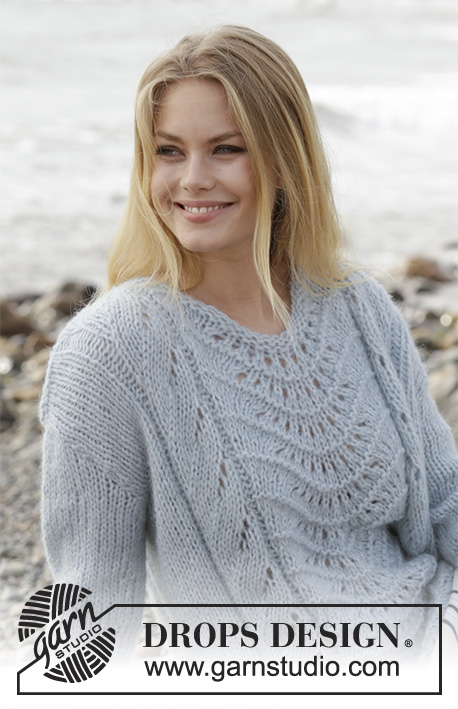
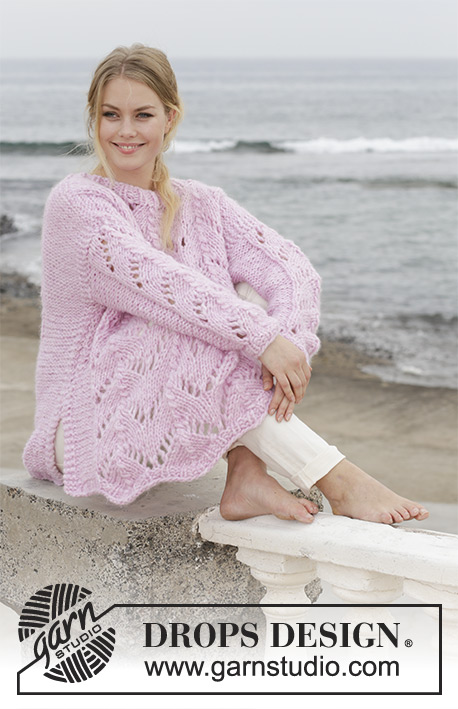
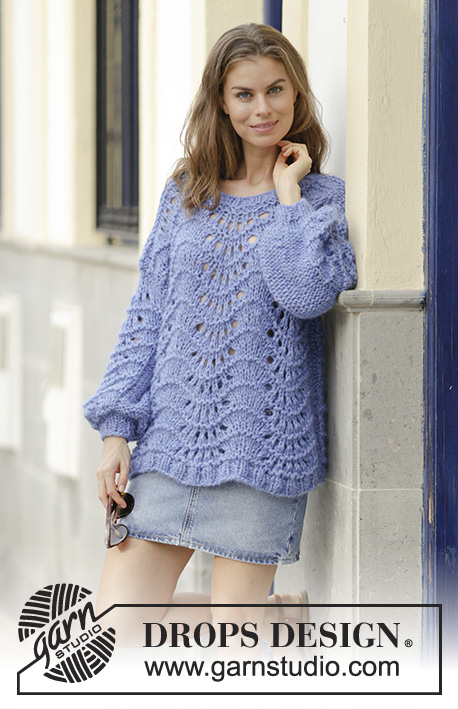
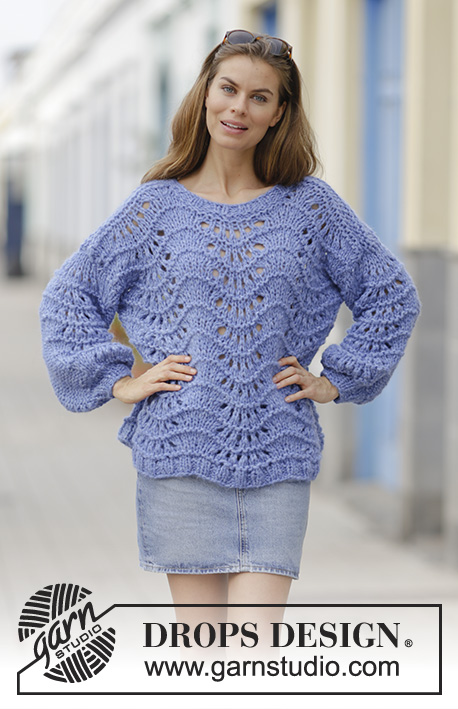
Knitted jumper with wave pattern, worked top down. Sizes S - XXXL. The piece is worked in 2 strands DROPS Air or you can use 2 strands DROPS Brushed Alpaca Silk.
DROPS 188-4 |
|||||||||||||||||||||||||
|
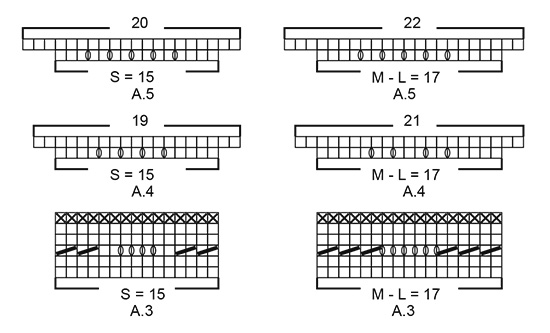
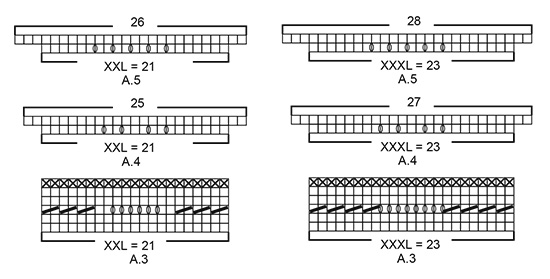
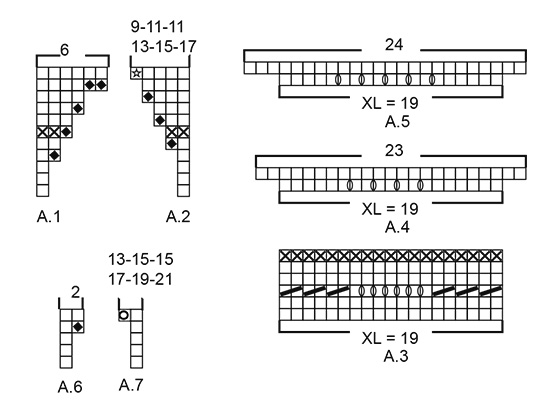
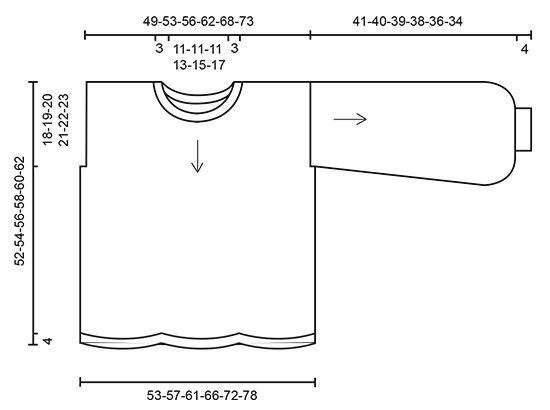
INFORMATION FOR THE PATTERN: RIDGE/GARTER STITCH (worked back and forth): 1 ridge = Knit 2 rows. PATTERN: See diagrams A.1 to A.7. Choose diagram for your size. The diagrams show all rows in the pattern seen from the right side. INCREASE TIP (for sleeves): All increases are made from the right side! Increase 1 stitch inside the 1 edge stitch in each side of piece by making 1 yarn over; on the next round purl the yarn over twisted to avoid a hole. DECREASE TIP (evenly spaced): To work out how to decrease evenly, count the number of stitches to be decreased over (e.g. 41 stitches) and divide by the number of decreases to be made (e.g. 7) = 5.9. In this example, knit together approx. every 5th and 6th stitch. ---------------------------------------------------------- JUMPER: The jumper is worked top down. First work each piece separately, back and forth down to the armholes, then place the pieces on circular needle and work in the round. The sleeves are worked back and forth with circular needle, top down. The neck is worked back and forth on circular needle. FRONT PIECE: Each shoulder is worked separately, increase and cast on stitches for neck and then work the pieces together. LEFT SHOULDER: Cast on 18-19-20-22-24-26 stitches with 2 strands Air or 2 strands Brushed Alpaca Silk and circular needle size 10 mm. Knit 1 row from the wrong side, then 1 RIDGE - see description above. Then work as follows - from the right side: Work diagram A.1 (= 1 stitch), A.3 (= 15-17-17-19-21-23 stitches), purl 1-0-1-1-1-1 stitch (knit from wrong side) and 1 stitch in garter stitch - read PATTERN above. REMEMBER THE KNITTING TENSION! Continue this pattern until A.1 has been completed in height. There are now 23-24-25-27-29-31 stitches on the needle. Place stitches on 1 thread, or leave them un-worked on a needle. RIGHT SHOULDER: Cast on 18-19-20-22-24-26 stitches with 2 strands Air or 2 strands Brushed Alpaca Silk and circular needle size 10 mm. Knit 1 row from the wrong side, then 1 ridge. Continue as follows - from the right side: Work 1 stitch in garter stitch, purl 1-0-1-1-1-1 stitch (knit from the wrong side), A.3 (= 15-17-17-19-21-23 stitches) and A.2 (= 1 stitch). When A.2 has been completed in height there are 26-29-30-34-38-42 stitches on the needle. FRONT PIECE: Place the 23-24-25-27-29-31 stitches from the left shoulder on the same circular needle as the right shoulder = 49-53-55-61-67-73 stitches. Knit 1 row from the wrong side. Then work as follows - from the right side: Work 1 stitch in garter stitch, purl 1-0-1-1-1-1 stitch (knit from the wrong side), A.3 (= 15-17-17-19-21-23 stitches) a total of 3 times in width, purl 1-0-1-1-1-1 stitch (knit from the wrong side) and 1 stitch in garter stitch. Continue with this pattern. When the piece measures 18-19-20-21-22-23 cm from the cast-on edge (measure in the middle of A.3), cast on 2-2-3-2-2-2 stitches at the end of the next 2 rows for armholes = 53-57-61-65-71-77 stitches. Lay the piece to one side and work the back piece. BACK PIECE: Each shoulder is worked separately; increase and cast on stitches for neck and then work the pieces together. RIGHT SHOULDER: Cast on 18-19-20-22-24-26 stitches with 2 strands Air or 2 strands Brushed Alpaca Silk and circular needle size 10 mm. Knit 1 row from the wrong side, then work 1 ridge. Continue as follows - from the right side: Work diagram A.6 (= 1 stitch), A.3 (= 15-17-17-19-21-23 stitches), purl 1-0-1-1-1-1 stitch (knit from the wrong side) and 1 stitch in garter stitch. Continue this pattern until A.6 has been completed in height. There are now 19-20-21-23-25-27 stitches on the needle. Place the stitches on 1 thread, or leave them un-worked on a needle. LEFT SHOULDER: Cast on 18-19-20-22-24-26 stitches with 2 strands Air or 2 strands Brushed Alpaca Silk and circular needle size 10 mm. Knit 1 row from the wrong side, then work 1 ridge. Continue as follows - from the right side: Work 1 stitch in garter stitch, purl 1-0-1-1-1-1 stitch (knit from the wrong side), A.3 (= 15-17-17-19-21-23 stitches) and A.7 (= 1 stitch). When A.7 has been completed in height, there are 30-33-34-38-42-46 stitches on the needle. BACK PIECE: Place the 19-20-21-23-25-27 stitches from the right shoulder on the same circular needle as the left shoulder = 49-53-55-61-67-73 stitches. Knit 1 row from the wrong side. Then work as follows - from the right side: Work 1 stitch in garter stitch, purl 1-0-1-1-1-1 stitch (knit from wrong side), A.3 (= 15-17-17-19-21-23 stitches) a total of 3 times in width, purl 1-0-1-1-1-1 stitch (knit from wrong side) and 1 stitch in garter stitch. Continue with this pattern. When the piece measures 18-19-20-21-22-23 cm from the cast-on edge, cast on 2-2-3-2-2-2 stitches at the end of the next 2 rows for armholes = 53-57-61-65-71-77 stitches. BODY: Place all stitches on the same circular needle (without working them) = 106-114-122-130-142-154 stitches. Insert 1 marker in the piece - THE PIECE IS NOW MEASURED FROM HERE! The round starts in the side. Continue with pattern as before - the increased stitches are purled. Continue working until piece measures 29-30-31-32-33-34 cm. Change to circular needle size 9 mm and work pattern as follows: Purl 4-3-5-4-4-4, A.4 (= 15-17-17-19-21-23 stitches), A.5 (= 15-17-17-19-21-23 stitches), A.4 (= 15-17-17-19-21-23 stitches), purl 8-6-10-8-8-8, A.4 (= 15-17-17-19-21-23 stitches), A.5 (= 15-17-17-19-21-23 stitches), A.4 (= 15-17-17-19-21-23 stitches) and purl 4-3-5-4-4-4. When the diagrams have been completed in height, there are 132-140-148-156-168-180 stitches on the needle. Continue with rib (= knit 2 / purl 2) for 4 cm. Cast off with knit over knit and purl over purl. So the cast-off edge is not tight, you can cast off with a needle 1 size larger. SLEEVE: The sleeve is worked back and forth on circular needle, top down. Cast on 35-37-39-39-43-45 stitches (including 1 edge stitch in each side) with 2 strands Air or 2 strands Brushed Alpaca Silk and circular needle size 10 mm. Purl 1 row from the wrong side. Then work as follows - from the right side: Work 1 edge stitch in garter stitch, purl 9-9-10-9-10-10 stitches (knit from wrong side), A.3 (= 15-17-17-19-21-23 stitches), purl 9-9-10-9-10-10 stitches (knit from wrong side) and 1 edge stitch in garter stitch. Continue the pattern like this. When the piece measures 3 cm increase 1 stitch in each side - read INCREASE TIP. Increase like this every 11-11-10-7-7-6 cm a total of 3-3-3-4-4-4 times. When the increases are finished, there are 41-43-45-47-51-53 stitches on the needle. Continue working until the piece measures 34-33-32-31-29-27 cm - adjust so that the next row is from the right side. Knit 1 row where you decrease 7-9-11-5-9-11 stitches evenly on row - read DECREASE TIP = 34-34-34-42-42-42 stitches. Purl 1 row from the wrong side. Work 1 row where the stitches (inside the edge stitches) are knitted together 2 and 2 = 18-18-18-22-22-22 stitches. Purl 1 row from the wrong side. Change to circular needle size 9 mm and work rib (= knit 2 / purl 2) inside the 1 edge stitch in garter stitch, for 4 cm. Cast off with knit over knit and purl over purl. Work the other sleeve in the same way. ASSEMBLY: Sew right shoulder seam. NECK: The neck is worked back and forth on circular needle. Knit up from the right side approx. 50-50-50-54-54-58 stitches along the neck with 2 strands Air or 2 strands Brushed Alpaca Silk and circular needle size 9 mm. Knit 1 row from the wrong side. Work rib (= knit 2 / purl 2) with 1 edge stitch in garter stitch in each side, for 2 cm. Cast off with knit over knit and purl over purl. ASSEMBLY: Sew the left shoulder seam and up the neck edge (inside the 1 edge stitch in garter stitch). Sew in sleeves and sew sleeve seams inside the 1 edge stitch in garter stitch. |
|||||||||||||||||||||||||
Diagram explanations |
|||||||||||||||||||||||||
|
|||||||||||||||||||||||||
 |
|||||||||||||||||||||||||
 |
|||||||||||||||||||||||||
 |
|||||||||||||||||||||||||
 |
|||||||||||||||||||||||||
Have you finished this pattern?Tag your pictures with #dropspattern #segoviasweater or submit them to the #dropsfan gallery. Do you need help with this pattern?You'll find 28 tutorial videos, a Comments/Questions area and more by visiting the pattern on garnstudio.com. © 1982-2026 DROPS Design A/S. We reserve all rights. This document, including all its sub-sections, has copyrights. Read more about what you can do with our patterns at the bottom of each pattern on our site. |
|||||||||||||||||||||||||


With over 40 years in knitting and crochet design, DROPS Design offers one of the most extensive collections of free patterns on the internet - translated to 17 languages. As of today we count 324 catalogues and 12290 patterns translated into English (UK/cm). 12290
We work hard to bring you the best knitting and crochet have to offer, inspiration and advice as well as great quality yarns at incredible prices! Would you like to use our patterns for other than personal use? You can read what you are allowed to do in the Copyright text at the bottom of all our patterns. Happy crafting!
Post a comment to pattern DROPS 188-4
We would love to hear what you have to say about this pattern!
If you want to leave a question, please make sure you select the correct category in the form below, to speed up the answering process. Required fields are marked *.