
Popular categories
Looking for a yarn?


Comments / Questions (50)
![]() Ruth wrote:
Ruth wrote:
Auf ihre Antwort vom 16.3.26. Was heißt genügend Maschen? Ist auf eine bestimmte Maschenanzahl zu achten?
16.03.2026 - 11:47DROPS Design answered:
Liebe Ruth, also ja, Sie müssen genügend Maschen haben um so zu stricken: 2 Maschen kraus rechts, A.5 über 1 Masche, A.6 bis noch 1 Masche vor der Mittelmasche übrig ist, A.7 über 1 Masche, 1 Masche glatt rechts (= Mittelmasche), A.5 über 1 Masche, A.6 bis noch 3 Maschen übrig sind, A.7 über 1 Masche und 2 Maschen kraus rechts. Viel Spaß beim Stricken!
16.03.2026 - 16:36
![]() Ruth wrote:
Ruth wrote:
Muss ich für die nächsten Mustersätze bei Muster A2, A3, A4 auf eine Maschenanzahl achten(17x 303 Maschen), wenn ich größer werden möchte, da meine Wolle dünner ist? LG Ruth
15.03.2026 - 18:49DROPS Design answered:
Liebe Ruth, beachten Sie nur daß Sie dann genügende Maschen für das nächste Muster (A.5, A.6 und A.7) haben. Viel Spaß beim Stricken!
16.03.2026 - 10:48
![]() Adam wrote:
Adam wrote:
Witam mam otóż pytanie przerobiłem od A.1 do A.4 i nie wiem co dalej czytam instrukcje i każe tylko powtarzać od A.2 do A.4 więc pytam nie wiem . Byłbym wdzięczny za pomoc.
25.06.2025 - 17:44DROPS Design answered:
Witaj Adamie, po przerobieniu schematu A.1 masz 31 oczek na drucie. Dalej przerabiasz tylko schematy A.2-A.4 w tym samym rzędzie. Schematy A.2-A.4 powtarzasz 17 razy na wysokość, aż na drutach będą 303 oczka. Pozdrawiamy!
26.06.2025 - 12:05
![]() Delhomme Gwendoline wrote:
Delhomme Gwendoline wrote:
Bonjour c'est Mme delhomme gwendoline je suis rendu à A.5,A.6,A.7 est-ce que il faut que je fasse une jetée A.6 à côté de la maille du milieu ce trajet?
14.04.2025 - 10:19DROPS Design answered:
Bonjour Mme Delhomme, lorsque vous tricotez les diagrammes A.5, A.6 et A.7, vous allez augmenter au début de A.5 et à la fin de A.7, autrement dit, après les 2 m point mousse au début du châle (juste au début de A.5, puis à la fin de A.7 juste avant la maille centrale, au début de A.5 après la maille centrale et à la fin de A.7 avant les 2 m point mousse à la fin du rang. Bon tricot!
23.04.2025 - 10:16
![]() Ghislaine Marchand wrote:
Ghislaine Marchand wrote:
Bonjour Je souhaite allonger le châle en tricotant 20 fois la séquence A2-A4 au lieu de 17 fois. Mais il me semble que cela ne va pas aller avec les diagrammes A8-A9-A10. En effet on rajoute ainsi 24 mailles donc pas possible de rajouter un nombre entier de diagrammes A9 qui nécessite 9 mailles. Comment faut-il faire pour allonger le châle ? Très exactement combien de fois faut-il faire la séquence A2-A4 pour que ça marche avec la suite ? Merci pour votre réponse.
04.02.2025 - 22:06DROPS Design answered:
Bonjour Mme Marchand, vous pouvez probablement tricoter le nombre de fois A.2-A.4 voulue en hauteur, puis ajuster le nombre de mailles au dernier rang juste avant les diagrammes A.8-A.10 pour être certaine que vous aurez suffisamment de mailles pour tricoter ces diagrammes de chaque côté de la maille centrale. Ce peut être une solution. Bon tricot!
05.02.2025 - 09:26
![]() Delhomme Gwendoline wrote:
Delhomme Gwendoline wrote:
Ok ça c'est le motif du milieu du chale .mais j'ai pas les côtés du chale.
03.02.2025 - 14:01DROPS Design answered:
Bonjour Mme Delhomme, en fait non, vous tricotez les 2 côtés du châle en même temps: vous tricotez de haut en bas, la maille centrale est la maille du milieu qui sépare les motifs ajourés (entre les 2 A.1 au début et entre A.4 et A.2 ensuite). Autrement dit, les débuts/fins de rangs correspondent à l'envergure et la maille centrale à la hauteur du châle, au milieu des points ajourés (que l'on répète de part et d'autre). Bon tricot!
03.02.2025 - 14:28
![]() Delhomme Gwendoline wrote:
Delhomme Gwendoline wrote:
Bonjour j'ai un soucis pour le chale le diagrammes A.1. Le 1 rang j'ai tricote 2 point mossus ,jete ,2 mailles ensemble , jete, une mailles endroit,jete ,glisser 1 mailles, tricote une endroit, passer maille par dessus la maille,jete et z mailles point mossus. Je n'ai pas le même dessin que le chale. Je fini A2 ,A3 ,A4 j'ai même 47 mailles .mais ça ne donne pas du tout le motif.
02.02.2025 - 20:16DROPS Design answered:
Bonjour Mme Delhomme, le 1er rang est juste mais notez bien que vous devez tricoter A.1 de part et d'autre de la maille centrale, ainsi, vous avez 13 mailles dans chacun des A.1,soit: 2 m point mousse, 13 m A.1, 1 m jersey, 13 m A.1, 2 m point mousse = 31 m. Vous tricotez ensuite: 2 m point mousse, A.2, A.3, A.4, 1 m jersey, A.2, A.3, A.4 et 2 point mousse, soit, au dernier rang: 2+7+8+6+1+7+8+6+2=47 mailles. Et vous répétez maintenant A.2, A.3 A.4 en hauteur, vous avez maintenant: A.2, 2 xA.3, A.4 de chaque côté du châle. Bon tricot!
03.02.2025 - 10:11
![]() Lou wrote:
Lou wrote:
Ik wil het patroon inkorten door minder herhalingen van a2, a3 en a4 te te doen, is dit mogelijk en zoja bij welke hoeveelheid steken? Klopt het daarnaast dat als a2, a3, en a4 wel 17x wordt herhaald patroon a5, a6, en a7 niet helemaal klopt en er steken te weinig zijn?
20.01.2025 - 20:37DROPS Design answered:
Dag Lou,
Je zou minder patroon herhalingen kunnen maken, maar eerlijk gezegd weet ik dan niet precies hoe je uitkomt met het randpatroon. Dat zou je dan uit moeten rekenen.
Voor de rest klopt het aantal steken dat je hebt om de randen te kunnen maken als je het patroon volgt.
21.01.2025 - 20:30
![]() Shoshana Goldberg wrote:
Shoshana Goldberg wrote:
Wondering if I want to make it longer - and want to repeat A2-A4 can I add one repeat or some multiples of that section so that it will all work out?
22.12.2024 - 01:42DROPS Design answered:
Dear Shoshana, yes, you can lengthen it by working more repeats of A.2-A.4. Happy knitting!
22.12.2024 - 23:50
![]() Hazard Michele wrote:
Hazard Michele wrote:
Bonjour J'ai un problème sur le rang 3 du diagramme 1, il me reste une maille avant la maille centrale, est-ce correct? Merci pour votre aide
26.08.2024 - 14:12DROPS Design answered:
Bonjour Mme Hazard, au 1er rang de A.1 vous avez augmenté 2 mailles dans chacun des 2 A.1, vous devez ainsi avoir 7 mailles de A.1 de chaque côté de la maille centrale, vérifiez bien que vous aviez bien le bon nombre de mailles (aux 4 premiers rangs sur l'endroit, on fait 4 jetés et on diminue 2 mailles = on augmente ainsi 2 mailles dans chaque A.1 de chaque côté de la maille centrale). Bon tricot!
27.08.2024 - 08:58
|
|||||||||||||||||||
Aretusa#aretusashawl |
|||||||||||||||||||
 |
 |
||||||||||||||||||
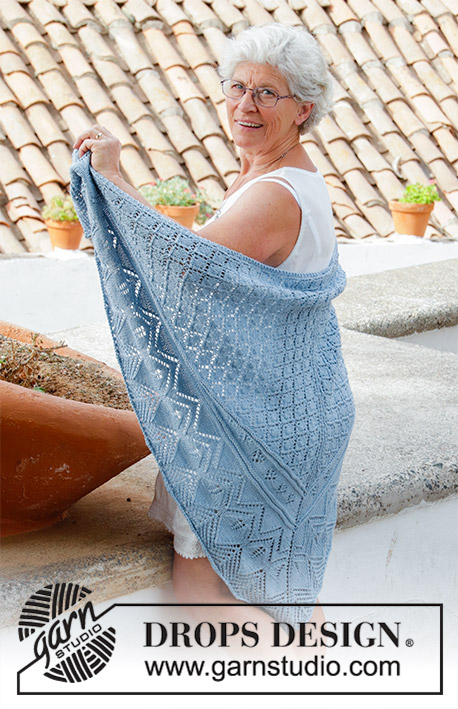
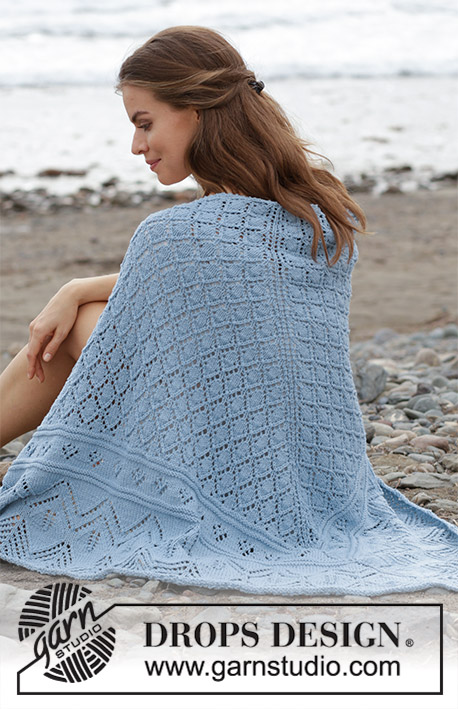
Knitted shawl with lace pattern. Piece is knitted top down in DROPS Merino Extra Fine.
DROPS 186-19 |
|||||||||||||||||||
|
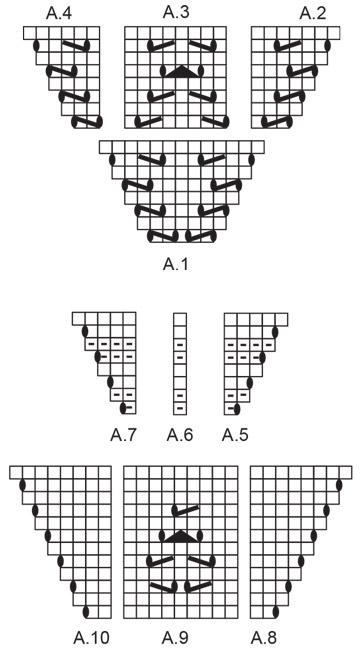
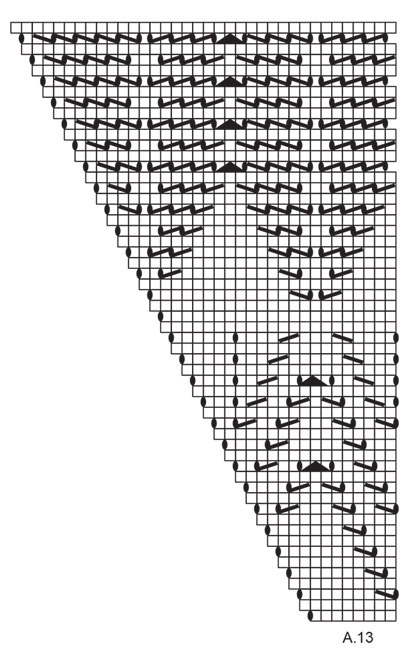
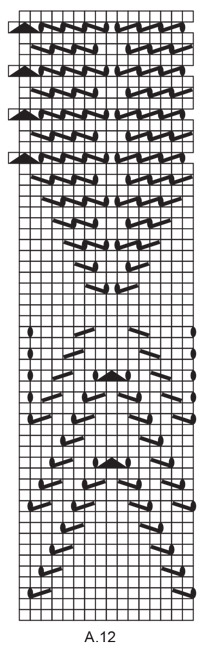
INFORMATION FOR PATTERN: GARTER STITCH (back and forth): 1 ridge = knit 2 rows. PATTERN: See diagrams A.1 to A.13. Diagrams show all rows in pattern seen from the right side. CAST-OFF TIP: To get an elastic cast-off edge you can use a bigger needle size when casting off, or make yarn overs from previous pattern row. Cast off these yarn overs as regular stitches. ---------------------------------------------------------- SHAWL: Worked back and forth on circular needle to make room for all the stitches. Work top down. Cast on 7 stitches on circular needle size 3.5 mm with Merino Extra Fine. Knit 1 row from wrong side. ROW 1: (= right side): Work 2 stitches in GARTER STITCH - see explanation above, 1 yarn over, knit 1, 1 yarn over, knit 1, 1 yarn over, knit 1, 1 yarn over, 2 stitches in garter stitch. ROW 2 (= wrong side): Work 2 stitches in garter stitch, purl until 2 stitches remain and work 2 stitches in garter stitch = 11 stitches on row. ROW 3 (= right side): Work 2 stitches in garter stitch, 1 yarn over, knit 3, 1 yarn over, knit 1, 1 yarn over, knit 3, 1 yarn over and 2 stitches in garter stitch = 15 stitches on row. ROW 4 (= wrong side): Work 2 stitches in garter stitch, purl until 2 stitches remain and work 2 stitches in garter stitch. Then work according to diagrams, in each side of piece work 2 stitches in garter stitch throughout the piece and work middle stitch in stocking stitch. Work according to diagram A.1 as follows from right side: Work 2 stitches in garter stitch, work A.1 over 5 stitches, 1 stitch in stocking stitch (= middle stitch), work A.1 over 5 stitches and 2 stitches in garter stitch. When the diagrams have been worked 1 time vertically, there are 31 stitches on row. Work according to diagrams A.2, A.3 and A.4 as follows from right side: Work 2 stitches in garter stitch, A.2 over 3 stitches, A.3 over 8 stitches, A.4 over 2 stitches, 1 stitch in stocking stitch (= middle stitch), A.2 over 3 stitches, A.3 over 8 stitches, A.4 over 2 stitches and 2 stitches in garter stitch. When diagram has been worked 1 time vertically, there are 47 stitches on row. Repeat diagram vertically, every time the diagrams are worked vertically, there is room for 1 more repetition over A.3 between A.2 and A.4. Work the diagrams like this until A.2-A.4 have been worked 17 times in total vertically and there are 303 stitches on row. Work according to diagrams A.5, A.6 and A.7 as follows from right side: Work 2 stitches in garter stitch, A.5 over 1 stitch, repeat A.6 until 1 stitch remains before middle stitch, A.7 over 1 stitch, 1 stitch in stocking stitch (= middle stitch), A.5 over 1 stitch, repeat A.6 until 3 stitches remain, A.7 over 1 stitch and 2 stitches in garter stitch. When the diagrams have been worked 1 time vertically, there are 319 stitches on row. Work according to diagrams A.8, A.9 and A.10 as follows from right side: Work 2 stitches in garter stitch, A.8 over 2 stitches, repeat A.9 until 2 stitches remain before middle stitch (17 times in width), A.10 over 2 stitches, 1 stitch in stocking stitch (= middle stitch), A.8 over 2 stitches, repeat A.9 until 4 stitches remain (17 times in width), A.10 over 2 stitches and 2 stitches in garter stitch. When the diagrams have been worked 1 time vertically, there are 343 stitches on row. Work according to diagrams A.5, A.6 and A.7 as follows from right side: Work 2 stitches in garter stitch, A.5 over 1 stitch, repeat A.6 until 1 stitch remains before middle stitch, A.7 over 1 stitch, 1 stitch in stocking stitch (= middle stitch), A.5 over 1 stitch, repeat A.6 until 3 stitches remain, A.7 over 1 stitch and 2 stitches in garter stitch. When the diagrams have been worked 1 time vertically, there are 359 stitches on row. Work according to diagrams A.11, A.12 and A.13 as follows from right side: Work 2 stitches in garter stitch, A.11 over 9 stitches, repeat A.12 until 8 stitches remain before middle stitch (10 times in width), A.13 over 8 stitches, 1 stitch in stocking stitch (= middle stitch), A.11 over 9 stitches, repeat A.12 until 10 stitches remain on needle (10 times in width), A.13 over 8 stitches and 2 stitches in garter stitch. When the diagrams have been worked 1 time vertically, there are 471 stitches on row. READ CAST-OFF TIP! Loosely cast off on next row from right side. Fasten off. |
|||||||||||||||||||
Diagram explanations |
|||||||||||||||||||
|
|||||||||||||||||||
 |
|||||||||||||||||||
 |
|||||||||||||||||||
 |
|||||||||||||||||||
 |
|||||||||||||||||||
Have you finished this pattern?Tag your pictures with #dropspattern #aretusashawl or submit them to the #dropsfan gallery. Do you need help with this pattern?You'll find 20 tutorial videos, a Comments/Questions area and more by visiting the pattern on garnstudio.com. © 1982-2026 DROPS Design A/S. We reserve all rights. This document, including all its sub-sections, has copyrights. Read more about what you can do with our patterns at the bottom of each pattern on our site. |
|||||||||||||||||||


With over 40 years in knitting and crochet design, DROPS Design offers one of the most extensive collections of free patterns on the internet - translated to 17 languages. As of today we count 324 catalogues and 12290 patterns translated into English (UK/cm). 12290
We work hard to bring you the best knitting and crochet have to offer, inspiration and advice as well as great quality yarns at incredible prices! Would you like to use our patterns for other than personal use? You can read what you are allowed to do in the Copyright text at the bottom of all our patterns. Happy crafting!
Post a comment to pattern DROPS 186-19
We would love to hear what you have to say about this pattern!
If you want to leave a question, please make sure you select the correct category in the form below, to speed up the answering process. Required fields are marked *.