
Popular categories
Looking for a yarn?


Comments / Questions (21)
![]() Mette Tronrud wrote:
Mette Tronrud wrote:
Er det feil i oppskriften? I str M på mønster A2, rad 10, er det annenhver grå/hvit....men rapporten slutter med hvit og starter med hvit...dvs at det kommer to hvite ved siden av hverandre hver 17.maske ca....virker rart....Noen som vet?
20.11.2019 - 22:03DROPS Design answered:
Hei Mette! Det skal strikkes annenhver hvit og grå gjennom hele omgang 10. Lykke til!
21.11.2019 - 08:29
![]() My wrote:
My wrote:
Hej! Jag får inte riktigt ihop hur man efter att ha stickat sista ökningen i A2 ska ha 300 maskor på stickan i storlek M angående tröjan. Det finns bara 4 ökningar på diagram A2 och dess för innan ska man bara ha haft 240 maskor på stickan. Tack!
09.10.2019 - 21:41DROPS Design answered:
Hej. Du stickar A.2 15 gånger på 1 varv i storlek M. I varje A.2 är det som du skriver 4 ökningar totalt - 15 x 4 m = 60 M ökade. 240+60=300 m. Lycka till!
10.10.2019 - 07:53
![]() Ulla wrote:
Ulla wrote:
Kan man byta ut karisma mot ngt bland garn med ull eller till ett ullgarn som inte sticks.
29.07.2019 - 10:20DROPS Design answered:
Hei Ulla. Så lenge du oppnår den angitte strikkefatsheten kan du helt fint bytte til et annet garn. Karisma tilhører garngruppe B, og alle garn i denne garngruppen skal ha samme strikkefasthet. Du skal derfor kunne bytte med hvilket som helst av disse garnene, se liste her. Hva med å prøve feks Lima, som inneholder 35% alpakka? Vi råder likevel til å lage en strikkeprøve for å kontrollere strikkefatsheten. Garnkalkulatoren vil fortlle deg ny garnmengde i de alternative kvalitetene. God fornøyeløse
29.07.2019 - 15:06
![]() Inge Gevers wrote:
Inge Gevers wrote:
Hallo, ik ben al een aardig eind op weg, maar na het meerderen bij het lijf ( 9x 4 steken naast de markering) kom ik nog niet aan 53 cm. Is het de bedoeling dat ik door ga tot 53 cm dan 46 steken meerder en meteen daarna aan het boord begin? Ik hoor het graag! Groetjes Inge
27.01.2019 - 21:29DROPS Design answered:
Dag Inge,
Als je na de meerderingen nog niet de juiste lengte hebt, brei je door tot de juiste afmetingen zonder verder te meerderen. De 46 steken meerder je pas vlak voordat je met de boord begint.
03.02.2019 - 12:50
![]() Karen wrote:
Karen wrote:
Hei, Har denne genseren også A-line fasong som jakken? Er dette eventuel årsaken til at den er strikket fra halsen og ned fremfor motsatt - og hvis ikke - kan oppskriften enkelt snus?
27.01.2019 - 16:35DROPS Design answered:
Hei Karen. Ja det er A-fasong på genseren. Den er strikket ovenfra og ned fordi dette gjør det lettere å tilpasse bærestykket underveis, samt at det er enklere å prøve den på mens du strikker. Om du heller vil strikke den nedenfra og opp kan du helt fint snu oppskriften selv, husk at du også må snu diagrammene på hodet, og at det felles der du øker og omvendt. God fonrøyelse
29.01.2019 - 13:21
![]() Peggy wrote:
Peggy wrote:
Bonjour, je ne trouve pas les explications pour les augmentations de la flêche 5 qui fait passer de 240 à 300 mailles? Merci pour votre aide
17.10.2018 - 18:59DROPS Design answered:
Bonjour Peggy, Après la flèche-4, vous avez 240 m, terminez le diagramme A.1 en hauteur, puis tricotez A.2 (= 15 fois tout le tour), vous allez augmenter dans chaque diagramme = vous aurez 300 m après la dernière augmentation dans A.2, puis à l'avant-dernier rang de A.2 = flèche-5, augmentez 6 m = 306 m. au total. Bon tricot!
18.10.2018 - 09:17
![]() Trine wrote:
Trine wrote:
Hei. Kommder det til å bli gitt ut oppskrift på Narvik genseren til barn? Eller tips til hvordan en kan regne seg frem til mindre str??
01.08.2018 - 09:47DROPS Design answered:
Hej Trine, Her finder du lignende opskrifter. DROPS children 22-44 DROPS 22-15
15.08.2018 - 08:34
![]() COENS wrote:
COENS wrote:
Je ne trouve pas le modèle A3 dans vos explications. Pouvez-vous me le transmettre. Merci beaucoup
05.01.2018 - 14:01DROPS Design answered:
Bonjour, le diagramme A.3 se trouve a cote du schéma des mesures, apres les explications. Bon tricot!
05.01.2018 - 14:19
![]() Morgan De Rivery wrote:
Morgan De Rivery wrote:
Bonjour, je souhaite réaliser un de vos modèles de pulls, mais je ne sais pas comment choisir la taille, à quoi correspondent les M, L, XL... Je vous remercie de votre réponse
20.11.2017 - 22:14DROPS Design answered:
Bonjour Mme De Rivery, vous trouverez en bas de page un schéma avec toutes les mesures pour chaque taille, elles ont été prises à plat, et sont en cm. Comparez ces mesures à un vêtement similaire dont vous aimez la forme pour trouver la taille idéale. Vous trouverez ici plus d'infos sur les tailles. Bon tricot!
21.11.2017 - 08:23
![]() Jiřina wrote:
Jiřina wrote:
V návodu na čepici je v české verzi chyba. Po upletení lemu následuje vzor A4, poté vzor A3.
29.10.2017 - 18:31DROPS Design answered:
Dobrý den, Jiřino, díky za upozornění - opraveno! Hana
31.10.2017 - 20:10
|
||||||||||||||||
Narvik#narviksweater |
||||||||||||||||
 |
 |
|||||||||||||||
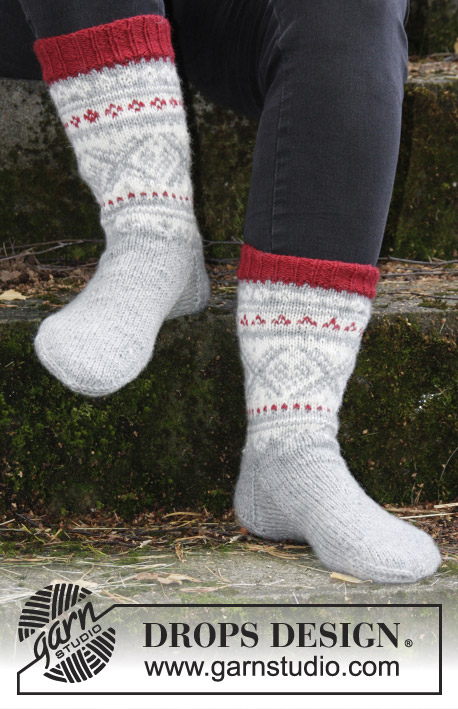
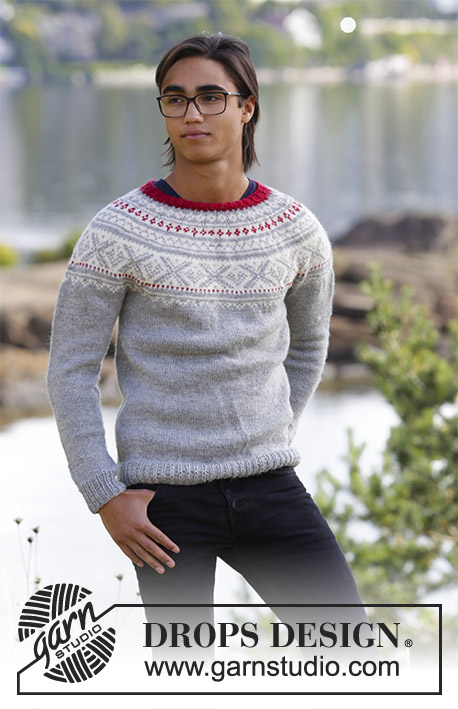
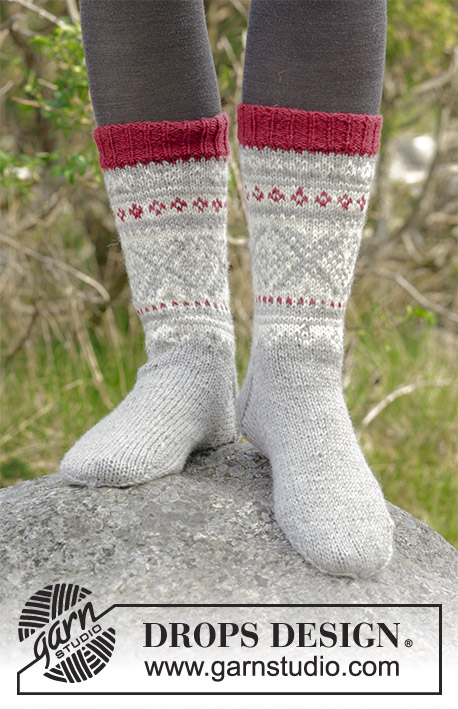
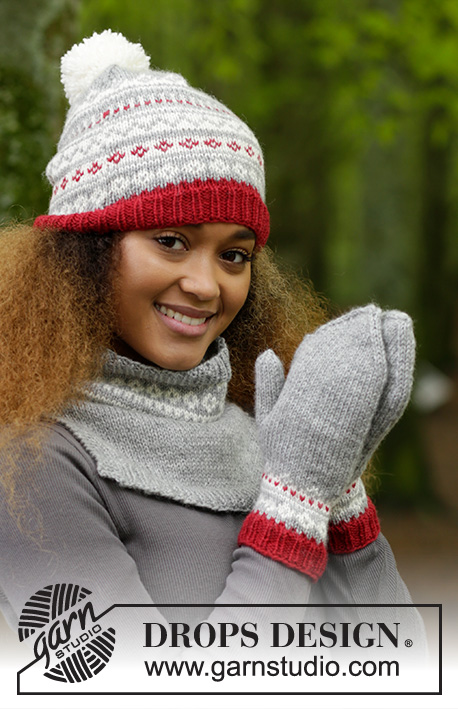
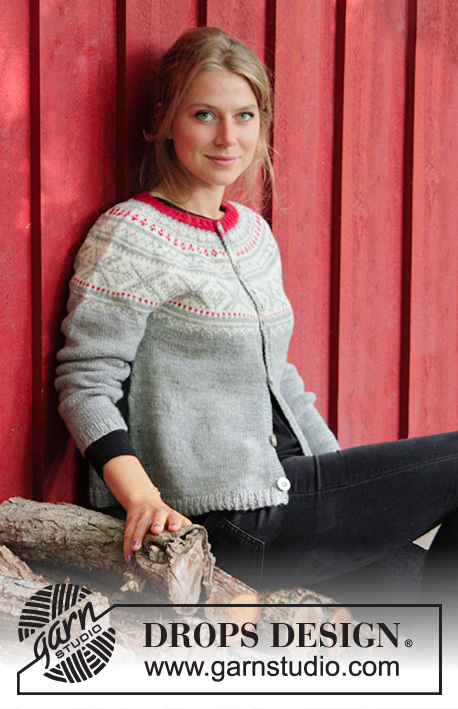
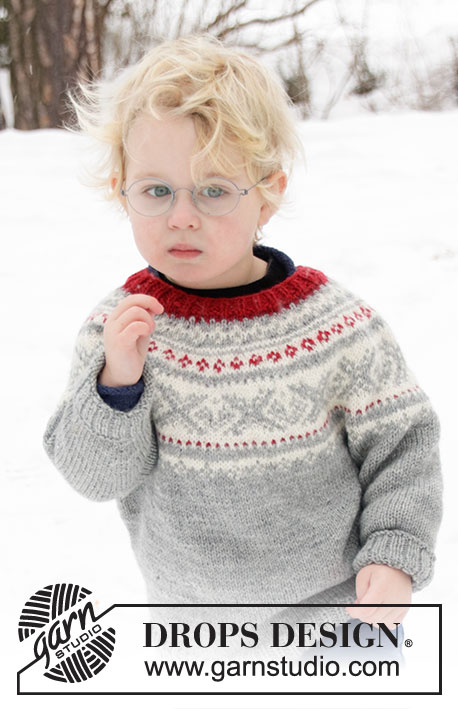
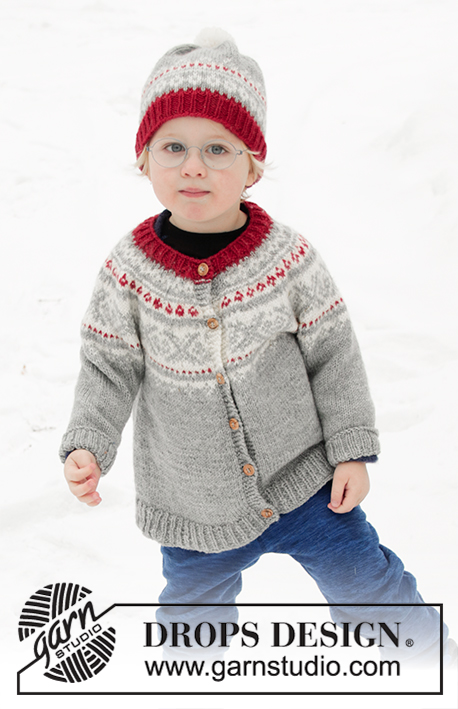
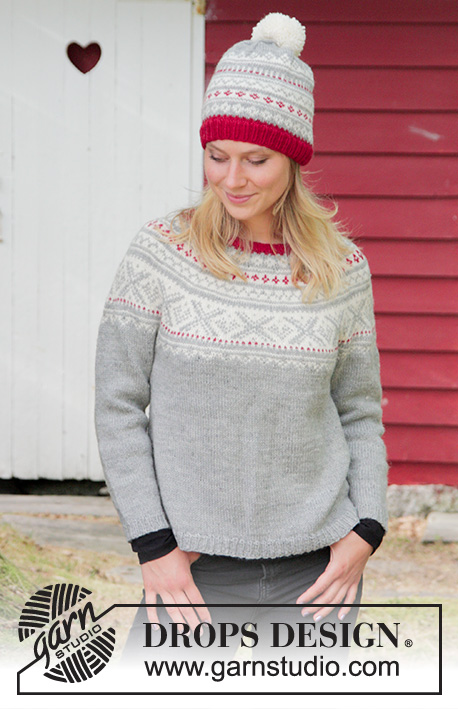
The set consists of: Knitted jumper with round yoke, multi-coloured Norwegian pattern and A-shape, worked top down. Sizes S - XXXL. Hat with multi-coloured Norwegian pattern and pom pom. The set is worked in DROPS Karisma.
DROPS 183-2 |
||||||||||||||||
|
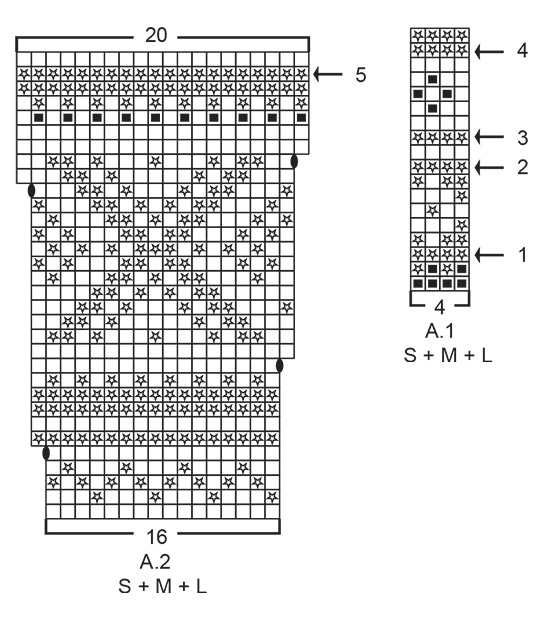
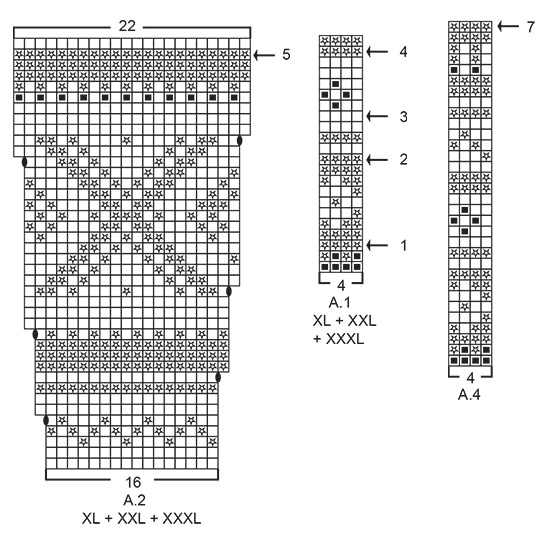
INFORMATION FOR THE PATTERN: INCREASE/DECREASE TIP: To work out how to increase or decrease evenly, count the total number of stitches on the needle (e.g. 96 stitches) and divide by the number of increases/decreases to be made (e.g. 28) = 3.4. In this example, increase by making 1 yarn over alternately after each 3rd and 4th stitch. On the next round knit the yarn overs twisted to prevent holes. If you are decreasing, knit alternately approx. every 3rd and 4th stitch and every 4th and 5th stitch together. ELEVATION (for back of neck on jumper): Insert 1 marker at the beginning of the round = mid back. Start from the right side with wine red and knit 12-13-14-15-16-17 stitches past the marker, turn, tighten the strand and purl 24-26-28-30-32-34 stitches. Turn, tighten the strand and knit 36-39-42-45-48-51 stitches, turn, tighten the strand and purl 48-52-56-60-64-68 stitches. Turn, tighten the strand and knit 60-65-70-75-80-85 stitches, turn, tighten the strand and purl 72-78-84-90-96-102 stitches. Turn, tighten the strand and knit back to mid back. PATTERN: Jumper: See diagrams A.1 to A.3. Choose diagram for your size. Hat: See diagrams A.3 and A.4. The whole pattern is worked in stocking stitch. KNITTING TIP: To avoid the knitting tension becoming tighter when working pattern, it is important that the strands do not pull at the back of the piece. You can increase a needle size when working pattern if this is a problem. INCREASE TIP (for sides of body): Start 2 stitches before the marker thread, make 1 yarn over, knit 4 (the marker thread sits in the middle of these 4 stitches), make 1 yarn over (= 2 stitches increased). On the next round knit the yarn overs twisted to prevent holes. DECREASE TIP (for mid under sleeve): Start 3 stitches before the marker thread, knit 2 together, knit 2 (the marker thread sits in the middle of these 2 stitches), slip 1 stitch as if to knit, knit 1, pass the slipped stitch over the knitted stitch (= 2 stitches decreased). ---------------------------------------------------------- JUMPER: The piece is worked in the round with circular needle from mid back and top down. The sleeves are worked in the round with short circular needle top down, change to double pointed needles when necessary. NECKLINE: Cast on 96-99-105-108-111-117 stitches with circular needle size 3 mm and wine red. Knit 1 round. Then work rib (knit 1 / purl 2). When the rib measures 3 cm knit 1 round where you increase 28-33-39-40-41-43 stitches evenly on round – read INCREASE/DECREASE TIP = 124-132-144-148-152-160 stitches. Continue by working yoke as described below. YOKE: Read KNITTING TIP! Change to circular needle size 4 mm and knit 1 round. For a better fit, you can now work an ELEVATION in the back of the neck – see description above. When the elevation has been completed, work A.1 in the round (= 31-33-36-37-38-40 repeats of 4 stitches). Continue the pattern in this way and at the same time increase on every round marked with an arrow in A.1 as described below – read INCREASE/DECREASE TIP and REMEMBER THE KNITTING TENSION! On round with arrow-1 increase 28-32-36-36-36-40 stitches evenly on round = 152-164-180-184-188-200 stitches. On round with arrow-2 increase 24-28-36-32-36-36 stitches evenly on round = 176-192-216-216-224-236 stitches. On round with arrow-3 increase 24-24-28-28-32-36 stitches evenly on round = 200-216-244-244-256-272 stitches. On round with arrow-4 increase 24-24-28-28-32-32 stitches evenly on round = 224-240-272-272-288-304 stitches. When A.1 has been completed, work A.2 in the round (= 14-15-17-17-18-19 repeats of 16 stitches). Continue pattern in this way and increase as shown in the diagram. After the last increase in A.2 there are 280-300-340-374-396-418 stitches on the round. Continue A.2 and at the same time increase 2-6-2-4-0-2 stitches evenly on round with arrow-5 in A.2 = 282-306-342-378-396-420 stitches. When A.2 has been completed, work A.3 in the round (= 47-51-57-63-66-70 repeats of 6 stitches). Continue pattern in this way. AT THE SAME TIME on the round with arrow-6 in A.3 increase 6-14-6-2-4-4 stitches evenly on round = 288-320-348-380-400-424 stitches. When A.3 has been completed the piece measures approx. 23-23-23-27-27-27 cm from the cast-on edge mid front. Continue working stocking stitch with light grey until the piece measures 23-25-27-29-31-33 cm from the cast-on edge mid front (if your knitting tension is right in height, you will reach this length in size S when A.3 has been completed). The next round is worked as follows: Knit 42-46-50-56-60-65 stitches (= ½ back piece), place the next 60-68-74-78-80-82 stitches on a thread for sleeve, cast on 8-8-10-10-12-14 new stitches on the needle (= in side under sleeve), knit 84-92-100-112-120-130 stitches (= front piece), place the next 60-68-74-78-80-82 stitches on a thread for sleeve, cast on 8-8-10-10-12-14 new stitches on needle (= in side under sleeve) and knit the remaining 42-46-50-56-60-65 stitches (= ½ back piece). Body and sleeves are finished separately. THE PIECE IS NOW MEASURED FROM HERE! BODY: = 184-200-220-244-264-288 stitches. Insert 1 marker thread in the middle of the 8-8-10-10-12-14 stitches cast on under the sleeve in each side. Start the round by one of the marker threads and continue with stocking stitch and light grey. When the piece measures 2 cm from the separation increase 1 stitch on each side of both marker threads – read INCREASE TIP (= 4 stitches increased). Increase in this way every 8th round (approx. every 3 cm) a total of 9 times in each side = 220-236-256-280-300-324 stitches. Knit 1 round where you increase 44-46-50-56-60-66 stitches evenly on round = 264-282-306-336-360-390 stitches. Change to circular needle size 3 mm and work rib in the round (= knit 1 / purl 2) for 3 cm. Cast off with knit over knit and purl over purl, but to avoid the cast-off edge being tight you can make 1 yarn over after every 6th stitch AT THE SAME TIME as you cast off (yarn overs cast off as normal stitches). The jumper measures approx. 54-56-58-60-62-64 cm from the shoulder down. SLEEVE: Place the 60-68-74-78-80-82 stitches from the thread in the one side of the piece on short circular needle size 4 mm. In addition knit up 1 stitch in each of the 8-8-10-10-12-14 stitches cast on under the sleeve = 68-76-84-88-92-96 stitches on the needle. Insert 1 marker thread in the middle of the 8-8-10-10-12-14 stitches (= mid under the sleeve). Work stocking stitch in the round with light grey. When the piece measures 3-2-2-3-2-2 cm from the separation decrease 2 stitches mid under sleeve – read DECREASE TIP. Decrease in this way every 3-2½-2-1½-1½-1½ cm a total of 12-15-18-19-20-21 times = 44-46-48-50-52-54 stitches. When the sleeve measures 40-39-37-36-35-33 cm from the separation (shorter measurements in the larger sizes due to longer yoke), knit 1 round where you increase 7-8-6-7-8-6 stitches evenly on round = 51-54-54-57-60-60 stitches. Change to double pointed needles size 3 mm. Work rib in the round (= knit 1 /purl 2) for 3 cm. Cast off with knit over knit and purl over purl, but to avoid the cast-off edge being tight you can make 1 yarn over after every 6th stitch at the same time as you cast off (yarn overs cast off as normal stitches). The sleeve measures approx. 43-42-40-39-38-36 cm from the separation and down. Work the other sleeve in the same way. ---------------------------------------------------------- HAT: The piece is worked in the round with circular needle, bottom up. Change to double pointed needles when necessary. Cast on 111-117-123 stitches with circular needle size 3 mm and wine red. Knit 1 round. Then work rib (= knit 1 / purl 2) for 3-4-4 cm. Knit 1 round where you decrease 3-5-7 stitches evenly on round – read INCREASE/DECREASE TIP = 108-112-116 stitches. Change to circular needle size 3.5 mm and work A.4 (= 27-28-29 repeats of 4 stitches). REMEMBER THE KNITTING TENSION! On the last round in A.4 decrease 0-4-2 stitches evenly on round = 108-108-114 stitches. Continue by working A.3 in the round (= 18-18-19 repeats of 6 stitches). When A.3 has been completed, the piece measures approx. 16-17-17 cm. Continue with stocking stitch and light grey. When the piece measures 18-19-20 cm insert 6 marker threads in the piece with 18-18-19 stitches between each one. On the next round decrease 1 stitch after each marker thread by knitting 2 stitches together (= 6 stitches decreased). Decrease in this way every 2nd round a total of 6-6-7 times and then every round a total of 10 times in all sizes = 12 stitches left in all sizes. Cut the strand, pull it through the remaining stitches, tighten and fasten well. The hat measures approx. 25-26-28 cm top down. POM POM: Make a pom pom of approx. 8 cm in diameter with off white. Sew the pom pom to the top of the hat. |
||||||||||||||||
Diagram explanations |
||||||||||||||||
|
||||||||||||||||
 |
||||||||||||||||
 |
||||||||||||||||
 |
||||||||||||||||
Have you finished this pattern?Tag your pictures with #dropspattern #narviksweater or submit them to the #dropsfan gallery. Do you need help with this pattern?You'll find 35 tutorial videos, a Comments/Questions area and more by visiting the pattern on garnstudio.com. © 1982-2026 DROPS Design A/S. We reserve all rights. This document, including all its sub-sections, has copyrights. Read more about what you can do with our patterns at the bottom of each pattern on our site. |
||||||||||||||||


With over 40 years in knitting and crochet design, DROPS Design offers one of the most extensive collections of free patterns on the internet - translated to 17 languages. As of today we count 324 catalogues and 12290 patterns translated into English (UK/cm). 12290
We work hard to bring you the best knitting and crochet have to offer, inspiration and advice as well as great quality yarns at incredible prices! Would you like to use our patterns for other than personal use? You can read what you are allowed to do in the Copyright text at the bottom of all our patterns. Happy crafting!
Post a comment to pattern DROPS 183-2
We would love to hear what you have to say about this pattern!
If you want to leave a question, please make sure you select the correct category in the form below, to speed up the answering process. Required fields are marked *.