
Popular categories
Looking for a yarn?


Comments / Questions (17)
![]() Iwona wrote:
Iwona wrote:
Mam też problem z dołem swetra, francuski ściągacz wywija się do góry, co robię żle?
28.08.2017 - 22:11DROPS Design answered:
Witaj, po zakończeniu pracy należy namoczyć lekko sweter i blokować (naciągnąć zwijający się brzeg i przypiąć szpilkami do materaca lub dywanu i suszyć rozłożony na płasko). To powinno pomóc. POWODZENIA!
29.08.2017 - 18:34
![]() Iwona wrote:
Iwona wrote:
Problem mam w tym miejscu karczka ''Dodawać tak samo 13-17-19-20-21-21 razy w każdym okrążeniu, dalej 8-8-8-10-12-14 razy co 2 okr'', czyli jak dodawać?
28.08.2017 - 22:08DROPS Design answered:
Witaj Iwono, na karczku dodajemy po 1 oczku w miejscu każdego markera – PATRZ DODAWANIE OCZEK-2 (karczek). Np. w rozmiarze S dodajemy oczka 13 razy w każdym rzędzie (tj. i na prawej i na lewej stronie robótki, w sumie będziemy dodawać oczka na 13 rzędach), dalej dodajemy oczka 8 razy co 2 rzędy (tylko na prawej stronie robótki, tj. 16 kolejnych rzędów) = w sumie dodajemy oczka 21 razy. POWODZENIA!
29.08.2017 - 18:32
![]() Iwona wrote:
Iwona wrote:
Jak rozumieć ''okrążenie'' w swetrze rozpinanym? Proszę o dokładne wyjaśnienie dodawania oczek na karczku.
28.08.2017 - 12:49DROPS Design answered:
Witaj Iwono, oczywiście chodzi o rzędy, na okrągło są wykonywane tylko rękawy. Co do dodawania oczek na karczku, proszę sprecyzować jaki dokładnie jest problem. Pozdrawiam
28.08.2017 - 13:09
![]() Maga wrote:
Maga wrote:
Ich habe Schwierigkeiten bei den Zunahmen in der Passe, sei es mit dem genauen Positionieren (vor bzw. nach dem Marker), als auch mit der Ausführung. Es sollen ja keine Löcher entstehen und das passt auch, allerdings wird meine Arbeit nicht sehr schön und ich frage mich, ob durch das einmal vor und einmal nach dem Markierer Zunehmen nicht so eine Art Muster entstehen soll?
24.07.2017 - 22:02DROPS Design answered:
Liebe Maga, bei der 1. Zunahemenrunde werden Sie vor jedem Markierer zunehmen, bei der 2. Zunahmenrunde werden Sie nach jedem Markierer zunehmen, und so weiterstricken. Viel Spaß beim stricken!
25.07.2017 - 09:39
![]() Stella wrote:
Stella wrote:
What is meant by 2 strands of wool? Does that mean untwisting the wool (Drops Alpaca) or doubling it up?
10.07.2017 - 23:50DROPS Design answered:
Hi Stella, 2 strands of wool means that you work with double strands. You are either working with a strand of 2 different qualities of yarn or 2 strands of the same yarn (in this pattern 2 strands of Drops Alpaca), in which case it is easiest to take the strands from the outside and inside of the ball at the same time. In this way you can work without getting the yarns in a tangle. Kind regards, Deirdre
11.07.2017 - 06:30
![]() Madeleine wrote:
Madeleine wrote:
Jag som är relativt ny på att sticka, är denna för svår för att börja med? Den är ju så himla fin!
20.12.2016 - 13:15DROPS Design answered:
Hej Madeleine. Det kan blive lidt en udfordring for dig med det runde baerestykke, men det er derudover en meget enkel model - der er ikke meget mönster udover striberne. Men pröv at laese opskriften godt igennem og se om det er noget du kan fölge - og saa tag det skridt for skridt og brug vores videoer :)
20.12.2016 - 15:30
![]() Vittoria wrote:
Vittoria wrote:
Perchè Per Questo Modello Non C'è La Spiegazione Completa Per l'esecuzione? Potete Controllare Se Non è Stato Caricato Correttamente. Grazie, Sito Bellissimo E Utilissimo. Saluti. Vittoria
23.11.2016 - 13:33DROPS Design answered:
Buongiorno Vittoria. Caricheremo le spiegazioni quanto prima. La ringraziamo per la segnalazione. Buon lavoro!
23.11.2016 - 14:15
|
|
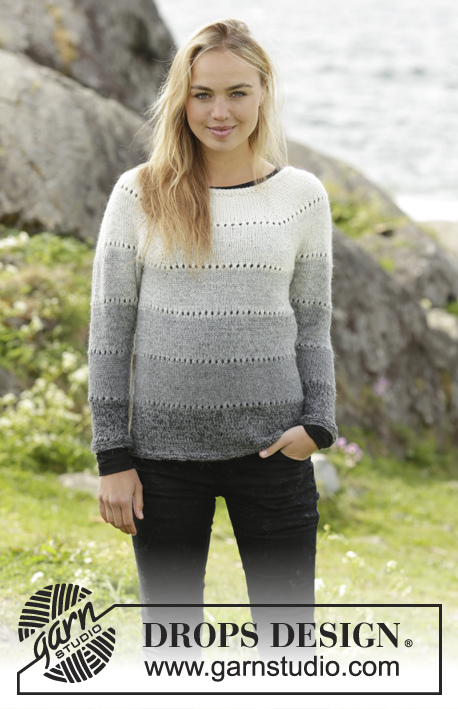
Shades of Grey Cardigan |
|
|
|
|
Knitted jacket in 2 strands DROPS Alpaca with round yoke, stripes and lace pattern, worked top down. Size: S - XXXL.
DROPS Extra 0-1325 |
|
|
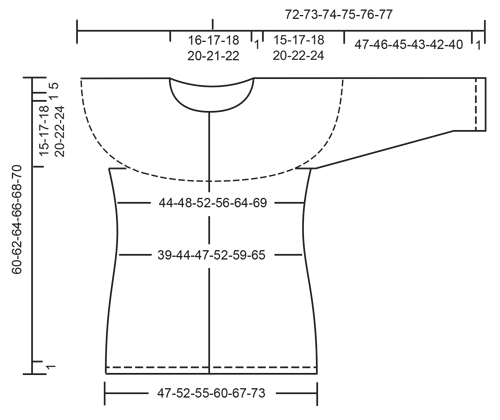
GARTER ST (worked in the round): 1 ridge = 2 rounds. * K 1 round and P 1 round *, repeat from *-*. GARTER ST (back and forth): K all rows. 1 ridge = 2 rows K. ELEVATION AT THE BACK: NOTE: On every turn in the middle of piece slip 1st st, tighten yarn and continue to work. Work an elevation in stocking st at the back of neck as follows, beg from WS: K 4 (= band), P over the next 52-54-58-60-62-69 sts, insert a marker here (= mid back), continue over the next 8-9-10-11-11-12 sts, turn, tighten yarn and work 16-18-20-22-22-24 sts, turn, tighten yarn and work 29-31-33-35-35-37 sts, turn, tighten yarn and work 42-44-46-48-48-50 sts, turn, tighten yarn and work 50-52-54-56-56-58 sts, turn, tighten yarn and work 58-60-62-64-64-66 sts. Turn and P until 4 sts remain on needle, K 4. STRIPES: Work all stripes with 2 strands Alpaca. When approx. 1 cm in 1st-5th stripe remain, work a EYELET ROW - see explanation below. Stripe 1: 9-9-9-10-10-10 cm with 2 strands off white. Stripe 2: 9-9-10-10-10-11 cm with 1 strand off white + 1 strand light pearl grey. Stripe 3: 9-9-10-10-10-11 cm with 1 strand light pearl grey + 1 strand light grey. Stripe 4: 9-10-10-10-11-11 cm with 1 strand light grey + 1 strand medium grey. Stripe 5: 9-10-10-10-11-11 cm with 2 strands medium grey. Stripe 6: 1 strand medium grey + 1 strand dark grey until finished measurements. EYELET ROW: When approx. 1 cm remains on stripe 1-5, work an eyelet row as follows, beg from RS: Work 4 band sts in garter st, * K 2 tog, 1 YO *, repeat from *-* until 4 sts remain, 4 band sts in garter st. NOTE: If 1 st remains on row before the last 4 band sts this round, K this st. On next row P the YOs to make holes. NOTE: When working eyelet row on sleeves, work in the round. K the YOs on next round to make holes. INCREASE TIP-1 (evenly spaced): To calculate how to inc evenly, use the total no of sts on row (e.g. 96 sts), minus bands (e.g. 8 sts) and divide the remaining sts by no of inc to be done (e.g. 16) = 5.5. I.e. in this example inc 1 st after 5th and 6th st alternately and do not inc over bands. INCREASE TIP-2 (yoke): Inc as follows from RS: Inc 1 st by making a YO. On next row P YOs twisted to avoid holes. Inc as follows from WS: Inc 1 st by making a YO. On next row K YOs twisted to avoid holes. Inc alternately on right and left side of each marker seen from RS. I.e. first time inc on the right side of all markers and second time inc on the left side of all markers, etc. INCREASE TIP-3 (body): All inc are done from RS. Work until 2 st remains before marker, 1 YO, K 4 (marker is between these sts), 1 YO. On next row P YO twisted to avoid holes. DECREASE TIP: All dec are done from RS! Work until 4 sts remain before marker, K 2 tog, K 4 (marker is in the middle of these sts), slip 1 st as if to K, K 1, psso. NOTE: Adjust dec to avoid it on a round with eyelet row. CAST-OFF TIP: To avoid a tight cast-off edge you may use a needle ½ size larger. BUTTONHOLES: Dec for buttonhole on right band (when garment is worn). Dec from RS when 3 sts remain on row as follows: Make 1 YO, K the next 2 sts tog, K last st. On next round K the YO to make a hole. Dec for 1st buttonhole when piece measures 2 cm (measured along band). Then dec the next 5 buttonholes on the same row while working eyelet row. Dec for 7th buttonhole (= last buttonhole) when piece measures 57-59-61-63-65-67 cm. ---------------------------------------------------------- JACKET: Worked top down, back and forth on circular needle. Worked in the round on double pointed needles. YOKE: Cast on 96-100-103-107-111-117 sts (incl 4 band sts in each side towards mid front) with 2 strands off white on circular needle size 4.5 mm. Work 2 ridges in GARTER ST - see explanation above. K 1 row from RS while inc 16-16-21-21-21-23 sts evenly - READ INCREASE TIP-1 (evenly), do not inc over bands = 112-116-124-128-132-140 sts. Switch to circular needle size 5 mm. For better shape work an ELEVATION AT THE BACK, see explanation above, in stocking st. REMEMBER THE KNITTING TENSION Now work in stocking st with 4 band sts in garter st in each side and insert 6 markers as follows: Work 13-13-14-14-15-15 sts, insert a marker, work 17-18-19-20-20-22 sts, insert a marker, work 17-18-19-20-20-22 sts, insert a marker, work 18-18-20-20-22-22 sts, insert a marker, work 17-18-19-20-20-22 sts, insert a marker work 17-18-19-20-20-22 sts, insert a marker, work the remaining 13-13-14-14-15-15 sts. REMEMBER BUTTONHOLES! Continue back and forth with STRIPES and EYELET ROW - see explanation above. On next row from RS, inc 1 st at every marker – Read INCREASE TIP-2 (yoke). Inc like this every round 13-17-19-20-21-21 times, then every other round 8-8-8-10-12-14 times (= 21-25-27-30-33-35 times in total) = 238-266-286-308-330-350 sts. Work 1 row from RS while AT THE SAME TIME inc 2-4-2-2-4-2 sts evenly = 240-270-288-310-334-352 sts. Now work next row from WS as follows: Work the first 38-42-44-48-53-57 sts (= left front piece), slip the next 48-55-60-63-65-66 sts on a stitch holder (= sleeve), cast on 6-6-8-8-10-12 sts under sleeve, work the next 68-76-80-88-98-106 sts (= back piece), slip the next 48-55-60-63-65-66 sts on a stitch holder (= sleeve), cast on 6-6-8-8-10-12 sts under sleeve, work the remaining 38-42-44-48-53-57 sts (= right front piece). BODY: There are now 156-172-184-200-224-244 sts for body. Insert a marker in the middle of the new 6-6-8-8-10-12 sts cast on under each sleeve (= 3-3-4-4-5-6 new sts on each side). NOW MEASURE THE PIECE FROM HERE. Continue back and forth with 4 band sts in each side towards mid front, stripes, stocking st and eyelet row as before. When piece measures 4 cm, dec 1 st on each side of marker in each side - READ DECREASE TIP. Dec like this every 2 cm a total of 4 times = 140-156-168-184-208-228 sts. When piece measures 15-15-16-16-16-16 cm, inc 1 st on each side of marker in each side – see INCREASE TIP-3 (body). Inc like this every 2 cm a total of 7 times = 168-184-196-212-236-256 sts. When piece measures 39-39-40-40-40-40 cm, switch to circular needle size 4.5 mm. Work 2 ridges in garter st and cast off - READ CAST-OFF TIP. Piece measures 60-62-64-66-68-70 cm in total from shoulder. SLEEVE: Work sleeves in the round on double pointed needles. NOW MEASURE THE PIECE FROM HERE. Slip sts from stitch holder back on double pointed needles size 5 mm (= 48-55-60-63-65-66 sts). Pick up 1 st in each of the 6-6-8-8-10-12 sts cast on under sleeve, insert a marker in the middle of these sts (= 3-3-4-4-5-6 new sts on each side of marker) = 54-61-68-71-75-78 sts. Continue with stocking st, stripes and eyelet holes as on body. When piece measures 4 cm, dec 1 st on each side of marker mid under sleeve. Dec like this approx. every 4-3-2-2-2-2 cm 9-12-15-15-16-17 times in total = 36-37-38-41-43-44 sts. AT THE SAME TIME in size S, M and L work 3rd, 4th and 5th stripe 2-2-1 cm longer than on body (this is done so that the last stripes will not be much more longer than the other). In size XL, XXL and XXXL work stripes as on body. Work 6th stripe until piece measures 46-45-44-42-41-39 cm: Now work an eyelet row. Switch to double pointed needles size 4.5 mm. Work 2 ridges and cast off. Knit another sleeve the same way. ASSEMBLY: Sew the buttons on to the left band. |
|
 |
|
Have you finished this pattern?Tag your pictures with #dropspattern or submit them to the #dropsfan gallery. Do you need help with this pattern?You'll find 27 tutorial videos, a Comments/Questions area and more by visiting the pattern on garnstudio.com. © 1982-2026 DROPS Design A/S. We reserve all rights. This document, including all its sub-sections, has copyrights. Read more about what you can do with our patterns at the bottom of each pattern on our site. |


With over 40 years in knitting and crochet design, DROPS Design offers one of the most extensive collections of free patterns on the internet - translated to 17 languages. As of today we count 324 catalogues and 12290 patterns translated into English (UK/cm). 12290
We work hard to bring you the best knitting and crochet have to offer, inspiration and advice as well as great quality yarns at incredible prices! Would you like to use our patterns for other than personal use? You can read what you are allowed to do in the Copyright text at the bottom of all our patterns. Happy crafting!
Post a comment to pattern DROPS Extra 0-1325
We would love to hear what you have to say about this pattern!
If you want to leave a question, please make sure you select the correct category in the form below, to speed up the answering process. Required fields are marked *.