
Popular categories
Looking for a yarn?


Comments / Questions (49)
![]() Maryvonne Kottelat wrote:
Maryvonne Kottelat wrote:
Bonjour, je ne trouve pas la version française du béret, pouvez-vous m'indiquer où elle se trouve svpl ? Merci d'avance et meilleures salutations
19.12.2020 - 18:14DROPS Design answered:
Bonjour Maryvonne! La version francaise est ICI. Bon tricot!
20.12.2020 - 22:49
![]() Nicole Pelletier wrote:
Nicole Pelletier wrote:
Bonjour, Pour le béret vous dites de mettre un marqueur dans la maille centrale. Mais vous montez combien de mailles au départ ? Je ne comprends pas comment vous commencez les demi-dominos pour le bonnet. Cordialement Nicole
04.12.2020 - 19:37DROPS Design answered:
Bonjour Mme Pelletier, les dominos se tricotent sur 65-73 m chacun - cf "BÉRET". La maille centrale de chaque domino est au milieu du haut du bonnet. Et la bordure sera tricotée à partir des mailles relevées le long de chaque domino (de haut en bas). Bon tricot!
07.12.2020 - 07:14
![]() Tanja wrote:
Tanja wrote:
Bedankt, nu snap ik het! Heel mooi patroon, trouwens, top!
28.02.2020 - 20:40
![]() Tanja wrote:
Tanja wrote:
Hoi, ik heb een vraag over de baret, als de halve dominovierkanten al klaar zijn. Wat wordt precies bedoeld met " brei na elke mindering 1 st minder tussen de minderingen elke nld dat u mindert"? Ik snap die hele zin niet. Groetjes en bedankt, Tanja
27.02.2020 - 11:21DROPS Design answered:
Dag Tanja,
Er zitten steeds een aantal steken tussen de minderingen (je begint met 26-30 tussen de minderingen) en na elke keer dat je een mindernaald hebt gemaakt is dit 1 steek minder. Dus als als je de volgende keer mindert, brei je 25-29 steken en brei je de volgende 2 st. recht samen, enzovoort.
28.02.2020 - 19:17
![]() Anja Lanzrath wrote:
Anja Lanzrath wrote:
Vielen Dank 😊
29.07.2019 - 17:00
![]() Anja Lanzrath wrote:
Anja Lanzrath wrote:
Liebes Team, ich habe noch keine Antwort auf meine Frage vom 15.7. Ich kann den Schal nicht fertigstellen. Ich vermute, dass am Anfang und am Ende jeder Hinreihe 1 M abgenommen werden muss. Für eine baldige Lösung bin ich sehr dankbar. Liebe Grüße Anja Lanzrath
29.07.2019 - 16:25DROPS Design answered:
Liebe Anja, die Anleitung wurde soeben korrigiert (aufgrund der Urlaubszeit dauern die Korrekturen im Moment etwas länger...). Die Abnahmen erfolgen in jeder Reihe am Ende, d.h. beidseitig. Viel Spaß beim Weiterstricken und Tragen des Schals! :-)
29.07.2019 - 16:32
![]() Anja Lanzrath wrote:
Anja Lanzrath wrote:
Ich habe eine Frage zum Schal: Bei Teil 6 steht: 51 Maschen, 25x abnehmen am Ende jeder Hinreihe, dann bleiben 26 Maschen übrig und nicht 1M. Oder verstehe ich das falsch. Vielen Dank Anja Lanzrath
15.07.2019 - 21:04DROPS Design answered:
Liebe Frau Lanzrath, unser Designteam wird die Anleitung noch mal prüfen, danke für den Hinweis und im voraus für Ihren Geduld.
16.07.2019 - 09:11
![]() Uilebeesje wrote:
Uilebeesje wrote:
Goedemiddag! Bij de sjaal, meerder je alleen in de naalden aan de goede kant? Of meerder je in elke naald?
04.06.2019 - 13:08DROPS Design answered:
Dag Uilebeesje,
Je meerdert inderdaad steeds alleen aan de goede kant, niet aan de verkeerde kant.
06.06.2019 - 21:29
![]() Anais wrote:
Anais wrote:
Bonjour, je suis en train de tricoter le beret, j'arrive à la bordure, et je ne comprends pas ce que signifie la dernière note : "à chaque tour de diminutions, tricoter 1 m en moins entre chaque diminution". pourriez-vous m'en dire plus ?
31.01.2019 - 13:07DROPS Design answered:
Bonjour Anaïs, au 1er rang de diminutions, vous tricotez 26-30 m end, 1 diminution. Au 2ème rang de diminution, vous tricoterez 25-29 m end, 1 diminution, au 3ème rang de diminutions: 24-28 m end, 1 diminution et ainsi de suite. On tricote ainsi 1 m en moins entre chaque diminution. Bon tricot!
31.01.2019 - 13:26
![]() Memi wrote:
Memi wrote:
Hola, intento la boina. Me lío con el marcador. Empiezo el primer medio cuadrado, coloco marcador en el punto central. Cuando falta un punto para el marcador (¿No debería ser cuando falten 3?) sigo las instrus haciendo 1 disminución doble. El patrón no indica dónde volver a colocar el marcador tras la disminución. Al llegar a la disminución de la segunda hilera no entiendo dónde debería hacerla. Gracias
10.01.2019 - 23:44
|
||||||||||
Tara#taraset |
||||||||||
 |
 |
|||||||||
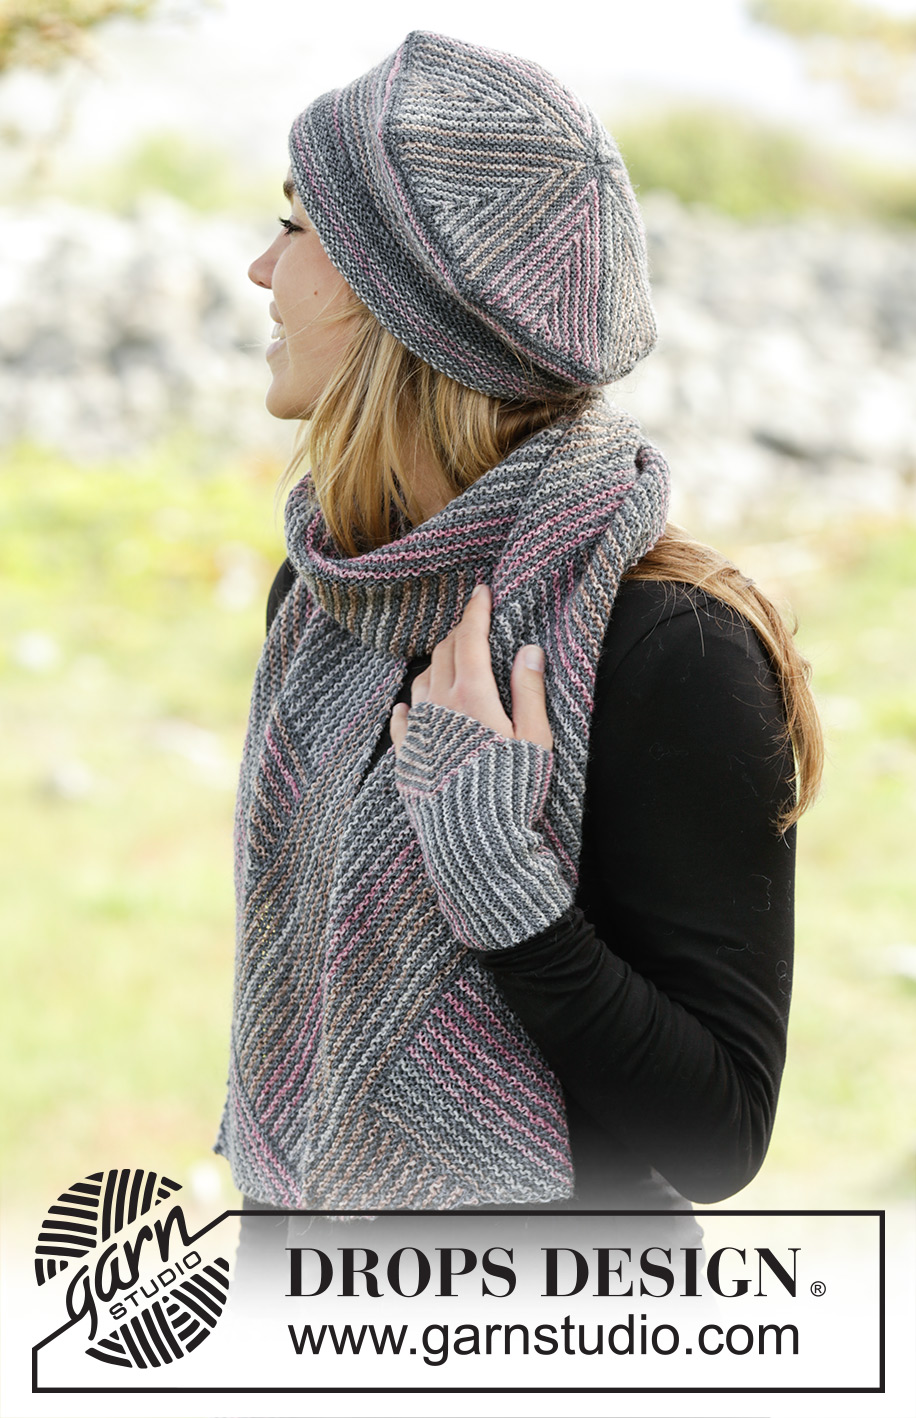
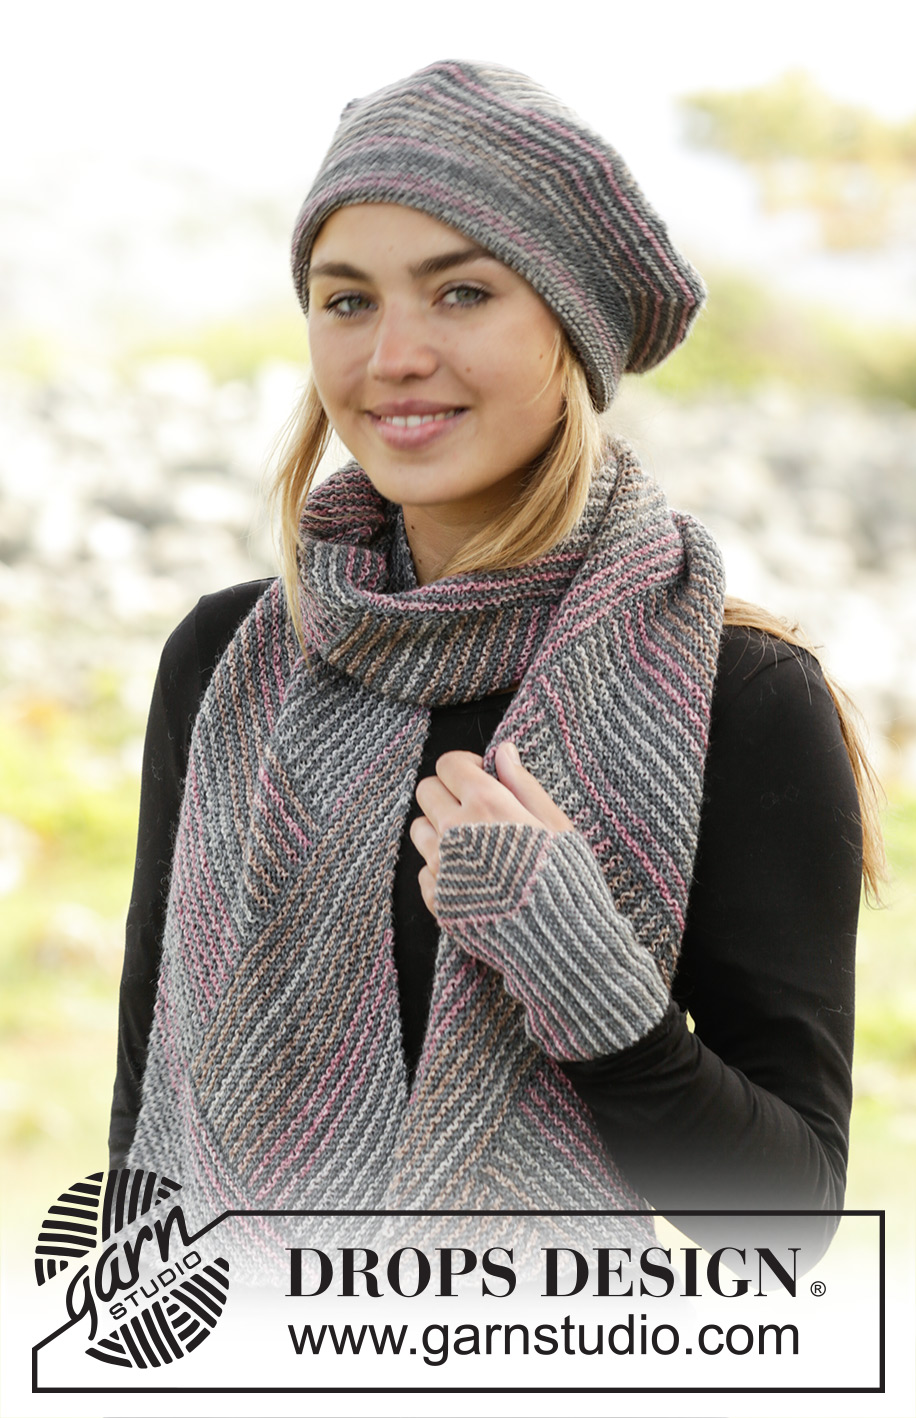
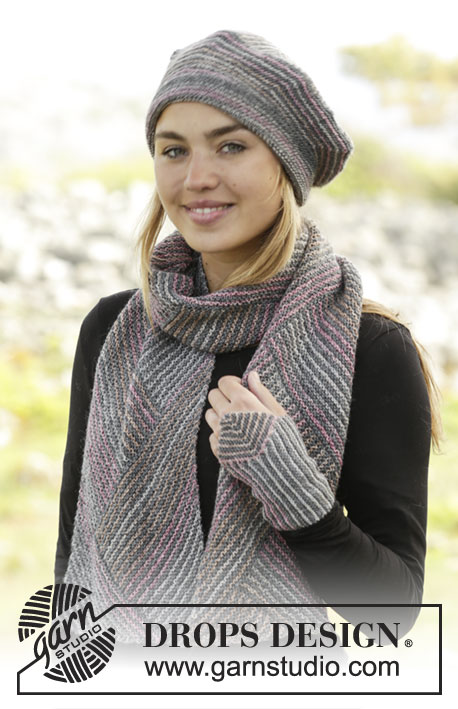
Set consists of: Knitted DROPS beret and wrist warmers with domino squares and scarf worked diagonally with stripes in ”Fabel”.
DROPS 171-48 |
||||||||||
|
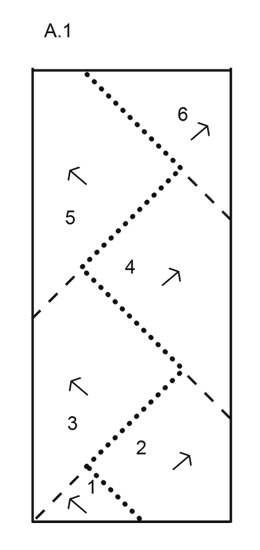
GARTER ST (worked in the round): 1 ridge = 2 rounds. * K 1 round and P 1 round *, repeat from *-*. GARTER ST (back and forth): K all rows. 1 ridge = 2 rows K. STRIPES: Always pick up sts with grey, then work 1 row from WS with grey. Then work * 2 rows with rose mist, 2 rows with grey *, repeat from *-*. PATTERN (applies to scarf): See illustration A.1. INCREASE TIP: Inc 1 st by working 2 sts in one st. DECREASE TIP: Dec 1 st by K 2 sts tog. HALF DOMINO SQUARE (hat): Insert 1 marker in the middle st. Row 1 (= WS): K until 1 st remains before marker, slip 1 st as if to K, K 2 tog, psso (= 2 sts dec), K rest of row (= 2 sts dec). Row 2 (= RS): K until 1 st before marker, slip 1 st as if to K, K 2 sts tog, psso (= 2 sts dec), K rest of row. Row 3: K until 1 st remains before marker, slip 1 st as if to K, K 2 tog, psso (= 2 sts dec), K rest of row. Row 4: Work the first 2 sts K tog, (= 1 st dec), K until 1 st remains before marker, slip 1 st as if to K, K 2 tog, psso (= 2 sts dec), K until 2 sts remain, K 2 tog (= 1 st dec). Repeat 1st- 4th row, i.e. so that 1 st is dec on each side of marker on every row and dec 1 st at beg and end of every 4th row until 1 st remain, cut the thread and pull through the last st. DOMINO SQUARE (wrist warmer): Insert a marker in the middle st. Row 1 (= WS): K all sts. Row 2 (= RS): K until 1 st remain before st with marker, 1 YO, K 1 (= st with marker), 1 YO, K the rest of row. Row 3: K all sts. NOTE: K YOs twisted to avoid holes. Repeat 2nd and 3rd row until 13 sts have been inc in total on each side of mid st = 29 sts in total on needle. Adjust so that last row is worked from WS (with rose mist). ---------------------------------------------------------- BERET: First work a circle with half domino squares. Then pick up st around edge on the 7 half domino squares before continuing in the round with an edge in garter st. Cast on 65-73 sts with grey on circular needle size 3 mm. Work STRIPES and HALF DOMINO SQUARE (hat) - see explanation above. REMEMBER THE KNITTING TENSION. When entire half domino square has been worked vertically, continue as follows: Beg from RS with grey and pick up 1 st in every st along the cast-on edge down to st with marker on previous half domino square worked = 32-36 sts, then cast on 33-37 new sts. Then work half domino square the same way as on first half domino square. Continue like this by picking up sts and working half domino squares in the round until 7 half domino squares have been worked in total. NOTE: When working the last half domino square, pick up sts along cast-on edge on previous half domino square worked, then pick up sts along cast-on edge on the first half domino square. Now pick up sts around the edge of hat as follows: Beg from RS with grey on circular needle size 3 mm and pick up 28-32 sts along the edge of each half domino square = 196-224 sts. Insert a marker here. NOW MEASURE THE PIECE FROM HERE. Work in GARTER ST in the round - see explanation above. When 2 ridges with grey have been worked, continue in the round with stripes and garter st as before and on next round dec as follows: * K 26-30 sts, K the next 2 sts tog *, repeat from *-* the entire round = 189-217 sts. Dec like this every other ridge a total of 8-8 times and then every ridge 3-6 times in total = 119-126 sts. NOTE: On every dec work 1 st less between every dec on every round with dec. Continue in garter st and stripes until piece measures 12-13 cm from marker. Now work 4 ridges with grey. Cast off. ---------------------------------------------------------- SCARF: Worked back and forth on needle. PART 1: Cast on 1 st on needle size 4.5 mm with grey. Work in GARTER ST and STRIPES - see explanation above. Inc 1 st at the end of every row from RS – READ INCREASE TIP, inc like this 17 times in total = 18 sts on needle. Work 1 row from WS while dec 1 st - READ DECREASE TIP = 17 sts. REMEMBER THE KNITTING TENSION Slip sts on a stitch holder. Cut the yarn. PART 2: Pick up 17 sts along the ridges in the side on part 1 - A.1 = approx. 1 st in every ridge. Work in garter st and stripes as before and at beg of every row from RS inc 1 st. Inc like this 17 times in total = 34 sts. Then dec 1 st at beg of every row from RS. Dec like this 17 times in total = 17 sts. Work last row from WS. Slip sts on a stitch holder. Cut the yarn. PART 3: Pick up 1 st in every ridge from the side on part 2 (= 34 sts), slip sts from stitch holder on part 1 back on needle and work these sts = 51 sts. Work in garter st and stripes as before. At beg of every row from WS dec 1 st. Dec like this 34 times in total = 17 sts. Work last row from WS. Slip sts on a stitch holder. Cut the yarn. PART 4: Slip sts from stitch holder on part 2 back on left needle and work them, pick up 1 st in every ridge from part 3 = 51 sts. Work in garter st and stripes as before. At beg of every row from RS dec 1 st. Dec like this 34 times in total = 17 sts. Work last row from WS. Slip sts on a stitch holder. Cut the yarn. Repeat 3rd and 4th part upwards until scarf measures approx. 134 cm along the longest of the sides. Next to last part = part 5. Work as part 3 but keep sts on needle after dec = 17 sts. Continue with garter st and stripes as before. At beg and end of every row from RS dec 1 st. Dec as follows 8 times in total, pull yarn through last st. Cut the yarn. LAST PART (PART 6): Slip sts from stitch holder back on left needle and work them, pick up 1 st in every ridge from previous part = 51 sts. Work in garter st and stripes as before. At end of every row dec 1 st. Dec as follows 25 times in total, pull yarn through last st. ---------------------------------------------------------- WRIST WARMERS: Cast on 3 sts with grey on circular needle size 3 mm. Work STRIPES and DOMINO SQUARE (wrist warmer) - see explanation above. REMEMBER THE KNITTING TENSION When entire domino square has been worked, insert a marker in last st worked (= from WS). Cut the yarn. Slip all sts on a stitch holder (or an extra circular needle). Cast on 34-36 sts with grey on circular needle size 3 mm. Work 1 row from WS. Then work back and forth in stripes and garter st as follows: Row 1 (RS): Work until 3 sts remain on needle, K 2 tog (= 1 st dec) and K next st tog with st with marker on domino square + next st on domino square (= 2 sts from domino square) Row 2 (WS): Turn and work back. Row 3: Work until 3 sts remain on needle, K 2 tog (= 1 st dec) and K next st tog with the next 2 sts on domino square. Row 4: Turn and work back. Row 5: Work until 3 sts remain on needle, K the next 2 sts tog (= 1 st dec) and K next st tog with the next 2 sts on domino square. Row 6: Turn and K back. Row 7: Work all sts. Row 8: Turn and work back. Row 9: Work until 3 sts remain on needle, K 2 tog (= 1 st dec) and K the last st tog with the next 2 sts on domino square. Row 10: Turn and K back. Repeat from 3rd-10th row 1 more time (= 18 rows in total). There are now 27-29 sts on needle. Now work as follows: Row 19: Work until 1 st remains on needle, K this st tog with next st on domino square (= mid st at the top of domino square). Row 20: Turn and work back. Then work as follows: Row 1: K until 1 st remains on needle, 1 YO, K the next st tog with the next 2 sts on domino square. Row 2: Turn and K back. K YO twisted to avoid holes. Rows 3-6: Work as 1st and 2nd row. Row 7: K all sts. Row 8: Turn and K back. Row 9: K until 1 st remains on needle, 1 YO, K the next st tog with the next 2 sts on domino square. Row 10: Turn and K back. K YO twisted to avoid holes. Repeat 3rd-10th row 1 more time (= 18 rows in total). When all sts on domino square have been worked tog with ridges and there are 34-36 sts on needle. Insert a marker here. NOW MEASURE THE PIECE FROM HERE. Continue back and forth with stripes and garter st until piece measures 8-9 cm - adjust to finish with a stripe in rose mist. Cast off. Make sure that the cast-off edge is not too tight. Sew cast-off edge and cast-on edge tog by sewing one and one st neatly tog with grey. Fasten off. Knit another wrist warmer the same way. |
||||||||||
Diagram explanations |
||||||||||
|
||||||||||
 |
||||||||||
Have you finished this pattern?Tag your pictures with #dropspattern #taraset or submit them to the #dropsfan gallery. Do you need help with this pattern?You'll find 20 tutorial videos, a Comments/Questions area and more by visiting the pattern on garnstudio.com. © 1982-2026 DROPS Design A/S. We reserve all rights. This document, including all its sub-sections, has copyrights. Read more about what you can do with our patterns at the bottom of each pattern on our site. |
||||||||||


With over 40 years in knitting and crochet design, DROPS Design offers one of the most extensive collections of free patterns on the internet - translated to 17 languages. As of today we count 324 catalogues and 12290 patterns translated into English (UK/cm). 12290
We work hard to bring you the best knitting and crochet have to offer, inspiration and advice as well as great quality yarns at incredible prices! Would you like to use our patterns for other than personal use? You can read what you are allowed to do in the Copyright text at the bottom of all our patterns. Happy crafting!
Post a comment to pattern DROPS 171-48
We would love to hear what you have to say about this pattern!
If you want to leave a question, please make sure you select the correct category in the form below, to speed up the answering process. Required fields are marked *.