
Popular categories
Looking for a yarn?


Comments / Questions (93)
![]() Aly wrote:
Aly wrote:
Hoewel dit al een wat ouder patroon is vind ik het nog steeds mooi. ik gebruik wat dunner garen en het patroon laat zich makkelijk aanpassen. gewoon een maatje groter en elke 2e of 3e naald meerderen ,geen enkel probleem. wil dan geen punten onderop maar dat komt ook wel goed. echt tijdloos en flatterend***
14.08.2022 - 19:55
![]() Nina wrote:
Nina wrote:
Man braucht sehr viel Konzentration, aber der Ergebnis lohnt sich.
01.10.2021 - 08:58
![]() Sandra wrote:
Sandra wrote:
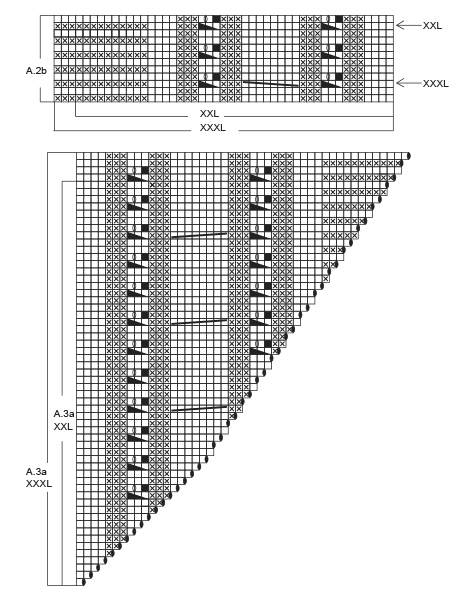
Hallo, ich stricke den Poncho in der Größe XXL und habe jetzt die Maschen für die Ärmel stillgelegt und mit Muster A5b und A6b angefangen. Wenn ich die Abnahme an der Seite nach Abnahmetip 1 mache und die Seitenmaschen laut Anleitung kraus rechts stricke kann ich Muster A4b aber nicht komplett beenden bzw. A1b beginnen. Ist das korrekt? Da ja in den letzten bzw. Ersten Maschen des Musters abgenommen wird. Oder? Vielen Dank.
17.03.2021 - 14:28DROPS Design answered:
Liebe Sandra, wenn Sie bei der 8. Reihe/Runde abnehmen, soll die Maschen von A.1b/A.4b abnehmen, dh es sind immer die gleichen Anzahl von der Maschen kraus rechts unter beiden Ärmel. dh nach und nach werden immer weniger Maschen vor/nach diesen Krausrechts Maschen in A.1b/A.4b gestrickt. Viel Spaß beim stricken!
17.03.2021 - 16:07
![]() Sandra wrote:
Sandra wrote:
Hallo vielen Dank für die schnelle Antwort. Nein sie haben recht und ich habe es missverstanden. Ich dachte der Pfeil mit Xxl ist das Ende und nicht der Anfang.
19.02.2021 - 12:16
![]() Sandra wrote:
Sandra wrote:
Hallo. Ich habe eine Frage zu Diagramm A2b und A3b in der Größe Xxl. In dieser Größe geht es ja über 44 Maschen in der Breite. Ist es korrekt dass das Diagramm 11 Reihen in der Höhe ist bis zur XXL Markierung? Nur damit ich es nicht falsch verstanden habe. Vielen Dank.
19.02.2021 - 10:43DROPS Design answered:
Liebe Sandra, der Pfil im Diagram A.2b/A.3b zeigt wo man das Diagram beginnt, dann stricken Sie bis zur letzten Reihe (= 2 Reihe in XXL) und dann stricken Sie das Diagram von der 1. Reihe (A.2b/A.3b sind 12 Reihen), oder habe ich Ihre Frage misverstanden?
19.02.2021 - 11:43
![]() Geneviève wrote:
Geneviève wrote:
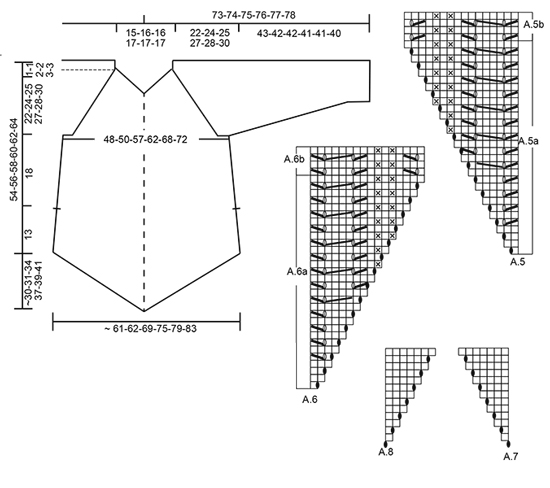
Bonjour, J’en suis au 53e rang et je dois augmenter de 2 mailles sur le milieu du devant et du dos et diminuer de 2 mailles sous chaque manche. Je dois répéter ces tours jusqu’à 18 cm de longueur. Comme j’ai monté seulement 6 mailles sous la manche (taille médium), il me sera impossible de diminuer aux 2 tours tel que demandé, à moins de diminuer dans le point de fantaisie (A1B). Est-ce que c’est ce que je dois faire? Merci!
04.01.2021 - 04:26DROPS Design answered:
Bonjour Geneviève, vous devez diminuer 2 mailles de chaque côté (= 4 mailles au total) comme indiqué au tour/rang 2, vous allez ainsi diminuer le motif sous chacune des manches, et en même temps, augmenter 2 m au milieu devant et au milieu dos (4 augmentations), le motif va ainsi continuer en forme de pointe sur les côtés et diminuer sur les côtés. Bon tricot!
05.01.2021 - 10:16
![]() Marta wrote:
Marta wrote:
Buonasera, ho lavorato il ferro come da schema, ma nonostante ciò per fare la seconda manica mi restano due maglie invece che sei. Sto lavorando la taglia xl e parto da 114 punti sul ferro, l'1 dir, 1 rov e 1 dir devono essere eseguiti nella stessa maglia? Cosa si intende per saltare la maglia?
20.12.2020 - 00:20DROPS Design answered:
Buonasera Marta, "saltare la maglia" vuol dire che in quel punto non c'è proprio la maglia, perchè viene aumentare nel giro dopo, quindi deve lavorare solo 3 diritti e poi continuare . E per l'altra domanda: 1 maglia diritto, 1 maglia rovescio e 1 maglia diritto si lavorano in 3 maglie diverse, non nella stessa. Buon lavoro!
20.12.2020 - 18:00
![]() Marta wrote:
Marta wrote:
Buonasera, questo è il primo modello "top down" che inizio nonché il mio primo maglione e sono abbastanza confusa su come leggere il pattern. Ho lavorato le prime 23 maglie seguendo il diagramma A1 (saltare la maglia significa passarla senza lavorarla?), ma non capisco cosa fare quando dice "lavorare A2.a su m successiva, 1 rov, 1 dir (centro) ecc.". Devo lavorare A2.a sulle 23 m successive? Come funziona? Grazie mille
19.12.2020 - 20:53DROPS Design answered:
Buonasera Marta, deve lavorare come indicato: lavorare A.1a sulle prime 23 maglie, A.2a sulla maglia successiva, 1 maglia rov, 1 maglia dir, 1 maglia rov, A.3a sulla maglia successiva, A.4a sulle 23 m successive, e poi inserire i segnapunti come spiegato. Buon lavoro!
19.12.2020 - 22:27
![]() Shari Masson wrote:
Shari Masson wrote:
Hi - you have lots of very lovely patterns, but I hate the way they’re written. I find the one big paragraph format very confusing and difficult to follow. I use the KnitCompanion app for all my knitting and just cannot use your patterns in the app, therefore, I’ve yet to knit any of your patterns - I just look at the pics and admire, but won’t knit one. Would you consider changing your format to make your patterns easier on old eyes and usable with KnitCompanion? Hoping here!
29.10.2020 - 18:02
![]() Alice Grimes wrote:
Alice Grimes wrote:
When decreasing on sides and increasing in the centers, what is the pattern for the extra stitches in the center? I understand that I just eliminate the pattern on the sides, I just don't see any new stitches for the center. Or are the increases the YO on 5a & 6a? I was doing both.... increasing and the YO.
01.08.2020 - 15:29DROPS Design answered:
Dear Mrs Grimes, the increases on mid front/mid back are included in diagrams A.5/A.6, work these increases as shown in diagrams. Happy knitting!
03.08.2020 - 07:56
|
||||||||||||||||||||||||||||||||||||||||
Winter Flair#winterflairtunic |
||||||||||||||||||||||||||||||||||||||||
 |
 |
|||||||||||||||||||||||||||||||||||||||
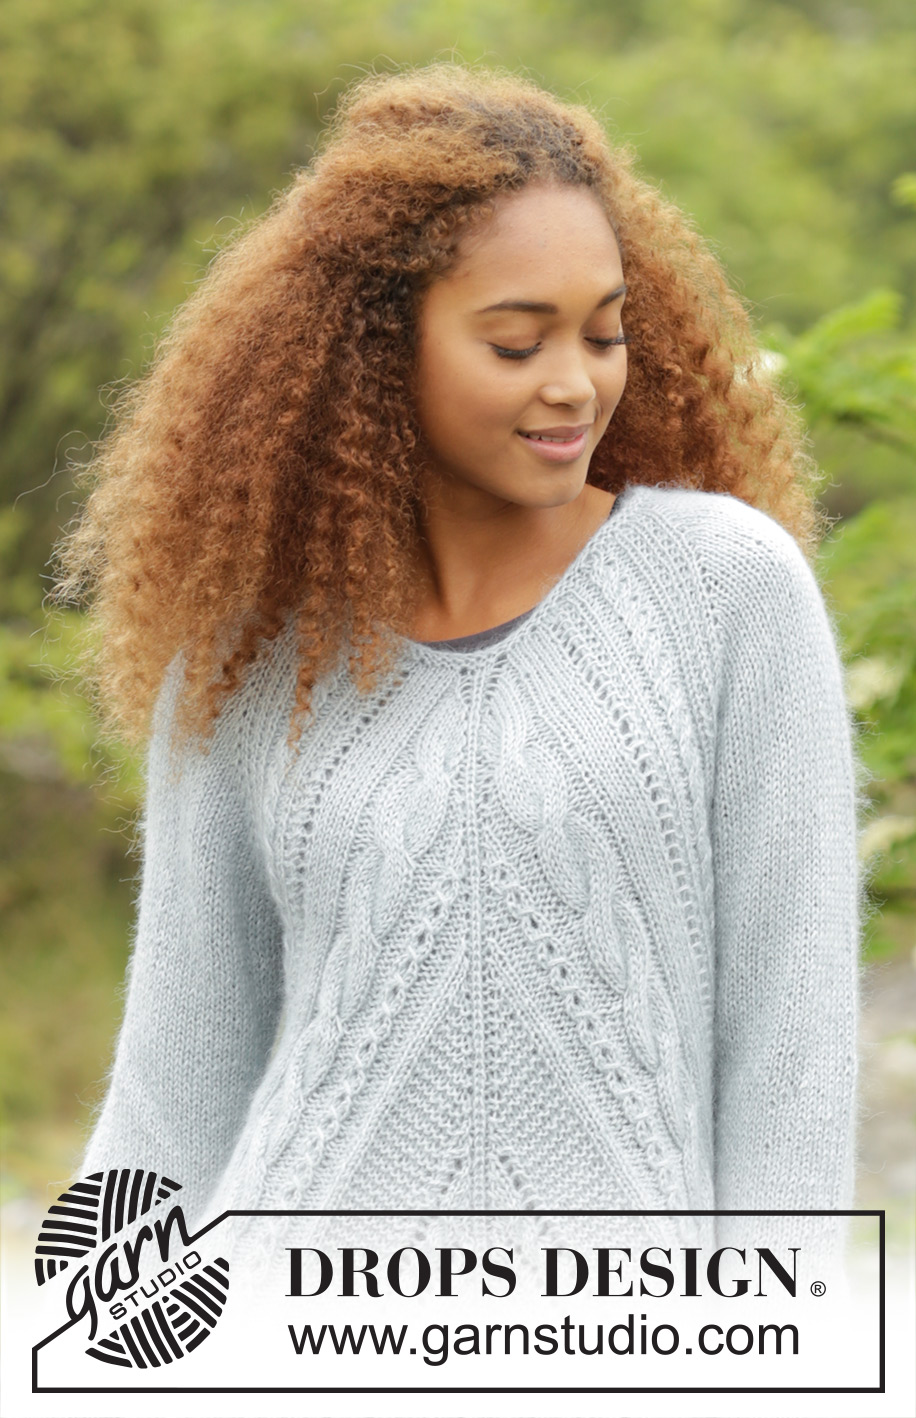
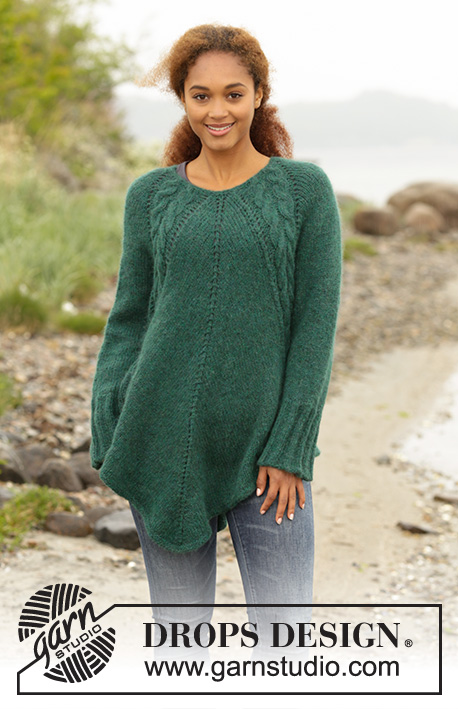
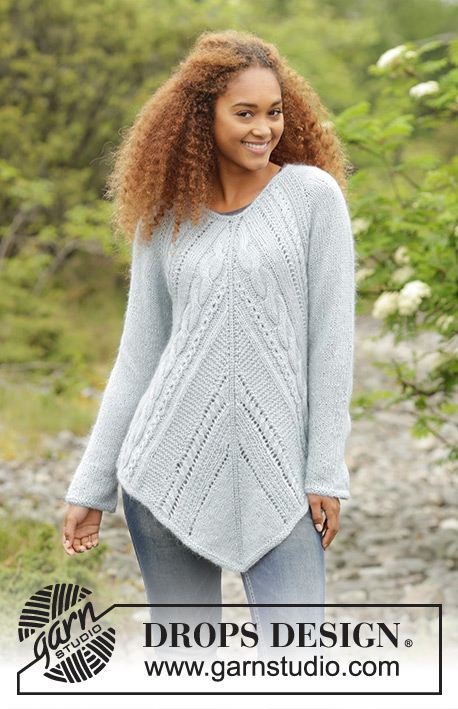
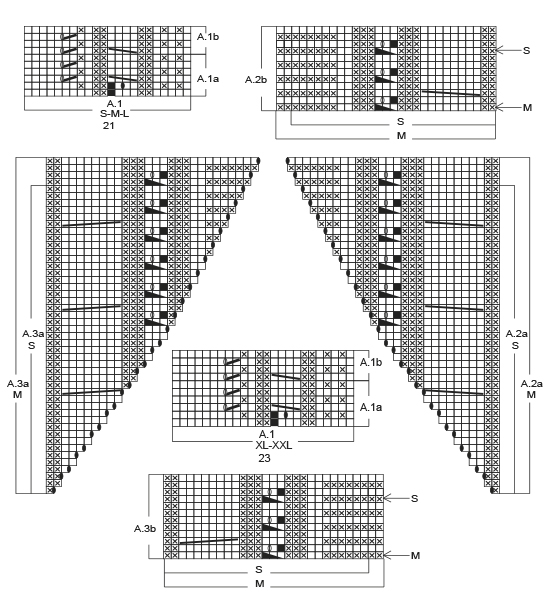
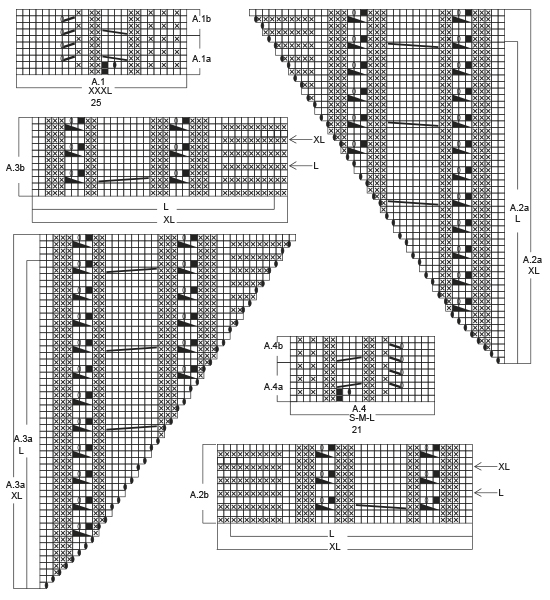
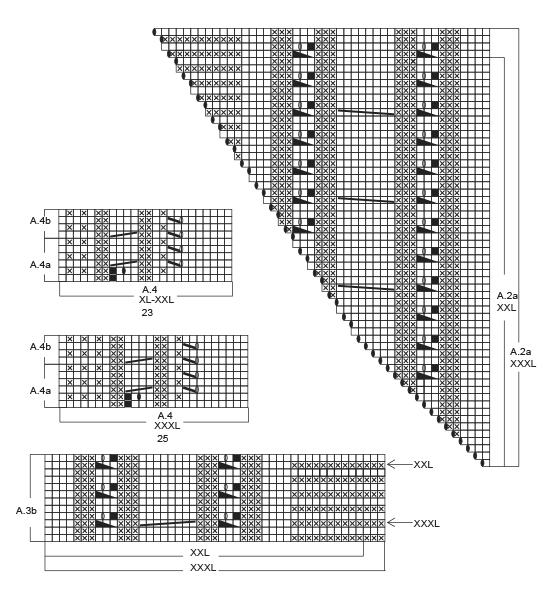
Knitted DROPS tunic with cables, garter st and lace pattern, worked top down in ”Alpaca” and ”Kid-Silk”. Size: S - XXXL.
DROPS 172-1 |
||||||||||||||||||||||||||||||||||||||||
|
GARTER ST (worked in the round): 1 ridge = 2 rounds. * K 1 round and P 1 round *, repeat from *-*. GARTER ST (back and forth): K all rows. 1 ridge = 2 rows K. RAGLAN: On sleeves inc for raglan with YO K twisted on next round, they should not make holes. Inc as follows: Inc with 1 YO after 1st and 3rd marker and before 2nd and 4th marker as follows: Inc every round 0-2-4-0-0-0 times in total. Inc every other round 22-23-23-27-24-26 times in total. Inc every 4th round, 0-0-0-0-2-2 times in total (= 22-25-27-27-26-28 times in total) = 48-54-60-60-62-66 sts in total on each sleeve. PATTERN: See diagrams A.1 to A.8. See diagram for correct size. DECREASE TIP-1: When working in the round, dec as follows: Dec as follows at each marker: Work until 3-3-3-5-6-6 sts remain before marker, K 2 tog (= 1 st dec), 2-2-2-6-8-8 sts in garter st (marker is in the middle of these sts), slip 1 st as if to K, K 1, psso (= 1 st dec). When working back and forth, dec as follows: All dec are done from RS. Work 3-3-3-3-4-4 sts in garter st, slip 1 st as if to K, K 1, psso (= 1 st dec), work pattern as before until 5-5-5-5-6-6 sts remain, K 2 tog (= 1 st dec), finish with 3-3-3-3-4-4 sts in garter st. DECREASE TIP-2 (applies to sleeve): Dec as follows at marker: Work until 3 sts remain before marker, K 2 tog (= 1 st dec), K 2 (marker is in the middle of these sts), slip 1 st as if to K, K 1, psso (= 1 st dec). CAST-OFF TIP: To avoid a tight cast-off edge you may use a needle ½-1 size larger. ---------------------------------------------------------- TUNIC: Worked in the round, top down. Cast on 80-84-86-92-96-102 sts on circular needle size 4.5 mm with 1 strand Alpaca and 1 strand Kid-Silk. Work 2 ridges in GARTER ST - see explanation above. Switch to circular needle size 5.5 mm. K 1 round while AT THE SAME TIME inc 22-18-20-22-26-28 sts evenly = 102-102-106-114-122-130 sts. On next round work pattern and inc for RAGLAN - see explanation above, as follows: Work A.1a over the first 21-21-21-23-23-25 sts, A.2a over next st, P 1, K 1 (= mid back), P 1, A.3a over next st, A.4a over the next 21-21-21-23-23-25 sts (= back piece), insert 1st marker, K 4-4-6-6-10-10, insert 2nd marker (= sleeve), A.1a over the next 21-21-21-23-23-25 sts, A.2a over next st, P 1, K 1 (= mid front), P 1, A.3a over next st, A.4a over the next 21-21-21-23-23-25 sts (= front piece), insert 3rd marker, K 4-4-6-6-10-10, insert 4th marker (= sleeve). Continue pattern like this. REMEMBER THE KNITTING TENSION When A.1a and A.4a have been worked 1 time vertically, repeat A.1b and A.4b vertically. When A.2a and A.3a have been worked 1 time vertically, there are 298-318-362-378-402-430 sts on needle. Piece measures approx. 22-24-25-27-28-30 cm on the shortest part of piece. Work next round as follows: Continue with A.1b over the first 22-22-22-24-24-26 sts as before, A.2b over the next 27-29-37-39-44-47 sts, 1 YO, P 1, K 1 (= mid back), P 1, 1 YO, A.3b over the next 27-29-37-39-44-47 sts, A.4b over the next 22-22-22-24-24-26 sts, slip the next 48-54-60-60-62-66 sts on a stitch holder for sleeve, cast on 6-6-6-10-12-12 sts under sleeve, insert 1 marker in the middle of the new sts (= side marker), A.1b over the next 22-22-22-24-24-26 as before, A.2b over the next 27-29-37-39-44-47 sts, 1 YO, P 1, K 1 (= mid front), P 1, 1 YO, A.3b over the next 27-29-37-39-44-47 sts, A.4b over the next 22-22-22-24-24-26 sts, slip the next 48-54-60-60-62-66 sts on a stitch holder for sleeve, cast on 6-6-6-10-12-12 sts under sleeve, insert 1 marker in the middle of the new sts (= side marker) = 218-226-258-282-306-326 sts. Work 1 round pattern, K YOs twisted mid front and mid back, they should not make holes. Work next round as follows: Continue with * A.1b over the first 22-22-22-24-24-26 sts as before, A.2b over the next 27-29-37-39-44-47 sts, A.5a over next st (inc 1 st in A.5a), P 1, K 1 (= mid back/front), P 1, A.6a over next st (inc 1 st in A.6a), A.3b over the next 27-29-37-39-44-47 sts, A.4b over the next 22-22-22-24-24-26 sts as before, K 2 tog (= 1 st dec), 2-2-2-6-8-8 sts in garter st, slip 1 st as if to K, K 1, psso (= 1 st dec) *, repeat from *-* 2 times in total. On this round inc 2 sts mid front and mid back and dec 2 sts in each side of piece, i.e. no of sts is the same. Insert 1 marker in piece, NOW MEASURE PIECE FROM HERE. Continue in the round as follows: Round/row 1: Work 1 round/row with pattern as before (= 1 round/row without YO in diagram). Round/row 2: Work pattern as before and dec 1 st on each side of each side marker – READ DECREASE TIP-1. On this round/row inc 2 sts mid front and mid back and dec 2 sts in each side of piece, i.e. no of sts is the same. Round/row 3: Work as 1st round/row. Round/row 4: Work as 2nd round/row. Round/row 5: Work as 1st round/row. Round/row 6: Work as 2nd round/row. Round/row 7: Work as 1st round/row. Round/row 8: Work pattern as before. On this round/row inc 2 sts mid front and mid back = 4 sts inc in total. Do not dec before and after side markers. Repeat 1st to 8th round/row until finished measurements. When A.5a and A.6a have been worked 1 time vertically, work A.5b and A.6b vertically. Now work A.7 after A.5b and A.8 before A.6a mid front and mid back until finished measurements, i.e. work inc sts mid front/back in stocking st. When piece measures 18 cm from marker under sleeve, adjust so that last round is 1 round with YO, divide piece at side markers, work front piece and back piece separately until finished measurements. FRONT PIECE: (Beg at left side marker. First row = from WS). Work pattern and repeat 1st to 8th round/row as before, but work the outermost 3-3-3-3-4-4 sts in each side of piece in GARTER ST – see explanation above. When piece measures 30 cm from marker under sleeve, switch to circular needle size 4.5 mm. Work 2 ridges over all sts AT THE SAME TIME on first row dec 2 sts over each cable. Cast off - READ CAST-OFF TIP. BACK PIECE: Work as front piece. SLEEVE: = 48-54-60-60-62-66 sts. Work sleeve in stocking st in the round on double pointed needles. Slip sts from stitch holder back on double pointed needles size 5.5 mm and cast on 6-6-6-10-12-12 sts under sleeve = 54-60-66-70-74-78 sts. Work in stocking st in the round and insert a marker in the middle of the new sts under sleeve (i.e. 3-3-3-5-6-6 new sts on each side of marker). NOW MEASURE THE PIECE FROM HERE. When piece measures 4 cm, dec 1 st on each side of marker - READ DECREASE TIP-2. Dec like this approx. every 3½-2½-2-2-2-1½ cm 9-12-14-15-16-17 times in total = 36-36-38-40-42-44 sts. When sleeve measures 43-42-42-41-41-40 cm (NOTE: Shorter measurements in the larger sizes because of longer yoke) switch to double pointed needles size 4.5 mm. Work 2 ridges. Cast off. Work the other sleeve the same way. ASSEMBLY: Sew the opening under the sleeve. |
||||||||||||||||||||||||||||||||||||||||
Diagram explanations |
||||||||||||||||||||||||||||||||||||||||
|
||||||||||||||||||||||||||||||||||||||||
 |
||||||||||||||||||||||||||||||||||||||||
 |
||||||||||||||||||||||||||||||||||||||||
 |
||||||||||||||||||||||||||||||||||||||||
 |
||||||||||||||||||||||||||||||||||||||||
 |
||||||||||||||||||||||||||||||||||||||||
Have you finished this pattern?Tag your pictures with #dropspattern #winterflairtunic or submit them to the #dropsfan gallery. Do you need help with this pattern?You'll find 28 tutorial videos, a Comments/Questions area and more by visiting the pattern on garnstudio.com. © 1982-2026 DROPS Design A/S. We reserve all rights. This document, including all its sub-sections, has copyrights. Read more about what you can do with our patterns at the bottom of each pattern on our site. |
||||||||||||||||||||||||||||||||||||||||


With over 40 years in knitting and crochet design, DROPS Design offers one of the most extensive collections of free patterns on the internet - translated to 17 languages. As of today we count 324 catalogues and 12239 patterns translated into English (UK/cm). 12239
We work hard to bring you the best knitting and crochet have to offer, inspiration and advice as well as great quality yarns at incredible prices! Would you like to use our patterns for other than personal use? You can read what you are allowed to do in the Copyright text at the bottom of all our patterns. Happy crafting!
Post a comment to pattern DROPS 172-1
We would love to hear what you have to say about this pattern!
If you want to leave a question, please make sure you select the correct category in the form below, to speed up the answering process. Required fields are marked *.