
Popular categories
Looking for a yarn?

























Comments / Questions (173)
 Ruth wrote:
Vedr drops 170-4, hvordan man strikker rundt på ryggen ??
01.09.2026 - 12:53DROPS Design answered:
Hej Ruth, Da gentager du diagrammet 4 gange og hver pind ser du og strikker du fra retsiden. Klik på Video, så kan du se en video som viser hvordan du strikker diagrammet til forstykket, her ser du hvordan man gør, men her strikkes der frem og tilbage så hver 2.pind strikkes da fra vrangen :)
01.09.2026 - 14:08
 KATIE wrote:
Thank you for the answer, I still can't do the maths! I start garter increase on row 15 (RS), row 16 garter (WS), row 17 garter slip 50*2 each edge on row 17 (RS)? Still only leaves me with 11 rows. I'm so confused!
26.05.2026 - 21:02DROPS Design answered:
Dear Katie, after the 12 rows, work 1 row with garter stitch and inc from the RS, then work the next 3 rows with garter stitch on each side = you have worked 16 rows, 12 rows remain A.5/A.8 to work to get the 28 rows. Happy knitting!
27.05.2026 - 08:14
Katie wrote:
Please help A5-A8 section, XL, 3reps plus 4 rows equals 28rows. R1-2 A5-8 pattern , R3-12 short rows, R13-14 knit in pattern to reach RS edge, R15 garter increase on RS, R16-18 3 rows garter, R19 slip 50*2 on RS,Pattern says I have 12 rows left, but I only have 9. Where is my mistake? To have 12 rows left I need to have completed the garter rows at row 16.
25.05.2026 - 11:14DROPS Design answered:
Dear Katie, the 2 rows explained the increases are included in the 3 rows with 52 sts garter stitch on each side, so you have 2 rows + 10 rows with short rows+ 4 rows (2 ridges on each side = 16 rows + 12 extra rows = 28 rows A.5/A.8 in total this means 3 times the 8 rows + the first 4 rows . Happy knitting!
26.05.2026 - 17:03
 Claudia wrote:
Is there a way to get a higher resolution version of the charts? I’m having a very hard time seeing the YOs next to the Purls. In the US we write the charts different so it’s really hard for me to follow this without deep concentration, and they’re such low resolution symbols that it’s really hard to see what I’m looking at. Thank you very much.
22.05.2026 - 07:25
 Sari wrote:
Hei, laitoin tuossa äskettäin kysymyksen koskien A5-A8 kuvioita , en ole vielä saanut vastausta mitenkähän se on tarkoitus tehdä? Samalla kysyisin miten tehdään seuraava kohta hihassa: Luo 2 seuraavan krs:n loppuun 1 reunas = 74-78-82-86-90-94 s. Reunasilmukat neulotaan ainaoikein -neuleena lopulliseen mittaan asti. Luodaanko 2 silmukkaa seuraavan kierroksen loppuun vai molempiin reunoihin 1 silmukka?
19.05.2026 - 08:38DROPS Design answered:
Kumpaankin reunaan luodaan 1 silmukka.
19.05.2026 - 17:33
Sari wrote:
Hei, koossa M kun on tehnyt 2 kertaa mallin A5-A8 on silmukoita jäljellä: 25+91+25 eli silmukoita yht. 141. (Kun olet neulonut piirrokset A.5-A.8 loppuun, ennen 1. merkkiä on jäljellä 23-25-26-27-32-34 s, 1. ja 2. merkin välissä on 79-91-99-107-123-135 s ja 2. merkin jälkeen on jäljellä 23-25-26-27-32-34 s = yht. 125-141-151-161-187-203 s työssä.) Vaikka silmukoita p.o tuon verran jäljellä 3 kuvion jälkeen, miten tämä oikein menee?
15.05.2026 - 07:36DROPS Design answered:
Hei, en löytänyt ohjeesta virheitä. Kun olet neulonut piirrokset A.5-A.8 3 kertaa, ennen merkkiä on 25 silmukkaa, 1. ja 2.merkin välissä on 91 silmukkaa ja toisen 2.merkin jälkeen tulee 25 silmukkaa = 141 silmukkaa työssä. Jokaisessa mallikerrassa on aluksi 6 silmukkaa ja yhden mallikerran aikana lisätään joko 4 tai 6 silmukkaa. Oletko tehnyt kaikki kavennukset piirrosten mukaan?
19.05.2026 - 17:32
Sari wrote:
Hei, miten tehdään tämä kohta? SAMANAIKAISESTI kun olet neulonut 2-6-0-2-0-6 krs piirrosten A.5-A.8 mukaisesti, neulo kummassakin reunassa LYHENNETTYJÄ KERROKSIA Aloitetaanko heti lyhennetyt kierrokset vai kudotaanko ensin 6 krs ja sitten aloitetaan lyhennetyt kierrokset?
13.05.2026 - 07:16DROPS Design answered:
Hei, neulo aluksi 6 kerrosta ja aloita sitten lyhennetyt kerrokset.
13.05.2026 - 17:04
 Monika Leisten wrote:
Die Diagramme zu diesem Modell sind wirklich sehr klein. Das Erkennen der dreierlei Umschläge schon schwierig.
29.11.2025 - 17:57
 Cecile wrote:
Merci pour votre aide. Je me suis repéré au nombre de mailles. Par contre il ne me restait que 4 rangs de A5-A8 à faire et non 8 comme c'était écrit sur le modèle. J'ai fait pareil pour le dos, c'est ce qui compte. Je dois faire les manches maintenant. Je souhaite les rallonger jusqu'au poignet. Est ce qu'il suffit d ajouter des rangs tous identiques ou il y a t il des modifications dans l enchaînement des augmentations/diminutions ? Merci
28.08.2025 - 14:38DROPS Design answered:
Bonjour Cécile, vous pouvez éventuellement diminuer moins souvent pour adoucir la fin de manche, vous pouvez vous inspirer d'un modèle manches longues de même tension si besoin. Bon tricot!
28.08.2025 - 18:55
Cecile wrote:
Bonjour. Je n y arrive pas. 2rg raccourcis puis 6 rg raccourcis. Ok. Mais je commence alors 1rg end. Alors qu il est écrit " quand les rgs raccourcis sont faits, tricoter le dernier sur l envers pour commencer le rg suivant à partir de l épaule". Du coup je dois faire 1 rg endroit puis un rg envers. Cela me permet d avoir toutes les mailles tricotées d une épaule à l' autre. Mais ensuite je dois faire plus de rang pour faire les 6 premiers rangs de A5-8.
23.06.2025 - 17:05DROPS Design answered:
Bonjour Cécile, c'est d'abord 2 rangs raccourcis en laissant 24 m de chaque côté à la fin de chacun des 2 rangs suivants puis 6 rangs raccourcis en laissant 4 mailles à la fin de chacun des 3 rangs suivants de chaque côté, puis vous tricotez encore 1 rang sur l'envers et 6 rangs sur toutes les mailles avec 50 m point mousse de chaque côté; continuez simplement A.5 et A.8 - vous devez avoir 26 m avant le 1er marqueur, 99 m entre le 1er et le 2ème marqueur et 26 m après le 2ème marqueur. Repérez-vous avec le nombre de mailles, c'est peut-être plus facile. Bon tricot!
24.06.2025 - 17:54
|
|||||||||||||||||||||||||||||||
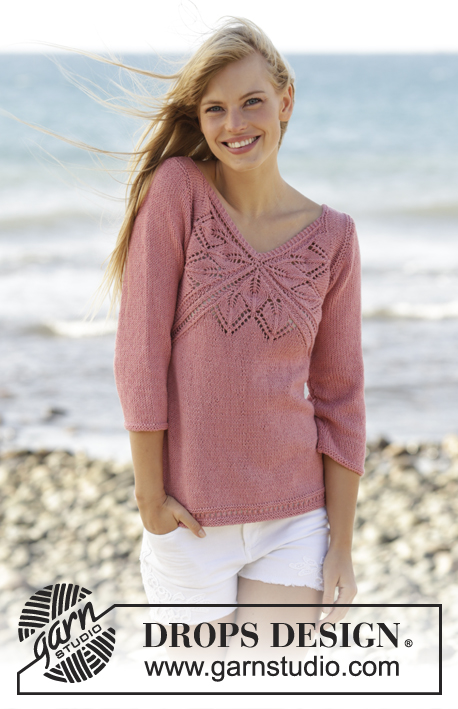
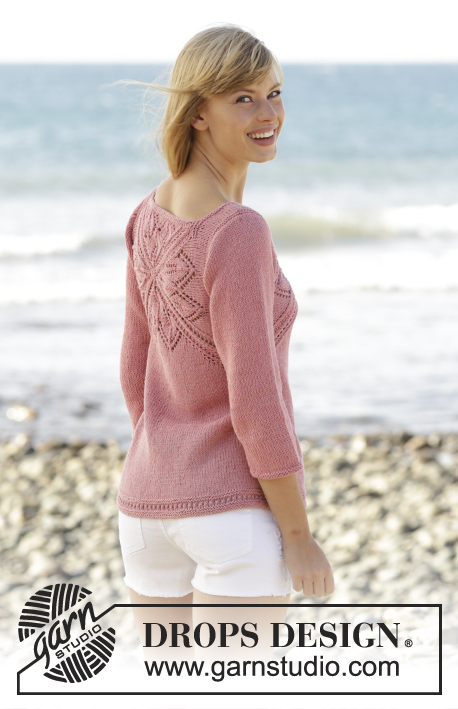
Butterfly Heart#butterflyheartsweater |
|||||||||||||||||||||||||||||||
 |
 |
||||||||||||||||||||||||||||||
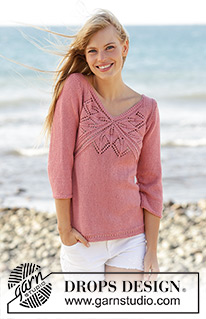
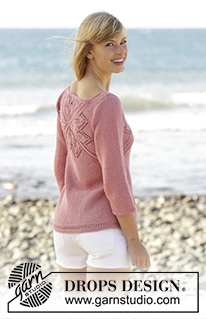
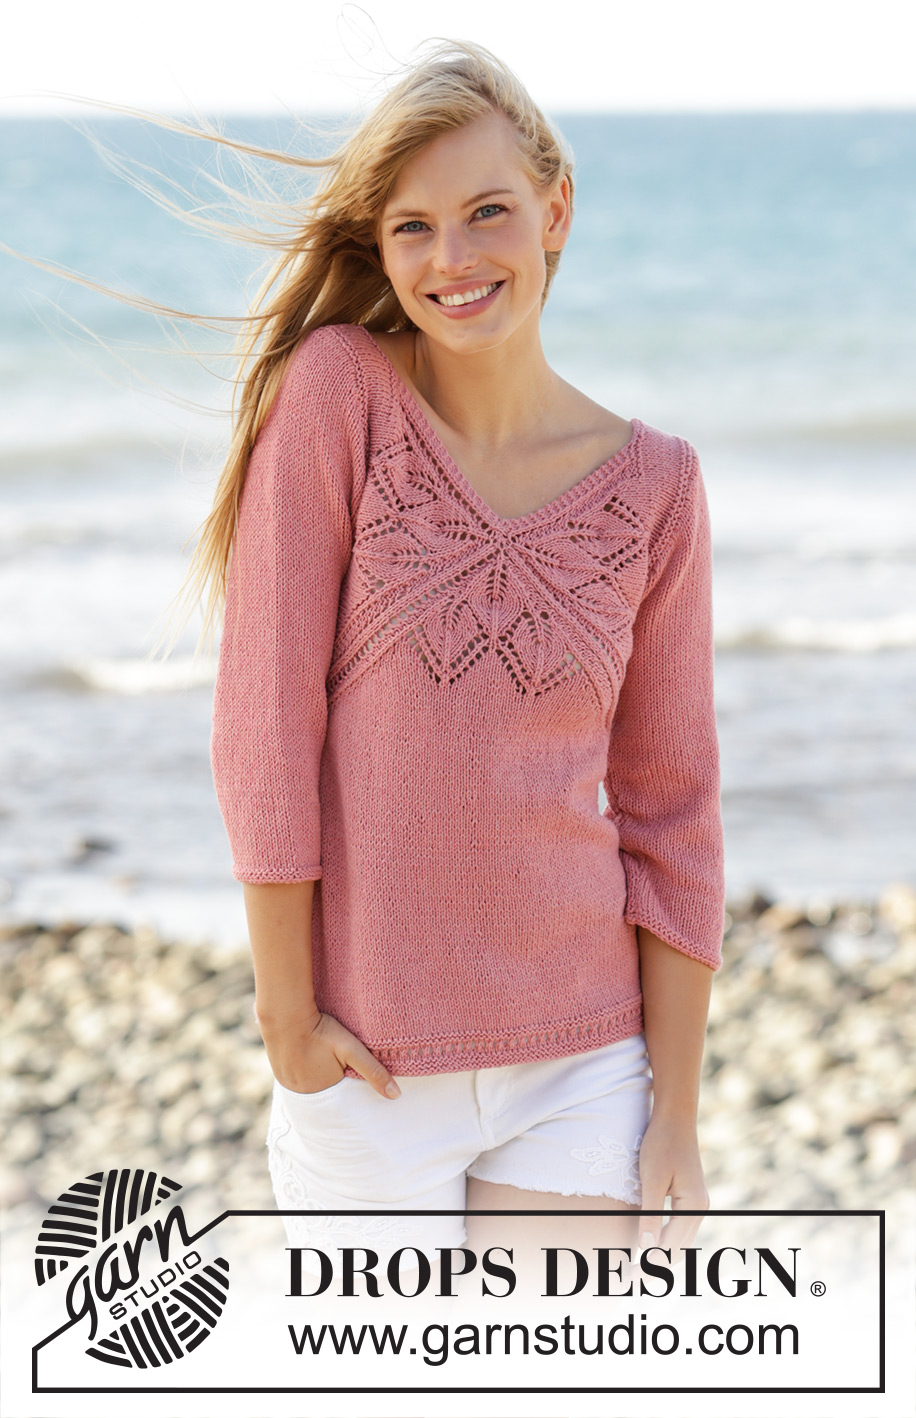
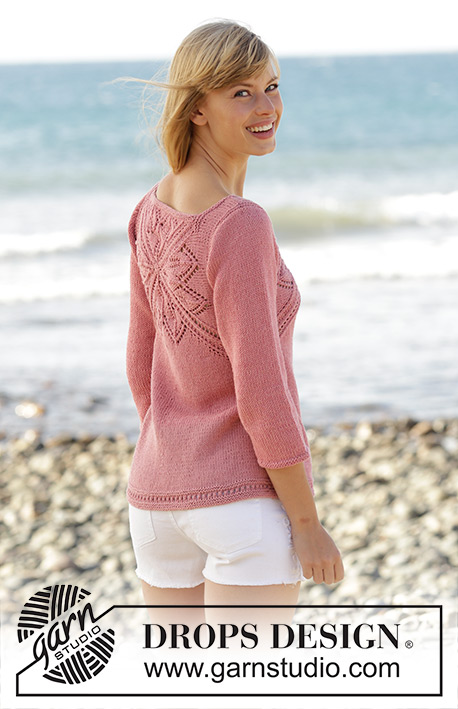
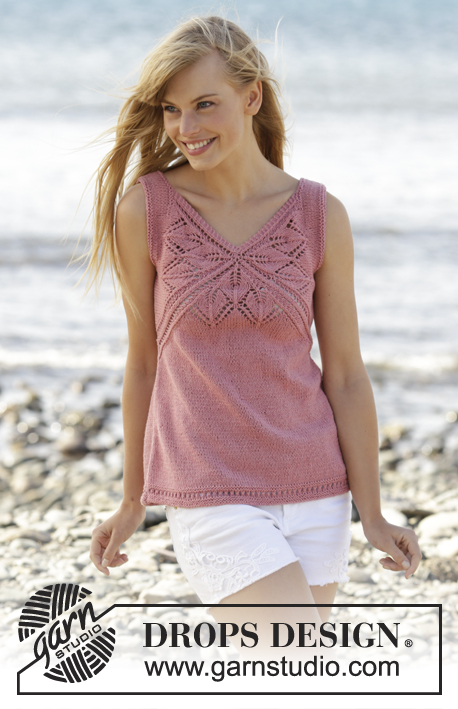
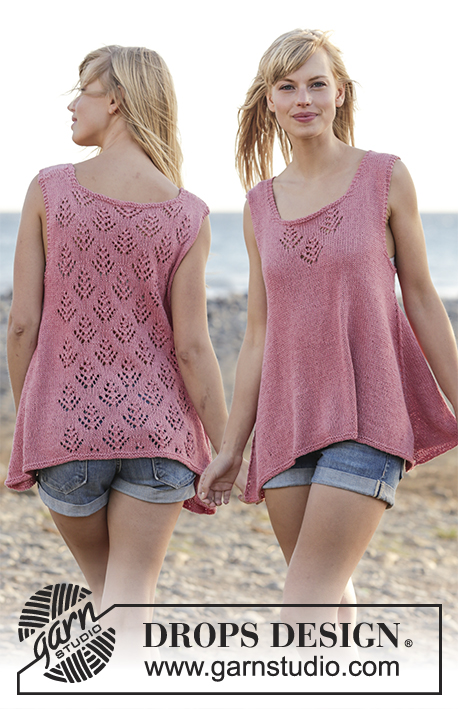
Knitted DROPS jumper with lace pattern and V-neck in ”Belle”. Worked top down. Size: S - XXXL.
DROPS 170-3 |
|||||||||||||||||||||||||||||||
|
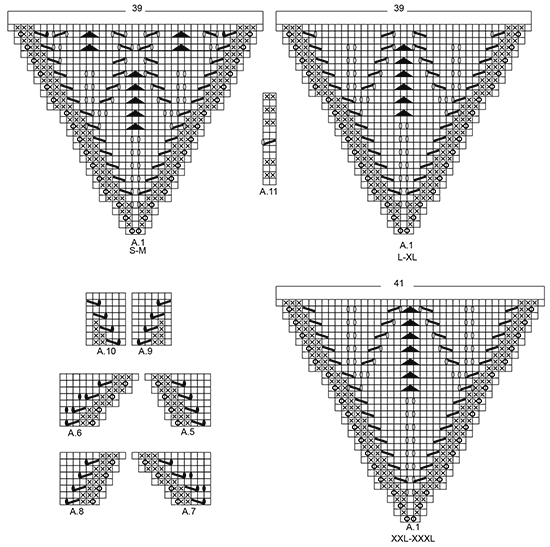
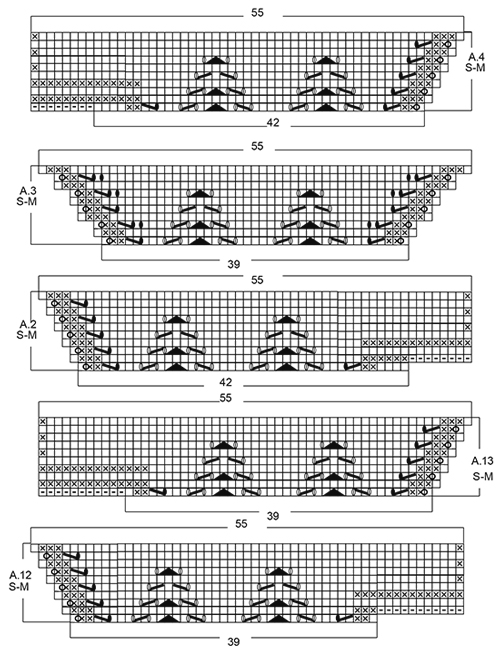
GARTER ST (back and forth): K all rows. 1 ridge = 2 rows K. PATTERN: See diagrams A.1 to A.13. The diagrams show all rows in pattern seen from RS. See diagram for correct size. SHORT ROWS: When turning in short rows, slip first st as if to K. Tighten thread and make sure to avoid big holes. INCREASE TIP: All inc are done from RS. Inc 1 st by making 1 YO, on next row P YO twisted to avoid holes. DECREASE TIP: All dec are done from RS! Dec 1 st at beg of row as follows: K 1, slip 1 st as if to K, K 1, psso Dec 1 st at end of row as follows: Work until 3 sts remain (incl the 2 new sts worked for the first time), K 2 tog. ---------------------------------------------------------- JUMPER: Work from the middle of V-neck and out in 3 triangles on front piece and 4 triangles on back piece, then work downwards. FRONT PIECE: Work back and forth from neck and down. Cast on 8 sts on circular needle size 4 mm with Belle. K 1 row. On next row inc as follows: * K 1, 1 YO *, repeat from *-* until 1 st remains and finish with K 1 = 15 sts on needle. Work next row as follows (from RS): Work YOs from previous row twisted, they should not make holes. Work 3 sts in GARTER ST - see explanation above, A.1, insert 1st marker, A.1, insert 2nd marker, A.1 (= repeat A.1 3 times in total on row), finish with 3 sts in garter st. REMEMBER THE KNITTING TENSION When A.1 has been worked 1 time vertically, there are 123-123-123-123-129-129 sts on needle. Piece measures approx. 11-11-11-11-12-12 cm from cast-on edge. Work next row as follows from RS: Work A.2 over the first 42-42-42-42-44-44 sts, A.3 over the next 39-39-39-39-41-41 sts and A.4 over the last 42-42-42-42-44-44 sts, after A.4 cast on 8 sts at the end of row for shoulder (see diagram). Work A.4 to A.2 on next row, after A.2 cast on 8 sts at the end of row for shoulder (see diagram). When A.2 to A.4 have been worked 1 time vertically, there are 165-165-183-183-193-193 sts on needle. Piece measures approx. 15-15-17-17-19-19 cm from cast-on edge. READ ALL OF THE FOLLOWING SECTION BEFORE CONTINUING! WORK PATTERN AS BEFORE WHILE AT THE SAME TIME WORKING SHORT ROWS IN EACH SIDE OF PIECE. PATTERN: Work next row as follows from RS: Work 1 st in garter st, 48-48-52-52-55-55 sts in stocking st, work A.5 over the next 6 sts, (marker), A.6 over the next 6 sts, 43-43-53-53-57-57 sts in stocking st, A.7 over the next 6 sts, (marker), A.8 over the next 6 sts, 48-48-52-52-55-55 sts in stocking st, finish with 1 st in garter st. Repeat A.5 to A.8 over the 6 sts on each side of each marker 2-3-2-3-4-5 times in total, then repeat the first 0-0-6-4-4-4 rows of A.5 to A.8 1 more times. SHORT ROWS: AT THE SAME TIME when 2-6-0-2-0-6 rows of A.5 to A.8 have been worked, work SHORT ROWS - see explanation above - in each side of piece as follows: Work until 26-26-24-23-18-18 sts remain on row (work A.5 to A.8 as before), turn and work until 26-26-24-23-18-18 sts remain, turn piece. Then work short rows in the different sizes as follows: SIZE M: Work 6 sts less for every turn 2 times in each side of piece. SIZE L-XL: Work 6 sts less for every turn 1-2 times in each side of piece, then work 4 sts less on every turn 3-2 times in each side of piece. SIZE XXL-XXXL: Work 6 sts less for every turn 1-1 time in each side of piece, then work 4 sts less for every turn 4-4 times in each side of piece, then work 2 sts less on every turn 4-5 times in each side of piece. ALL SIZES: When the short rows have been worked, work last row from WS, so that next row beg from shoulder. Then work over all sts from RS as follows: Work in garter st over the first 42-44-46-48-50-52 sts AT THE SAME TIME inc 0-2-4-4-6-6 sts evenly, work as before (i.e. A.5 to A.8 and stocking st) until 42-44-46-48-50-52 sts remain, work in garter st over the last sts AT THE SAME TIME inc 0-2-4-4-6-6 sts evenly (= 42-46-50-52-56-58 sts in garter st in each side of piece). Work 3 rows in garter st over the outermost 42-46-50-52-56-58 sts in garter st in each side of piece, pattern and stocking st over the remaining sts. On next row from WS work as follows: K the first 40-44-48-50-54-56 sts and slip them on a stitch holder for sleeve, work 2 sts in garter st, work in stocking st and pattern as before until 42-46-50-52-56-58 sts remain, 2 sts in garter st, K the next 40-44-48-50-54-56 sts and then slip them on a stitch holder for sleeve. Cut the yarn. 8-8-8-12-12-12 rows of A.5 to A.8 remain. Beg next row from RS. Continue to work in garter st over the first and last 2 sts in each side of piece. When A.5 to A.8 have been worked, there are 23-25-26-27-32-34 sts before 1st marker, 79-91-99-107-123-135 sts between 1st and 2nd marker and 23-25-26-27-32-34 sts after 2nd marker = 125-141-151-161-187-203 sts in total on row. Piece measures approx. 21-24-25-27-32-35 cm on the widest measured from cast-on edge. Insert 1 marker in piece, NOW MEASURE PIECE FROM HERE. On next row from RS loosely cast off the first 22-24-25-26-31-33 sts knitwise, work 1 edge st in garter st, (marker), work A.9 over the first 6 sts after marker, stocking st over the next 67-79-87-95-111-123 sts, A.10 over the last 6 sts before second marker, (marker ), 1 edge st in garter st, loosely cast of the last 22-24-25-26-31-33 sts knitwise = 81-93-101-109-125-137 sts remain on row. Cut the yarn. Work next row from WS over the remaining sts as follows: 1 edge st in garter st, A.10 as before, stocking st over the next 67-79-87-95-111-123 sts, A.9 as before, 1 edge st in garter st. When A.9 and A.10 have been worked 1 time vertically, continue in stocking st with 1 edge st in garter st in each side of piece. When piece measures 3 cm from marker, inc 1 st in each side of piece inside 1 edge st (= 2 sts inc) - READ INCREASE TIP. Repeat inc every 1½-1½-1½-1-1-1 cm 12-10-12-14-12-13 times in total = 105-113-125-137-149-163 sts on needle. When piece measures 23-23-24-24-23-23 cm from marker (piece measures 53-55-57-59-61-63 cm in total from shoulder), adjust so that next row is from RS, switch to circular needle size 3.5 mm. Work next row from RS as follows: Work 1 edge st in garter st, work A.11 (= 2 sts) until 2 sts remain, work first st in A.11, finish with 1 edge st in garter st. On row with holes (i.e. 7th row) work next to last st K. Cast off when A.11 has been worked 1 time vertically. Piece measures 56-58-60-62-64-66 cm in total from shoulder. BACK PIECE: Piece is first worked in the round, then worked as front piece. Cast on 6 sts on double pointed needles size 4 mm with Belle, switch to circular needle when needed. K 1 row. On next row inc as follows: * K 1, 1 YO *, repeat from *-* = 12 sts on row, K YOs twisted on next row, they should not make holes. Work A.1 4 times in total, insert 1 marker between each A.1 (= 4 markers). When A.1 has been worked 1 time vertically, there are 156-156-156-156-164-164 sts on needle. Continue as follows: A.12 over the first 39-39-39-39-41-41 sts, work A.3 over the next 39-39-39-39-41-41 sts and A.13 over the last 39-39-39-39-41-41 sts, slip the remaining sts on a stitch holder for neck edge (= 39-39-39-39-41-41 sts), after A.13 cast on 11 sts at the end of row for shoulder (see diagram). Then work back and forth on needle. Work A.13/A.3/A.12 on next row, after A.12 cast on 11 sts at the end of row for shoulder (see diagram). When A.12/A.3/A.13 have been worked 1 time vertically, there are 165-165-183-183-193-193 sts on needle. Piece measures approx. 15-15-17-17-19-19 cm from cast-on edge. Now continue back piece as front piece. NECK EDGE: Worked back and forth on needle. Slip sts from stitch holder for neck edge on back piece back on circular needle size 3.5 mm. Work 2 ridges. Fasten ridges where sts were cast on for shoulder. Fasten off. ASSEMBLY: Sew the side seams inside 1 edge st in garter st. Sew shoulder seams inside 1 edge st in garter st. Tighten tog the middle (i.e. cast-on edge) on both front and back piece. SLEEVE: Worked back and forth on circular needle in stocking st. Slip sts from the 2 stitch holders (on front and back piece) in one side of piece back on circular needle size 4 mm = 80-88-96-100-108-112 sts. Work short rows for sleeve cap as follows: Beg to work in the 25th-29th-31st-35th-43rd-45th st (i.e. 24-28-30-34-42-44 sts in one side are not worked). Work from RS 34-34-38-34-26-26 sts in stocking st, turn piece (= 22-26-28-32-40-42 sts remain on needle). Work in stocking st over the 36-36-40-36-28-28 sts, turn piece. Work 2 sts more on every turn in each side of piece until all sts have been worked. AT THE SAME TIME dec 1 st in each side of piece (= 2 sts dec), inside 1 st on every 4th-4th-2nd-4th-4th-4th row 4-6-8-8-10-10 times in total – READ DECREASE TIP = 72-76-80-84-88-92 sts on needle. Work 8-8-8-12-12-12 rows in stocking st over all sts, insert 1 marker in piece (sew side seam on sleeve up to here later). NOW MEASURE THE PIECE FROM HERE. Cast on 1 edge st at the end of the next 2 rows = 74-78-82-86-90-94 sts. Work edge sts in garter st until finished measurements. On next row from RS dec 1 st inside 2 sts in each side of piece (= 2 sts dec). Repeat dec every 2½-2-2-1½-1-1 cm 9-10-11-12-13-13 more times = 54-56-58-60-62-66 sts on needle. When sleeve measures 31-30-29-27-24-23 cm, switch to circular needle size 3.5 mm. Work 2 ridges. Cast off. Slip sts from stitch holders in the other side of piece on circular needle size 4 mm and work the same way. ASSEMBLY: Sew sleeve seams up to where 1 edge st in garter st was cast on in each side of piece. Sew the under arm seam. |
|||||||||||||||||||||||||||||||
Diagram explanations |
|||||||||||||||||||||||||||||||
|
|||||||||||||||||||||||||||||||
 |
|||||||||||||||||||||||||||||||
 |
|||||||||||||||||||||||||||||||
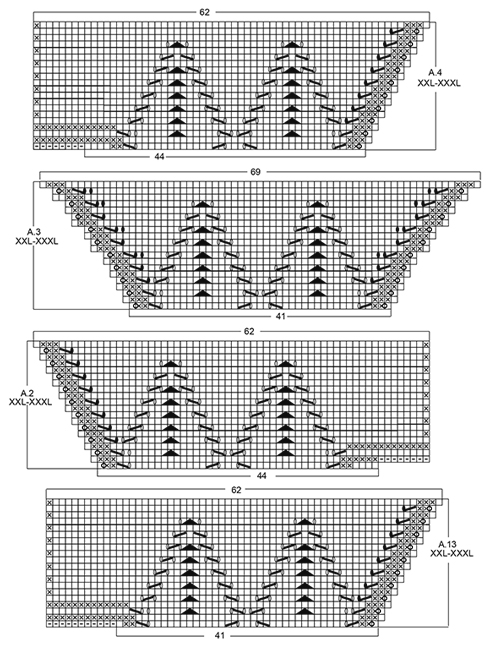 |
|||||||||||||||||||||||||||||||
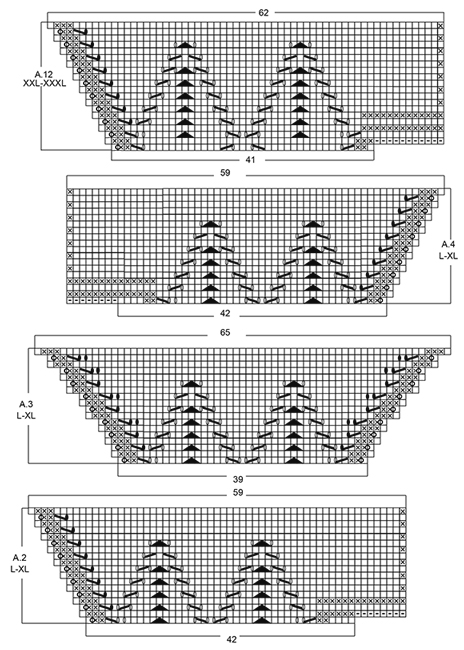 |
|||||||||||||||||||||||||||||||
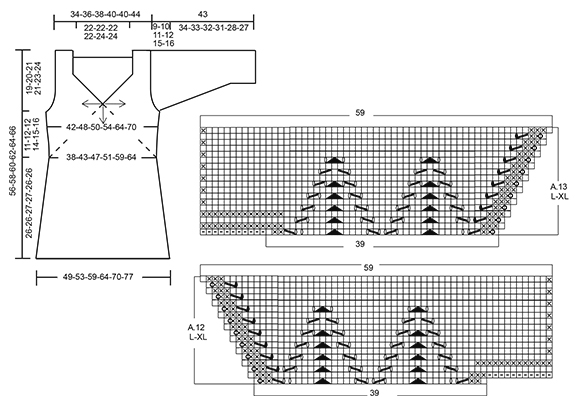 |
|||||||||||||||||||||||||||||||
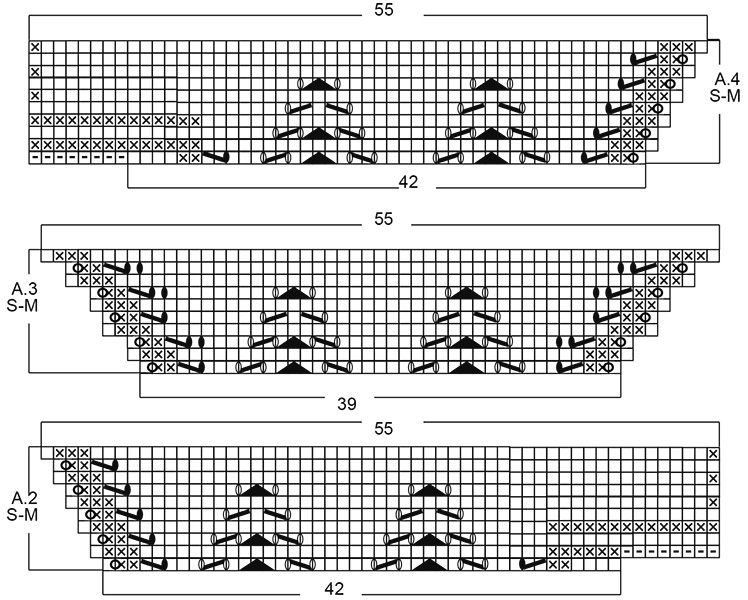 |
|||||||||||||||||||||||||||||||
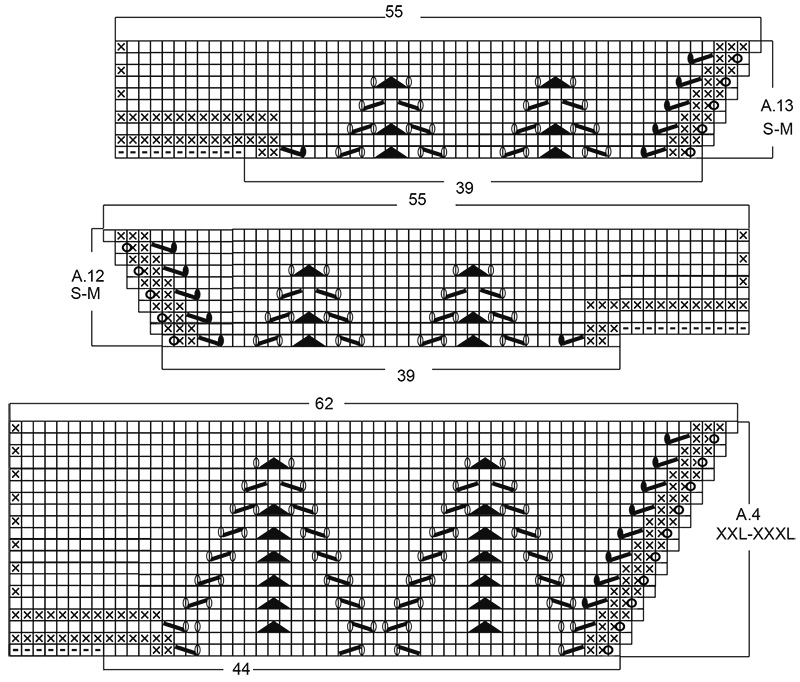 |
|||||||||||||||||||||||||||||||
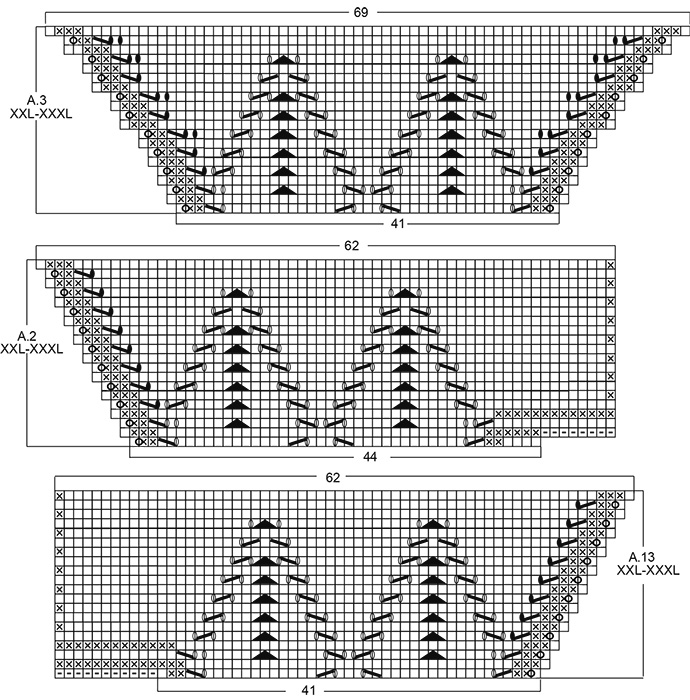 |
|||||||||||||||||||||||||||||||
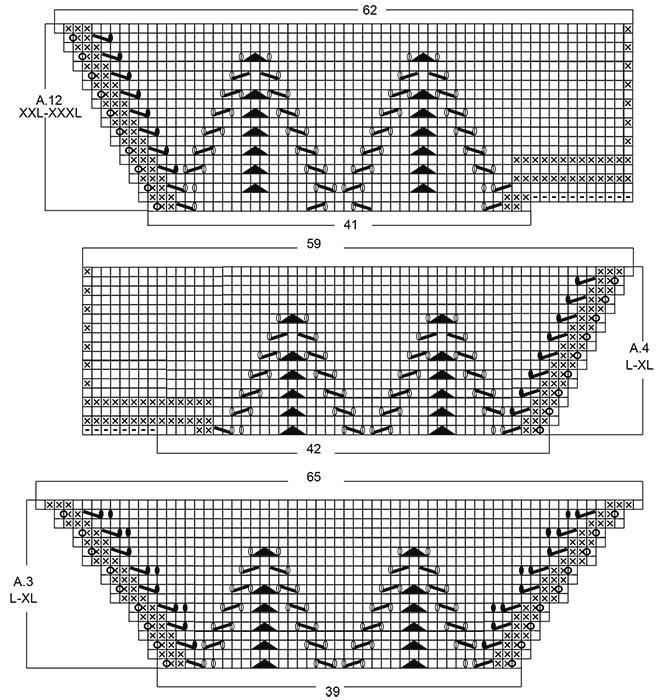 |
|||||||||||||||||||||||||||||||
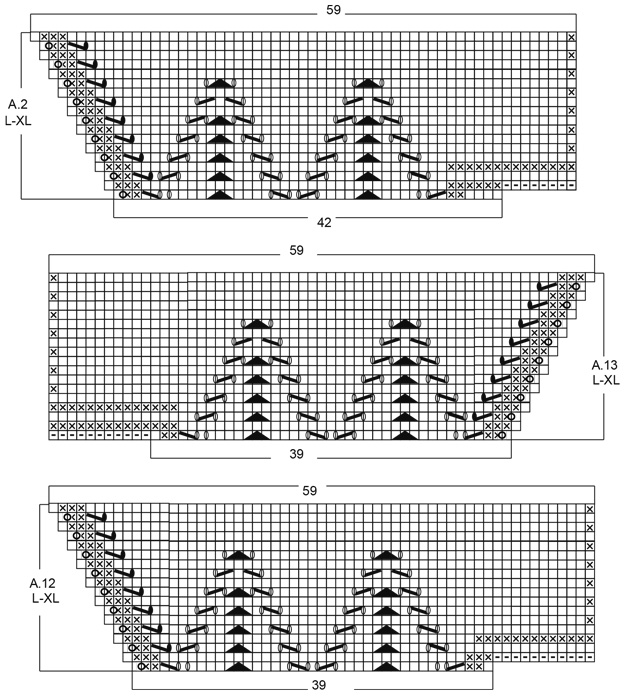 |
|||||||||||||||||||||||||||||||
Have you finished this pattern?Tag your pictures with #dropspattern #butterflyheartsweater or submit them to the #dropsfan gallery. Do you need help with this pattern?You'll find 18 tutorial videos, a Comments/Questions area and more by visiting the pattern on garnstudio.com. © 1982-2026 DROPS Design A/S. We reserve all rights. This document, including all its sub-sections, has copyrights. Read more about what you can do with our patterns at the bottom of each pattern on our site. |
|||||||||||||||||||||||||||||||






With over 40 years in knitting and crochet design, DROPS Design offers one of the most extensive collections of free patterns on the internet - translated to 17 languages. As of today we count 333 catalogues and 12525 patterns translated into English (UK/cm). 12525
We work hard to bring you the best knitting and crochet have to offer, inspiration and advice as well as great quality yarns at incredible prices! Would you like to use our patterns for other than personal use? You can read what you are allowed to do in the Copyright text at the bottom of all our patterns. Happy crafting!
Post a comment to pattern DROPS 170-3
We would love to hear what you have to say about this pattern!
If you want to leave a question, please make sure you select the correct category in the form below, to speed up the answering process. Required fields are marked *.