
Popular categories
Looking for a yarn?


Comments / Questions (22)
![]() Ola wrote:
Ola wrote:
Witam, czy w trakcie zamykania oczek na rękawy nadal dodajemy oczka przy markerach?
28.12.2014 - 10:32DROPS Design answered:
W trakcie nie. Później po 4 ściągaczach francuskich już tak, jak we wzorze: "Dalej przer. wg schematu A.2 i dodawać o. przez 4-5-7-9 cm, przer. 5 ściągaczy francuskich z dodawaniem o..."
29.12.2014 - 07:50
![]() Sandrine wrote:
Sandrine wrote:
J'ai 15 mailles entre chaque marqueurs je vais tricoter une 2 ème fois A2 en hauteur et au premier rang ça ne fonctionne pas j'ai à la fin du rang un jeté et une maille endroit, je ne peux pas faire un jeté et une maille endroit
16.12.2014 - 05:35DROPS Design answered:
Bonjour Sandrine, effectivement le dernier rang ajouré de A.2 se termine par 1 jeté, 1 m end - vous allez donc répéter le 2e rang ajouré de A.2 soit : 1 m end, *1 jeté, 2 m ens à l'end* jusqu'au marqueur, 1 jeté avant le marqueur et répéter ainsi tout le tour. Bon tricot!
16.12.2014 - 09:52
![]() Sandrine wrote:
Sandrine wrote:
J'en suis après le 1 er motif de A2 (J'ai 15 mailles entre chaque marqueurs) je vais augmenter une maille après le marqueur pour obtenir 16 mailles; il faut reprendre au premier rang de A2 ?
15.12.2014 - 11:07DROPS Design answered:
Bonjour Sandrine, à la fin de A2, vous reprenez au 1er rang de A.2, en répétant le motif de la même façon: ex au tour 1 quand on reprend A.2: 1 m end, *1 jeté, 2 m ens à l'end* jusqu'à ce qu'il reste 1 m avant le marqueur suivant, puis 1 jeté, 1 m end (= 1 augm). Et au tour 3 suivant: 1 m end, (1 jeté 2 m ens à l'end) jusqu'au marqueur suivant, 1 jeté avant le marqueur (= 1 augm). Bon tricot!
15.12.2014 - 11:46
![]() Sandrine wrote:
Sandrine wrote:
Je comprends mais il y a déjà 16 mailles sans augmenter au début du rang en faisant au premier rang une maille endroit (la 1ère maille) un jeté et 2 mailles ensemble et à la fin du rang on termine par 2 m ensemble et un jeté = 16 mailles
14.12.2014 - 21:12DROPS Design answered:
Bonjour Sandrine, au 1er tour de A.2 on a: 1 m end, 4 fois (1 jeté, 2 m ens à l'end), puis 1 jeté, 1 m end = 17 m à la fin du 1er tour. Bon tricot!
15.12.2014 - 10:22
![]() Sandrine wrote:
Sandrine wrote:
Quant on augmente dans A2 la maille augmentée après le marqueur est la maille 1 du diagramme A2 que je tricote à l'endroit ? c'est bien ça
14.12.2014 - 12:09DROPS Design answered:
Bonjour Sandrine, la 1ère m après chaque marqueur est la 1ère m du diagramme (colonne de gauche), on augmente après la 1ère m dans A.1 et de A.2 - placez bien un marqueur entre chaque rapport du diagramme tout le tour (7 marqueurs dont 1 pour le début du tour) pour bien repérer vos répétitions en largeur. Bon tricot!
14.12.2014 - 16:37
![]() Katia wrote:
Katia wrote:
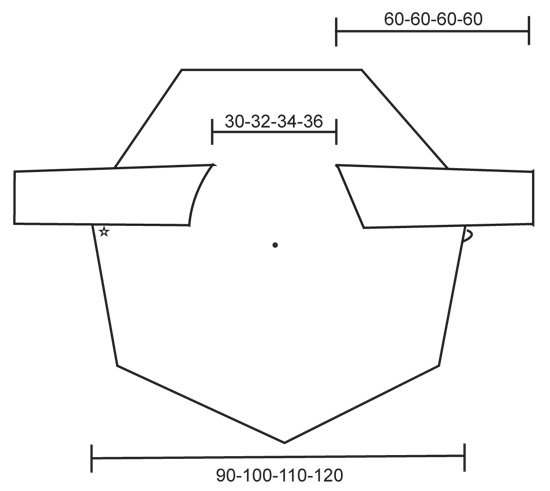
OK, if you look at the chart, the flat side is at the very top and it forms a collar. There should be a corner at the very top of the chart and the flat side should face down. The row starts at the corner. In the description it says to make holes for the sleeves by knitting, for example, 25 st, then make a hole, and then on the other side you make a hole for the sleeve and knit 25 st to the end of the row. So the corner is at the very top in the middle of your collar. Hope that helps...
19.09.2014 - 04:45DROPS Design answered:
Thank you Katia, your feedback has been forwarded. Happy knitting!
19.09.2014 - 10:06
![]() Katia wrote:
Katia wrote:
There is a mistake in this pattern. The description is correct, but the chart is drawn the wrong way. Please correct.
18.09.2014 - 05:15DROPS Design answered:
Dear Katia, chart looks correct, can you please explain what you mean. Thank you.
18.09.2014 - 09:03
![]() Chrissy wrote:
Chrissy wrote:
Chic und zeitlos.
13.06.2014 - 11:54
![]() Mimi55 wrote:
Mimi55 wrote:
Très joli gilet qui serait peut-être encore plus joli bicole car les motifs le permettent. Aérien et en même temps chaud, l'élèment indispensable d'une garde robe.
11.06.2014 - 13:25
![]() Orielle wrote:
Orielle wrote:
Good project for some serious redesign. Collar as a hood, round shape way over done. Has some good textural variation and interest.
06.06.2014 - 11:03
|
|||||||||||||||||||
Saralyn#saralyncardigan |
|||||||||||||||||||
 |
 |
||||||||||||||||||
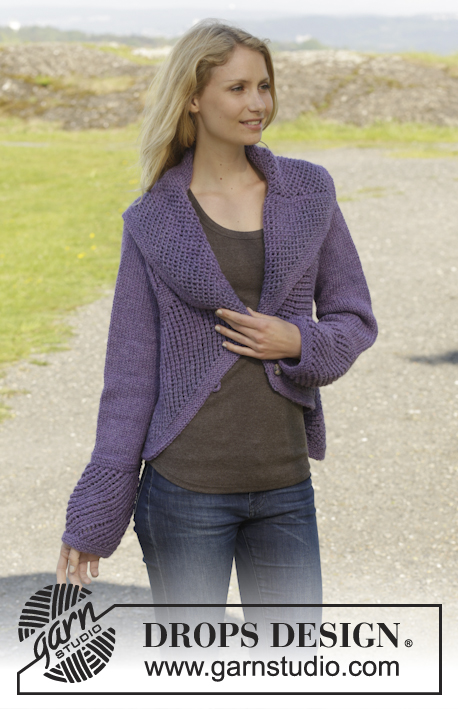
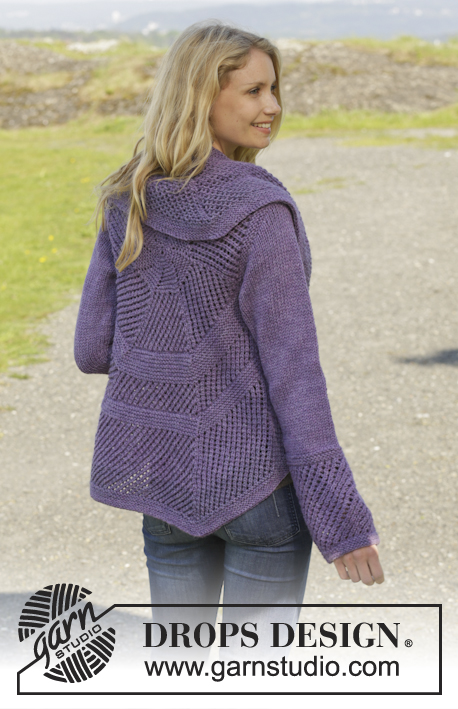
Knitted DROPS jacket worked in a circle in garter st with lace pattern in ”Big Merino”. Size: S - XXXL.
DROPS 156-37 |
|||||||||||||||||||
|
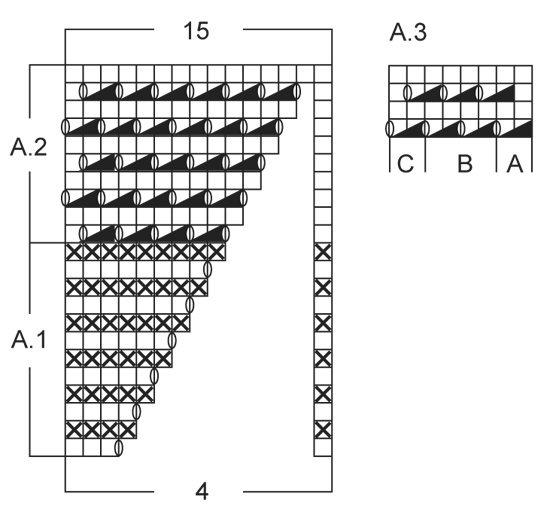
GARTER ST (in the round on circular needle): * K 1 round and P 1 round *, repeat from *-*. 1 ridge = 2 rounds. GARTER ST (back and forth on needle): K all rows. 1 ridge = 2 rows K. PATTERN: See diagrams A.1-A.3. The diagrams show all rows in pattern seen from RS. INCREASE TIP: Inc 1 st by making a YO. On next row work YO twisted (i.e. work in the back loop of st instead of front) to avoid holes. ---------------------------------------------------------- BODY: Worked in the round in a circle from mid back. Cast on 7 sts with Big Merino and divide them on 4 double pointed needles size 5 mm. K 1 round while AT THE SAME TIME K 2 sts in every st = 14 sts. Insert 7 markers in the piece, 2 sts apart. 1st marker = at beg of round = back of neck. P 1 round. On next round K while AT THE SAME TIME working 2 sts in every other st = 21 sts. P 1 round. On next round K with 2 sts in every 3rd st = 28 sts. P 1 round. Then work according to A.1, work 1 repetition over the 4 sts between every marker. When A.1 has been worked, continue according to A.2. After A.2 continue pattern in A.2 the same way with 7 inc on every other round, work the inc sts in pattern. Switch to circular needle size 5 mm when needed. REMEMBER THE KNITTING TENSION! When piece measures 17-18-19-20 cm from centre, work 3 ridges in GARTER ST – see explanation above - over all sts. NOTE! Continue inc every other round, inc with a YO after every marker (= 7 inc). Work next round as follows: Work 25-27-29-31 sts, cast off 32-34-37-40 sts (= armhole), work until 57-61-66-71 sts remain on needle, cast off 32-34-37-40 sts (= armhole) and work 25-27-29-31 sts. P 1 round - AT THE SAME TIME cast on 32-34-37-40 new sts over each armhole, same no of sts that were cast off for armhole. Work 4 ridges. Continue with A.2 and inc for 4-5-7-9 cm, work 5 ridges with inc, work A.2 with inc for 13-16-18-20 cm, finish with 5 ridges with inc – piece measures approx. 45-50-55-60 cm from centre and outwards. LOOSELY cast off. SLEEVE: The sleeve is worked back and forth on circular needle. Cast on 44-46-48-50 sts (incl 1 edge st in each side) on needle size 5 mm with Big Merino, work 3 ridges in GARTER ST - see explanation above (= 1st row = WS). Work next row as follows from RS: 1 edge st in garter st, A.3A (= 2 sts) A.3B until 3 sts remain, finish with A.3C (= 2 sts) and 1 edge st in garter st. When piece measures 17 cm, work 3 ridges. Then work in stocking st with 1 edge st in garter st in each side – AT THE SAME TIME on next row from RS inc 1 st in each side – read INCREASE TIP, repeat inc every 3½-3-2½-2 cm 9-10-12-15 times in total = 62-66-72-80 sts. When piece measures 52 cm in all sizes, cast off for sleeve cap at beg of every row in each side as follows: 5 sts 1 time, then 2-2-3-3 sts in each side until piece measures approx. 60 cm - NOTE! For size XL/XXL cast off 3 sts only 6 times in each side, then 2 sts. Cast off the remaining sts. ASSEMBLY: Sew the sleeve seams inside 1 edge st. Sew in the sleeves so that middle of sleeve cap is placed where armholes are the closest tog (i.e where 1st st was dec for first armhole and where last st was dec on second armhole) and sleeve seams are placed where the armholes are the furthest apart (i.e. in opposite side - see chart). BUTTON AND LOOP: Lay the jacket down as shown in chart with RS up and sleeves straight out, sew button in the left side under sleeve from RS. Crochet 1 buttonhole loop on hook size 4 mm in cast-off edge under sleeve in the right side as follows: 1 dc in cast-off edge on jacket, 5 ch, skip approx. 1 cm and fasten with 1 dc in cast-off edge. |
|||||||||||||||||||
Diagram explanations |
|||||||||||||||||||
|
|||||||||||||||||||
 |
|||||||||||||||||||
 |
|||||||||||||||||||
Have you finished this pattern?Tag your pictures with #dropspattern #saralyncardigan or submit them to the #dropsfan gallery. Do you need help with this pattern?You'll find 25 tutorial videos, a Comments/Questions area and more by visiting the pattern on garnstudio.com. © 1982-2026 DROPS Design A/S. We reserve all rights. This document, including all its sub-sections, has copyrights. Read more about what you can do with our patterns at the bottom of each pattern on our site. |
|||||||||||||||||||


With over 40 years in knitting and crochet design, DROPS Design offers one of the most extensive collections of free patterns on the internet - translated to 17 languages. As of today we count 325 catalogues and 12298 patterns translated into English (UK/cm). 12298
We work hard to bring you the best knitting and crochet have to offer, inspiration and advice as well as great quality yarns at incredible prices! Would you like to use our patterns for other than personal use? You can read what you are allowed to do in the Copyright text at the bottom of all our patterns. Happy crafting!
Post a comment to pattern DROPS 156-37
We would love to hear what you have to say about this pattern!
If you want to leave a question, please make sure you select the correct category in the form below, to speed up the answering process. Required fields are marked *.