
Popular categories
Looking for a yarn?


Comments / Questions (298)
![]() Greta A Krey wrote:
Greta A Krey wrote:
Hei. Takk for flotte oppskrifter. Tenkte prøve meg på jakken Morning Glory, men tåler ikke ull (spes saueull). Har Dere noe garnalternativ å foreslå? Evt strikke m 2 typer garn... På forhånd takk fra Gran Canaria - venter på hjemreise. Ta vare på hverandre. Mvh Greta A. Krey
18.03.2020 - 14:13DROPS Design answered:
Hej Greta, tusind tak :) Ja du kan strikke denne model i DROPS Belle, DROPS Cotton Light eller i DROPS Muskat som alle 3 tilhører garngruppe B. Velkommen hjem og rigtig god fornøjelse!
19.03.2020 - 14:41
![]() Salmissra wrote:
Salmissra wrote:
Diminuer chaque section de 14-16-16-16-16-16 m env ainsi: 2 m ens à l'env, 10-12-12-12-12-12 m env, 2 m ens à l'env (= 10 m diminuées au total). Je comprends la section 14, mais où sont les 10 M a diminué ? Merci
07.02.2020 - 19:07DROPS Design answered:
Bonjour Salmrissa, vous avez 5 sections de 14 m envers au total (en taille S), vous diminuez 2 mailles dans chacune de ces sections = vous diminuez 10 mailles au total sur ce rang et à chaque fois que vous allez diminuer dans ces sections en mailles envers. Bon tricot!
10.02.2020 - 07:37
![]() Sara Willott wrote:
Sara Willott wrote:
Hi, I'm struggling with several technical instructions. First is that I don't understand why there is reference to 3 patterns in the body of the instructions. I assumed this was one pattern for a knitted jacket with cables? Thanks, Sara
31.12.2019 - 18:31DROPS Design answered:
Dear Sara, cable pattern is divided into several charts, because we use several different types of cables. Pattern between cables is changing as we shape the jacket. Happy knitting!
31.12.2019 - 23:56
![]() Tine Mikkelsen wrote:
Tine Mikkelsen wrote:
Hvordan skal jeg forstå sjalkraven? Skal den kun strikkes over de 21 masker på forstykket? Og hvis den kun skal det, hvordan får jeg nakken med? På forhånd tak
28.12.2019 - 14:32DROPS Design answered:
Hej Tine, kraven fra begge forstykker sys sammen midt bagpå i nakken og på bagstykket langs med halsen bagpå. God fornøjelse!
31.01.2020 - 11:17
![]() Tine Mikkelsen wrote:
Tine Mikkelsen wrote:
Når der står 1 Pind, mener I 1 række eller både frem og tilbage ?
16.11.2019 - 09:07DROPS Design answered:
Hej Tine, 1 pind = 1 række i diagrammet :)
19.11.2019 - 13:29
![]() Inger Lausund wrote:
Inger Lausund wrote:
Hei! I Morning Glory skjønner jeg ikke hvordan mønster A3 skal oppfattes. Etter første omgang blir det kun 1 maske igjen - omgang to har et kast - hvordan kan det bli 3 masker?
12.11.2019 - 09:52DROPS Design answered:
Hej. Efter första omgang i A.3 har du 2 masker igjen (du tar 1 m löst av pinnen, stickar 2 räta maskor, tar den lösa m över de 2 maskor som stickades). På omgang 1 stickar du 1 m, 1 kast, stickar 1 m. På omgang 3 har du då sen 3 masker. Lycka till!
13.11.2019 - 08:20
![]() Joanna Zawadzka wrote:
Joanna Zawadzka wrote:
Droga pani. Pisze pani -Tyl-na wysokosci .... zakonczyc 5 o nad A1 i 5 o nad A2....pierwsze pytanie-jest to srodek pleców więc czemu nastepne zdanie brzmi-Nastepnie zamknac ....o Srodkowych na dekold??????
30.06.2019 - 20:58DROPS Design answered:
Witaj Joanno! Chodzi o dekolt tyłu. Brzeg na górze z tyłu nie jest prosty. Dekolt tyłu, nawet gdy dekolt z przodu jest okrągły, a nie tak jak tutaj w kształcie litery V, jest również wykonywany, chociaż jest płytszy niż z przodu. Pozdrawiamy i życzymy miłej pracy nad robótką!
01.07.2019 - 07:49
![]() Shoga wrote:
Shoga wrote:
Heel interessant Bedankt
04.05.2019 - 10:40
![]() Ada wrote:
Ada wrote:
Onder telpatroon staan 8 afbeeldingen (bovenaan een open vierkantje onderaan een zwart vierkantje) mijn computer pakt de afbeeldingen 4,5 en 6 niet, dus ik weet dan niet welke kant op de kabel gebreid zou moeten worden. Dank alvast voor uw antwoord, fijn weekend en vriendelijke groet, Ada
22.02.2019 - 08:24
![]() Quillec Nicole wrote:
Quillec Nicole wrote:
Je mesure 1,56 m et je voudrait faire le gilet 6 cm de moins ( soit 74 cm ) que le modèle en taille L,comment puis je procéder. Merci infiniment
17.12.2018 - 13:38DROPS Design answered:
Bonjour Mme Quillec, nous ne sommes malheureusement pas en mesure de pouvoir ajuster chacun de nos modèles à chaque demande. Vous pouvez toutefois vous aider du schéma des mesures pour ajuster les explications et la longueur souhaitée. Votre magasin DROPS saura vous aider et vous assister, même par mail ou téléphone. Bon tricot!
17.12.2018 - 14:21
|
|||||||||||||||||||||||||
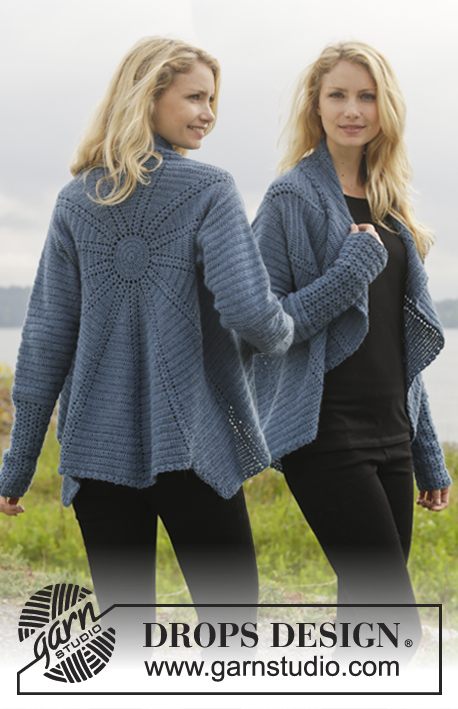
Morning Glory#morningglorycardigan |
|||||||||||||||||||||||||
 |
 |
||||||||||||||||||||||||
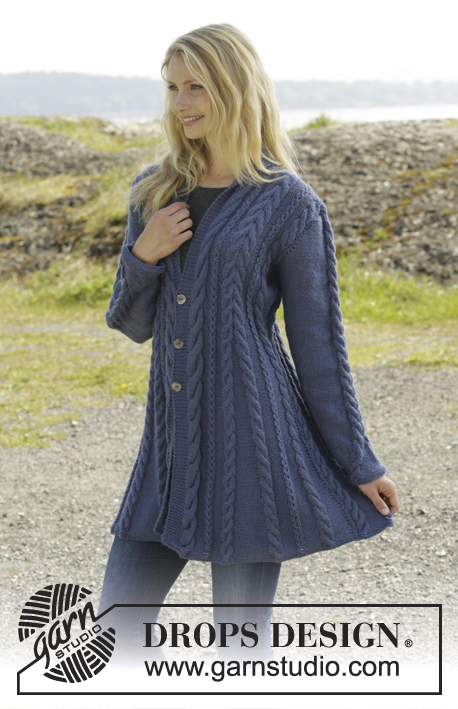
Knitted DROPS jacket with cables and shawl collar in ”Karisma”. Size: S - XXXL.
DROPS 158-1 |
|||||||||||||||||||||||||
|
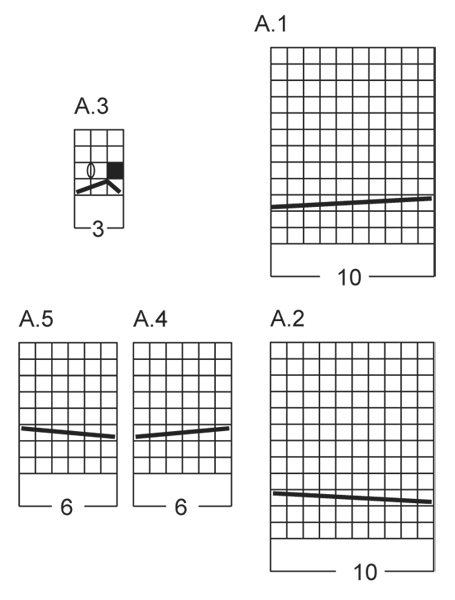
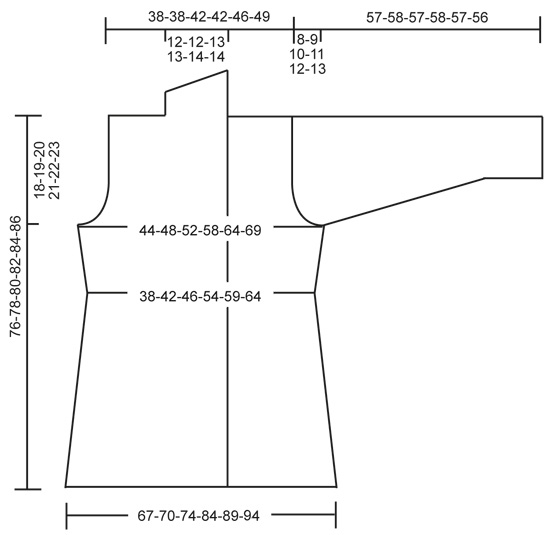
GARTER ST (back and forth on needle): K all rows. 1 ridge = 2 rows K. GARTER ST (in the round on double pointed needles): * K 1 round and P 1 round *, repeat from *-*. 1 ridge = 2 rounds. DECREASE TIP: Dec 1 st before marker/A.3 as follows: Work until 2 sts remain before marker, P 2 tog. Dec 1 st after marker/A.3 as follows: P 2 tog. PATTERN 1: See diagrams A.1-A.5. The diagrams show all rows in pattern seen from RS. PATTERN 2: P 7-7-8-8-9-10, A.3, P 7-7-8-8-9-10. PATTERN 3: P 4-5-6-6-7-8, A.3, P 4-5-6-6-7-8. BUTTONHOLES: Dec for buttonholes on right band. 1 buttonhole = K tog second and third st from edge and make 1 YO. Dec for buttonholes when piece measures: SIZE S: 31, 39 and 47 cm SIZE M: 31, 39 and 47 cm SIZE L: 31, 39 and 47 cm SIZE XL: 32, 40 and 48 cm SIZE XXL: 32, 40 and 48 cm SIZE XXL: 32, 40 and 48 cm ---------------------------------------------------------- BODY: Worked back and forth on circular needle. Cast on 306-318-334-378-398-418 sts (incl 8 band sts in each side of piece) on circular needle size 3.5 mm with Karisma. Work 2 ridges in GARTER ST - see explanation above AT THE SAME TIME on last row inc 44 sts evenly = 350-362-378-422-442-462 sts. Switch to circular needle size 4 mm. Then work from RS AT THE SAME TIME insert 2 markers and 0-0-0-4-4-4 strands in the piece as follows: Work 8 band sts in garter st, A.2, PATTERN 2 – see explanation above, A.4, P 14-16-16-16-16-16, A.5, pattern 2, A.4, P 0-0-0-8-9-10, insert 1 strand in size XL-XXL-XXXL, A.3 0-0-0-1-1-1 time, insert 1st marker, P 8-9-9-9-9-9, A.3 0-0-0-1-1-1 time, insert 1 strand in size XL-XXL-XXXL, P 0-0-0-8-9-10, A.5, pattern 2, A.4, P 14-16-16-16-16-16, A.5, pattern 2, A.1, P 14-16-16-16-16-16, A.2, pattern 2, A.4, P 14-16-16-16-16-16, A.5, pattern 2, A.4, P 0-0-0-8-9-10, insert 1 strand in size XL-XXL-XXXL, A.3 0-0-0-1-1-1 time, P 8-9-9-9-9-9, insert 2nd marker, A.3 0-0-0-1-1-1 time, insert 1 strand in size XL-XXL-XXXL, P 0-0-0-8-9-10, A.5, pattern 2, A.4, P 14-16-16-16-16-16, A.5, pattern 2, A.1, 8 band sts in garter st. Move the markers and strands upwards when working. Work band sts in garter st until finished measurements. Work K over K sts between cables from WS, i.e. P sts seen from RS. Continue pattern like this. Remember BUTTONHOLES - see explanation above. REMEMBER THE KNITTING TENSION! When piece measures 8-10-10-10-10-10 cm, dec as follows: Dec in every section with 14-16-16-16-16-16 P sts by working as follows: P 2 tog, P 10-12-12-12-12-12, P 2 tog (= 10 sts dec in total). Repeat this dec every 5-4-4-4-4-4 cm 6-7-7-7-7-7 more times. NOTE: On last dec work the remaining 2 P tog. AT THE SAME TIME when piece measures 8-10-10-10-10-10 cm, dec as follows: Dec 1 st after 1st marker and 1 st before 2nd marker - see DECREASE TIP. Repeat this dec every 6-4½-4½-4½-4½-4½ cm 5-6-6-6-6-6 more times. AT THE SAME TIME when piece measures 16 cm, dec as follows in pattern 2: Dec 1 st before A.3 and 1 st after A.3 (= 16 sts dec). Repeat this dec every 10-20-20-20-20-20 cm 2-1-1-1-1-1 more times. AT THE SAME TIME in size XL-XXL-XXXL dec as follows at every strand: Dec 1 st by working the 2 P sts closes to A.3 P tog (= 4 sts dec). Repeat this dec every 20 cm 1 more time. When all dec are done, there are 225-241-257-293-313-333 sts on needle. There are now 2 P st at markers in the sides and 1 P st between A.4 and A.5 and between A.1 and A.2 and 4-5-6-6-7-8 P sts on each side of A.3. When piece measures 44 cm, adjust so that next row is from RS, inc as follows: 8 band sts in garter st, A.2, PATTERN 3 – see explanation above, A.4, P 1, A.5, pattern 3, A.4, P 0-0-0-6-7-8, A.3 0-0-0-1-1-1 time, 1 YO, P 2, 1 YO, A.3 0-0-0-1-1-1 time, P 0-0-0-6-7-8, A.5, pattern 3, A.4, P 1, A.5, pattern 3, A.1, P 1, A.2, pattern 3, A.4, P 1, A.5, pattern 3, A.4, P 0-0-0-6-7-8, A.3 0-0-0-1-1-1 time, 1 YO, P 2, 1 YO, A.3 0-0-0-1-1-1 time, P 0-0-0-6-7-8, A.5, pattern 3, A.4, P 1, A.5, pattern 3, A.1, 8 band sts in garter st (= 4 sts inc). K YOs twisted on next row to avoid holes. Repeat inc every 6th-6th-6th-12th-10th-12th row 5-5-5-3-4-4 more times = 249-265-281-309-333-353 sts. Work inc sts P from RS and K from WS. When piece measures 58-59-60-61-62-63 cm, divide the piece, finish front and back pieces separately as follows: Slip the first and last 66-70-74-81-87-92 sts on a stitch holder for front pieces, cut the yarn, then work only over the middle 117-125-133-147-159-169 sts (= back piece). BACK PIECE: Now cast off for armholes at beg of every row in each side as follows: Cast off 3 sts 1 time, then 2 sts 1-1-1-3-4-4 times and 1 st 1-1-1-4-4-5 times = 105-113-121-121-129-137 sts. Then dec on next row from RS as follows: Dec 1 st before A.3 and 1 st after A.3 0-1-1-1-1-1 time = 105-105-113-113-121-129 sts. When piece measures 73-75-77-79-81-83 cm, dec 5 sts over A.1 and 5 sts over A.2 by working 2 and 2 sts K tog = 95-95-103-103-111-119 sts on needle. Then cast off the middle 25-25-27-27-29-31 sts for neck and finish each shoulder separately = 35-35-38-38-41-44 sts remain on each shoulder. When piece measures 75-77-79-81-83-85 cm, dec 3 sts over every A.4 and A.5 (= 9 sts dec) = 26-26-29-29-32-35 sts remain on needle. Cast off. RIGHT FRONT PIECE: = 66-70-74-81-87-92 sts. Now cast off for armhole at beg of every row from the side as follows: Cast off 3 sts 1 time, then 2 sts 1-1-1-3-4-4 times and 1 st 1-1-1-4-4-5 times = 60-64-68-68-72-76 sts. Then dec on next row from RS as follows: Dec 1 st before A.3 and 1 st after A.3 0-1-1-1-1-1 time = 60-60-64-64-68-72 sts on needle. When piece measures 75-77-79-81-83-85 cm, dec 5 sts over A.2 by working 2 and 2 sts K tog and 3 sts over every A.4 and A.5 = 46-46-50-50-54-58 sts. Then cast off the first 26-26-29-29-32-35 sts for shoulder, work the rest of row = 20-20-21-21-22-23 sts. Then work shawl collar in garter st over the remaining sts, beg mid front (1st row = RS) as follows: * Work 2 rows back and forth over the first 12-12-13-13-14-15 sts, work 2 rows back and forth over all sts *, repeat from *-* until shawl collar measures 8-8-9-9-10-10 cm at the shortest. Cast off. LEFT FRONT PIECE: Work as right front piece but reversed. Dec 5 sts over A.1 instead of A.2. Shawl collar beg from WS. SLEEVE: Worked in the round on double pointed needles. Cast on 48-50-52-54-54-56 sts on double pointed needles size 3.5 mm with Karisma. Work 2 ridges in GARTER ST - see explanation above AT THE SAME TIME on last round inc 5 sts = 53-55-57-59-59-61 sts. Switch to double pointed needles size 4 mm. READ ALL OF THE FOLLOWING SECTION BEFORE CONTINUING! Work as follows: P 4-5-6-7-7-8, A.4, P 33, A.5, finish with P 4-5-6-7-7-8. Insert 1 marker at the beg of the round. On next round move A.4 and A.5 1 st towards the middle as follows: P 4-5-6-7-7-8, 1 YO, A.4, P 2 tog, P 29, P 2 tog, A.5, 1 YO, finish with P 4-5-6-7-7-8. P YO twisted on next round. Move A.4 and A.5 towards the middle 1 st every other round until 1 st remains between A.4 and A.5. Piece measures approx. 12 cm. Continue to work P and A.4/A.5 with 1 P st between until finished measurements. AT THE SAME TIME when piece measures 10 cm, inc 1 st on each side of marker. Repeat inc every 4-3½-2½-2½-2-1½ cm 9-10-12-13-16-17 more times = 73-77-83-87-93-97 sts. When piece measures 49-49-47-47-46-43 cm (shorter measurements in the larger sizes because of longer sleeve cap and wider shoulders) cast off for sleeve cap at beg of every row in each side: Cast off 4 sts 1 time, 2 sts 3 times and 1 st 6 times, then cast off 2 sts in each side until piece measures 56-57-56-57-56-55 cm, then cast off 3 sts 1 time in each side AT THE SAME TIME dec 2 sts over every cable. Cast off the remaining sts, piece measures approx. 57-58-57-58-57-56 cm. Knit another sleeve. ASSEMBLY: Sew the shoulder seams. Sew in sleeves. Sew the collar tog mid back and sew it to the neckline. Sew the buttons on to left band. SHAPING: Moisten piece and place it on a carpet or mattress - carefully stretch it out to measurements. Leave to dry. |
|||||||||||||||||||||||||
Diagram explanations |
|||||||||||||||||||||||||
|
|||||||||||||||||||||||||
 |
|||||||||||||||||||||||||
 |
|||||||||||||||||||||||||
Have you finished this pattern?Tag your pictures with #dropspattern #morningglorycardigan or submit them to the #dropsfan gallery. Do you need help with this pattern?You'll find 31 tutorial videos, a Comments/Questions area and more by visiting the pattern on garnstudio.com. © 1982-2026 DROPS Design A/S. We reserve all rights. This document, including all its sub-sections, has copyrights. Read more about what you can do with our patterns at the bottom of each pattern on our site. |
|||||||||||||||||||||||||


With over 40 years in knitting and crochet design, DROPS Design offers one of the most extensive collections of free patterns on the internet - translated to 17 languages. As of today we count 324 catalogues and 12290 patterns translated into English (UK/cm). 12290
We work hard to bring you the best knitting and crochet have to offer, inspiration and advice as well as great quality yarns at incredible prices! Would you like to use our patterns for other than personal use? You can read what you are allowed to do in the Copyright text at the bottom of all our patterns. Happy crafting!
Post a comment to pattern DROPS 158-1
We would love to hear what you have to say about this pattern!
If you want to leave a question, please make sure you select the correct category in the form below, to speed up the answering process. Required fields are marked *.