
Popular categories
Looking for a yarn?


Comments / Questions (298)
![]() Nel Schat wrote:
Nel Schat wrote:
Hallo, Ik vind dit patroon prachtig maar zou het graag willen breien in een dunner garen. Ik heb een proeflapje op naald 2 1/2 met de volgende steken verhouding: 28st en 36 nld is 10x10cm Is het mogelijk om het om te rekenen? Met vriendelijke groet, Nel Schat
19.09.2021 - 11:35DROPS Design answered:
Dag Nel,
Helaas is het voor ons niet mogelijk om patronen aan te passen naar persoonlijke wensen. Op basis van de stekenverhouding zou je het hele patroon inderdaad om kunnen rekenen. Voor maat S zet je bijvoorbeeld 306 steken op in dit patroon. Als je dit deelt door 21 en dan weer keer 28, dan kom je ongeveer op het aantal op te zetten steken. Maar je moet ook rekening houden met hoe de kabels, de biezen, zijnaden etc verdeeld zijn over de steken.
23.09.2021 - 14:44
![]() Bryony Griffiths wrote:
Bryony Griffiths wrote:
I have read and re-read the pattern over and over, and I can't find a gauge swatch measurement to go with this pattern! Can anyone help me find it? :)
02.09.2021 - 04:47DROPS Design answered:
Dear Mrs Griffiths, sure you will find it under the header, together with sizes, materials and needle sizes required, ie 21 sts x 28 rows in stocking stitch = 10 x 10 cm. Happy knitting!
02.09.2021 - 08:43
![]() Rita wrote:
Rita wrote:
Ich möchte diese Jacke mit einer dickeren Wolle stricken. Eine Verkäuferin gab mir Drops Alaska Wolle und meinte dass der Garnumrechner mir alles genau ausrechnen würde. Leider macht dieser das nicht. Als ich die Verkäuferin telefonisch nach Hilfe fragte, konnte sie mir nicht weiter helfen, sie kann nicht umrechnen. Jetzt habe ich Wolle gekauft (keinenBon mehr) und kann das nicht umrechnen. Bitte helfen Sie mir, Ich bin kein Profi und brauche eine Anleitung mit dem Alaska Garn
28.10.2020 - 18:05DROPS Design answered:
Liebe Rita, hier finden Sie alle unsere Modellen, die mit Alaska gestrickt werden - und hier finden Sie noch mehr Modellen, die mit Alaska (= Garngruppe C) gestrickt werden können- benutzen Sie hier unseren Garnumrechner um die neuen Menge kalkukieren zu lassen. Viel Spaß beim stricken!
29.10.2020 - 08:29
![]() Nel wrote:
Nel wrote:
Kan ik dit patroon ook op gewone (ouderwetse) breinaalden breien?
19.10.2020 - 17:51DROPS Design answered:
Dag Nel,
Ja dat zou kunnen. Voor het aanpassen van een patroon, zodat je hem met rechte naalden kunt breien, hebben we een instructie gemaakt. Dee kun je hier vinden. Let er in dit geval even goed op hoe je uit komt met de kabels in de zijnaden.
21.10.2020 - 10:58
![]() Dalila Mammasse wrote:
Dalila Mammasse wrote:
Est ce que c'est la grosse laine ?
01.06.2020 - 21:52DROPS Design answered:
Bonjour Mme Mammasse, vous trouverez toutes les informations sur DROPS Karisma ici. Bon tricot!
02.06.2020 - 10:29
![]() Dalila Mammasse wrote:
Dalila Mammasse wrote:
Qu'elle taille 42,44,46,48 pour ce pull ?
01.06.2020 - 21:08DROPS Design answered:
Bonjour Mme Mammasse, pour connaître la taille à tricoter, mesurez un vêtement similaire qui vous va et dont vous aimez la forme, comparez ensuite ces mesures à celles du schéma ( plus d'infos ici. Bon tricot!
02.06.2020 - 10:29
![]() Claudette Warner wrote:
Claudette Warner wrote:
Could this pattern be done in a DK weight alpaca/wool/linen blend?
19.05.2020 - 17:25DROPS Design answered:
Dear Mrs Warner, click on the yarn converter to find out the alternatives. Happy knitting!
20.05.2020 - 07:02
![]() Amy wrote:
Amy wrote:
I just sent a question re increase at 17 1/4 in. I realized the P 2 is at the markers between A.4 and A.5.
05.05.2020 - 00:23
![]() Amy wrote:
Amy wrote:
At the 17 1/4 in increase it says to do 1 YO, P 2, 1 YO between A.4 and A.5. My question: there is only 1 P between A.4 and A.5 on the medium size. Am I adding a P in the existing P. This would be more than 4 added stitches. I think the P 2 may be an error.
05.05.2020 - 00:04DROPS Design answered:
Dear Amy, you will increase after 2nd A.4 and before A.2 A.5, ie where there are P2 between A.4 and A.5 as explained in the description of the row. You still have P1 between A.4 and A.5 at the beg + end of row but you will now increase on the sides on either side of the P2 (after A.4 and before A.5). Happy knitting!
05.05.2020 - 11:20
![]() Rose wrote:
Rose wrote:
I'm the pattern it says, decrease 5 stitches over A1 & A2, by knit 2, and then k2tog. Over a 10 stitch cable this would not equal a 5 stitch decrease. I decided to do 5 sets of k2tog on each cable. The mistake is made several times, right before binding off the back of the collar and in the directions for the left front.
03.04.2020 - 07:14
|
|||||||||||||||||||||||||
Morning Glory#morningglorycardigan |
|||||||||||||||||||||||||
 |
 |
||||||||||||||||||||||||
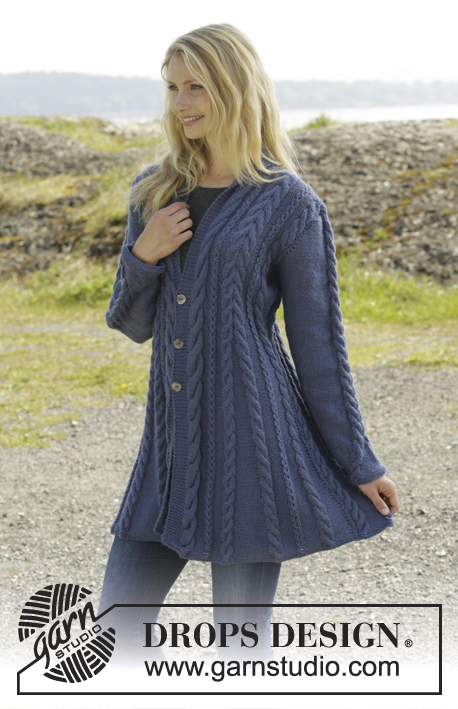
Knitted DROPS jacket with cables and shawl collar in ”Karisma”. Size: S - XXXL.
DROPS 158-1 |
|||||||||||||||||||||||||
|
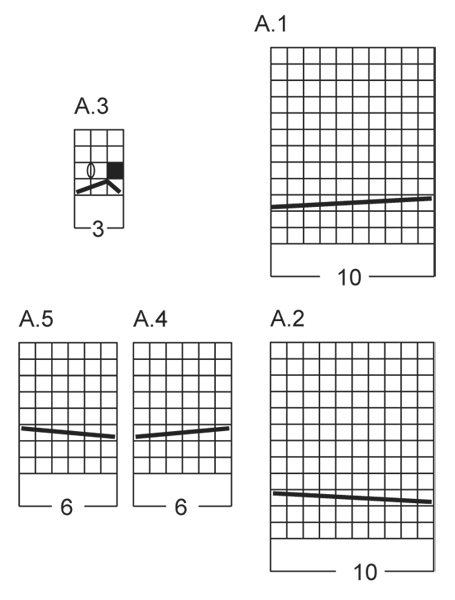
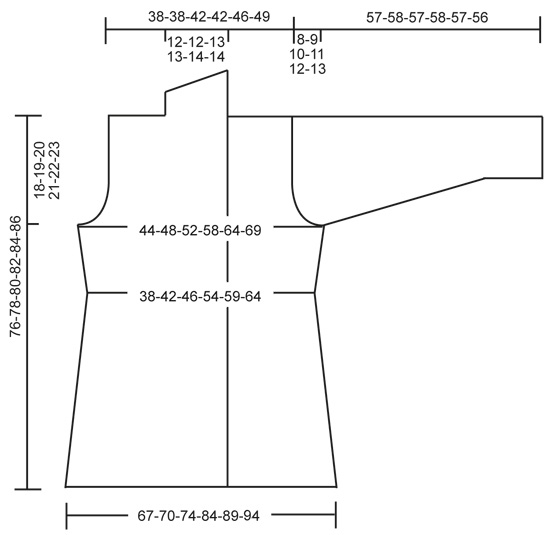
GARTER ST (back and forth on needle): K all rows. 1 ridge = 2 rows K. GARTER ST (in the round on double pointed needles): * K 1 round and P 1 round *, repeat from *-*. 1 ridge = 2 rounds. DECREASE TIP: Dec 1 st before marker/A.3 as follows: Work until 2 sts remain before marker, P 2 tog. Dec 1 st after marker/A.3 as follows: P 2 tog. PATTERN 1: See diagrams A.1-A.5. The diagrams show all rows in pattern seen from RS. PATTERN 2: P 7-7-8-8-9-10, A.3, P 7-7-8-8-9-10. PATTERN 3: P 4-5-6-6-7-8, A.3, P 4-5-6-6-7-8. BUTTONHOLES: Dec for buttonholes on right band. 1 buttonhole = K tog second and third st from edge and make 1 YO. Dec for buttonholes when piece measures: SIZE S: 31, 39 and 47 cm SIZE M: 31, 39 and 47 cm SIZE L: 31, 39 and 47 cm SIZE XL: 32, 40 and 48 cm SIZE XXL: 32, 40 and 48 cm SIZE XXL: 32, 40 and 48 cm ---------------------------------------------------------- BODY: Worked back and forth on circular needle. Cast on 306-318-334-378-398-418 sts (incl 8 band sts in each side of piece) on circular needle size 3.5 mm with Karisma. Work 2 ridges in GARTER ST - see explanation above AT THE SAME TIME on last row inc 44 sts evenly = 350-362-378-422-442-462 sts. Switch to circular needle size 4 mm. Then work from RS AT THE SAME TIME insert 2 markers and 0-0-0-4-4-4 strands in the piece as follows: Work 8 band sts in garter st, A.2, PATTERN 2 – see explanation above, A.4, P 14-16-16-16-16-16, A.5, pattern 2, A.4, P 0-0-0-8-9-10, insert 1 strand in size XL-XXL-XXXL, A.3 0-0-0-1-1-1 time, insert 1st marker, P 8-9-9-9-9-9, A.3 0-0-0-1-1-1 time, insert 1 strand in size XL-XXL-XXXL, P 0-0-0-8-9-10, A.5, pattern 2, A.4, P 14-16-16-16-16-16, A.5, pattern 2, A.1, P 14-16-16-16-16-16, A.2, pattern 2, A.4, P 14-16-16-16-16-16, A.5, pattern 2, A.4, P 0-0-0-8-9-10, insert 1 strand in size XL-XXL-XXXL, A.3 0-0-0-1-1-1 time, P 8-9-9-9-9-9, insert 2nd marker, A.3 0-0-0-1-1-1 time, insert 1 strand in size XL-XXL-XXXL, P 0-0-0-8-9-10, A.5, pattern 2, A.4, P 14-16-16-16-16-16, A.5, pattern 2, A.1, 8 band sts in garter st. Move the markers and strands upwards when working. Work band sts in garter st until finished measurements. Work K over K sts between cables from WS, i.e. P sts seen from RS. Continue pattern like this. Remember BUTTONHOLES - see explanation above. REMEMBER THE KNITTING TENSION! When piece measures 8-10-10-10-10-10 cm, dec as follows: Dec in every section with 14-16-16-16-16-16 P sts by working as follows: P 2 tog, P 10-12-12-12-12-12, P 2 tog (= 10 sts dec in total). Repeat this dec every 5-4-4-4-4-4 cm 6-7-7-7-7-7 more times. NOTE: On last dec work the remaining 2 P tog. AT THE SAME TIME when piece measures 8-10-10-10-10-10 cm, dec as follows: Dec 1 st after 1st marker and 1 st before 2nd marker - see DECREASE TIP. Repeat this dec every 6-4½-4½-4½-4½-4½ cm 5-6-6-6-6-6 more times. AT THE SAME TIME when piece measures 16 cm, dec as follows in pattern 2: Dec 1 st before A.3 and 1 st after A.3 (= 16 sts dec). Repeat this dec every 10-20-20-20-20-20 cm 2-1-1-1-1-1 more times. AT THE SAME TIME in size XL-XXL-XXXL dec as follows at every strand: Dec 1 st by working the 2 P sts closes to A.3 P tog (= 4 sts dec). Repeat this dec every 20 cm 1 more time. When all dec are done, there are 225-241-257-293-313-333 sts on needle. There are now 2 P st at markers in the sides and 1 P st between A.4 and A.5 and between A.1 and A.2 and 4-5-6-6-7-8 P sts on each side of A.3. When piece measures 44 cm, adjust so that next row is from RS, inc as follows: 8 band sts in garter st, A.2, PATTERN 3 – see explanation above, A.4, P 1, A.5, pattern 3, A.4, P 0-0-0-6-7-8, A.3 0-0-0-1-1-1 time, 1 YO, P 2, 1 YO, A.3 0-0-0-1-1-1 time, P 0-0-0-6-7-8, A.5, pattern 3, A.4, P 1, A.5, pattern 3, A.1, P 1, A.2, pattern 3, A.4, P 1, A.5, pattern 3, A.4, P 0-0-0-6-7-8, A.3 0-0-0-1-1-1 time, 1 YO, P 2, 1 YO, A.3 0-0-0-1-1-1 time, P 0-0-0-6-7-8, A.5, pattern 3, A.4, P 1, A.5, pattern 3, A.1, 8 band sts in garter st (= 4 sts inc). K YOs twisted on next row to avoid holes. Repeat inc every 6th-6th-6th-12th-10th-12th row 5-5-5-3-4-4 more times = 249-265-281-309-333-353 sts. Work inc sts P from RS and K from WS. When piece measures 58-59-60-61-62-63 cm, divide the piece, finish front and back pieces separately as follows: Slip the first and last 66-70-74-81-87-92 sts on a stitch holder for front pieces, cut the yarn, then work only over the middle 117-125-133-147-159-169 sts (= back piece). BACK PIECE: Now cast off for armholes at beg of every row in each side as follows: Cast off 3 sts 1 time, then 2 sts 1-1-1-3-4-4 times and 1 st 1-1-1-4-4-5 times = 105-113-121-121-129-137 sts. Then dec on next row from RS as follows: Dec 1 st before A.3 and 1 st after A.3 0-1-1-1-1-1 time = 105-105-113-113-121-129 sts. When piece measures 73-75-77-79-81-83 cm, dec 5 sts over A.1 and 5 sts over A.2 by working 2 and 2 sts K tog = 95-95-103-103-111-119 sts on needle. Then cast off the middle 25-25-27-27-29-31 sts for neck and finish each shoulder separately = 35-35-38-38-41-44 sts remain on each shoulder. When piece measures 75-77-79-81-83-85 cm, dec 3 sts over every A.4 and A.5 (= 9 sts dec) = 26-26-29-29-32-35 sts remain on needle. Cast off. RIGHT FRONT PIECE: = 66-70-74-81-87-92 sts. Now cast off for armhole at beg of every row from the side as follows: Cast off 3 sts 1 time, then 2 sts 1-1-1-3-4-4 times and 1 st 1-1-1-4-4-5 times = 60-64-68-68-72-76 sts. Then dec on next row from RS as follows: Dec 1 st before A.3 and 1 st after A.3 0-1-1-1-1-1 time = 60-60-64-64-68-72 sts on needle. When piece measures 75-77-79-81-83-85 cm, dec 5 sts over A.2 by working 2 and 2 sts K tog and 3 sts over every A.4 and A.5 = 46-46-50-50-54-58 sts. Then cast off the first 26-26-29-29-32-35 sts for shoulder, work the rest of row = 20-20-21-21-22-23 sts. Then work shawl collar in garter st over the remaining sts, beg mid front (1st row = RS) as follows: * Work 2 rows back and forth over the first 12-12-13-13-14-15 sts, work 2 rows back and forth over all sts *, repeat from *-* until shawl collar measures 8-8-9-9-10-10 cm at the shortest. Cast off. LEFT FRONT PIECE: Work as right front piece but reversed. Dec 5 sts over A.1 instead of A.2. Shawl collar beg from WS. SLEEVE: Worked in the round on double pointed needles. Cast on 48-50-52-54-54-56 sts on double pointed needles size 3.5 mm with Karisma. Work 2 ridges in GARTER ST - see explanation above AT THE SAME TIME on last round inc 5 sts = 53-55-57-59-59-61 sts. Switch to double pointed needles size 4 mm. READ ALL OF THE FOLLOWING SECTION BEFORE CONTINUING! Work as follows: P 4-5-6-7-7-8, A.4, P 33, A.5, finish with P 4-5-6-7-7-8. Insert 1 marker at the beg of the round. On next round move A.4 and A.5 1 st towards the middle as follows: P 4-5-6-7-7-8, 1 YO, A.4, P 2 tog, P 29, P 2 tog, A.5, 1 YO, finish with P 4-5-6-7-7-8. P YO twisted on next round. Move A.4 and A.5 towards the middle 1 st every other round until 1 st remains between A.4 and A.5. Piece measures approx. 12 cm. Continue to work P and A.4/A.5 with 1 P st between until finished measurements. AT THE SAME TIME when piece measures 10 cm, inc 1 st on each side of marker. Repeat inc every 4-3½-2½-2½-2-1½ cm 9-10-12-13-16-17 more times = 73-77-83-87-93-97 sts. When piece measures 49-49-47-47-46-43 cm (shorter measurements in the larger sizes because of longer sleeve cap and wider shoulders) cast off for sleeve cap at beg of every row in each side: Cast off 4 sts 1 time, 2 sts 3 times and 1 st 6 times, then cast off 2 sts in each side until piece measures 56-57-56-57-56-55 cm, then cast off 3 sts 1 time in each side AT THE SAME TIME dec 2 sts over every cable. Cast off the remaining sts, piece measures approx. 57-58-57-58-57-56 cm. Knit another sleeve. ASSEMBLY: Sew the shoulder seams. Sew in sleeves. Sew the collar tog mid back and sew it to the neckline. Sew the buttons on to left band. SHAPING: Moisten piece and place it on a carpet or mattress - carefully stretch it out to measurements. Leave to dry. |
|||||||||||||||||||||||||
Diagram explanations |
|||||||||||||||||||||||||
|
|||||||||||||||||||||||||
 |
|||||||||||||||||||||||||
 |
|||||||||||||||||||||||||
Have you finished this pattern?Tag your pictures with #dropspattern #morningglorycardigan or submit them to the #dropsfan gallery. Do you need help with this pattern?You'll find 31 tutorial videos, a Comments/Questions area and more by visiting the pattern on garnstudio.com. © 1982-2026 DROPS Design A/S. We reserve all rights. This document, including all its sub-sections, has copyrights. Read more about what you can do with our patterns at the bottom of each pattern on our site. |
|||||||||||||||||||||||||


With over 40 years in knitting and crochet design, DROPS Design offers one of the most extensive collections of free patterns on the internet - translated to 17 languages. As of today we count 324 catalogues and 12290 patterns translated into English (UK/cm). 12290
We work hard to bring you the best knitting and crochet have to offer, inspiration and advice as well as great quality yarns at incredible prices! Would you like to use our patterns for other than personal use? You can read what you are allowed to do in the Copyright text at the bottom of all our patterns. Happy crafting!
Post a comment to pattern DROPS 158-1
We would love to hear what you have to say about this pattern!
If you want to leave a question, please make sure you select the correct category in the form below, to speed up the answering process. Required fields are marked *.