
Popular categories
Looking for a yarn?


Comments / Questions (119)
![]() Marjan wrote:
Marjan wrote:
Welk model heeft deze sjaal? Wordt het een halve cirkel? Of een halve maan? Of misschien anders? Dank alvast voor uw reactie!
08.01.2017 - 16:28DROPS Design answered:
Hoi Marjan. Dit is een halve cirkel sjaal
09.01.2017 - 14:44
![]() Erika wrote:
Erika wrote:
Ich habe dieses Tuch nachgestrickt, in der letzten Musterreihe von A4 bis A6 sind im Diagramm 2 Umschläge zuviel, oder soll das so sein,da es die letzte Mustersatzreihe ist?
22.07.2016 - 19:16DROPS Design answered:
Liebe Erika, ja das ist so gedacht.
26.07.2016 - 13:44Moreau wrote:
Bonjour,j'aimerai vous demander si je peux utiliser des aiguilles droites car je ne suis pas très "douée " avec des aiguilles rondes et aussi pour les augmentations de chaque côté pour la lisière,faut-il augmenter tous les rangs donc,endroit et envers.Merci pour votre réponse.AMoreau
07.07.2016 - 18:48DROPS Design answered:
Bonjour Mme Moreau, on utilise ici des aiguilles circulaires pour avoir suffisamment de place pour y loger toutes les mailles, vous pouvez donc utiliser des droites, mais pensez à bien conserver la bonne tension, même quand il y aura beaucoup de mailles sur vos aiguilles. Quand on augmente tous les rangs, c'est sur l'endroit et sur l'envers, quand on augmente tous les 2 rangs, c'est uniquement sur l'endroit. Bon tricot!
08.07.2016 - 10:24
![]() Elise Ertlen wrote:
Elise Ertlen wrote:
Faut il faire une maille lisière en début et fin de rang pour tous les rangs endroit de dentelle ?
09.06.2016 - 21:50DROPS Design answered:
Bonjour Mme Ertlen, on tricote les diagrammes avec 1 m lis au point mousse de chaque côté (= 1 m tricotée à l'end tous les rangs au début et à la fin de chaque rang). Bon tricot!
10.06.2016 - 08:55
![]() Loredana wrote:
Loredana wrote:
Buongiorno! I diagrammi A4 - A6 vanno lavorati una sola volta o quattro? Grazie Loredana
11.01.2016 - 12:21DROPS Design answered:
Buonasera Loredana. I diagrammi A4 - A6 devono essere lavorati una sola volta. Buon lavoro!
11.01.2016 - 17:21
![]() Loredana wrote:
Loredana wrote:
Buonasera! E' possibile allungare ed allargare lo scialle aumentando tante maglie quante ne occorrono per ripetere i diagrammi A2 e A5 più volte ( ad esempio 30 maglie per ripetere altre 2 volte i diagrammi )? Buon anno e grazie Loredana
06.01.2016 - 16:58DROPS Design answered:
Buongiorno Loredana. E’ sufficiente che continui ad aumentare fino ad avere il numero di maglie che le occorre, prima di iniziare la parte con i diagrammi. P.es se ha bisogno di 30 m in più, aumenta fino ad avere 369 m. Al ferro successivo, sul rovescio, aumenta 1 m da ciascun lato: le m sono ora 371 e riesce così a ripetere due volte in più il diagramma A.2. Buon lavoro e buon anno!
06.01.2016 - 18:28
![]() Christin Liepelt wrote:
Christin Liepelt wrote:
Jeg har akkurat startet på sjalet. Jeg skjønner ikke om rillestrikkingen i kanten bare skal være de tre ytterste maskene hele tiden og resten glattstrikk, eller om rillemaskene blir fler og fler for hver omgang pga at man øker kantmasker hver omgang. Altså er det kun de 57 på midten samt de nye maskene annen hver omgang på hver side av dem - som blir glattstrikk ? og de øvrige rillestrikk?
27.12.2015 - 23:06
![]() Marianne wrote:
Marianne wrote:
Wundervoll! Habe ich noch nie gemacht und versucht es in Gedanken nachzuvollziehen. Ins schleudern kam ich bei der Korrektur. Ein Diagramm ist doch in sich geschlossen und wird in der Abfolge A.1, mehrmals A.2 und A.3 gestrickt. Warum in der 2. Reihe ein neues A.1, aber kein neues A.3 am Ende? Warum in der 8.. Reihe ein neues A.3 am Ende, aber kein neues A.1. am Anfang? Reihe? Wo liegt mein Denkfehler? Ich würde es gerne verstehen, bevor ich nach viel Arbeit merke, dass ich nicht klarkomme.
06.12.2015 - 12:42DROPS Design answered:
Die Korrekturanmerkung zum neuen Diagramm bezieht sich lediglich darauf, dass die Diagramme in den angebenen Reihen korrigiert wurden, im Vergleich zu den Diagrammen, wie sie vorher dort abgebildet waren. Sie stricken die Diagramme in der im Anleitungstext genannten Abfolge.
11.12.2015 - 15:45
![]() Landais Mariella wrote:
Landais Mariella wrote:
Bonjour...on ne fait plus d augmentation a partir des points fantaisie? Combien de mailles rabat on au tout dernier rang final? 341 ? Merci
10.08.2015 - 18:08DROPS Design answered:
Bonjour Mme Landais, c'est exact, on n'augmente plus quand on tricote les points fantaisie. Bon tricot!
10.08.2015 - 19:00
![]() Else wrote:
Else wrote:
Kunt me uitleggen wat ik hier moet doen. "Zet 63 steken op en zet een markeerder in het werk aan elke kant van de middelste 57 st. " De middelste steek is 63/2 is de 32ste steek. Wat moet ik doen met de "middelste 57 st"?
08.05.2015 - 20:58DROPS Design answered:
Hoi Else. Je breit het patroon zoals beschreven - ook over de middelste 57 st, maar je meerdert aan elke kant van gemarkeerde 57 st = Je blijft dus 57 st hebben in het midden, maar door de meerderingen naast beide markeerders en de zijkanten krijg je steeds meer steken aan de zijkanten.
12.05.2015 - 17:29
|
|||||||||||||||||||
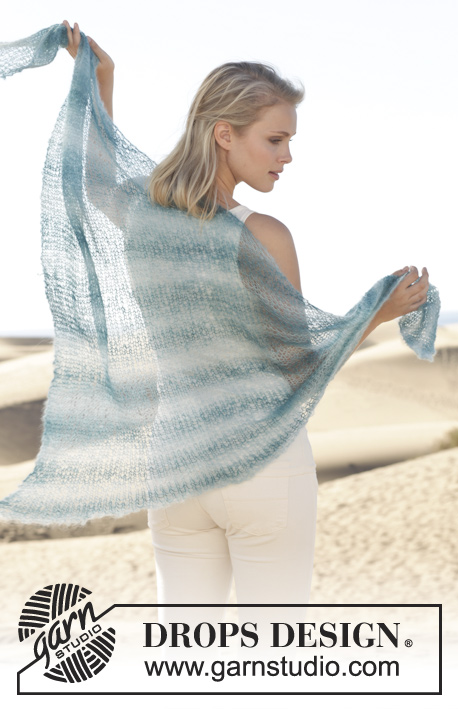
French Riviera#frenchrivierashawl |
|||||||||||||||||||
|
|
|||||||||||||||||||
Knitted DROPS shawl with lace pattern in ”Lace”.
DROPS 152-4 |
|||||||||||||||||||
|
KNITTING TENSION: This garment is to be soaked and blocked/stretched to size afterwards so the knitting tension is not that important. But to get a sense of whether you are working too loose/tight, work a test on needle size 3.5 mm in stocking st and get approx. 23 sts x 30 rows = 10 x 10 cm. GARTER ST (back and forth on needle): K all rows. 1 ridge = 2 rows K. PATTERN: See diagrams A.1 to A.6. The diagrams show all rows in pattern seen from RS. INCREASE TIP: Inc with YO, YO should not be twisted on next row but should make a hole in the piece. ---------------------------------------------------------- SHAWL: Worked back and forth on circular needle. Cast on 63 sts on circular needle size 3.5 mm with Lace, insert 2 markers in the piece on each side of the middle 57 sts. Continue in stocking st with 1 edge st in GARTER ST - READ EXPLANATION ABOVE in each side of piece - AT THE SAME TIME inc as follows - READ INCREASE TIP ABOVE: Inc 1 st in each side inside 1 edge st on every row and inc 1 st on each side of the middle 57 sts every other row. REMEMBER THE KNITTING TENSION! Continue like this until inc have been done 46 times in total on each side of the 57 sts and 92 times in each side = 339 sts on needle. NOTE! Adjust so that last row is from RS. On next row from WS inc 1 st inside edge st in each side = 341 sts. Piece now measures approx. 30 cm mid back. Then work PATTERN - READ EXPLANATION ABOVE! according to diagrams A.1 to A.3, beg from RS as follows: Work 1 edge st in garter st, A.1 (= 6 sts), A.2 until 4 sts remain on needle, then work diagram A.3 and finish with 1 edge st in garter st. Work diagram 4 times vertically in total. Then work diagrams A.4 to A.6 the same way. After last row in diagram P 1 row from WS before loosely casting off with K from RS. Cast off with a YO for every YO from last row in diagram to make the edge extra elastic and easy to stretch and shape. Piece measures approx. 50 cm vertically. BLOCKING: Place the shawl in lukewarm water until it is soaking wet. Carefully squeeze out the water from the shawl - do not twist. Then roll the shawl in a towel and squeeze to remove more water - the piece will now only be moist. Place the shawl on a carpet or mattress - carefully stretch it out to measurements. On this shawl tips can be made in the bottom edge by stretching a little extra where 2 K sts are (diagram A.5). Also stretch the edge st in each side at the bottom of edge, fasten pins in each tip and along the other edges. Leave shawl to dry. Repeat the process when the garment has been washed. |
|||||||||||||||||||
Diagram explanations |
|||||||||||||||||||
|
|||||||||||||||||||
 |
|||||||||||||||||||
Have you finished this pattern?Tag your pictures with #dropspattern #frenchrivierashawl or submit them to the #dropsfan gallery. Do you need help with this pattern?You'll find 19 tutorial videos, a Comments/Questions area and more by visiting the pattern on garnstudio.com. © 1982-2026 DROPS Design A/S. We reserve all rights. This document, including all its sub-sections, has copyrights. Read more about what you can do with our patterns at the bottom of each pattern on our site. |
|||||||||||||||||||


With over 40 years in knitting and crochet design, DROPS Design offers one of the most extensive collections of free patterns on the internet - translated to 17 languages. As of today we count 324 catalogues and 12290 patterns translated into English (UK/cm). 12290
We work hard to bring you the best knitting and crochet have to offer, inspiration and advice as well as great quality yarns at incredible prices! Would you like to use our patterns for other than personal use? You can read what you are allowed to do in the Copyright text at the bottom of all our patterns. Happy crafting!
Post a comment to pattern DROPS 152-4
We would love to hear what you have to say about this pattern!
If you want to leave a question, please make sure you select the correct category in the form below, to speed up the answering process. Required fields are marked *.