
Popular categories
Looking for a yarn?


Comments / Questions (17)
![]() Annick Combray-Leblanc wrote:
Annick Combray-Leblanc wrote:
Rebonjour, et merci pour votre réponse rapide. Mais je suis perplexe. Si la moufle fait 30 cm de haut, elle m'arrive au milieu de l'avant bras ?! Du bout du majeur à la pliure du poignet ma main mesure 17 cm, il ne faut donc pas que la longueur totale de la moufle fasse plus de 22 ou 23 cm... 🤔
11.02.2021 - 17:07DROPS Design answered:
Bonjour Mme Combray-Leblanc, vous pouvez tout à fait ajuster la longueur totale de la moufle sur celle de vos mains. Les diminutions mesurent 4 cm, enfilez la moufle, et quand il reste 4 cm, commencez à diminuer. Bon tricot!
12.02.2021 - 06:46
![]() Annick Combray-Leblanc wrote:
Annick Combray-Leblanc wrote:
Bonjour, Dans le modèle vous dîtes "quand la moufle mesure environ 26-28 cm...". Ne serait-ce pas plutôt 16-18 cm ? Bonne journée
11.02.2021 - 16:14DROPS Design answered:
Bonjour Mme Combray-Leblanc, il s'agit bien de 26-28 cm, il s'agit de la longueur totale depuis le rang de montage (on a commencé les augmentations du pouce à 13-14 cm). Bon tricot!
11.02.2021 - 16:27
![]() Mariann wrote:
Mariann wrote:
Lurer på fellingen. Første merketråd etter 16 masker, 2 merketråd etter 17 masker, 1 maske igjen på omg. På felling går det greit med 3 masker før merketråden med 2 masker rett sammen, men kun 1 maske som kan felles etter merketråd?
18.11.2018 - 10:07DROPS Design answered:
Hei Mariann. Litt usikker på om jeg skjønner spørsmålet ditt. Du har 1 merke i hver siden av arbeidet (med 17 masker mellom hvert merke) og feller 1 maske på hver side av hvert merke (= 4 masker felt på omgangen). Du feller slik: strikk til det gjenstår 3 masker før merket, strikk 2 masker rett sammen (= 1 maske felt før merket), strikk 2 rett (merket sitter nå midt mellom disse 2 maskene) ta 1 maske løst av pinnen, strikk 1 rett, trekk den løse masken over (= 1 maske felt etter merket). God fornøyelse.
19.11.2018 - 11:58
![]() Marianne Dahl wrote:
Marianne Dahl wrote:
For høyre vott står det at man skal strikke "*2 m rett sammen, 1 kast*, gjenta fra *_* omg ut", rett etter at man har skiftet til settp 4. Dette har man ikke nevnt for venstre vott (dvs. omvendt: *1 kast, 2 m rett sammen*).
20.11.2016 - 14:53DROPS Design answered:
Hej Marianne. Du har ret, det er fejl. Jeg skal sörge for en rettelse.
21.11.2016 - 15:23Ulla wrote:
You work from 40 to 34 st as this: 3(5+1)+2+3(3)+5.
22.05.2014 - 10:15
![]() Esther Paris wrote:
Esther Paris wrote:
I mean these nbrs add up to greater than 40:K 3, P 2, * K 2 tog, K 2 *, repeat from *-* 2 more times, K 2 tog, P 2, * K 2 tog, K 5 *, repeat from *-* 2 more times.
21.05.2014 - 12:56DROPS Design answered:
Dear Mrs Paris, you are correct, we will check and come back as soon as possible. Thanks in advance for your patience.
23.05.2014 - 15:57
![]() Esther Paris wrote:
Esther Paris wrote:
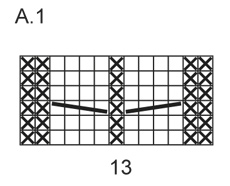
Hi The diagram is wrong (a1). You can't do a 3/3 cable on 4 sts. I see the original pattern says 2/2 cable. See: = slip 3 sts on cable needle behind piece, K 3, K 3 from cable needle = slip 3 sts on cable needle in front of piece, K 3, K 3 from cable needle
21.05.2014 - 03:23DROPS Design answered:
Dear Mrs Paris, you are correct, diagram text will be edited, it should be slip 2 sts on cable needle behind/in front of piece, K 2, K 2 from cable needle. Happy knitting!
21.05.2014 - 09:49
![]() Esther Paris wrote:
Esther Paris wrote:
I think the numbers for Left Mitten don't add up quite right in first row after rib, here: Work 1st round after rib as follows: K 3, P 2, * K 2 tog, K 2 *, repeat from *-* 2 more times, K 2 tog, P 2, * K 2 tog, K 5 *, repeat from *-* 2 more times.
21.05.2014 - 03:00DROPS Design answered:
Dear Mrs Paris, left mitten is worked as right mitten but reversed. This round will not be lined up above rib. You may adjust to get it lined up if you like to. Happy knitting!
21.05.2014 - 09:48
![]() Katrine Storbakk wrote:
Katrine Storbakk wrote:
Hei. Hvorfor retter dere ikke feilen som er i venstre votte? Er jo flere som har kommentert denne feilen.
25.01.2014 - 21:25DROPS Design answered:
Hej Katrine. Fejlen er rettet.
14.02.2014 - 11:31
![]() Jezi wrote:
Jezi wrote:
Hittat fel i mönstret till vänster vante... Mellan upprepningarna på första varvet efter resår är där inga räta maskor på höger vante, maskorna räcker inte till om man stickar dessa. Varvet man gör därefter på höger finns inte med i beskrivningen till vänster vante
06.01.2014 - 22:24DROPS Design answered:
Oppskriften på venstre vott er nå rettet opp. Mvh DROPS Design
04.11.2014 - 14:31
|
|||||||||||||
Fireside Snuggle Mittens#firesidesnugglemittens |
|||||||||||||
|
|
|||||||||||||
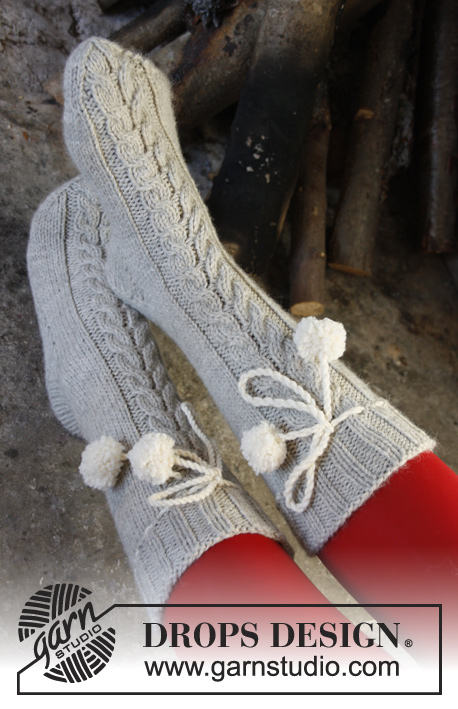
DROPS Christmas: Knitted DROPS mittens with cable in ”Nepal”.
DROPS Extra 0-997 |
|||||||||||||
|
PATTERN: See diagram A.1. INCREASE TIP: Inc 1 st by making 1 YO, on next row K YO twisted to avoid holes. DECREASE TIP: Dec as follows (beg 3 sts before marker): K 2 tog, K 2 (marker is between these 2 sts), slip 1 st as if to K, K 1, psso. -------------------------------------------------------- RIGHT MITTEN: Cast on 40-40 sts on double pointed needles size 3 mm with light grey and K 1 round. Then work rib (= K 2/P 2). When rib measures 6-7 cm, work next round as follows: * K 5, K the next 2 tog *, repeat from *-* 2 more times, P 2, * K 2 tog, K 2 *, repeat from *-* 2 more times, P 2 and finish with K 3 = 34-34 sts. Switch to double pointed needles size 4 mm, work next round as follows: * K 2 tog, 1 YO *, repeat from *-* the entire round. Work next round as follows (K YOs): 18 sts in stocking st (= inside hand), A.1 (= 13 sts) and 3 sts in stocking st. Continue pattern like this. When piece measures 13-14 cm, inc 1 st on each side of first st on round for thumb - READ INCREASE TIP. Repeat inc on each side of the inc sts on every other round 4-5 more times = 44-46 sts. Now slip the 11-13 thumb sts on 1 stitch holder. Continue in the round as before AT THE SAME TIME cast on 1 new st behind thumb sts on next round = 34-34 sts. When mitten measures approx. 26-28 cm (try the mitten on if needed, approx. 4 cm until finished measurements), insert 1 marker after the first 16 sts on round and 1 marker after the next 17 sts (1 st remains on round after last marker). Now dec 1 st on each side of both markers - READ DECREASE TIP. Repeat dec every other round 2 more times and then every round 3 times = 10 sts remain on needle. Cut the yarn and pull it through the remaining sts, tighten tog and fasten. THUMB: Slip the 11-13 thumb sts back on double pointed needles size 4 mm. In addition pick up 4-3 sts behind thumb = 15-16 sts. Work in stocking st until the thumb itself measures approx. 4½-5 cm (try on the mitten, approx. ½ cm remains until finished measurements). K 2 rounds AT THE SAME TIME K all sts tog 2 by 2 on both rounds = 4-4 sts remain on needle. Cut the yarn and pull it through the remaining sts, tighten tog and fasten. LEFT MITTEN: Cast on and work as right but reversed – i.e. beg rib with 2 P sts (instead of 2 K sts). Work 1st round after rib as follows: K 3, P 2, * K 2, K 2 tog *, repeat from *-* 2 more times, P 2, * K 2 tog, K 5 *, repeat from *-* 2 more times. Switch to double pointed needles size 4 mm, work next round as follows: * K 2 tog, 1 YO *, repeat from *-* the entire round. Work next round as follows (K YOs): 3 sts in stocking st, A.1 (= 13 sts) and 18 sts in stocking st. Inc for thumb on each side of last st on round. Before dec at the top of mitten insert 1st marker after 1st st on round and 2nd marker after the next 17 sts (= 16 sts remain on round after last marker). TIES: Cut 2 lengths of 2.5 metres each with off white. Twine the strands tog until they resist, fold the string double so that it twines again. Make a knot at each end. Thread the tie up and down through the eyelet holes on the mitten. Make 2 pompoms with an approx. diameter of 2 cm in off white. Fasten a pompom in each end of the tie. Repeat on the other mitten. |
|||||||||||||
Diagram explanations |
|||||||||||||
|
|||||||||||||
 |
|||||||||||||
Have you finished this pattern?Tag your pictures with #dropspattern #firesidesnugglemittens or submit them to the #dropsfan gallery. Do you need help with this pattern?You'll find 20 tutorial videos, a Comments/Questions area and more by visiting the pattern on garnstudio.com. © 1982-2026 DROPS Design A/S. We reserve all rights. This document, including all its sub-sections, has copyrights. Read more about what you can do with our patterns at the bottom of each pattern on our site. |
|||||||||||||


With over 40 years in knitting and crochet design, DROPS Design offers one of the most extensive collections of free patterns on the internet - translated to 17 languages. As of today we count 324 catalogues and 12290 patterns translated into English (UK/cm). 12290
We work hard to bring you the best knitting and crochet have to offer, inspiration and advice as well as great quality yarns at incredible prices! Would you like to use our patterns for other than personal use? You can read what you are allowed to do in the Copyright text at the bottom of all our patterns. Happy crafting!
Post a comment to pattern DROPS Extra 0-997
We would love to hear what you have to say about this pattern!
If you want to leave a question, please make sure you select the correct category in the form below, to speed up the answering process. Required fields are marked *.