DROPS Nepal
DROPS Nepal
65% vlna, 35% alpaka
od 68.00 Kč /50g
Přízi na tento model můžete mít už za 204.00Kč.

Cenu za klubka počítáme podle spotřeby při výrobě modelu v nejmenší velikosti a nejlevnější variantě příze. Rádi byste ještě lepší cenu? Třeba ji najdete mezi DROPS Deals!

DROPS Extra 0-997

DROPS design: model č. ne-131
Skupina přízí: C
-----------------------------------------------------------
Velikost: S/M – M/L

Materiál: DROPS NEPAL firmy Garnstudio
100-100 g, barva č.0500, stříbrošedá
50-50 g, barva č.100, smetanová

DROPS PONOŽKOVÉ JEHLICE č.4 – nebo velikosti potřebné k upletení zkušebního vzorku o rozměrech 19 ok x 25 řad lícovým žerzejem = 10 x 10 cm.
DROPS PONOŽKOVÉ JEHLICE č.3 – na lemy.

-------------------------------------------------------

Náhradní příze – Podívejte se, jak změnit přízi
Skupina přízí A až F – Neměňte návod, změňte přízi
Spotřeba příze při použití náhradní příze – Využijte náš převodník

-------------------------------------------------------

DROPS Nepal
DROPS Nepal
65% vlna, 35% alpaka
od 68.00 Kč /50g
Přízi na tento model můžete mít už za 204.00Kč.

Cenu za klubka počítáme podle spotřeby při výrobě modelu v nejmenší velikosti a nejlevnější variantě příze. Rádi byste ještě lepší cenu? Třeba ji najdete mezi DROPS Deals!

DROPS Super Sale

SAVE 30% on 6 cotton favourites!
Platí do 12.04.2024

Návod

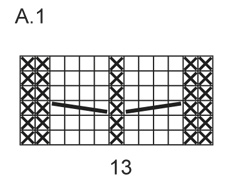
VZOR:
Viz schéma A.1.

TIP - PŘIDÁVÁNÍ:
Přidáváme nahozením, v následující řadě pleteme nahození hladce za zadní nit, aby se v pletenině netvořily dírky.

TIP - UJÍMÁNÍ:
Ujímáme takto – začínáme 3 oka před značkou: 2 oka spleteme hladce, 2 oka upleteme hladce (značka leží mezi těmito oky), 1 oko sejmeme hladce, 1 upleteme hladce a sejmuté přes ně přetáhneme.
--------------------------------------------------------

RUKAVICE – PALČÁKY

PRAVÁ RUKAVICE:
Na ponožkové jehlice č.3 nahodíme stříbrošedou přízí 40-40 ok a upleteme 1 kruhovou řadu hladce. Pokračujeme pružným lemem 2/2 (= 2 oka hladce/2 obrace) do výše 6-7 cm. Následující kruhovou řadu pleteme takto: *5 ok hladce, následující 2 oka spleteme hladce*, *-* zopakujeme ještě 2x, 2 oka obrace, *2 oka spleteme hladce, 2 upleteme hladce*, *-* zopakujeme ještě 2x, 2 oka obrace a končíme 3 oky hladce = 34-34 ok. Pleteninu převedeme na ponožkové jehlice č.4 a následující kruhovou řadu pleteme takto: *2 oka spleteme hladce, 1x nahodíme*, *-* opakujeme v průběhu celé kruhové řady. Další kruhovou řadu pleteme takto (nahození pleteme hladce): 18 ok lícovým žerzejem (= dlaň), vzor A.1 (= 13 ok) a 3 oka lícovým žerzejem. V tomto rozvržení vzorů pokračujeme. Ve výši 13-14 cm přidáme na každé straně prvního oka v kruhové řadě 1 oko (= palec) – viz TIP - PŘIDÁVÁNÍ. Přidávání opakujeme vždy po stranách přidaných ok v každé 2. kruhové řadě ještě 4-5x = 44-46 ok. Nyní odložíme 11-13 ok palce na pomocnou jehlici. Pokračujeme v kruhových řadách jako dosud a SOUČASNĚ nahodíme v následující kruhové řadě za oky palce 1 oko nové = 34-34 ok. Ve výši (celkové) asi 26-28 cm (do ukončení práce nám zbývá doplést asi 4 cm výšky – rukavici vyzkoušejte a délku přizpůsobte) umístíme jednu značku za prvních 16 ok v kruhové řadě a druhou za následujících 17 ok (= po poslední značce zůstává v kruhové řadě 1 oko). Nyní ujímáme na obou stranách obou značek po 1 oku - viz TIP - UJÍMÁNÍ. Toto ujímání opakujeme v každé 2. kruhové řadě ještě 2x a poté v každé kruhové řadě ještě 3x = na jehlici zbývá 10 ok.
Přízi odstřihneme, protáhneme zbylými oky, stáhneme a zapošijeme.

PALEC:
Odložených 11-13 ok palce vrátíme zpět na ponožkové jehlice č.4. Z okraje za palcem nabereme ještě 4-3 oka = 15-16 ok. Pleteme v kruhových řadách lícovým žerzejem, až je palec vysoký asi 4,5-5 cm (do ukončení práce zbývá doplést asi 0,5 cm výšky). Upleteme 2 kruhové řady hladce a SOUČASNĚ splétáme v obou těchto řadách každá 2 oka hladce = na jehlicích zůstávají 4-4 oka. Přízi odstřihneme, protáhneme zbylými oky, stáhneme a zapošijeme.

LEVÁ RUKAVICE:
Nahodíme a pleteme stejně jako pravou, ale zrcadlově převrácenou, tj. pružný lem začínáme 2 oky obrace. 1. kruhovou řadu po pružném lemu pleteme takto: 3 oka hladce, 2 obrace, *2 oka spleteme hladce, 2 oka upleteme hladce*, *-* zopakujeme ještě 2x, 2 oka spleteme hladce, 2 oka upleteme obrace, *2 oka spleteme hladce, 5 ok upleteme hladce*, *-* zopakujeme ještě 2x. Pleteninu převedeme na ponožkové jehlice č.4 a následující kruhovou řadu pleteme takto: 3 oka lícovým žerzejem, vzor A.1 (= 13 ok) a 18 ok lícovým žerzejem. Oka pro palec přidáváme po stranách posledního oka v kruhové řadě. Před ujímáním špičky rukavice umístíme jednu značku za 1. oko v kruhové řadě a druhou za následujících 17 ok (= po poslední značce zůstává v kruhové řadě 16 ok).

VÁZAČKY:
Ustřihneme si dvě vlákna smetanové příze, každé o délce 2,5 metru. Vlákna společně stáčíme, dokud kladou odpor, pak je přeložíme napolovic a necháme samovolně zkroutit. Oba konce zavážeme na uzel. Vzniklou šňůrku protáhneme dírkovou řadou v rukavici.
Vyrobíme si 2 smetanové bambule o průměru asi 2 cm a připevníme je na konce šňůrky.
Stejnou šňůrku s bambulemi vyrobíme i do druhé rukavice.

Návod byl opraven.

Poslední úpravy: 13.12.2013
Ve vysvětlivkách chybně uvedený počet ok copánkového křížení - nikoli 3 oka, ale jen 2.

Schéma

symbols = hladce
symbols = obrace
symbols = 2 oka odložíme na pomocnou jehlici ZA práci, 2 oka upleteme hladce, 2 oka z pom.jehlice hladce
symbols = 2 oka odložíme na pomocnou jehlici PŘED práci, 2 oka upleteme hladce, 2 oka z pom.jehlice hladce
diagram

Každý náš návod je doprovázen speciálními video-ukázkami, které vás navedou.

Chcete se na něco zeptat? Projděte si seznam nejčastějších otázek (FAQ).

Knitting tension is what determines the final measurements of your work, and is usually measured per 10 x 10 cm. It is provided like so: number of stitches in width x number of rows in height - eg: 19 stitches x 26 rows = 10 x 10 cm.

The knitting tension is very individual; some people knit/crochet loosely while others work tightly. You adjust the knitting tension with the needle size, which is why the suggested needle size is only meant as a guide! You need to adjust this (up or down) to ensure that YOUR knitting tension matches the knitting tension provided in the pattern. If you work with a different knitting tension than provided you will have a different yarn consumption, and your work will have different measurements than what the pattern suggests.

The knitting tension also determines which yarns can replace each other. As long as you achieve the same knitting tension you can replace one yarn with another.

See DROPS lesson: How to measure your tension/gauge

See DROPS video: How to make a gauge tension swatch

The required amount of yarn is provided in grams, eg: 450 g. To calculate how many balls you’ll need you first need to know how many grams are in 1 ball (25g, 50g or 100g). This information is available if you click on the individual yarn quality on our pages. Divide the amount required with the amount of each ball. For example, if each ball is 50g (the most common amount), the calculation will be as follows: 450 / 50 = 9 balls.

The important thing when changing from one yarn to another is that the knitting/crochet tension remains the same. This is so that the measurements of the finished piece will be the same as on the sketch provided. It is easier to achieve the same knitting tension using yarns from the same yarn group. It is also possible to work with multiple strands of a thinner yarn to achieve the knitting tension of a thicker one. Please try our yarn converter. We recommend you to always work a test swatch.

Please NOTE: when changing yarn the garment might have a different look and feel to the garment in the photo, due to individual properties and qualities of each yarn.

See DROPS lesson: Can I use a different yarn than the one mentioned in the pattern?

All our yarns are categorised into yarn groups (from A to F) according to thickness and knitting tension – group A contains the thinnest yarns and group F the thickest. This makes it easier for you to find alternative yarns to our patterns, should you wish to switch yarn. All yarns within the same group have a similar knitting tension and can easily replace each other. However, different yarn qualities have different structures and properties which will give the finished work a unique look and feel.

Click here for an overview of the yarns in each yarn group

At the top of all our patterns you’ll find a link to our yarn calculator, which is a helpful tool should you wish to use a different yarn than suggested. By filling in the yarn quality you wish to replace, the amount (in your size) and number of strands, the calculator will present good alternative yarns with the same knitting tension. Additionally it will tell you how much you’ll require in the new qualities and whether you’ll need to work with multiple strands. Most skeins are 50g (some are 25g or 100g).

If the pattern is worked with multiple colours, every colour will have to be calculated separately. Similarly, if the pattern is worked with several strands of different yarns (for example 1 strand Alpaca and 1 strand Kid-Silk) you will have to find alternatives for each, individually.

Click here to see our yarn calculator

Since different yarns have different qualities and textures we have chosen to keep the original yarn in our patterns. However, you can easily find options among our available qualities by using our yarn calculator, or simply pick a yarn from the same yarn group.

It is possible that some retailers still have discontinued yarns in stock, or that someone has a few skeins at home that they would like to find patterns for.

The yarn calculator will provide both alternative yarn as well as required amount in the new quality.

If you think it's hard to decide what size to make, it can be a good idea to measure a garment you own already and like the size of. Then you can pick the size by comparing those measures with the ones available in the pattern's size chart.

You'll find the size chart at the bottom of the pattern.

See DROPS lesson: How to read size chart

The needle size provided in the pattern serves only as a guide, the important thing is to follow the knitting tension. And since knitting tension is very individual, you will have to adjust the needle size to ensure that YOUR tension is the same as in the pattern – maybe you’ll have to adjust 1, or even 2 needle sizes, up or down to achieve the correct tension. For this, we recommend that you work test swatches.

Should you work with a different knitting tension than the one provided, the measurements of the finished garment might deviate from the measurement sketch.

See DROPS lesson: How to measure your tension/gauge

See DROPS video: How to make a tension/gauge swatch

Working a garment top-down provides more flexibility and room for personal adjustment. For example it is easier to try the garment on while working, as well as making adjustments to length of yoke and shoulder caps.

The instructions are carefully explaining every step, in the correct order. Diagrams are adjusted to the knitting direction and are worked as usual.

The diagram depicts all rows/rounds, and every stitch seen from the right side. It is read from bottom to top, from right to left. 1 square = 1 stitch.

When working back and forth, every other row is worked from the right side and every other row is worked from the wrong side. When working from the wrong side, the diagram will have to be worked reversed: from left to right, knit stitches are purled, purl stitches are knit etc.

When working in the round every round is worked from the right side and the diagram are worked from right to left on all rounds.

See DROPS lesson: How to read knitting diagrams

The diagram depicts all rows/rounds, and every stitch seen from the right side. It is worked from bottom to top, from right to left.

When working back and forth every other row is worked from the right side: from right to left and every other row is worked from the wrong side: from left to right.

When working in the round, every row in the diagram are worked from the right side, from right to left.

When working a circular diagram you start in the middle and work your way outwards, counter clockwise, row by row.

The rows usually start with a given number of chain stitches (equivalent to the height of the following stitch), this will either be depicted in the diagram or explained in the pattern.

See DROPS lesson: How to read crochet diagrams

Instructions for working several diagrams after each other on the same row/round, will often be written like so: “work A.1, A.2, A.3 a total of 0-0-2-3-4 times". This means you work A.1 once, then A.2 is worked once, and A.3 is repeated (in width) the number of times provided for your size – in this case like so: S = 0 times, M = 0 times, L=2 times, XL= 3 times and XXL = 4 times.

The diagrams are worked as usual: begin with the first row in A.1, then work the first row in A.2 etc.

See DROPS lesson: How to read knitting diagrams

See DROPS lesson: How to read crochet diagrams

The total width of the garment (from wrist-to-wrist) will be larger in the larger sizes, despite the actual sleeves being shorter. The larger sizes have longer sleeve caps and wider shoulders, so there will be a good fit in all sizes.

The measurement sketch/schematic drawing provides information regarding the full length of the garment. If it’s a jumper or a jacket the length is measured from the highest point on the shoulder closest to the neckline, and straight down to the bottom of the garment. It is NOT measured from the tip of shoulder. Similarly, the length of yoke is measured from the highest point on the shoulder and down to where yoke is split into body and sleeves.

On a jacket measures are never taken along bands, unless specifically stated. Always measure inside band stitches when measuring the length.

See DROPS lesson: How to read a schematic drawing

Diagrams are often repeated on the round or in height. 1 repeat is the diagram the way it appears in the pattern. If it says to work 5 repeats of A.1 in the round, then you work A.1 a total of 5 times after/next to each other in the round. If it says to work 2 repeats of A.1 vertically/in height you work the entire diagram once, then begin again at the start and work the entire diagram one more time.

Chain stitches are slightly narrower than other stitches and to avoid working the cast-on edge too tight, we simply chain more stitches to begin with. The stitch count will be adjusted on the following row to fit the pattern and measurement sketch.

The rib edge is more elastic and will contract slightly compared to, for example, stocking stitch. By increasing before the rib edge, you avoid a visible difference in width between the rib edge and the rest of the body.

It’s very easy to cast off too tightly, and by making yarn overs while casting off (and simultaneously casting these off) you avoid a too tight cast off edge.

See DROPS video: How to bind off with yarn overs (yo)

To achieve an even increase (or decrease) you can increase on, for example: every 3rd and 4th row alternately, like so: work 2 rows and increase on the 3rd row, work 3 rows and increase on the 4th. Repeat this until the increase is complete.

See DROPS lesson: Increase or decrease 1 st on every 3rd and 4th row alternately

Should you prefer to work in the round instead of back and forth, you may of course adjust the pattern. You’ll need to add steeks mid-front (usually 5 stitches), and follow the instructions. When you would normally turn and work from the wrong side, simply work across the steek and continue in the round. At the end you’ll cut the piece open, pick up stitches to work bands, and cover the cut edges.

See DROPS video: How to knit steeks and cut open

Should you prefer to work back and forth instead of in the round, you may of course adjust the pattern so you work the pieces separately and then assemble them at the end. Divide the stitches for the body in 2, add 1 edge stitch in each side (for sewing) and work the front and back pieces separately.

See DROPS lesson: Can I adapt a pattern for circular needles into straight needles?

Pattern repeats can vary slightly in the different sizes, in order to get the correct proportions. If you’re not working the exact same size as the garment in the photo, yours might deviate slightly. This has been carefully developed and adjusted so that the complete impression of the garment is the same in all sizes.

Make sure to follow instructions and diagrams for your size!

If you have found a pattern you like which is available in women’s size it’s not very difficult to convert it to men’s size. The biggest difference will be the length of sleeves and body. Start working on the women size that you think would fit across the chest. The additional length will be worked right before you cast off for the armhole/sleeve cap. If the pattern is worked top-down you can add the length right after the armhole or before the first decrease on sleeve.

Regarding additional yarn amount, this will depend on how much length you add, but it is better with a skein too many than too few.

All yarns will have excess fibres (from production) that might come off as lint or shedding. Brushed yarns (ie hairier yarns) have more of these loose, excess fibres, causing more shedding.

Shedding also depends on what is worn under or over the garment, and whether this pulls at the yarn fibres. It’s therefore not possible to guarantee that there will be no shedding

Below are some tips on how to get the best result when working with hairier yarns:

1. When the garment is finished (before you wash it) shake it vigorously so the looser hairs come off. NOTE: do NOT use a lint roller, brush or any method that pulls at the yarn.

2. Place the garment in a plastic bag and put it in your freezer - the temperature will cause the fibres to become less attached to each other, and excess fibres will come off easier.

3. Leave in the freezer for a few hours before taking it out and shaking it again.

4. Wash the garment according to the instructions on the yarn label.

Pilling is a natural process that happens to even the most exclusive of fibers. It's a natural sign of wear and tear that is hard to avoid, and that is most visible in high friction areas of your garment like a sweater's arms and cuffs.

You can make your garment look as new by removing the pilling, using a fabric comb or a pill/lint remover.

Pořád se nemůžete dobrat odpovědi, kterou hledáte? Pak posuňte stránku dolů a napište nám svůj dotaz, naši specialisté se vám pokusí poradit. Obvykle to zvládneme během 5 až 10 pracovních dnů..
Mezitím si můžete pročíst otázky a odpovědi, které k tomuto modelu položili ostatní, nebo navštívit skupinu DROPS Workshop na Facebooku, kde vám může poradit některá spřízněná duše!

Mohly by se vám líbit...

Přidejte komentář k návodu DROPS Extra 0-997

Rádi bychom věděli, co si o tomto modelu myslíte!

Pokud se chcete na něco zeptat, dbejte prosím na to, abyste ve formuláři níže vybrali správnou kategorii - díky tomu se dříve dozvíte, co potřebujete vědět. Povinná pole jsou označena *.

Komentáře / Otázky (17)

country flag Annick Combray-Leblanc wrote:

Rebonjour, et merci pour votre réponse rapide. Mais je suis perplexe. Si la moufle fait 30 cm de haut, elle m'arrive au milieu de l'avant bras ?! Du bout du majeur à la pliure du poignet ma main mesure 17 cm, il ne faut donc pas que la longueur totale de la moufle fasse plus de 22 ou 23 cm... 🤔

11.02.2021 - 17:07

DROPS Design answered:

Bonjour Mme Combray-Leblanc, vous pouvez tout à fait ajuster la longueur totale de la moufle sur celle de vos mains. Les diminutions mesurent 4 cm, enfilez la moufle, et quand il reste 4 cm, commencez à diminuer. Bon tricot!

12.02.2021 - 06:46

country flag Annick Combray-Leblanc wrote:

Bonjour, Dans le modèle vous dîtes "quand la moufle mesure environ 26-28 cm...". Ne serait-ce pas plutôt 16-18 cm ? Bonne journée

11.02.2021 - 16:14

DROPS Design answered:

Bonjour Mme Combray-Leblanc, il s'agit bien de 26-28 cm, il s'agit de la longueur totale depuis le rang de montage (on a commencé les augmentations du pouce à 13-14 cm). Bon tricot!

11.02.2021 - 16:27

country flag Mariann wrote:

Lurer på fellingen. Første merketråd etter 16 masker, 2 merketråd etter 17 masker, 1 maske igjen på omg. På felling går det greit med 3 masker før merketråden med 2 masker rett sammen, men kun 1 maske som kan felles etter merketråd?

18.11.2018 - 10:07

DROPS Design answered:

Hei Mariann. Litt usikker på om jeg skjønner spørsmålet ditt. Du har 1 merke i hver siden av arbeidet (med 17 masker mellom hvert merke) og feller 1 maske på hver side av hvert merke (= 4 masker felt på omgangen). Du feller slik: strikk til det gjenstår 3 masker før merket, strikk 2 masker rett sammen (= 1 maske felt før merket), strikk 2 rett (merket sitter nå midt mellom disse 2 maskene) ta 1 maske løst av pinnen, strikk 1 rett, trekk den løse masken over (= 1 maske felt etter merket). God fornøyelse.

19.11.2018 - 11:58

country flag Marianne Dahl wrote:

For høyre vott står det at man skal strikke "*2 m rett sammen, 1 kast*, gjenta fra *_* omg ut", rett etter at man har skiftet til settp 4. Dette har man ikke nevnt for venstre vott (dvs. omvendt: *1 kast, 2 m rett sammen*).

20.11.2016 - 14:53

DROPS Design answered:

Hej Marianne. Du har ret, det er fejl. Jeg skal sörge for en rettelse.

21.11.2016 - 15:23

Ulla wrote:

You work from 40 to 34 st as this: 3(5+1)+2+3(3)+5.

22.05.2014 - 10:15

country flag Esther Paris wrote:

I mean these nbrs add up to greater than 40:K 3, P 2, * K 2 tog, K 2 *, repeat from *-* 2 more times, K 2 tog, P 2, * K 2 tog, K 5 *, repeat from *-* 2 more times.

21.05.2014 - 12:56

DROPS Design answered:

Dear Mrs Paris, you are correct, we will check and come back as soon as possible. Thanks in advance for your patience.

23.05.2014 - 15:57

country flag Esther Paris wrote:

Hi The diagram is wrong (a1). You can't do a 3/3 cable on 4 sts. I see the original pattern says 2/2 cable. See: = slip 3 sts on cable needle behind piece, K 3, K 3 from cable needle = slip 3 sts on cable needle in front of piece, K 3, K 3 from cable needle

21.05.2014 - 03:23

DROPS Design answered:

Dear Mrs Paris, you are correct, diagram text will be edited, it should be slip 2 sts on cable needle behind/in front of piece, K 2, K 2 from cable needle. Happy knitting!

21.05.2014 - 09:49

country flag Esther Paris wrote:

I think the numbers for Left Mitten don't add up quite right in first row after rib, here: Work 1st round after rib as follows: K 3, P 2, * K 2 tog, K 2 *, repeat from *-* 2 more times, K 2 tog, P 2, * K 2 tog, K 5 *, repeat from *-* 2 more times.

21.05.2014 - 03:00

DROPS Design answered:

Dear Mrs Paris, left mitten is worked as right mitten but reversed. This round will not be lined up above rib. You may adjust to get it lined up if you like to. Happy knitting!

21.05.2014 - 09:48

country flag Katrine Storbakk wrote:

Hei. Hvorfor retter dere ikke feilen som er i venstre votte? Er jo flere som har kommentert denne feilen.

25.01.2014 - 21:25

DROPS Design answered:

Hej Katrine. Fejlen er rettet.

14.02.2014 - 11:31

country flag Jezi wrote:

Hittat fel i mönstret till vänster vante... Mellan upprepningarna på första varvet efter resår är där inga räta maskor på höger vante, maskorna räcker inte till om man stickar dessa. Varvet man gör därefter på höger finns inte med i beskrivningen till vänster vante

06.01.2014 - 22:24

DROPS Design answered:

Oppskriften på venstre vott er nå rettet opp. Mvh DROPS Design

04.11.2014 - 14:31