
Popular categories
Looking for a yarn?


Comments / Questions (186)
![]() Diny Blaakmeer- Post wrote:
Diny Blaakmeer- Post wrote:
Is dit patroon ook beschikbaar voor gewone breinaalden, dus NIET op rondbreinaalden!
22.02.2025 - 15:36DROPS Design answered:
Dag Diny,
Nee, helaas is dit patroon alleen beschikbaar voor de rondbreinaald.
23.02.2025 - 19:24
![]() Adrija Laha Mukherji wrote:
Adrija Laha Mukherji wrote:
Please elaborate on the following: On the next row put the center 30-30-30-34-34 sts on a st holder for the neck and knit back and forth on needles.Continue to dec 1 st at each neck edge every other row 1-2-2-2-2 times. After all raglan and neck shaping is complete, 93-91-91-95-95 sts remain and the piece measures approx. 56-66-68-70-72 cm to shoulder. Neckband: Pick up and knit approx. 32-38 sts in front neck (incl. sts on st holder) on double-pointed needles and put all sts on the same needle.
08.02.2025 - 07:57DROPS Design answered:
Dear Adrija, as you approach the upper part of the yoke you need to put the center neck sts (used in the neckband later) in a stitch holder. Now you will work back and forth over the shoulder sts, while you continue decreasing 1 st at the beginning/end of every row (so that the neck edge is symmetrical on both sides). This is what's called the neck shaping. After finishing raglan decreases and neck shaping the yoke is done and you start the neckband. For the neckband you pick up the sts on the stitch holder and the sts that were decreased for the neck earlier, alongside the sts in the needles you should have enough for the neckband. Happy knitting!
09.02.2025 - 23:55
![]() Adrija Laha Mukherji wrote:
Adrija Laha Mukherji wrote:
Dear Team, I am a beginner so finding it a little confusing to read the instructions. Kindly bear with me :). When you say 'put a marker in the center stitch = side', does it mean putting a marker on the 3rd stitch, (since I'm knitting L size so would K5) and not at the usual joint while knitting on a circular needles? Kindly respond at the earliest as I'm unable to begin the pattern. Thank you :)
22.01.2025 - 05:27DROPS Design answered:
Dear Mrs Mukherji, size L is the 3rd size, so you should have K3 on the side, and insert the marker in the 2nd of these 3 sts. Happy knitting!
22.01.2025 - 09:28
![]() Jisu Kim wrote:
Jisu Kim wrote:
Hello, could you explain more on this part after the raglan? “ decreasing the 4 sts incd on the last row of Pattern 1 at lower edge of Body” Thank you :)
15.01.2025 - 21:57DROPS Design answered:
Dear Jisu Kim, if you look at the pattern, you can see , that there were 4 stitches increased at the 8th row (of the M.1 pattern). This 4 stitches are decreased at the very last row of the M.4 pattern, so you will end up as many stitches in the pattern as you started with, Happy Knitting!
16.01.2025 - 01:27
![]() Sonia Turrini wrote:
Sonia Turrini wrote:
Hi, sorry but it seems like the stitch count does not add up. I’m making an XL, so I start by casting on 183 sts. But then the instruction for the first round for the XL add up to 201 stitches. What am I supposed to do?
10.01.2025 - 08:55DROPS Design answered:
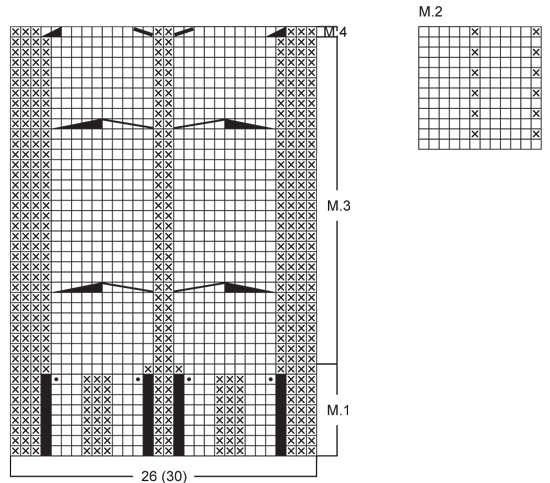
Dear Mrs Turini, work as follows: K5, 30 sts with rib (P3,K3), 26 sts M.1, 30 sts with rib (P3, K3), K5, 84 sts with rib (P3, K3), P3=5+30+26+30+5+84+3=183 sts. Happy knitting!
10.01.2025 - 09:50
![]() Karen Berger wrote:
Karen Berger wrote:
Trying to get a response, I dont understand main pattern! K 3-5-3-5-3, Pattern 2 ? What is this as M2 has P1, K5, P1, K5. Please see all my other questions posted as well. I am not spam I am a customer!
05.12.2024 - 14:34DROPS Design answered:
Dear Karen, please see our answers below. The Pattern is worked as in its corresponding chart and is independent of the other rib, knit and purl stitches mentioned in the same row. Happy knitting!
07.12.2024 - 21:07
![]() Karen Berger wrote:
Karen Berger wrote:
In the past I’ve posted a question and got a response this time I’ve posted a question four times from two different email addresses and I’m not getting any reply. It’s very frustrating and disappointing as I wanted to make a sweater as a gift for the holiday seasons. Hopefully someone will get back to me I keep checking my junk folder hoping I’ll see something but so far nothing
05.12.2024 - 12:07
![]() Karen Berger wrote:
Karen Berger wrote:
Can you please respond and explain the body knitting instructions better they are very confusing after the main ribbing Thanks
03.12.2024 - 19:00DROPS Design answered:
Dear Karen, please see our answers below. Happy knitting!
07.12.2024 - 21:06
![]() Karen Berger wrote:
Karen Berger wrote:
I’ve sent 2 emails no reply :( please give better instructions for beginning and using m2 and 3 I don’t understand -
03.12.2024 - 18:59DROPS Design answered:
Dear Karen, please see our answers below. Happy knitting!
07.12.2024 - 21:05
![]() Karen Berger wrote:
Karen Berger wrote:
Not understanding pattern at all! K 3–5–3 – 5–3? Then knit what follow pattern M2. Then M3 and repeat M2 then What reverse M3 ?? Knit M2 again? If I do that, I will not have 73 stitches left the numbers or math does not add up for me K3,5 .. sequence =19( x2= 38) 11 M2- 26 (2 x )=52 M3 30 (2x) = 60 That’s 150 and I have 157 Where do you get knit the remaining 73 stitches using pattern 2
29.11.2024 - 23:48DROPS Design answered:
Dear Karen, please see our first answer below. Pattern 2 and Pattern 3 are charts M.2 and M.3 respectively; you can find them at the bottom of the pattern. You will be working M.2 over the rib stitches in the previous row and M.3 over M.1, as shown in the chart (M.3 is the section right above the M.1 rows). So, since you work M.2 over rib stitches and M.3 over M.1 stitches you should have: Knit 3 (=side), M.2 over the following 24 sts, work M.3 over M.1, M.2 over 24 sts (but worked in reverse, so work it left to right), Knit 3 (= side), M.2 over the last 73 stitches. This is a total of 157 stitches. Happy knitting!
07.12.2024 - 21:04
|
||||||||||||||||||||||||||||
To the Sea |
||||||||||||||||||||||||||||
|
|
||||||||||||||||||||||||||||
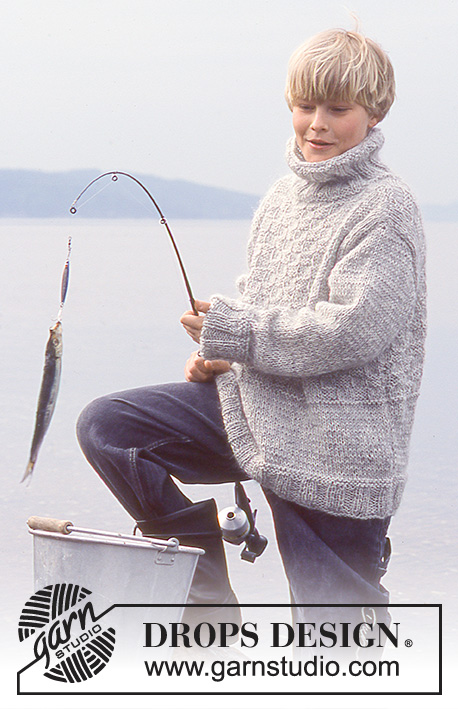
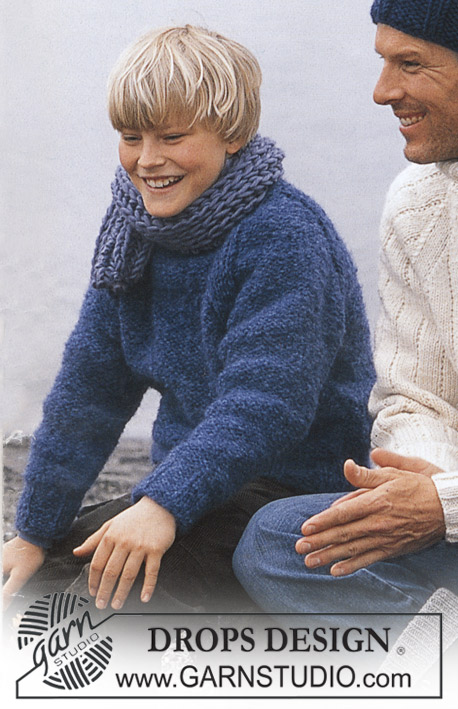
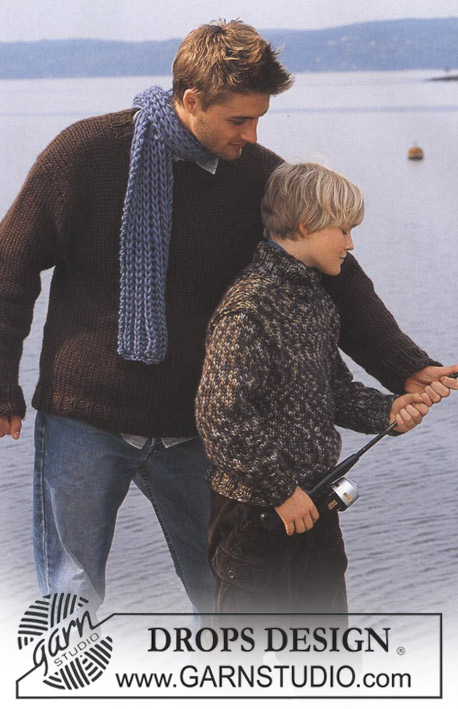
Knitted men's jumper with cables and high neck in DROPS Alaska, plus hat in DROPS Snow
DROPS 85-23 |
||||||||||||||||||||||||||||
|
Gauge: 17 sts x 22 rows on larger needles in stockinette st = 10 x 10 cm. Rib: *K 3, P 3*, repeat from *-*. Pattern: See the chart below. The pattern is seen from the right side. Decreasing tips (for raglan): Dec as follows on right side: Start 4 sts before the marker: Sl 1 as if to knit, K 1, psso, K 4 (the marker is in the middle of these 4 sts), K 2 tog. Dec as follows on wrong side: Start 4 sts before the marker, P 2 tog, P 4, P 2 tog, twisting sts (if this is too difficult, sl 2, return to left needle 1 by 1, twisting each, then P 2 tog). BODY Cast on 155-159-179-183-203 sts on smaller circular needles; join and knit rib as follows: K 3-5-3-5-3 (put a marker in the center st = side), *P 3, K 3*, repeat *-* over the following 24-24-30-30-36 sts, Pattern 1 (= 26 sts), *K 3, P 3*, repeat *-* over the following 24-24-30-30-36 sts, K 3-5-3-5-3 (put a marker in the center st = side), *P 3, K 3*, repeat *-* over the following 72-72-84-84-96 sts and finish with P 3. On the last row of Pattern 1 dec 2 sts on back and at the same time inc 4 sts on the front as shown in chart = 157-161-181-185-205 sts. When Pattern 1 is complete (the piece measures approx. 4 cm) change to larger circular needles and continue as follows: K 3-5-3-5-3, Pattern 2 over the following 24-24-30-30-36 sts, Pattern 3 (= 30 sts), Pattern 2 over the following 24-24-30-30-36 sts – reverse the pattern so that it will be the same on both sides of Pattern 3, K 3-5-3-5-3 and Pattern 2 over the remaining 73-73-85-85-97 sts. When the piece measures 12 cm inc 1 st at each side of sts with markers at each side every 5-4-6-4-4 cm a total of 4-6-4-6-6 times – knit the increased sts in Pattern 2 as you go along = 173-185-197-209-229 sts. When the piece measures 34-41-42-43-43 cm bind off 7 sts at each side for armhole (= the sts with the markers + 3 sts each side = 82-88-94-100-110 sts on front and 77-83-89-95-105 sts on back. Lay piece aside and knit the sleeves. Sleeve: Cast on 42-42-42-48-48 sts on double-pointed needles 4 mm; join and place a marker at the join. Knit rib. When the piece measures 4 cm change to double-pointed needles 5 mm and continue working following Pattern 2 (the pattern will not come out even). When the piece measures 9-12-14-14-14 cm inc 1 st on each side of seed st at marker every 3.5-2.5-2-2.5-2 cm a total of 11-14-17-15-20 times (knit the incd sts into the pattern as you go along) = 64-70-76-78-88 sts. When the piece measures 50-51-53-53-54 cm bind off 7 sts at marker (the st with the marker + 3 sts each side of marker) = 57-63-69-71-81 sts. Lay piece aside and knit second sleeve. Yoke: Put the sleeves in on the same circular needles as Body where you bound off for armhole = 273-297-321-337-377 sts Put a marker in each transition between Body and sleeves = 4 markers. Knit 2-3-0-0-0 rows before decreasing. Read the entire next section before knitting: Raglan shaping: Dec 1 st at each side of each marker (= 8 decs) – see Decreasing tips above. Dec every other row 18-21-23-24-24 times and every row 0-0-1-1-6 times. Pattern: When the piece measures 50-59-61-63-65 cm – adjust to end after a cable – knit Pattern 4 over the center 30 sts (decreasing the 4 sts incd on the last row of Pattern 1 at lower edge of Body) – knit the remaining sts as before. On the next row put the center 30-30-30-34-34 sts on a st holder for the neck and knit back and forth on needles. Continue to dec 1 st at each neck edge every other row 1-2-2-2-2 times. After all raglan and neck shaping is complete, 93-91-91-95-95 sts remain and the piece measures approx. 56-66-68-70-72 cm to shoulder. Neckband: Pick up and knit approx. 32-38 sts in front neck (incl. sts on st holder) on double-pointed needles and put all sts on same needles = approx. 125-133 sts. Join and P 1 row, then K 1 row, decreasing evenly distributed to 83-89-89-95-95 sts. Knit rib (K 3, P 3) – but at center front there should be a P 2, following pattern on front. When the collar measures 18-20-20-22-22 cm bind off all sts in rib. Fold neckband out to right side. If you want a crew neck, knit as follows: knit rib until the collar measures approx. 10-11-12-12-13 cm, bind off in pattern. Fold the neckband to wrong side and stitch in place. Assembly: Sew opening under the sleeve. HAT: Sizes: one-size Materials: SNOW 100 gr nr 15, marine blue. DROPS 9 mm double-pointed needles, or size needed to obtain correct gauge. Gauge: 10 sts x 14 rows in stockinette st = 10 x 10 cm. Rib: *P 5, K 2*, repeat from *-*. Hat: Cast on 56 sts; join and place a marker at the join. Knit 1 row stockinette st, then knit rib – see instructions above. When the piece measures 12 cm dec all P 5 to P 4 = 48 sts. When the piece measures 15 cm dec all P 4 to P 3 = 40 sts. Dec in the same way 2 more times with 3 cm between each dec round so that there will be 1 P less for each dec round = 24 sts – the rib is now *K 2, P 1*. When the piece measures 22 cm knit the next row as follows: *K 2 tog, P 1*, repeat from *-* over all sts = 16 sts. Cut yarn and pull through the remaining sts, fasten neatly. Hat measures approx 23 cm high. |
||||||||||||||||||||||||||||
Diagram explanations |
||||||||||||||||||||||||||||
|
||||||||||||||||||||||||||||
 |
||||||||||||||||||||||||||||
 |
||||||||||||||||||||||||||||
Have you finished this pattern?Tag your pictures with #dropspattern or submit them to the #dropsfan gallery. Do you need help with this pattern?You'll find 26 tutorial videos, a Comments/Questions area and more by visiting the pattern on garnstudio.com. © 1982-2026 DROPS Design A/S. We reserve all rights. This document, including all its sub-sections, has copyrights. Read more about what you can do with our patterns at the bottom of each pattern on our site. |
||||||||||||||||||||||||||||


With over 40 years in knitting and crochet design, DROPS Design offers one of the most extensive collections of free patterns on the internet - translated to 17 languages. As of today we count 324 catalogues and 12290 patterns translated into English (UK/cm). 12290
We work hard to bring you the best knitting and crochet have to offer, inspiration and advice as well as great quality yarns at incredible prices! Would you like to use our patterns for other than personal use? You can read what you are allowed to do in the Copyright text at the bottom of all our patterns. Happy crafting!
Post a comment to pattern DROPS 85-23
We would love to hear what you have to say about this pattern!
If you want to leave a question, please make sure you select the correct category in the form below, to speed up the answering process. Required fields are marked *.