
Popular categories
Looking for a yarn?


Comments / Questions (3)
![]() Federica wrote:
Federica wrote:
Mi permetto di segnalare una imprecisione: nel giro 1 dello sprone vengono eseguiti 2 aumenti per la manica sinistra e 1 solo aumento per la manica destra (viene saltato il secondo aumento sulla manica destra) che dovrebbe essere così: lavora a diritto fino al segnapunti successivo quindi aumenta 1 maglia verso destra e sposta il segnapunti. Poi lavorare 12- 12- 14 .... in totale 135- 135- 147- 151 .... Adoro questo modello, grazie😊
15.04.2026 - 15:52DROPS Design answered:
Buonasera Federica, grazie per la segnalazione, abbiamo corretto il testo. Buon lavoro!
15.04.2026 - 16:48
![]() Winnie Svangren wrote:
Winnie Svangren wrote:
Vil SÅ gerne strikke denne bluse, men kan ikke lide at strikke oppefra og ned!! Findes opskriften nedefra og op?? Dejligt forår til jer 🍀
03.03.2026 - 14:03DROPS Design answered:
Hei Winnie. Denne er nok kun skrevet oppefra og ned. mvh DROPS Design
03.03.2026 - 14:06
![]() Bougard Christine wrote:
Bougard Christine wrote:
J’aimerai faire ce modèle de bas en haut Séparèrent dos devant manche Comment je peux faire Merci
20.02.2026 - 11:27DROPS Design answered:
Bonjour Mme Bougard, ce type d'empiècement se tricote uniquement de haut en bas, retrouvez ici tous nos modèles de pulls tricotés de bas en haut, ajoutez les filtres correspondant à votre recherche pour l'affiner. Bon tricot!
23.02.2026 - 07:18
|
|||||||||||||||||||||||||
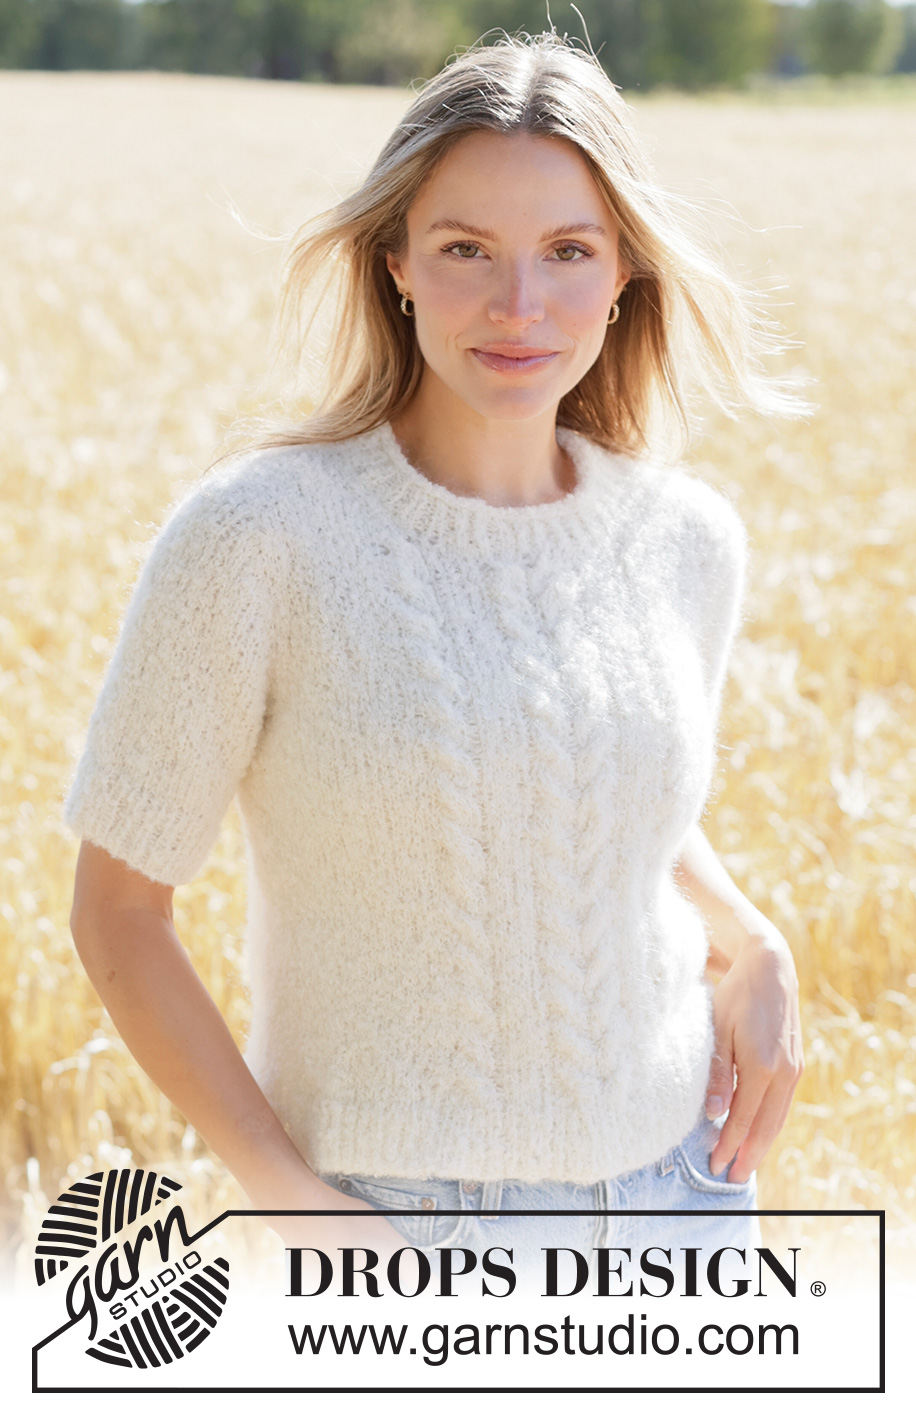
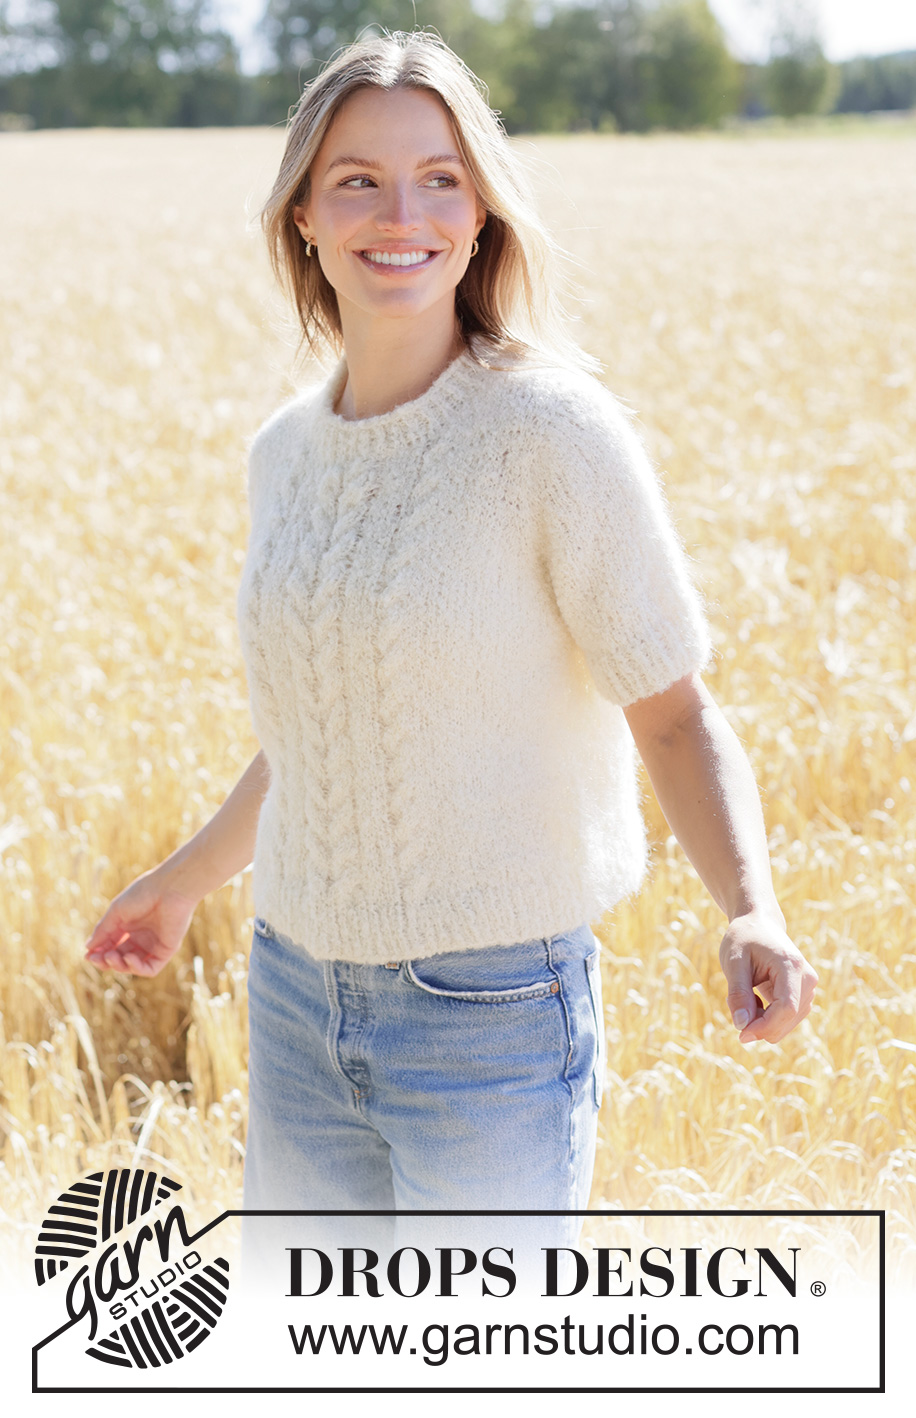
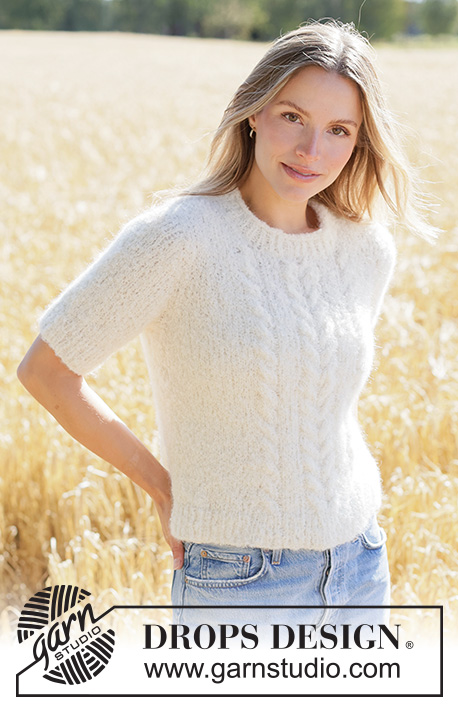
Barley Twist Sweater#barleytwistsweater |
|||||||||||||||||||||||||
 |
 |
||||||||||||||||||||||||
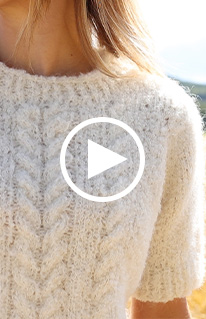
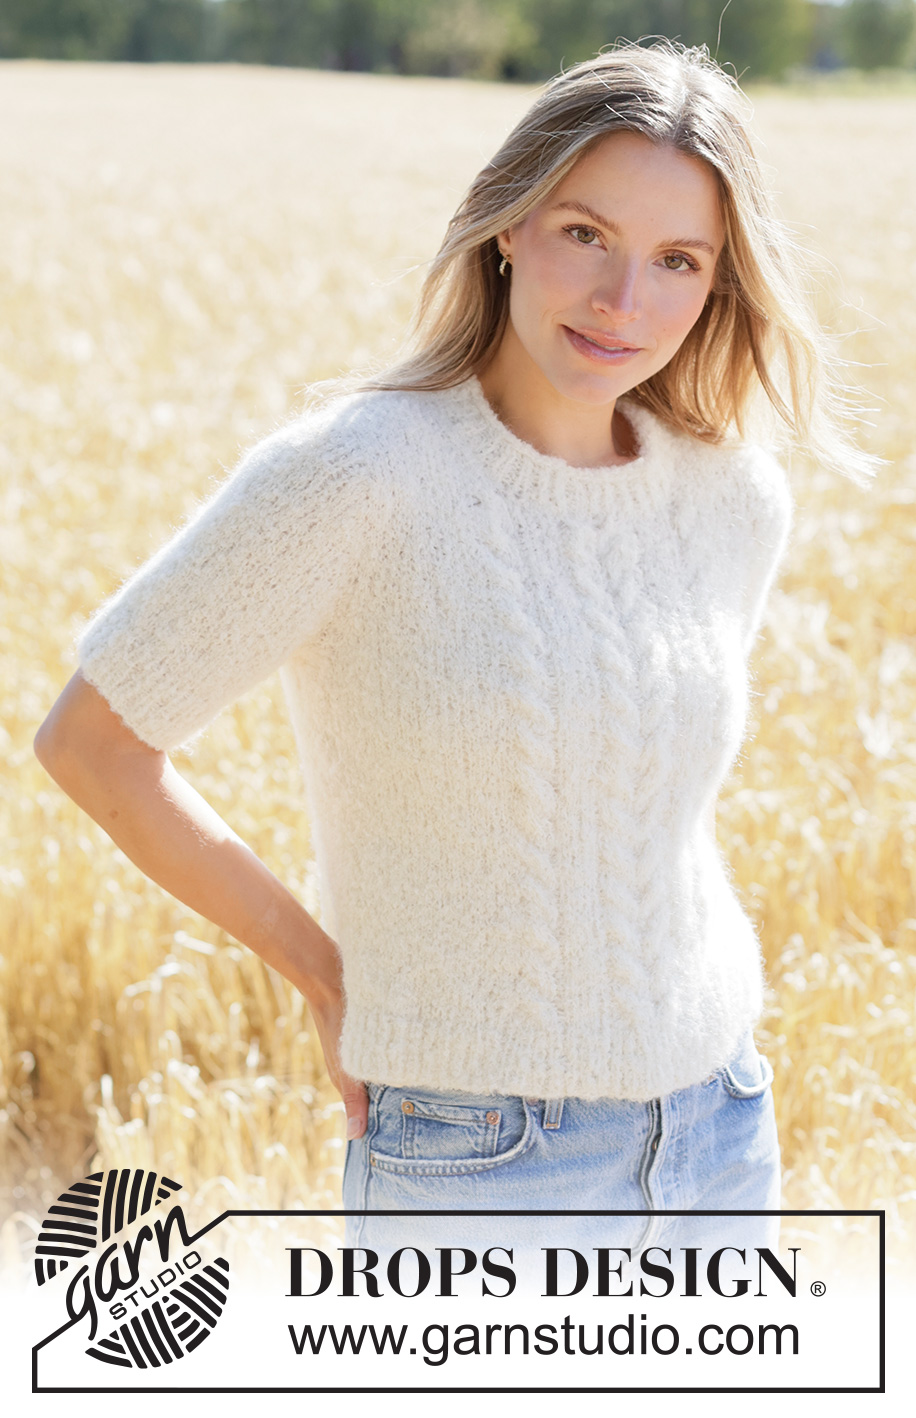
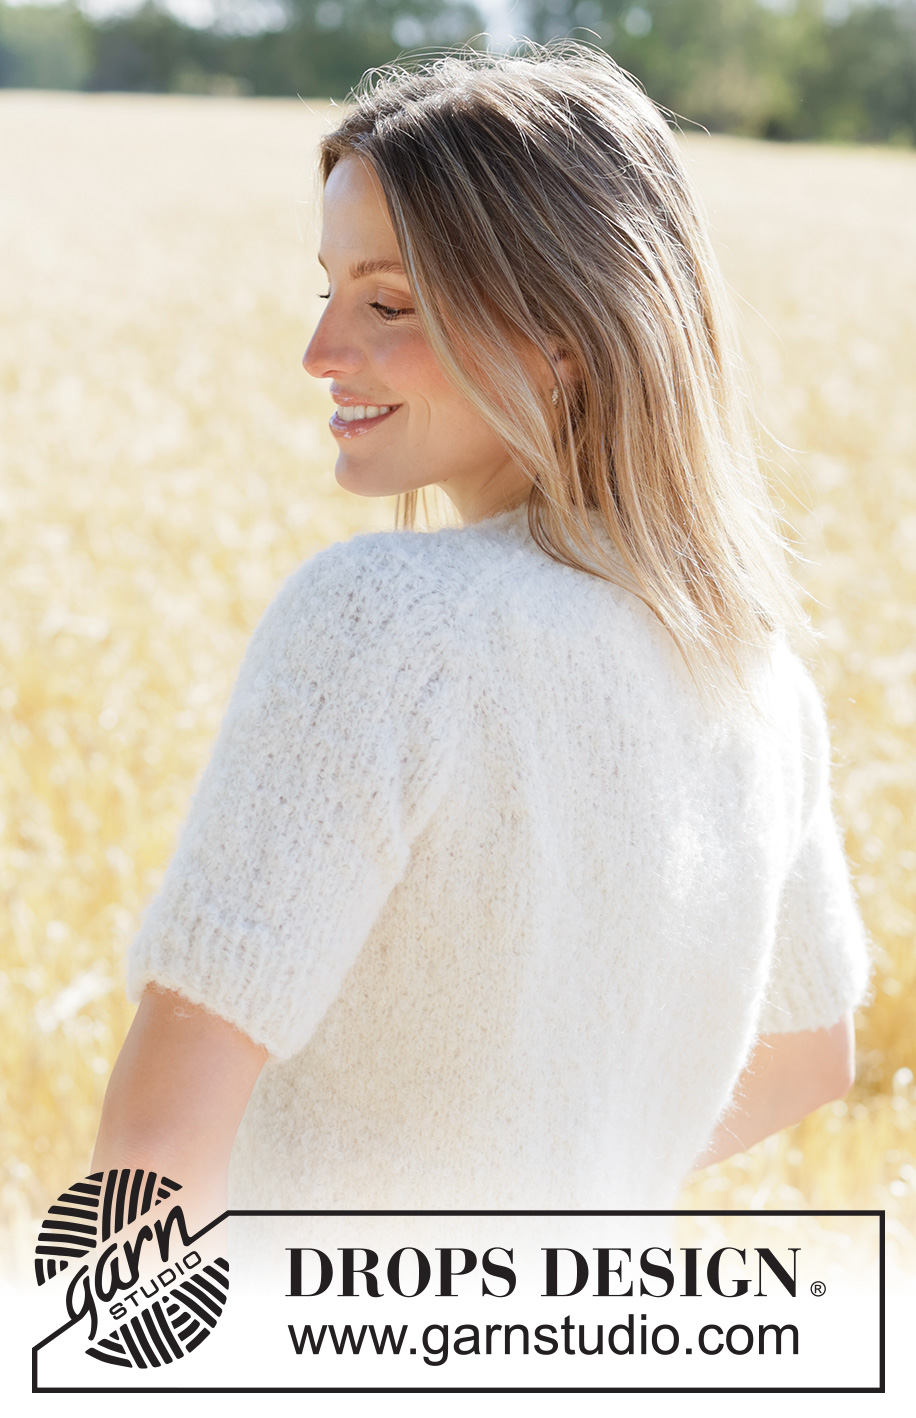
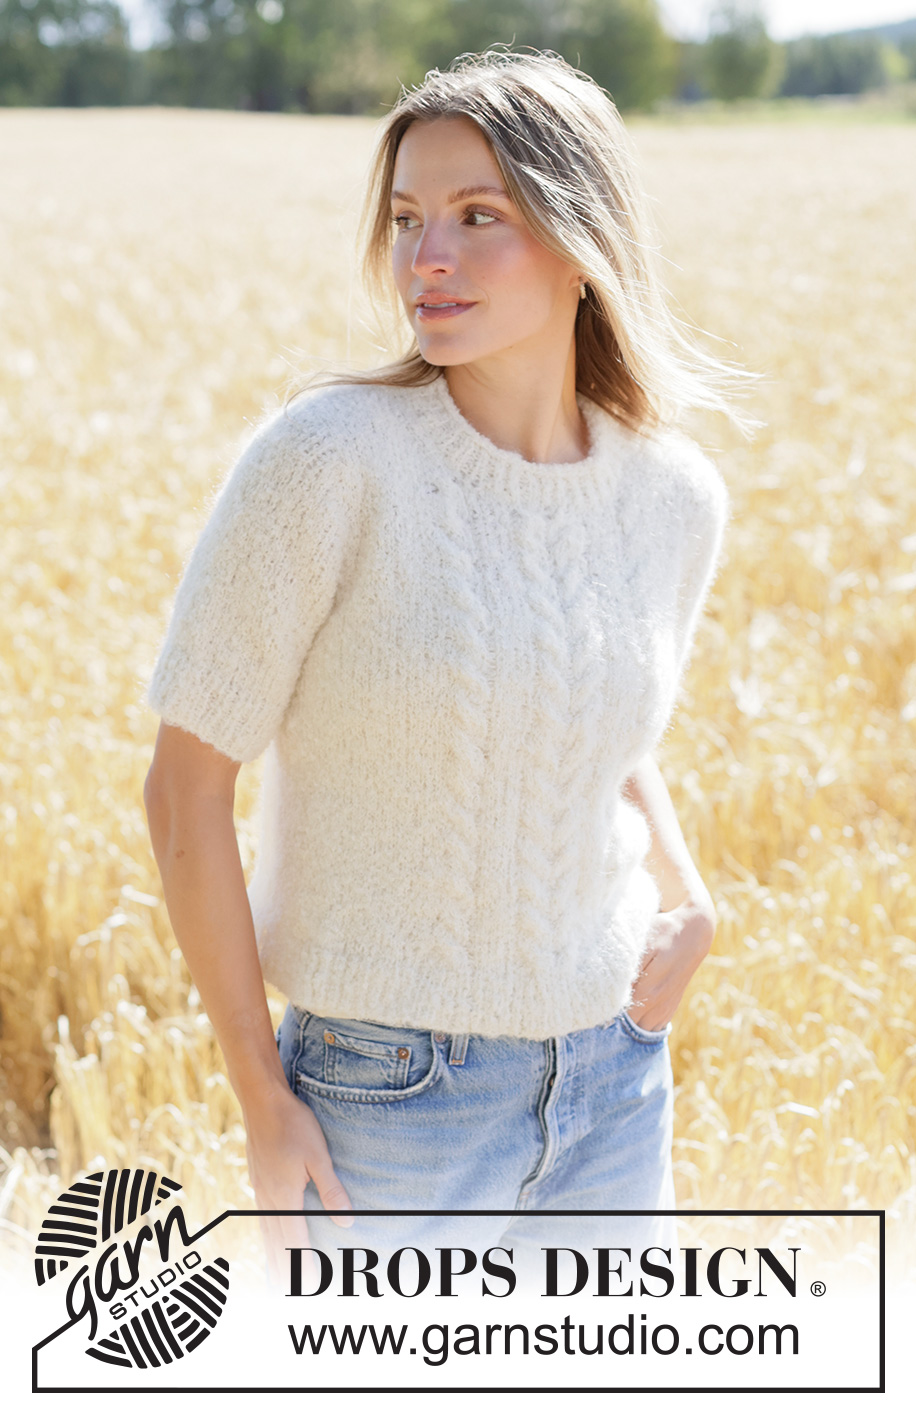
Knitted jumper in DROPS Alpaca Bouclé and DROPS Kid-Silk. The piece is worked top down in stocking stitch with European yoke and cables. Sizes XS - XXXL.
DROPS 267-9 |
|||||||||||||||||||||||||
|
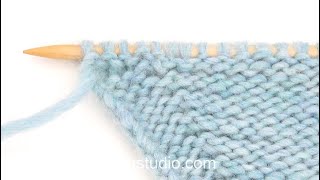
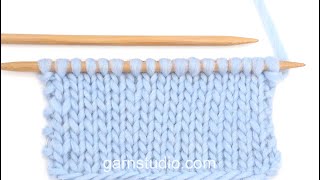
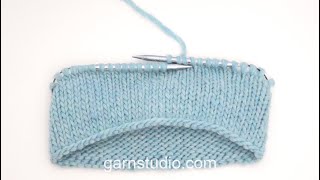
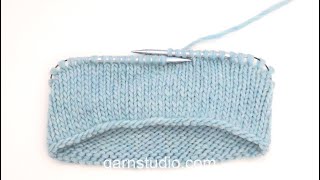
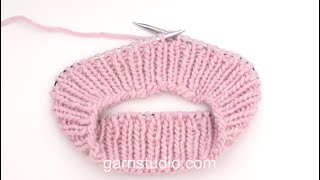
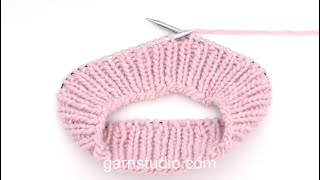
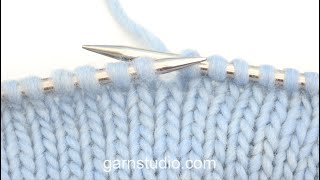
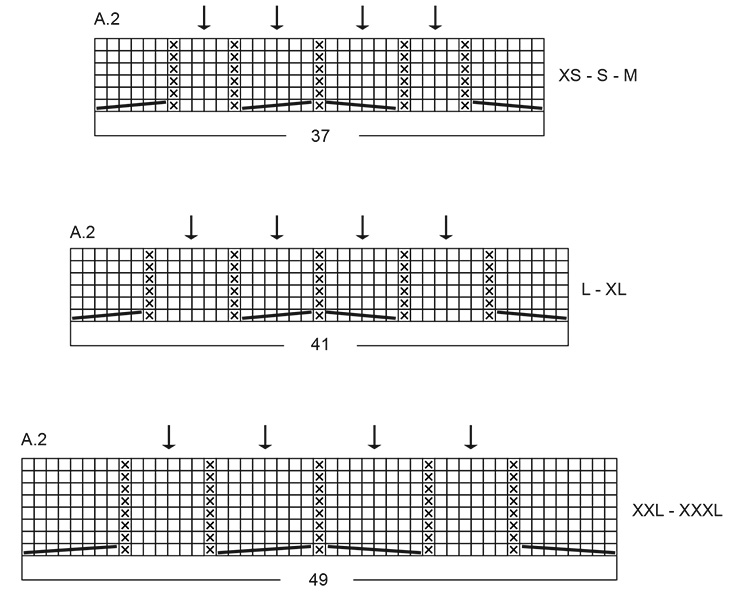
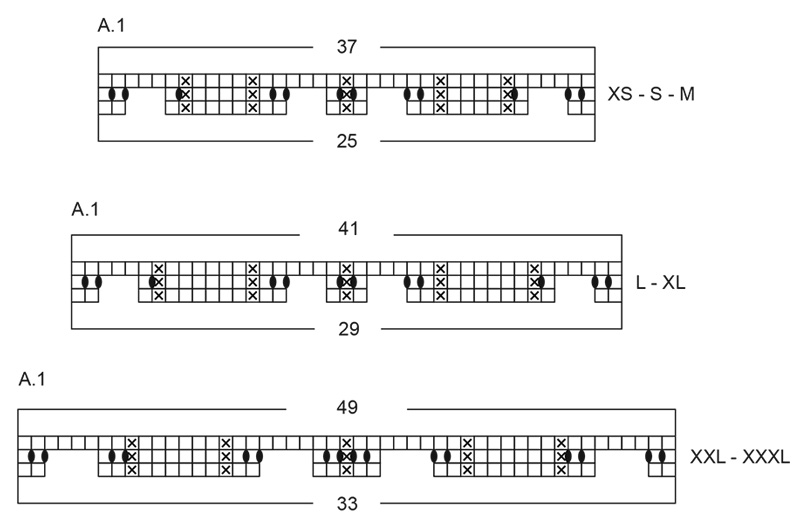
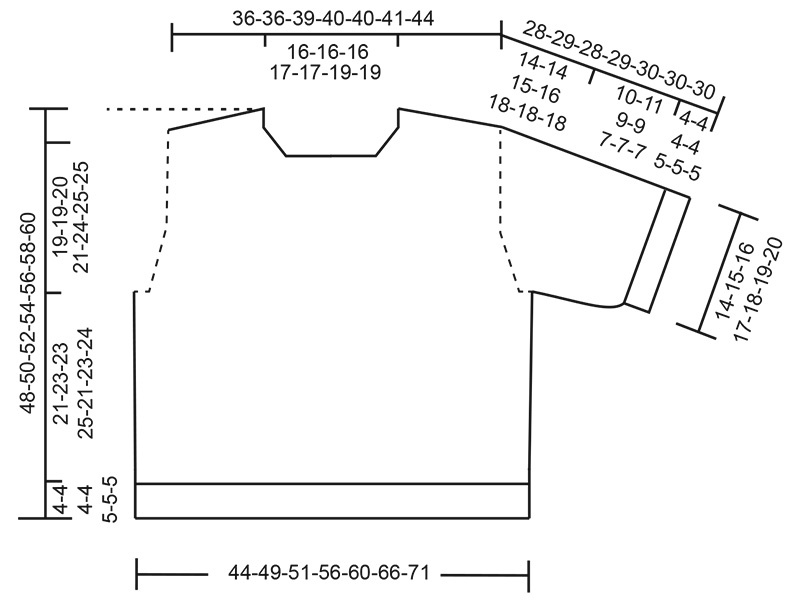
------------------------------------------------------- EXPLANATIONS FOR THE PATTERN: ------------------------------------------------------- PATTERN: See diagrams A.1 and A.2. Choose diagram for your size. INCREASE TIP-1: INCREASE 1 STITCH TOWARDS LEFT – from RIGHT SIDE: Use the left needle to pick up the strand between 2 stitches from the row below, pick up the strand from the front and knit through the stitch loop that lies on the back of the needle. INCREASE 1 STITCH TOWARDS THE RIGHT- from RIGHT SIDE: Use the left needle to pick up the strand between 2 stitches from the row below, pick up the strand from the back and knit through the stitch loop that lies on the front of the needle. INCREASE TIP-2: INCREASE 1 STITCH TOWARDS THE RIGHT- from WRONG SIDE: Use the left needle to pick up the strand between 2 stitches from the row below, pick up the strand from the back and purl through the stitch loop that lies on the front of the needle. INCREASE 1 STITCH TOWARDS LEFT – from WRONG SIDE: Use the left needle to pick up the strand between 2 stitches from the row below, pick up the strand from the front and purl through the stitch loop that lies on the back of the needle. SLEEVE TIP: When knitting up stitches under the sleeve, you can get a small hole in the transition between stitches on the body and sleeve. This hole can be closed by picking up the strand between 2 stitches and working this strand twisted together with the first stitch between body and sleeve. DECREASE TIP: Decrease 1 stitch on each side of the marker-thread as follows: Work until there are 3 stitches left before the marker-thread, knit 2 together, knit 2 (marker-thread sits between these 2 stitches), slip 1 stitch knit-wise, knit 1 and pass the slipped stitch over the knitted stitch (2 stitches decreased). ------------------------------------------------------- START THE PIECE HERE: ------------------------------------------------------- JUMPER – SHORT OVERVIEW OF THE PIECE. The pattern uses both long and short needles; start with the length which fits the number of stitches and change when necessary. Cables are worked on the front piece and stocking stitch on the rest of the round. If there is a «0» in your chosen size, skip the information and go straight to the next instruction. Work according to points 1 – 5. 1. BACK PIECE: Cast on stitches for the back of the neck. Work the back piece back and forth, top down, increasing stitches on each side until the shoulder stitch-count has been achieved. The back piece has slightly diagonal shoulders. 2. FRONT PIECE: Worked in 2 sections (each side of neck). Start by knitting up stitches along one back shoulder, working downwards and increasing for the neckline. Repeat on the other shoulder. 3. YOKE: Place all the stitches on the same circular needle, work first one front piece, knit up stitches for one sleeve along the side of the front piece, work the back piece, knit up stitches for the second sleeve along the side of the second front piece, cast on stitches for the front neckline. The yoke is continued back and forth from mid-front. 4. INCREASE FOR NECKLINE, BODY AND SLEEVES: While continuing the yoke, stitches are increased first for the neckline and sleeves and later for the body and sleeves. After the final increases for the neckline the front pieces are joined and the yoke is continued in the round. 5. BODY AND SLEEVES: When the increases and the yoke are finished, the yoke is divided for the body and sleeves. The body is finished in the round while the sleeves wait. Then the sleeves are worked in the round, top down. Stitches are knitted up around the neckline and the neck is worked to finish in the round. BACK PIECE: The piece is worked back and forth. Cast on 24-24-24-26-26-28-28 stitches with circular needle size 6 mm, 1 strand DROPS Alpaca Bouclé and 1 strand DROPS Kid-Silk (2 strands). ROW 1 (wrong side): Purl. ROW 2 (right side): Read INCREASE TIP-1. Knit 3, increase 1 stitch towards the left, knit until there are 3 stitches left on the row, increase 1 stitch towards the right, knit 3. ROW 3 (wrong side): Read INCREASE TIP-2. Purl 3, increase 1 stitch towards the right, purl until there are 3 stitches left on the row, increase 1 stitch towards the left, purl 3. AFTER ROW 3: Work ROWS 2 and 3 a total of 7-7-8-8-8-8-9 times (14-14-16-16-16-16-18 rows worked). After the last increase there are 52-52-56-58-58-60-64 stitches. Remember to maintain the knitting tension. Cut the strand and place the stitches on a stitch holder. RIGHT SHOULDER: Find the right back shoulder as follows: Lay the back piece flat, right side up, with the stitch holder/thread towards you; right-hand side of piece = right shoulder. Start from the right side by the armhole on the right back shoulder and knit up 1 stitch in each row worked, inside the outermost stitch, as far as the neckline = 14-14-16-16-16-16-18 shoulder-stitches. Insert 1 marker by the neck. All measurements on the front piece are taken from this marker, measured in the knitting direction. Work stocking stitch with the first row from the wrong side. When the piece measures 5-5-6-5-6-8-8 cm, increase for the neckline as follows: ROW 1 (right side): Knit until there are 3 stitches left on the row, increase 1 stitch towards the right, knit 3 – remember INCREASE TIP-1. ROW 2 (wrong side): Purl without increasing. Work ROWS 1 and 2 a total of 3-3-3-4-4-4-4 times (6-6-6-8-8-8-8 rows worked) = 17-17-19-20-20-20-22 stitches. The piece measures approx. 9-9-10-10-11-13-13 cm from the marker. Cut the strand, place the stitches on a stitch holder and work the left shoulder. LEFT SHOULDER: Start from the right side by the neckline on the left back shoulder and knit up 1 stitch in each row worked, inside the outermost stitch as far as the armhole = 14-14-16-16-16-16-18 shoulder-stitches. Insert 1 marker by the neck. All measurements on the front piece are taken from this marker, measured in the knitting direction. Work stocking stitch with the first row from the wrong side. When the piece measures 5-5-6-5-6-8-8 cm, increase for the neckline as follows: ROW 1 (right side): Remember INCREASE TIP-1. Knit 3, increase 1 stitch towards the left, knit to end of row (1 increased stitch). ROW 2 (wrong side): Purl without increasing. Work ROWS 1 and 2 a total of 3-3-3-4-4-4-4 times (6-6-6-8-8-8-8 rows worked) = 17-17-19-20-20-20-22 stitches. The yoke measures approx. 9-9-10-10-11-13-13 cm from the marker. The front and back pieces are now joined, stitches are knitted up for the sleeves, the neckline-increases are continued and stitches are increased for the sleeves. ROW 1 (right side): Start from the right side with the left front piece, knit 3, increase 1 stitch towards the left, knit until there are 2 stitches left on the front piece, slip 1 stitch, knit 1 and pass the slipped stitch over (1 stitch decreased), insert 1 marker here, knit up 12-12-14-14-16-18-18 stitches along the side of the left front piece (= sleeve-stitches, are knitted up inside the outermost stitch), insert 1 marker here, knit the first 2 stitches on the back piece together (1 stitch decreased), knit until there are 2 stitches left on the back piece, slip 1 stitch, knit 1 and pass the slipped stitch over (1 stitch decreased), insert 1 marker here, knit up 12-12-14-14-16-18-18 stitches along the side of the right front piece (= sleeve-stitches, are knitted up inside the outermost stitch), insert 1 marker here, knit together the first 2 stitches on the right front piece (1 stitch decreased) knit until there are 3 stitches left, increase 1 stitch towards the right, knit 3 = 108-108-120-124-128-134-142 stitches. The neckline-increases are finished. The piece measures approx. 10-10-11-11-12-14-14 cm from the marker. Some of the neckline-depth will lie on the back piece. Neckline-depth in front = 9-9-10-10-11-12-12 cm. Neckline-depth at back = 1-1-1-1-1-2-2 cm. ROW 2 (wrong side): Purl to the first marker, move the marker onto the right needle, increase 1 stitch towards the left, purl to the next marker, increase 1 stitch towards the right, move the marker onto the right needle, purl to the next marker, move the marker onto the right needle, increase 1 stitch towards the left, purl to the next marker, increase 1 stitch towards the right, move the marker onto the right needle, purl to end of row = 112-112-124-128-132-138-146 stitches. ROW 3 (right side): Knit to the first marker, move the marker onto the right needle, increase 1 stitch towards the left, knit to the next marker, increase 1 stitch towards the right, move the marker onto the right needle, knit to the next marker, move the marker onto the right needle, increase 1 stitch towards the left, knit to the next marker, increase 1 stitch towards the right, move the marker onto the right needle, knit to end of row, then cast on 15-15-15-15-15-17-17 new stitches for the neckline = 131-131-143-147-151-159-167 stitches. Now continue in the round. YOKE: Knit to the first marker (end of front piece), the round starts here, i.e., in the transition between the front piece and the left sleeve: ROUND 1: Move the marker onto the right needle, increase 1 stitch towards the left, knit to the next marker, increase 1 stitch towards the right, move the marker onto the right needle, knit to the next marker (= back piece), move the marker onto the right needle, increase 1 stitch towards the left, knit to the next marker (= right sleeve), increase 1 stitch towards the right, move the marker onto the right needle, knit 12-12-14-13-13-12-14, work A.1 across the next 25-25-25-29-29-33-33 stitches, knit 12-12-14-13-13-12-14 (= front piece) = 135-135-147-151-155-163-171 stitches. ROUND 2: Move the marker onto the right needle, increase 1 stitch towards the left, knit to the next marker, increase 1 stitch towards the right, move the marker onto the right needle, knit to the next marker, move the marker onto the right needle, increase 1 stitch towards the left, knit to the next marker, increase 1 stitch towards the right, move the marker onto the right needle, continue stocking stitch and A.1 across the front piece = 151-151-163-167-171-183-191 stitches – remember INCREASE TIP-1. The stitch count on the sleeves increases but remains the same on the front and back pieces. ROUND 3: Knit and work A.1 without increasing. Work ROUNDS 2 and 3 a total of 7-5-6-6-5-2-2 times (14-10-12-12-10-4-4 rounds worked BUT when A.1 is finished in height work A.2 above A.1 with the other stitches knitted). A total of 10-8-9-9-8-5-5 increases in height on the sleeves: 32-28-32-32-32-28-28 stitches on the sleeves, 50-50-54-56-56-58-62 stitches on the back piece and 61-61-65-67-67-73-77 stitches on the front piece) = 175-167-183-187-187-187-195 stitches. You now increase on both the body and sleeves, increasing on the body inside the 2 stocking stitches on the front and back pieces as follows: ROUND 1: Move the marker onto the right needle, increase 1 stitch towards the left, knit to the next marker, increase 1 stitch towards the right, move the marker onto the right needle, knit 2, increase 1 stitch towards the left, knit until there are 2 stitches left on the back piece, increase 1 stitch towards the right, knit 2, move the marker onto the right needle, increase 1 stitch towards the left, knit to the next marker, increase 1 stitch towards the right, move the marker onto the right needle, knit 2, increase 1 stitch towards the left, knit and continue A.2 until there are 2 stitches left on the front piece, increase 1 stitch towards the right, knit 2 (8 increased stitches: 1 increased stitch on each side of 2 stitches in each transition between the body and sleeves). ROUND 2: Knit and continue A.2 without increasing. Work ROUNDS 1 and 2 a total of 3-5-5-6-9-12-12 times (6-10-10-12-18-24-24 rounds worked). A total of 13-13-14-15-17-17-17 increases in height on the sleeves and 3-5-5-6-9-12-12 increases in height on the body: 38-38-42-44-50-52-52 stitches on each sleeve, 56-60-64-68-74-82-86 stitches on the back piece and 67-71-75-79-85-97-101 stitches on the front piece = 199-207-223-235-259-283-291 stitches. The sleeves measure approx. 14-14-15-16-18-18-18 cm. When the jumper is folded double at the shoulder the piece measures approx. 19-19-20-21-24-25-25 cm from outermost on the shoulder and down the armhole. If the piece is shorter than this, continue working to the correct length without further increases. Now divide for the body and sleeves. DIVIDE FOR BODY AND SLEEVES: Place the first 38-38-42-44-50-52-52 stitches on a stitch holder for the sleeve, cast on 6-8-8-10-10-12-14 stitches (mid-under the sleeve), knit 56-60-64-68-74-82-86 (back piece), place the next 38-38-42-44-50-52-52 stitches on a stitch holder for the sleeve, cast on 6-8-8-10-10-12-14 stitches (mid-under the sleeve), work the last 67-71-75-79-85-97-101 stitches in stocking stitch and cables as before (= front piece). The body and sleeves are finished separately. BODY: = 135-147-155-167-179-203-215 stitches. Work stocking stitch in the round, with pattern on the front piece, for a further 21-23-23-25-22-23-24 cm – adjust so you have worked 3 to 5 rounds after the last round of cabling. Change to circular needle size 4.5 mm. Work rib (knit 1, purl 1), AT THE SAME TIME increase 13-13-15-17-19-21-23 stitches evenly on the first round (4 of these are 1 stitch increased in each section marked with an arrow in A.2, the other 9-9-11-13-15-17-19 stitches evenly spaced = 148-160-170-184-198-224-238 stitches. The rib should fit neatly into the pattern on the front, with the purled stitches in the pattern continuing on the rib. When the rib measures 4-4-4-4-5-5-5 cm, cast off with rib. The jumper measures approx. 48-50-52-54-56-58-60 cm from the top of the shoulder. SLEEVES: Place the 38-38-42-44-50-52-52 sleeve-stitches from one stitch holder onto circular needle size 6 mm and knit up 1 stitch in each of the 6-8-8-10-10-12-14 stitches cast on under the sleeve – read SLEEVE TIP = 44-46-50-54-60-64-66 stitches. Insert a marker-thread in the middle of the 6-8-8-10-10-12-14 stitches under the sleeve. The round starts by the marker-thread. Work stocking stitch in the round. AT THE SAME TIME, when the sleeve measures 1 cm from the division, decrease mid-under the sleeve – read DECREASE TIP as follows: Decrease 2 stitches 2-2-3-3-5-5-5 times every 2nd round = 40-42-44-48-50-54-56 stitches. Continue working until the sleeve measures 10-11-9-9-7-7-7 cm from the division. Change to double pointed needles size 4.5 mm. Work rib (knit 1, purl 1), AT THE SAME TIME increase 2-4-4-4-4-4-4 stitches evenly on the first round = 42-46-48-52-54-58-60 stitches. When the rib measures 4-4-4-4-5-5-5 cm, cast off with rib. The sleeve measures approx. 14-15-13-13-12-12-12 cm from the division. NECK (rib with I-cord cast-off): Use circular needle size 4.5 mm and 1 strand of each quality (2 strands). Start from the right side on one shoulder-line and knit up 72-72-74-76-78-88-88 stitches inside 1 stitch around the neckline. Knit 1 round and adjust the stitch count if necessary, it must be divisible by 2. Work rib in the round (knit 1, purl 1) for 3-3-3-3½-3½-4-4 cm. After the last round, cast off as follows: START (right side): Cast on 2 stitches onto the right needle from the right side. Slip these 2 stitches onto the left needle so the working strand is 2 stitches in on the needle (when working, the strand tightens the edge into a small tube). ROW 1 (right side): Knit 1, knit the next 2 stitches twisted together. Slip the 2 stitches from the right to the left needle. Do not turn. Repeat ROW 1 until there are 2 stitches left. Slip the 2 stitches from the right to the left needle. Cast off. Sew a small stitch to join the beginning and end of the I-cord. |
|||||||||||||||||||||||||
Diagram explanations |
|||||||||||||||||||||||||
|
|||||||||||||||||||||||||
 |
|||||||||||||||||||||||||
 |
|||||||||||||||||||||||||
 |
|||||||||||||||||||||||||
Have you finished this pattern?Tag your pictures with #dropspattern #barleytwistsweater or submit them to the #dropsfan gallery. Do you need help with this pattern?You'll find 47 tutorial videos, a Comments/Questions area and more by visiting the pattern on garnstudio.com. © 1982-2026 DROPS Design A/S. We reserve all rights. This document, including all its sub-sections, has copyrights. Read more about what you can do with our patterns at the bottom of each pattern on our site. |
|||||||||||||||||||||||||


With over 40 years in knitting and crochet design, DROPS Design offers one of the most extensive collections of free patterns on the internet - translated to 17 languages. As of today we count 324 catalogues and 12291 patterns translated into English (UK/cm). 12291
We work hard to bring you the best knitting and crochet have to offer, inspiration and advice as well as great quality yarns at incredible prices! Would you like to use our patterns for other than personal use? You can read what you are allowed to do in the Copyright text at the bottom of all our patterns. Happy crafting!
Post a comment to pattern DROPS 267-9
We would love to hear what you have to say about this pattern!
If you want to leave a question, please make sure you select the correct category in the form below, to speed up the answering process. Required fields are marked *.