
Popular categories
Looking for a yarn?


Comments / Questions (11)
![]() Catherine wrote:
Catherine wrote:
Bonjour, puis je faire les manches en aller retour et comment diminuer, je n'aime pas tricoter avec 4 aiguillles
15.03.2026 - 18:00DROPS Design answered:
Bonjour Catherine, tout à fait, vous trouverez ici comment adapter les explications pour aiguilles droites, au lieu de relever les mailles ici, il vous suffira de les monter de chaque côté + 1 m lisière. Les diminutions se feront sur l'endroit, comme indiqué ici. Bon tricot!
16.03.2026 - 10:42
![]() Marieke wrote:
Marieke wrote:
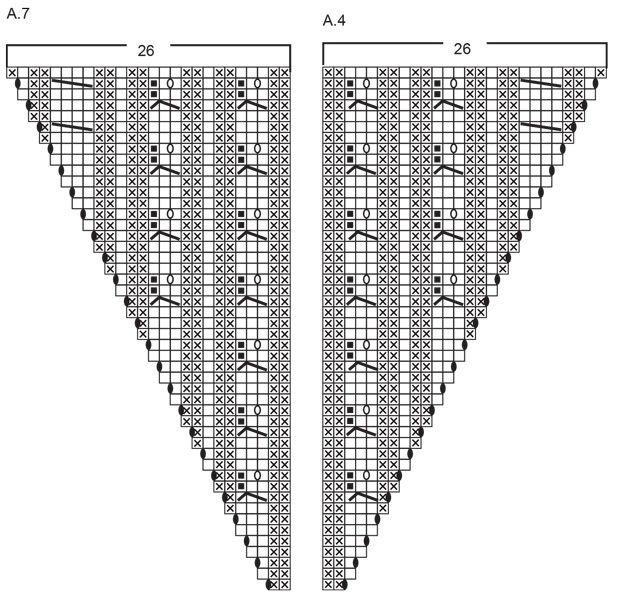
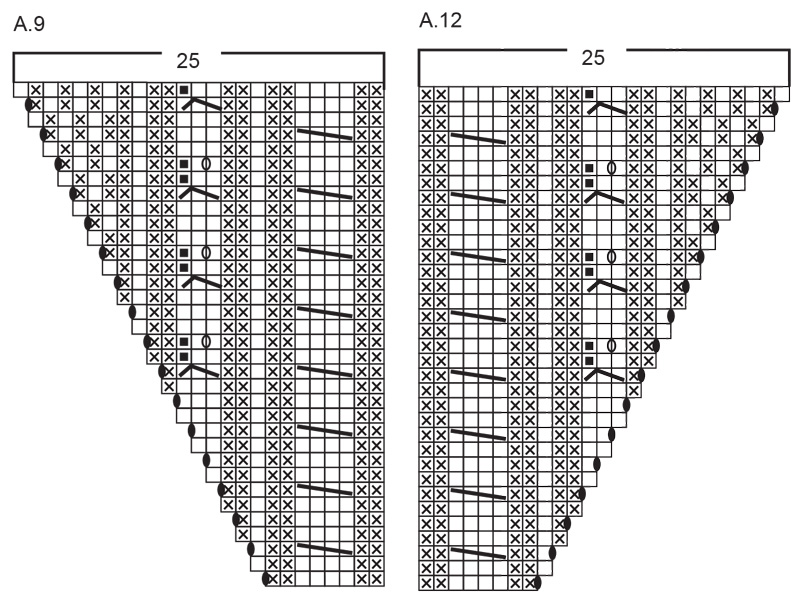
Es gibt einen Fehler in den Diagrammen A.9 und A.12. Beim Rückenteil und bei den Ärmeln endet das Muster vor dem großen Perlmuster mit dem kleinen Zopf. Aber bei den Vorderteilen wurden in den Diagrammen das Ajour- und das Zopfmuster vertauscht. Auf dem Foto ist es richtig gestrickt worden.
22.02.2026 - 08:56
![]() Rubina wrote:
Rubina wrote:
Making size XL, Back has 56 stitches when divided , my design adds upto 54 as in instructions, A4=2, A2=8, A5=36, A6=8, A7=2, where am I doing wrong ?
28.12.2025 - 05:59DROPS Design answered:
Hi Rubina, BACK: 2+8+36+8+2=56 sts (+2 increased sts in first row of A.4 and A.7 diagrams equals 58 sts). Happy knitting!
28.12.2025 - 10:43
![]() Cordula wrote:
Cordula wrote:
Das Muster ist einfach, die Anleitung sehr unübersichtlich. Bitte um eine Zeilen Anleitung über das ganze Modell. C.Hutter
04.12.2025 - 22:23
![]() Carol McMillan wrote:
Carol McMillan wrote:
I posted a question on November 5 and have not received a response.
19.11.2025 - 21:35
![]() Carol McMillan wrote:
Carol McMillan wrote:
After dividing for body do you continue the 3 sts of the raglan bands down the body? Therefore for size XXL there is a 3 st band on each side of the 17 cast on sts?
05.11.2025 - 06:52
![]() Maria Boe wrote:
Maria Boe wrote:
Jeg tror der er flere fejl i denne opskrift, bla der hvor man skal fortsætte udtag i nogle størrelser og ikke andre. Der kommer nemlig flere masker i opskriften selv man ikke skal tage ud. Og den man forklaring hvordan mønsteret fortsætter fra bærestykket og til for og bagstykke
31.10.2025 - 22:20
![]() Someone wrote:
Someone wrote:
Can you pls give me the measurements of xxxl I'm new to knitting and can't decide what size i should make
18.10.2025 - 10:39DROPS Design answered:
Hi, You will find a size chart at the bottom of the pattern with all the measurements for the different sizes. XXXL is the last number in each series. Regards, Drops Team.
20.10.2025 - 06:46
![]() Abby wrote:
Abby wrote:
What size is the model wearing?
17.10.2025 - 20:11DROPS Design answered:
Hi Abby, You will find a size chart at the bottom of the page, with all the measurements for the different sizes. Choose the correct size and you will get the shape and fit as shown in the photo. Regards, Drops Team.
20.10.2025 - 07:06
![]() Lisa wrote:
Lisa wrote:
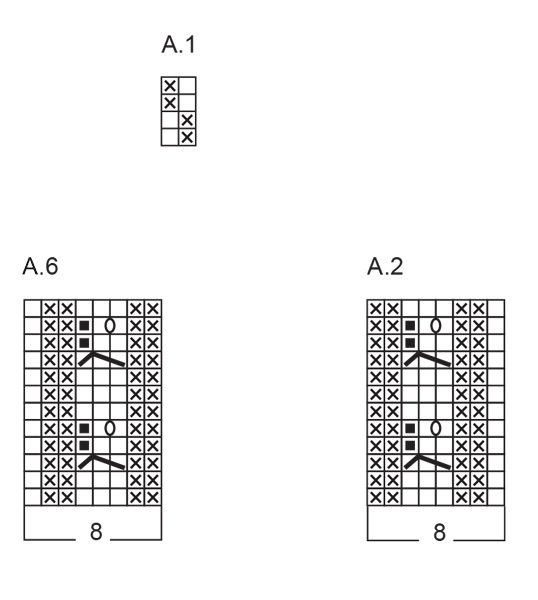
Should the neck be done with smaller needles? It says to use us 6 but in the next section it says to change to size 6. Also on the neck the first three stitches are A1 plus a purl. On the wrong side, I know you would use A1, but is the purl stitch from the right side done as a knit or purl on the wrong side? Thank you!
10.10.2025 - 01:35DROPS Design answered:
Dear Lisa, the neck is worked with 2.5mm needles/ US 1.5, while the yoke is worked with the 4mm needles/US 6. There is a typo in the US version; we will correct it as soon as possible. A.1 starts as: purl 1, knit 1, purl 1. On the wrong side you work the square above the square worked in the row from the right side, reading from left to right. So, over the knit stitch we need to work a purl stitch (as indicated in the diagram explanations) while over the purl stitch we work a knit stitch from the wrong side. Happy knitting!
12.10.2025 - 19:11
|
||||||||||||||||||||||||||||||||||
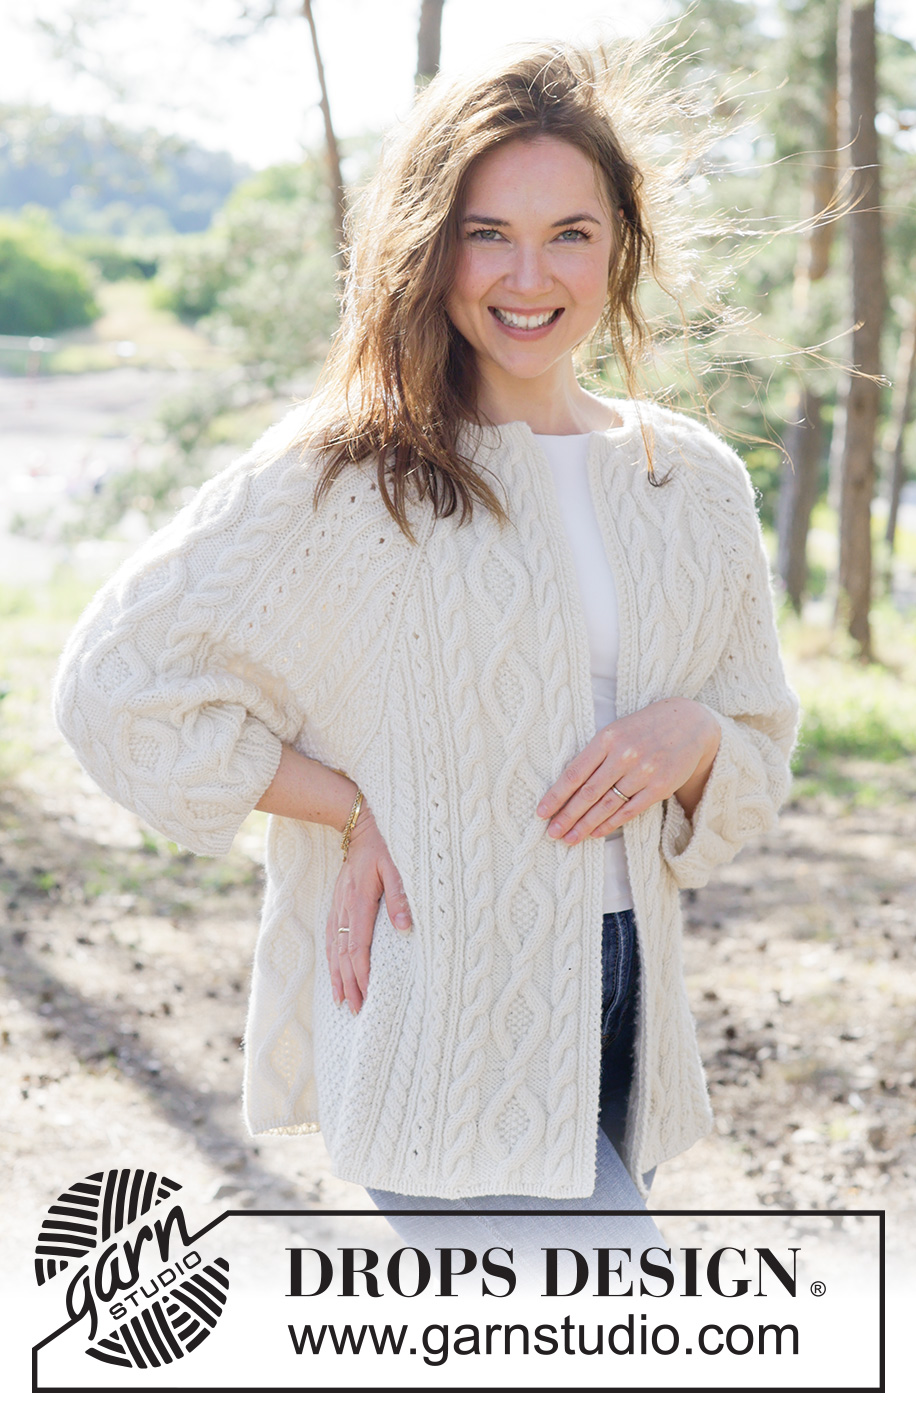
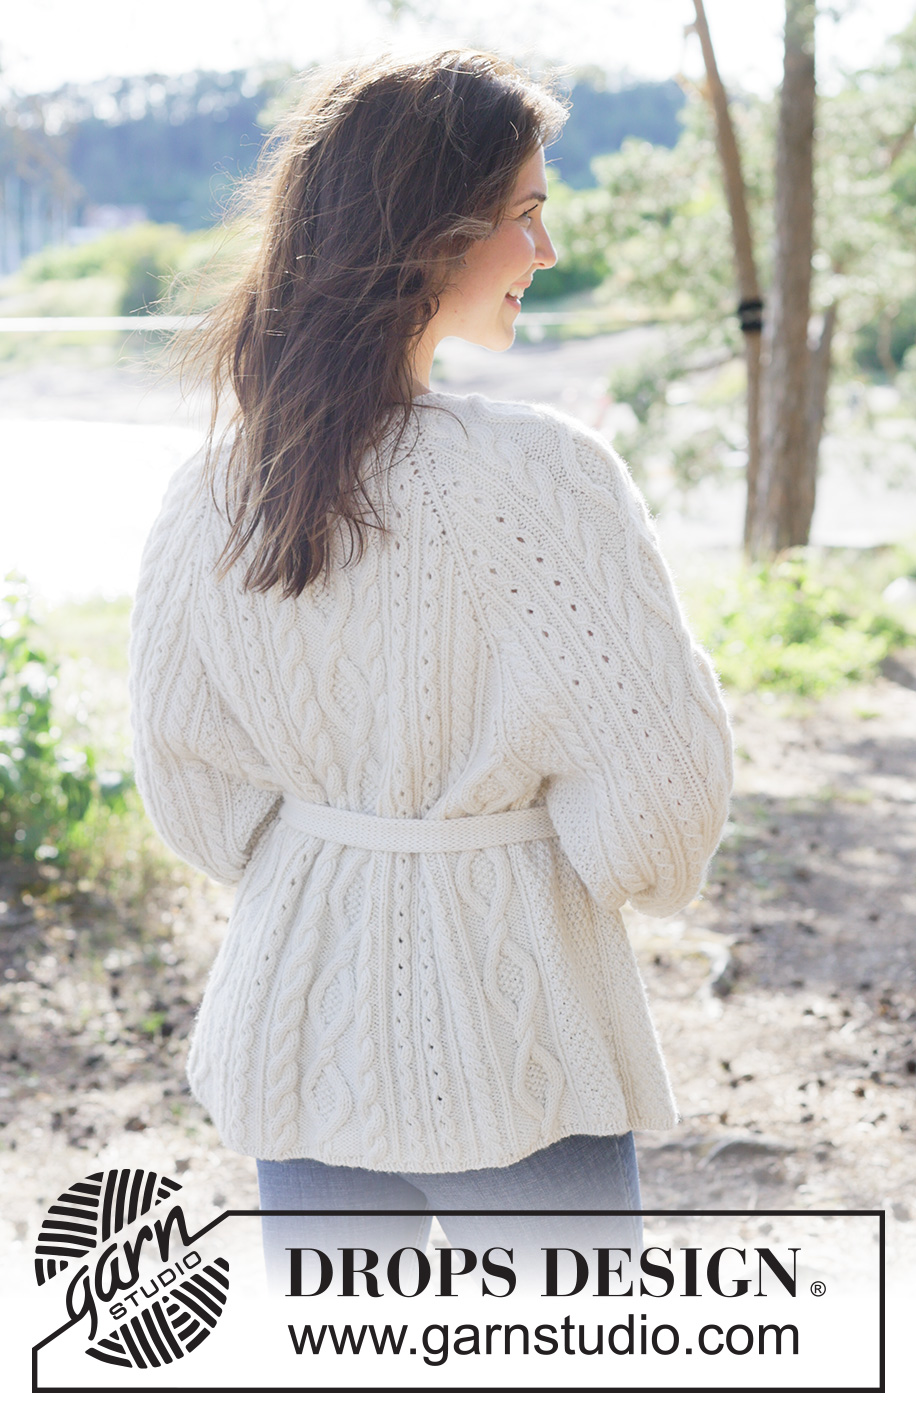
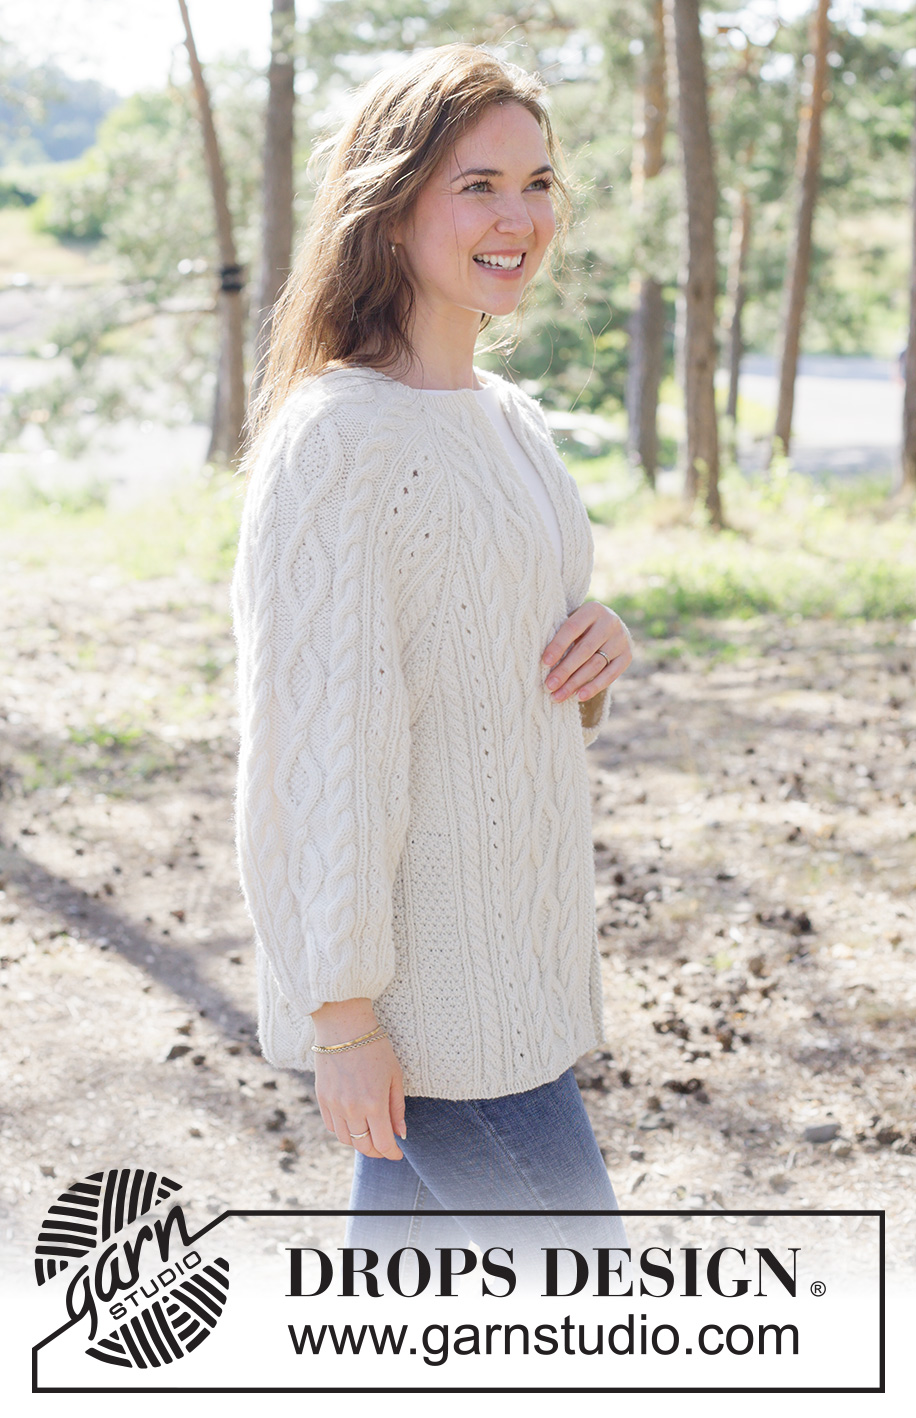
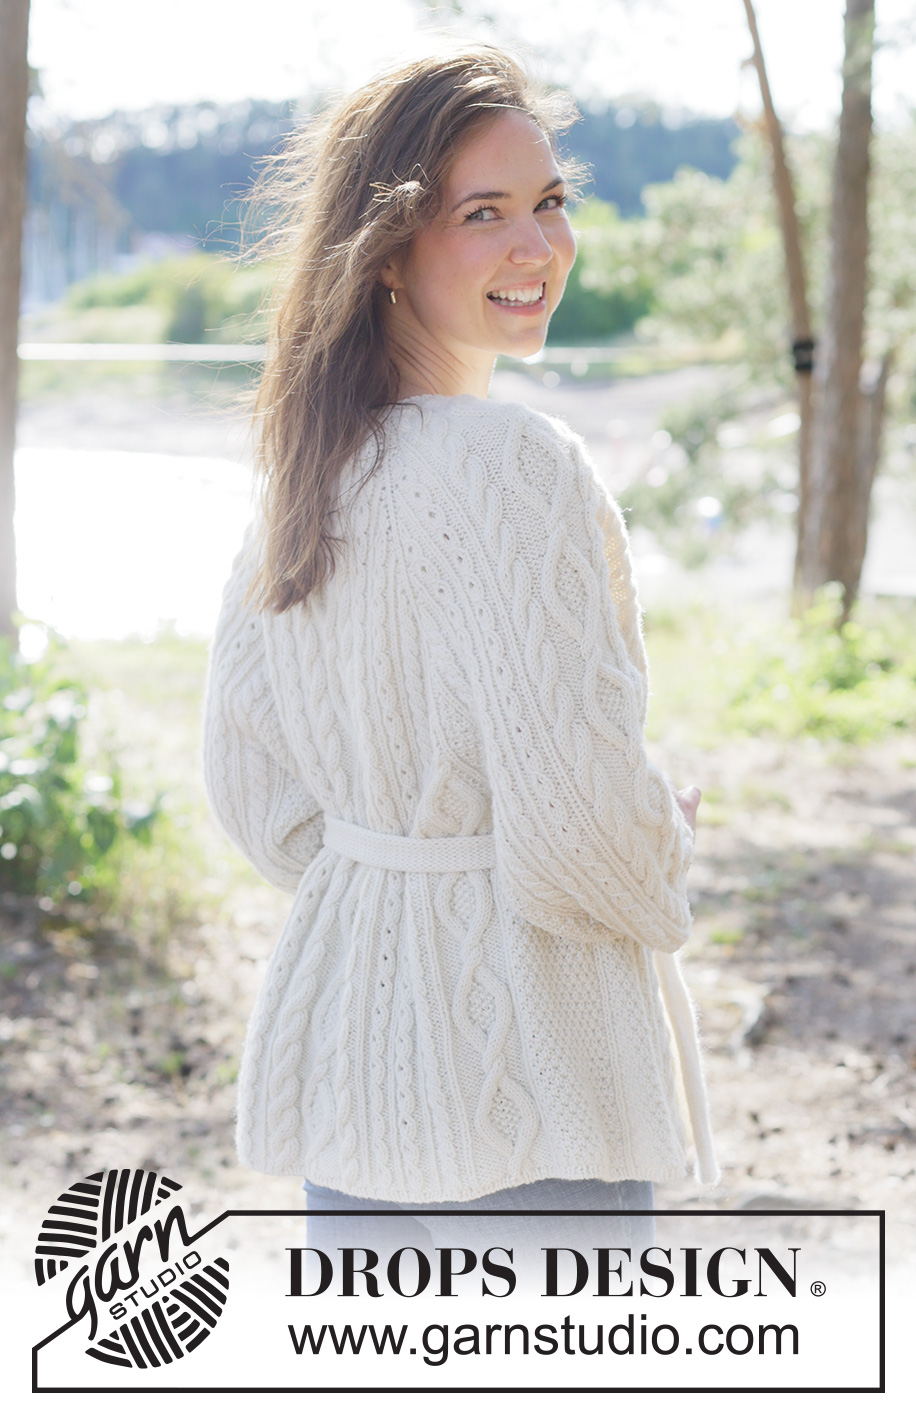
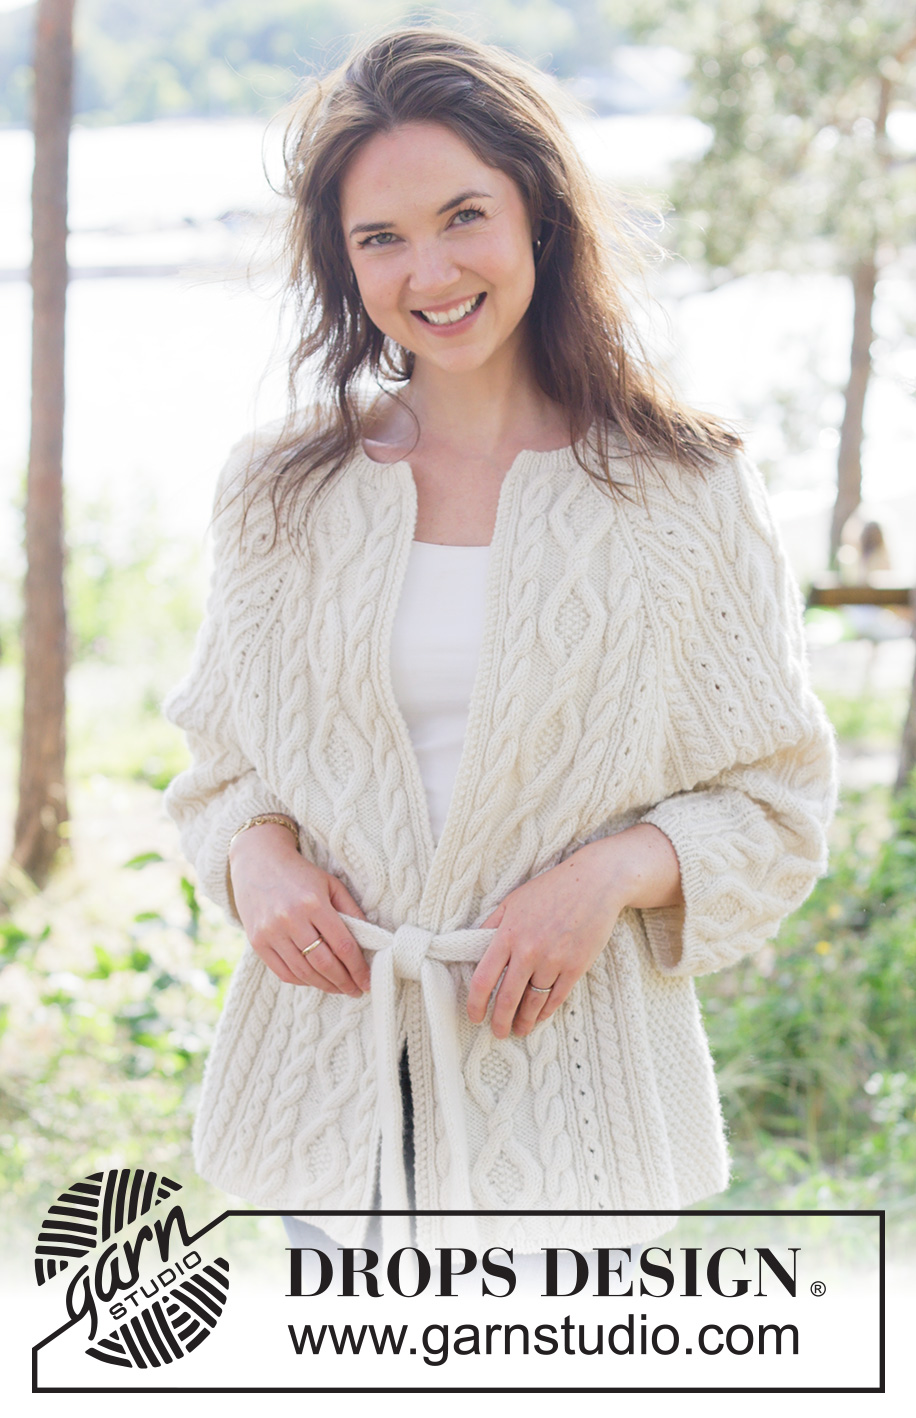
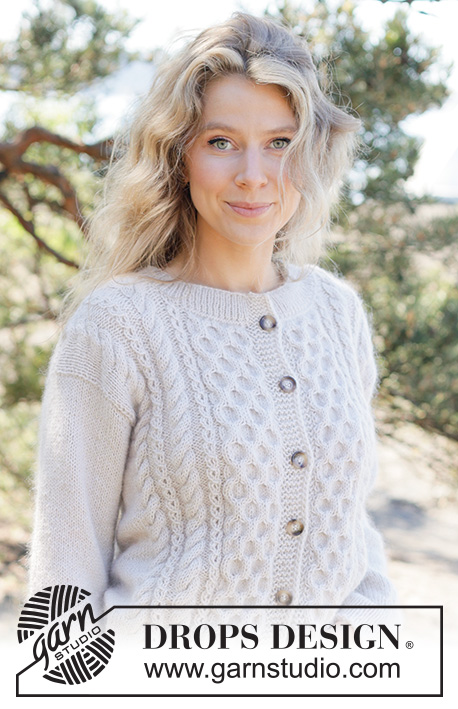
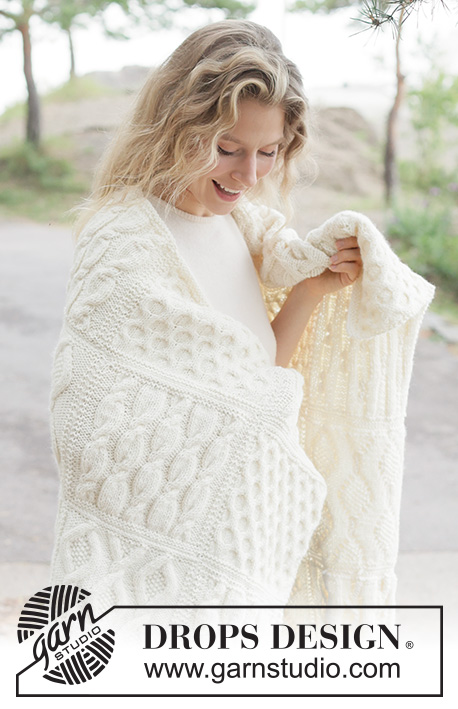
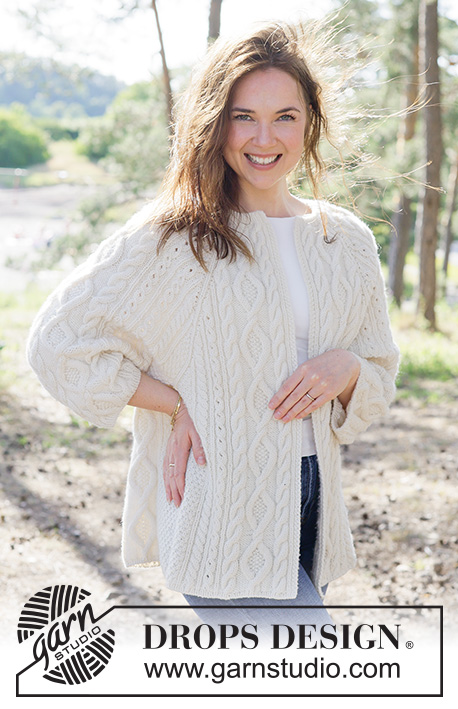
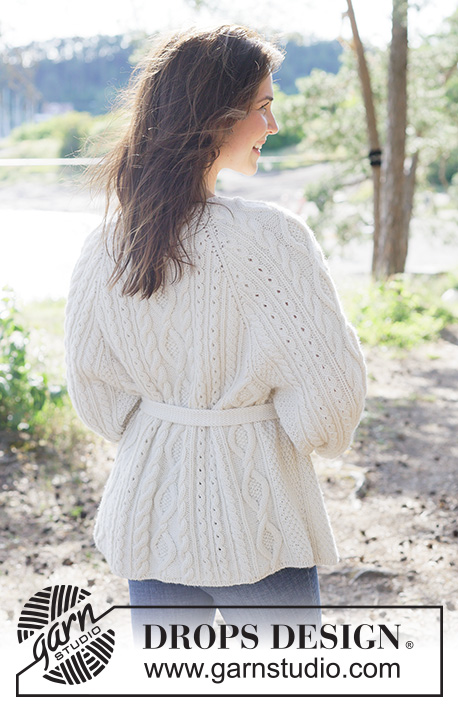
Braided Beauty Cardigan#braidedbeautycardigan |
||||||||||||||||||||||||||||||||||
 |
 |
|||||||||||||||||||||||||||||||||
Knitted jacket in DROPS Lima or DROPS Daisy. The piece is worked top down with raglan, cables, ¾-length sleeves and belt. Sizes XS - XXXL.
DROPS 262-23 |
||||||||||||||||||||||||||||||||||
|
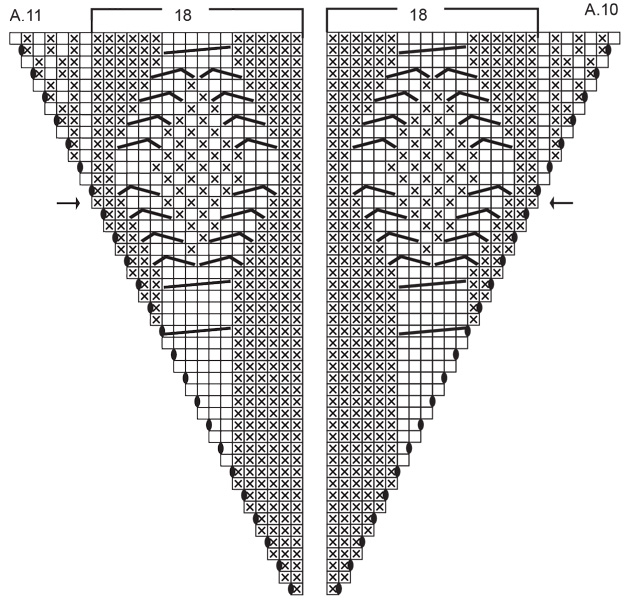
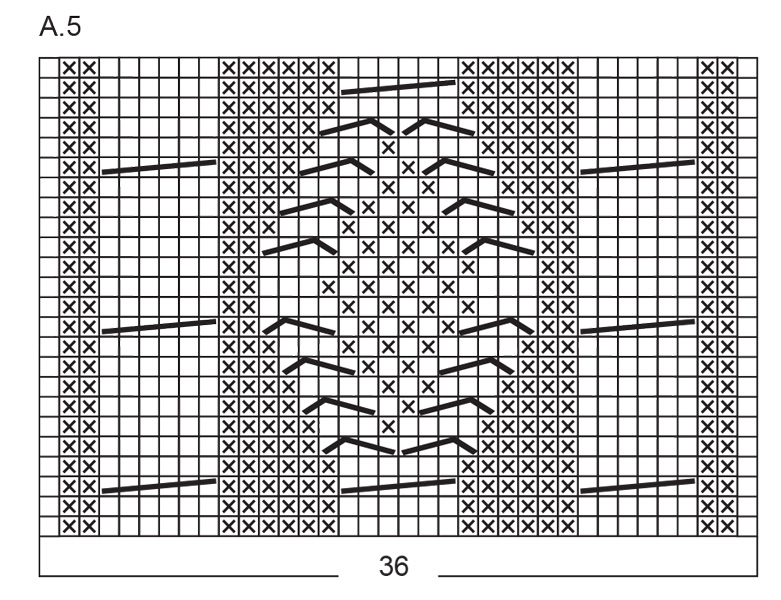
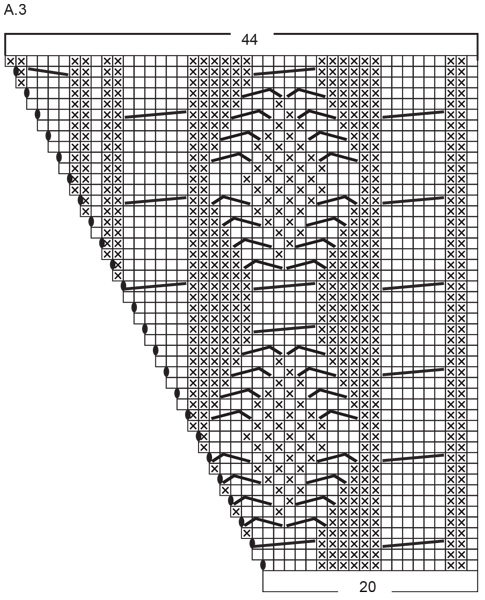
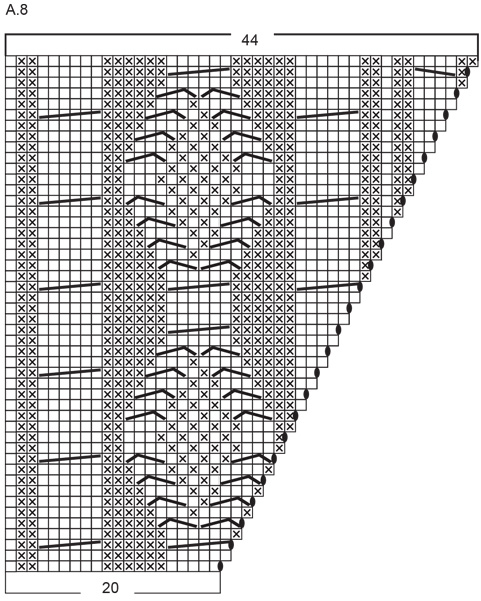
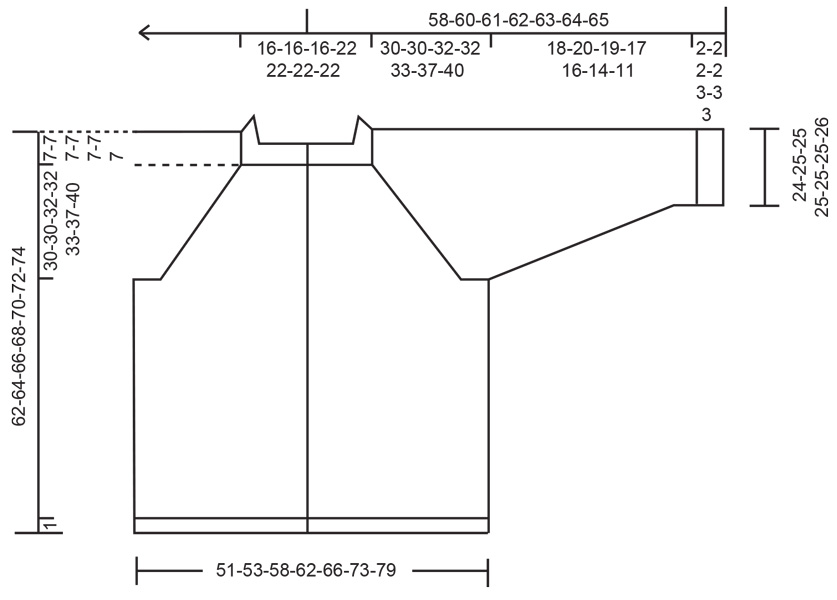
------------------------------------------------------- EXPLANATIONS FOR THE PATTERN: ------------------------------------------------------- BANDS: The jacket is worked with 3 stitches for bands. If you would like larger bands and buttons, cast on 5 extra stitches on each side and work them according to A.1. Work the buttonholes evenly on the band. PATTERN: See diagrams A.1 to A.14. The diagrams show the pattern from the right side. The diagrams are read from right to left when working from the right side and left to right when working from the wrong side. Due to the lace-cables, the stitch count will vary. Always count stitches without the decreased/increased stitches, i.e., the cable is always counted as 3 stitches. RAGLAN: Increase 1 stitch by making 1 yarn over, which is worked as follows on the next row: BEFORE RAGLAN-STITCH: Purl through the back loop to avoid a hole. Work the new stitch into the pattern. AFTER RAGLAN-STITCH: Slip the yarn over off the left needle and replace it the other way round (insert the left needle through the back when replacing it). Purl through the front loop to avoid a hole. Work the new stitch into the pattern. DECREASE TIP: Decrease 1 stitch on each side of the marker-stitch as follows: Work until there is 1 stitch left before the marker-stitch, knit/purl 3 together, depending on the pattern, the marker-stitch is the middle of these 3 stitches (2 stitches decreased). DOUBLE KNIT: ROW 1 (right side): * Slip the first/next stitch purl-wise with the strand in front, knit 1 *, work from *-* to end of row, turn. ROW 2 (wrong side): * Slip the first/next stitch purl-wise with the strand in front, knit 1 *, work from *-* to end of row, turn. Repeat ROWS 1 and 2. ------------------------------------------------------- START THE PIECE HERE: ------------------------------------------------------- JACKET – SHORT OVERVIEW OF THE PIECE. The pattern uses both long and short needles; start with the length which fits the number of stitches and change when necessary. The neck and yoke are worked back and forth with circular needle, from mid front and top down. When the yoke is finished, it is divided for body and sleeves and the body continued back and forth, while the sleeves wait. The sleeves are worked in the round, top down. If there is a «0» in your chosen size, skip the information and go straight to the next instruction. NECK: Cast on 121-125-131-137-143-149-155 stitches with circular needle size 2.5 mm and DROPS Lima or DROPS Daisy – read BANDS in explanations above. Work the first row from the right side as follows: Work A.1, purl1 (3 band-stitches), work rib (purl 1, knit 1) until there are 3 stitches left on the row, purl 1 and work A.1 (3 band-stitches). Continue this rib for 2-2-2-2-3-3-3 cm, finishing after a row from the right side. Purl 1 row from the wrong side (bands continued as before) and increase 57-53-47-73-67-61-55 stitches evenly spaced = 178-178-178-210-210-210-210 stitches. Due to the weight of the yarn, the neckline will stretch when worn. For a tighter neckline you can work a row of double crochets from the wrong side in the last row of neck (when the garment is finished). Insert 1 marker inside one band. The piece is now measured from here. YOKE: Change to circular needle size 4 mm. Insert 4 markers without working the stitches and each marker inserted into a knitted stitch. You increase for raglan on each side of the marker-stitch + 1 purled stitch on each side. These 3 stitches are called raglan-stitches The raglan increases are drawn into the diagrams. Count 23-23-23-31-31-31-31 stitches (= left front piece), count 3 stitches and insert 1 marker in the middle stitch (= raglan-stitches), count 40-40-40-40-40-40-40 stitches (= sleeve), count 3 stitches and insert 1 marker in the middle stitch (= raglan-stitches), count 40-40-40-56-56-56-56 stitches (= back piece), count 3 stitches and insert 1 marker in the middle stitch (= raglan-stitches), count 40-40-40-40-40-40-40 stitches (= sleeve), count 3 stitches and insert 1 marker in the middle stitch (= raglan-stitches). There are 23-23-23-31-31-31-31 stitches left after the last marker (= right front piece). Work PATTERN – read explanation above, with the bands as before, increasing for RAGLAN on each side of the raglan-stitches – read explanation above, working from the right side as follows: FRONT PIECE: Work A.1, purl 1 (= 3 band-stitches), work A.2 0-0-0-1-1-1-1 time, A.3, purl 1, knit 1, purl 1 (= 3 raglan-stitches). SLEEVE: Work A.4, A.5, A.7. BACK PIECE: Purl 1, knit 1, purl 1 (= 3 raglan-stitches), work A.4, A.2 0-0-0-1-1-1-1 time, A.5, work A.6 0-0-0-1-1-1-1 time, A.7, purl 1, knit 1, purl 1 (= 3 raglan-stitches). SLEEVE: Work A.4, A.5, A.7. FRONT PIECE: Purl 1, knit 1, purl 1 (= 3 raglan-stitches), work A.8, A.6 0-0-0-1-1-1-1 time, purl 1, A.1 (= 3 band-stitches). Continue this pattern, working the yarn overs as described in RAGLAN above. When A.3, A.4, A.6 and A.7 are finished in height there are 370-370-370-402-402-402-402 stitches: 47-47-47-55-55-55-55 stitches on each front piece, 88-88-88-104-104-104-104 stitches on the back piece, 88-88-88-88-88-88-88 stitches on each sleeve and 3 stitches in each raglan-line. Continue as follows from the right side: FRONT PIECE: Work A.1, purl 1 (= 3 band-stitches), continue the pattern until there are 8 stitches left before the 3 raglan-stitches, work A.9, work the raglan-stitches. SLEEVE: Work A.13, continue the pattern until there is 1 stitch left, work A.14. BACK PIECE: Work the raglan-stitches, A.10, continue the pattern until there is 1 stitch left before the raglan-stitches, work A.11, work the raglan-stitches. SLEEVE: Work A.13, continue the pattern until there is 1 stitch left, work A.14. FRONT PIECE: Work the raglan-stitches, A.12, continue the pattern until there are 3 stitches left, purl 1, A.1 (= 3 band-stitches). When A.9, A.12, A.13 and A.14 are finished in height (worked up to and including the row with an arrow in A.10/ A.11), there are 506-506-506-538-538-538-538 stitches: 64-64-64-72-72-72-72 stitches on each front piece, 122-122-122-138-138-138-138 stitches on the back piece, 122-122-122-122-122-122-122 stitches on each sleeve and 3 stitches in each raglan-line. In sizes XS, S and XL all the increases are finished. Go straight to ALL SIZES below. In sizes M, L, XXL and XXXL the sleeve-increases are finished but the increases on the body continue as follows: SIZES M-L-XXL-XXXL: Increase 4 stitches every 2nd row 0-0-3-0-4-10-15 times – do not increase on the sleeves, only on the front and back pieces. Work the yarn overs as described in RAGLAN. On the back piece, work the new stitches into A.10/A.11 until the diagrams are finished, then into the double moss stitch. On the front pieces work the new stitches into the double moss stitch. There are 506-506-518-538-554-578-598 stitches: 64-64-67-72-76-82-87 stitches on each front piece, 122-122-128-138-146-158-168 stitches on the back piece, 122-122-122-122-122-122-122 stitches on each sleeve and 3 stitches in each raglan-line. ALL SIZES: Continue the pattern and the bands until the yoke measures 30-30-32-32-33-37-40 cm from the marker mid-front. Now divide for the body and sleeves. DIVIDE FOR BODY AND SLEEVES: The piece is divided by the raglan-stitches as follows: Work 67-67-70-75-79-85-90 stitches as before (= front piece, and includes the raglan-stitches), place the next 122-122-122-122-122-122-122 stitches on a stitch holder for the sleeve, cast on 5-9-11-13-15-17-19 stitches (mid-under the sleeve), work 128-128-134-144-152-164-174 stitches as before (= back piece), place the next 122-122-122-122-122-122-122 stitches on a stitch holder for the sleeve, cast on 5-9-11-13-15-17-19 stitches (mid-under the sleeve), work the last 67-67-70-75-79-85-90 stitches as before (= front piece). The body and sleeves are finished separately. BODY: = 272-280-296-320-340-368-392 stitches. Continue the established pattern. A.2, A.6 and A.5 show a complete repeat of the pattern in height. Work the new stitches mid under sleeves in double moss stitch. Continue the pattern and bands until the piece measures 54-56-58-60-62-64-66 cm from the marker mid-front. Purl 1 row from the wrong side and increase 1 stitch (bands continued as before) = 273-281-297-321-341-369-393 stitches. On the next row from the right side, work rib as follows: Switch to circular needle size 2.5 mm and work band-stitches as before, (purl 1, knit 1) until there are 4 stitches left, purl 1 and work band-stitches as before. Work this rib back from the wrong side. Cast off with rib or work Italian cast-off. The jacket measures approx. 55-57-59-61-63-65-66 cm from the marker mid-front and 62-64-66-68-70-72-74 cm from the shoulder. SLEEVES: Place the 122-122-122-122-122-122-122 sleeve-stitches from one thread on circular needle size 4 mm and knit up 1 stitch in each of the 5-9-11-13-15-17-19 stitches cast on under the sleeve = 127-131-133-135-137-139-141 stitches. Insert a marker-thread in the middle of the 5-9-11-13-15-17-19 stitches under the sleeve, the round starts by the marker-thread. Continue the established pattern in the round with double moss stitch across the knitted-up stitches under the sleeve. A.2, A.6 and A.5 show a complete repeat of the pattern in height AT THE SAME TIME, when the sleeve measures 2 cm from the division, decrease mid-under the sleeve – read DECREASE TIP as follows: Decrease 2 stitches every 4½-4½-3½-3½-2½-2-1½ cm a total of 4-4-5-5-6-6-6 times = 119-123-123-125-125-127-129 stitches. Continue working until the sleeve measures 18-20-19-17-16-14-11 cm from the division. Change to double pointed needles size 2.5 mm. Work rib (knit 1, purl 1) for 2-2-2-2-3-3-3 cm. Cast off slightly loosely with rib or work Italian cast-off. The sleeve measures approx. 20-22-21-19-19-17-14 cm from the division. BELT: Cast on 16 stitches with double pointed needles size 4 mm. Work DOUBLE KNIT back and forth – read explanation above. When the belt measures 100-120 cm, knit all stitches together 2 and 2 = 8 stitches. Cast off. |
||||||||||||||||||||||||||||||||||
Diagram explanations |
||||||||||||||||||||||||||||||||||
|
||||||||||||||||||||||||||||||||||
 |
||||||||||||||||||||||||||||||||||
 |
||||||||||||||||||||||||||||||||||
 |
||||||||||||||||||||||||||||||||||
 |
||||||||||||||||||||||||||||||||||
 |
||||||||||||||||||||||||||||||||||
 |
||||||||||||||||||||||||||||||||||
 |
||||||||||||||||||||||||||||||||||
 |
||||||||||||||||||||||||||||||||||
 |
||||||||||||||||||||||||||||||||||
Have you finished this pattern?Tag your pictures with #dropspattern #braidedbeautycardigan or submit them to the #dropsfan gallery. Do you need help with this pattern?You'll find 32 tutorial videos, a Comments/Questions area and more by visiting the pattern on garnstudio.com. © 1982-2026 DROPS Design A/S. We reserve all rights. This document, including all its sub-sections, has copyrights. Read more about what you can do with our patterns at the bottom of each pattern on our site. |
||||||||||||||||||||||||||||||||||


With over 40 years in knitting and crochet design, DROPS Design offers one of the most extensive collections of free patterns on the internet - translated to 17 languages. As of today we count 324 catalogues and 12291 patterns translated into English (UK/cm). 12291
We work hard to bring you the best knitting and crochet have to offer, inspiration and advice as well as great quality yarns at incredible prices! Would you like to use our patterns for other than personal use? You can read what you are allowed to do in the Copyright text at the bottom of all our patterns. Happy crafting!
Post a comment to pattern DROPS 262-23
We would love to hear what you have to say about this pattern!
If you want to leave a question, please make sure you select the correct category in the form below, to speed up the answering process. Required fields are marked *.