
Popular categories
Looking for a yarn?


Comments / Questions (50)
![]() Niki wrote:
Niki wrote:
Follow up to my previous question, I found the answer to my chart reading question on your lessons. However, im a bit confused what to do with that extra stitch knitted from A1. The pattern mentions repeat the first stitch on A1. On the wrong side what do I do with that extra stitch? Should I carry on in moss stitch pattern?
09.04.2026 - 09:43DROPS Design answered:
Dear Nikki, from RS you finish with the first stith in A.1 to get a symmetrical pattern, so from WS work the last stitch A.1 reading from the left towards the right then repeat A.1, but basically yes you are working moss stitch pattern. Happy knitting!
09.04.2026 - 16:15
![]() Niki wrote:
Niki wrote:
Hi, I looked through the questions but I couldn't find what im looking for. When you knit from the wrong side, you read the chart left to right, but also do you start with A1 and then knit A2? Or stick with the A2 the A1 order? Does that apply throughout the pattern? Thank you! This is an ambitious project for me but I like learning like this.
09.04.2026 - 09:04DROPS Design answered:
Dear Niki, when you have to work from RS: A.2, then A.1 and the first stitch of A.1, from WS read the diagrams from the left towards the right and work the last stitch A.1 and work A.1 and A.2 (reading from the left towards the right). Happy knitting!
09.04.2026 - 16:14
![]() Elaine McParland wrote:
Elaine McParland wrote:
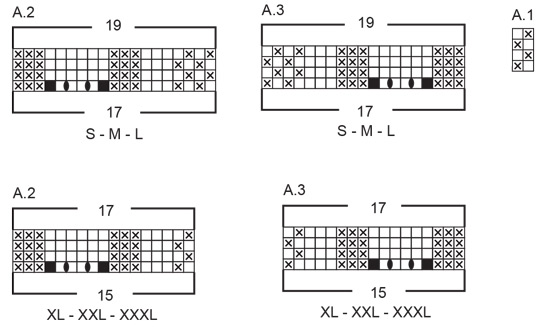
I am really struggling with this pattern. Left shoulder; cast on 22 stitches for medium size yet it tells me there are 24 stitches??? Weird! A2 I’m told to work 17 stitches from A2 yet the pattern shows 19 stitches. Line 5, black square says no stitch there but there clearly is a stitch there so what are we meant to do with it?! Very badly written pattern & Ive been knitting with Drops for years. Disappointed
01.02.2026 - 21:39DROPS Design answered:
Hi Elaine, On the left front shoulder you work A.2 across the first 17 stitches, then A.1 across the next 4 stitches and finally the first stitch in A.1 across the last stitch = 22 stitches. The diagrams are read bottom up (even when working top down), from right to left from the right side and left to right from the wrong side. Therefore, on the first row in A.2, you have: K1, P1, K3, P3, K1, 1 YO, K1, 1YO, K1 and P3. The black squares do not have stitches and the 2 YOs increase the stitch number to 19 stitches on each row from row 2 onwards. Regards, Drops Team.
02.02.2026 - 06:52
![]() Gro Anita wrote:
Gro Anita wrote:
Når kommer BILDE av bakstykket? Det er flere som har etterlyst det. Da bør det settes inn et, lettere å skjønne og se hvordan det skal være. -leser her i kommentarfeltet at det er flere som har spurt om det samme spørsmålet som jeg har stilt. Skal det gjentas fra 58 cm til 64 cm. Eller bare 1 rad først 58 cm, og neste ved 64 cm. Håper på snarlig BILDE og svar.
28.12.2025 - 21:23DROPS Design answered:
Hei Gro Anita. Om vi har hatt et bilde av bakstykket, ville det ha blitt lagt til, enten ved publisering eller ved 1. etterspørsel. Siden det ikke har blitt satt inn et bilde, har vi dessverre ingen bilder. Vi svarer så fort vi kan, men å stille et spørsmål en søndag (28. des.) og etterlyse svar noen timer senere er vel litt optimistisk :) Vi hverken jobber søndager eller i mellom julen, men se vårt svar til deg gitt tidligere i dag. mvh DROPS Design
12.01.2026 - 10:35
![]() Gro Anita Rannem wrote:
Gro Anita Rannem wrote:
Fra bakstykket når arb måler 58 cm(xxxl), skal det strikkes videre, ytterste 9 maskene helt til arb måler 64 cm? Eller bare den ene omg. Bilde av bakstykket nede
28.12.2025 - 18:08DROPS Design answered:
Hei Gro Anita. Litt vanskelig å tyde spørsmålet ditt, men når arbeidet (bakstykket) måler 58 cm, strikkes de ytterts 9 maskene i hver side som forklart i oppskriften til arbeidet måler 64 cm ( 3 masker i A.1, 2 rett, 2 vrang, 2 rett – de øvrige maskene fortsettes i A.1. til arbeidet måler 64 cm, ikke bare 1 pinne). Usikker på hva du mener med: Bilde av bakstykket nede. mvh DROPS Design
12.01.2026 - 10:04
![]() Melissa wrote:
Melissa wrote:
Jag undrar om jag ska klippa tråden och fästa den på ena axeln när jag sätter maskorna från höger och vänster axel på samma rundsticka och använda tråden från en av axlarna?
12.12.2025 - 16:10DROPS Design answered:
Hei Melissa. Jo, du kan klippe tråden på den siden du ikke vil bruke tråden lengre, fordi du bruker tråden på den andre siden når skuldrene strikkes sammen. mvh DROPS Design
15.12.2025 - 10:45
![]() Martine wrote:
Martine wrote:
Bonjour, Est ce possible d’avoir une photo du côté du chandail et du dos pour voir comment est construit l’ouverture de la fente et du début des côtes du dos? Merci à l’avance.
29.05.2025 - 18:45DROPS Design answered:
Bonjour Martine, nous n'avons pas d'autres photos de ce modèle et nous n'avons plus ce pullover désolée, toutefois, notez que le dos se tricote au point de riz (sans les torsades) - pour la fente des côtés, comme le dos est plus long que le devant, vous aurez une différence de hauteur (8 ou 10 cm devant et 14 ou 16 cm côté dos). Bon tricot!
30.05.2025 - 09:12
![]() Yvonne Van Rooij wrote:
Yvonne Van Rooij wrote:
Kunt u helpen met de mouwen? Steken opzetten en 1 steek over het armsgat? Tricotsteek heen en weer, samenvoegen en eindig met breien in de rondte? Ik kom hier niet uit, bvd
11.02.2025 - 12:10DROPS Design answered:
Dag Yvonne,
Je neemt steken op langs het armsgat van de panden en je neemt op vlak naast de buitenste steek van die rand. Dan brei je eerst heen en weer op de naald. Daarna brei je verder in de rondte.
11.02.2025 - 20:46
![]() Yvonne Van Rooij wrote:
Yvonne Van Rooij wrote:
Hallo, ik begrijp de uitleg mouwen niet. Ik lees: Steken opnemen, heen en weer breien, samenvoegen? En stoppen met rondbreien?. Kunt u het uitleggen?
10.02.2025 - 16:33Gina Herman wrote:
Pourquoi faire si compliqué? J airais aimé un modele traditionnel commencé par le bas serait il possible de le recevoir? Merci
17.01.2025 - 18:56DROPS Design answered:
Bonjour Mme Herman, retrouvez ici tous nos modèles de pulls tricotés de bas en haut, n'hésitez pas à ajouter des filtres si besoin. Bon tricot!
20.01.2025 - 07:28
|
||||||||||||||||||||||||||||
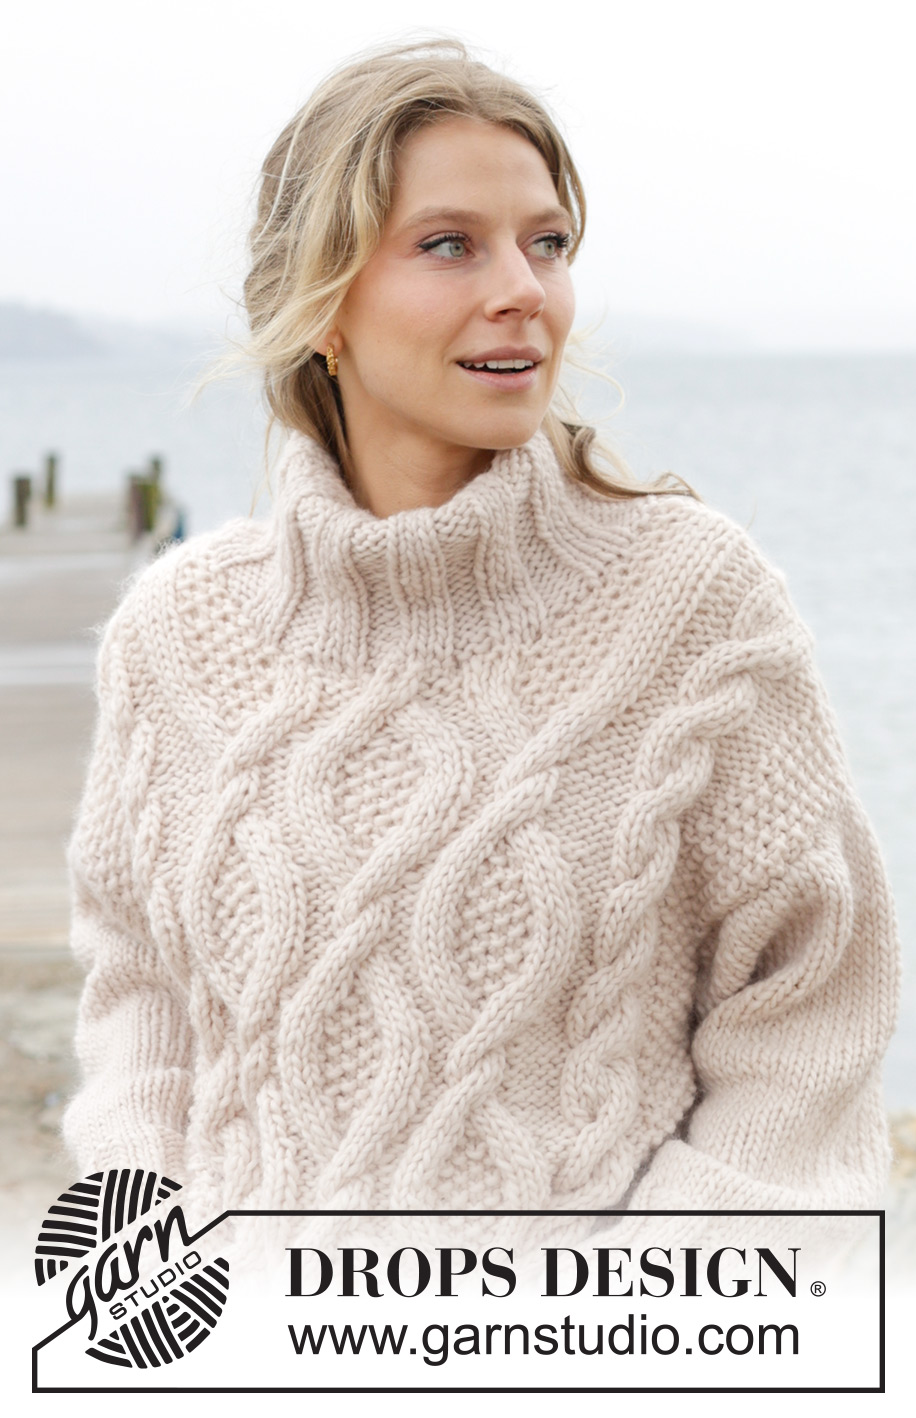
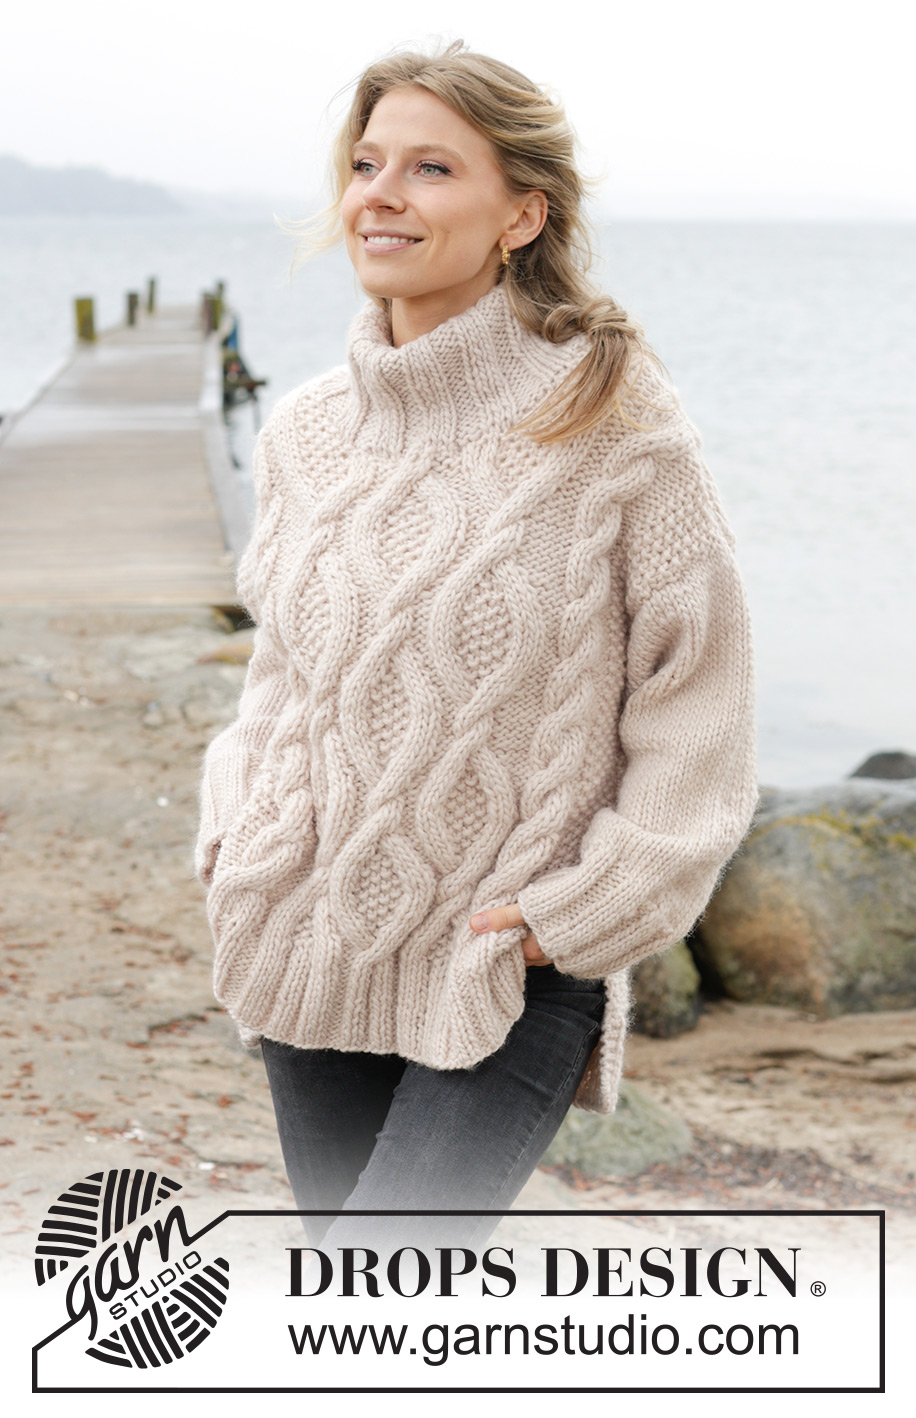
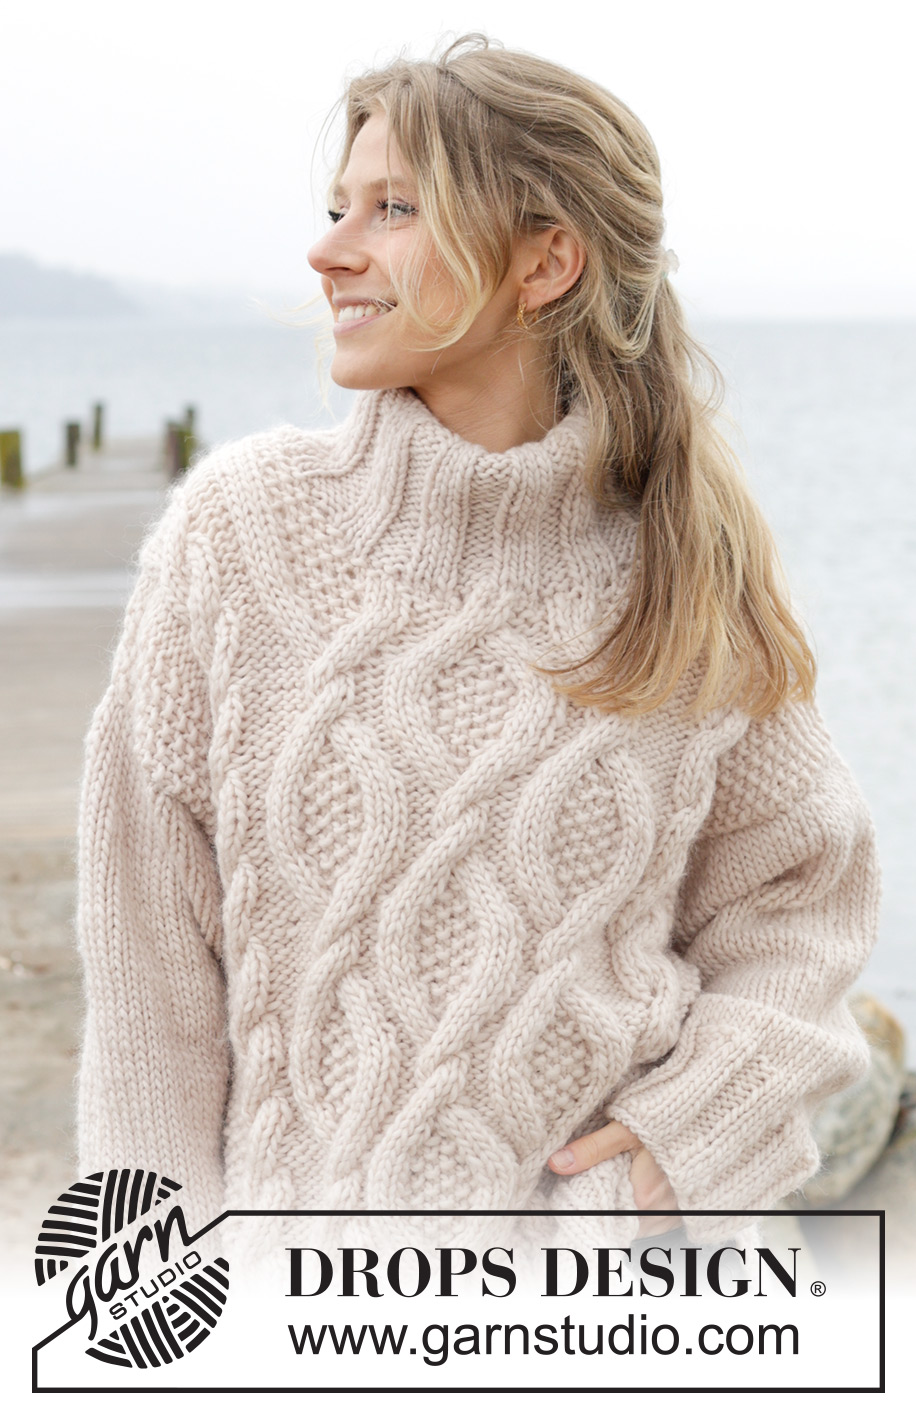
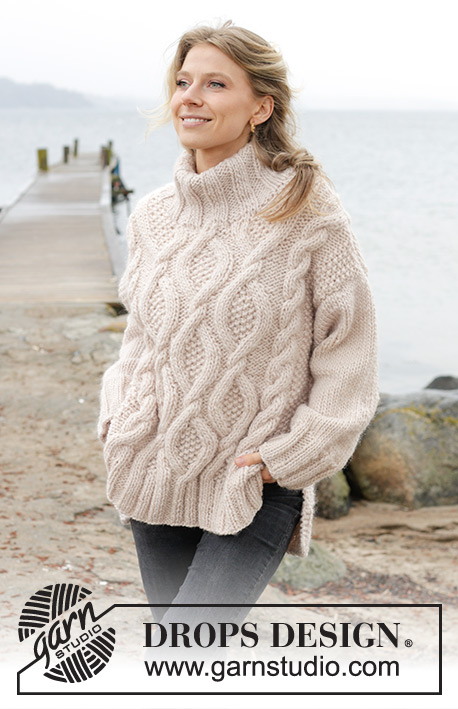
Cable Beach Sweater#cablebeachsweater |
||||||||||||||||||||||||||||
 |
 |
|||||||||||||||||||||||||||
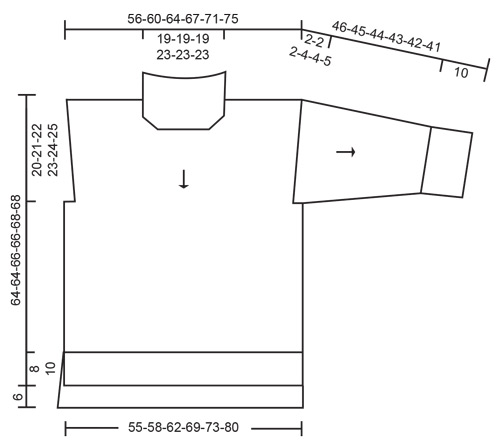
Knitted over-sized jumper in DROPS Snow. The piece is worked top down with cables, split in sides and double neck. Sizes S - XXXL.
DROPS 243-23 |
||||||||||||||||||||||||||||
|
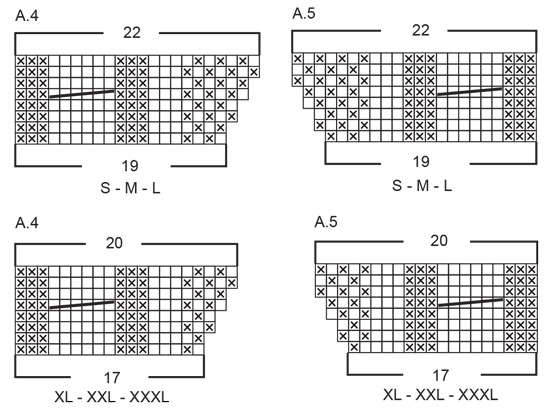
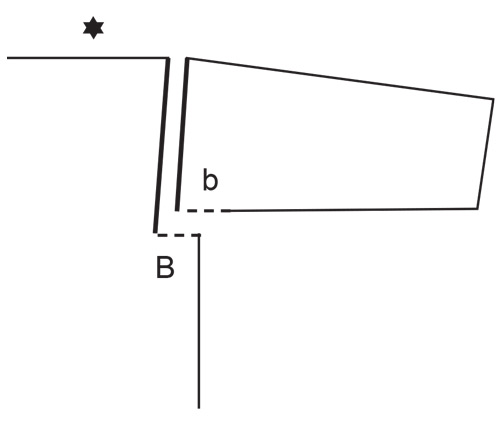
------------------------------------------------------- EXPLANATIONS FOR THE PATTERN: ------------------------------------------------------- PATTERN: See diagrams A.1 to A.7. Choose diagram for your size (applies to A.2 – A.5). The diagrams show all rows in the pattern from the right side. DECREASE TIP-1 (for armholes on back piece): Decrease 1 stitch outermost on each side by working the outermost 2 stitches together. The stitches are knitted together if the next/last stitch is purled or purled together if the next/last stitch is knitted. DECREASE TIP-2: Start 3 stitches before the marker-thread, knit 2 together, knit 2 (marker-thread sits between these 2 stitches), slip 1 stitch knit-wise, knit 1 and pass the slipped stitch over the knitted stitch (2 stitches decreased). ------------------------------------------------------- START THE PIECE HERE: ------------------------------------------------------- JUMPER – SHORT OVERVIEW OF THE PIECE: The front piece is worked top down, with moss stitch and cables. The back piece is worked top down with moss stitch. The back piece is 6 cm longer than the front piece. Stitches are knitted up along the armholes and the sleeves are worked in the round with double pointed needles/short circular needle, top down in stocking stitch. The edges are worked in rib. Pieces are sewn together as explained below. The high neck is worked in the round to finish. FRONT PIECE: Start with the left shoulder (when the garment is worn), then work the right shoulder before the two are joined together for the front piece. LEFT SHOULDER: Cast on 20-22-24-24-26-28 stitches with circular needle size 8 mm and DROPS Snow. Purl 1 row from the wrong side. Work as follows from the right side: A.2 over the first 17-17-17-15-15-15 stitches, A.1 over the next 2-4-6-8-10-12 stitches and work the first stitch in A.1. There are 22-24-26-26-28-30 stitches. Continue the pattern. When A.2 is finished, possibly repeat the last 2 rows in A.2 until the piece measures 3-3-4-3-4-5 cm from the cast-on edge. Work as follows from the right side: A.4 over the first 19-19-19-17-17-17 stitches, continue A.1 over the last 3-5-7-9-11-13 stitches. Continue this pattern. AT THE SAME TIME, cast on stitches for the neckline at the end of each row from the wrong side as follows: 1 stitch 3 times, then cast on 16-16-16-20-20-20 stitches at the end of the last row = 41-43-45-49-51-53 stitches. Lay the piece to one side and work the right shoulder. RIGHT SHOULDER: Cast on 20-22-24-24-26-28 stitches with circular needle size 8 mm and DROPS Snow. Purl 1 row from the wrong side. Work as follows from the right side: A.1 over the first 2-4-6-8-10-12 stitches, work the first stitch in A.1, work A.3 over the last 17-17-17-15-15-15 stitches. There are 22-24-26-26-28-30 stitches. Continue the pattern. When A.3 is finished, repeat possibly the last 2 rows in A.3 until the piece measures 3-3-4-3-4-5 cm from the cast-on edge. Work as follows from the right side: Continue A.1 over the first 3-5-7-9-11-13 stitches, work A.5 over the last 19-19-19-17-17-17 stitches and cast on 1 stitch for the neckline at the end of the first row from the right side. Continue the pattern. AT THE SAME TIME, cast on stitches for the neckline at the end of each row from the right side as follows: 1 stitch 2 times = 25-27-29-29-31-33 stitches. When A.5 is finished (last row is from the wrong side), join the 2 shoulders together for the front piece. FRONT PIECE: Place the stitches from both shoulders on circular needle size 8 mm (the 16-16-16-20-20-20 cast-on stitches are for the neckline mid-front) = 66-70-74-78-82-86 stitches. Work as follows from the right side: Continue A.1 over the first 3-5-7-9-11-13 stitches, purl over purl and knit over knit across the next 15 stitches, A.1 over the middle 30 stitches (making sure you continue the pattern correctly over A.4 and A.5), knit over knit and purl over purl across the next 15 stitches and continue A.1 over the last 3-5-7-9-11-13 stitches. Work this pattern back from the wrong side. Now start cabling mid-front from the right side: Continue A.1 over the first 3-5-7-9-11-13 stitches, work A.6A, A.6B, A.6C and continue A.1 over the last 3-5-7-9-11-13 stitches. Continue this pattern. REMEMBER THE KNITTING TENSION! When the piece measures 20-21-22-23-24-25 cm from the cast-on edge on the shoulder, cast on 2-2-2-4-4-6 stitches for the armholes at the end of the next 2 rows = 70-74-78-86-90-98 stitches. Work the new stitches in A.1 (= 5-7-9-13-15-19 stitches in A.1 on each side of A.6). Continue until A.6 has been worked 3 times in height. The piece measures approx. 56-56-57-56-57-58 cm from the cast-on edge on the shoulder. Continue working until the piece measures 56-56-58-56-58-58 cm, i.e., in sizes L and XXL you can work 2 or 4 more rows at the beginning of A.6, finishing after a row from the wrong side – AT THE SAME TIME, on the last row from the wrong side (all sizes), increase 4-2-4-4-2-2 stitches evenly over both the first 5-7-9-13-15-19 and the last 5-7-9-13-15-19 stitches = 78-78-86-94-94-102 stitches. Change to circular needle size 6 mm. Work rib back and forth as follows: A.1 over the first 3 stitches, * knit 2, purl 2 *, work from *-* 1-1-2-3-3-4 times in total, knit 2, A.7A, A.7B, A.7C, * knit 2, purl 2 *, work from *-* 1-1-2-3-3-4 times in total, knit 2, A.1 over the last 3 stitches. Continue this rib for 8-8-8-10-10-10 cm. Cast off a little loosely. The front piece measures approx. 64-64-66-66-68-68 cm from the shoulder. BACK PIECE: Start with the left shoulder (when the garment is worn), then the right shoulder before the two are joined together for the back piece. LEFT SHOULDER: Cast on 20-22-24-24-26-28 stitches with circular needle size 8 mm and DROPS Snow. Purl 1 row from the wrong side. Then work A.1 back and forth over all stitches. When the piece measures 3 cm, and the next row is from the right side, cast on 2 stitches for the neckline at the end of the row = 22-24-26-26-28-30 stitches. Work back from the wrong side. Lay the piece to one side and work the right shoulder. RIGHT SHOULDER: Cast on 20-22-24-24-26-28 stitches with circular needle size 8 mm and DROPS Snow. Purl 1 row from the wrong side. Then work A.1 back and forth over all stitches but start A.1 with purl 1 (so the pattern fits after stitches are cast on for the neckline mid-back). When the piece measures 2 cm and the next row is from the wrong side, cast on for the neckline at the end of each row from the wrong side as follows: 2 stitches 1 time and 17-17-17-21-21-21 stitches 1 time = 39-41-43-47-49-51 stitches. Now join the 2 shoulders together for the back piece. BACK PIECE: Place the stitches from both shoulders on circular needle size 8 mm (the 17-17-17-21-21-21 cast-on stitches = neckline mid-back) = 61-65-69-73-77-81 stitches. Start from the right side and continue A.1 back and forth over all stitches, with knit over purl and purl over knit. When the piece measures 6-5-7-6-8-6 cm from the cast-on edge, decrease 1 stitch on each side – read DECREASE TIP-1. Decrease like this every 6-5-7-6-8-6 cm a total of 2-3-2-3-2-3 times = 57-59-65-67-73-75 stitches. NOTE: This gives the back piece the same shape as the front piece. When the piece measures 20-21-22-23-24-25 cm from the cast-on edge on the shoulder, cast on 2-2-2-4-4-6 stitches for the armholes at the end of the next 2 rows = 61-63-69-75-81-87 stitches. Work the new stitches in A.1. When the piece measures 56-58-58-56-58-58 cm, work the outermost 9 stitches on each side as follows from the right side: 3 stitches in A.1, knit 2, purl 2, knit 2 – the other stitches are continued in A.1. When the piece measures 62-62-64-62-64-64 cm, work as follows from the right side: 3 stitches in A.1, knit 2, purl 2, knit 2, stocking stitch over the next 43-45-51-57-63-69 stitches and increase 26-30-30-30-30-36 stitches evenly over these stitches, knit 2, purl 2, knit 2, A.1 over the last 3 stitches = 87-93-99-105-111-123 stitches. Change to circular needle size 6 mm and work as follows from the wrong side: 3 stitches in A.1, purl 2, knit 2, purl 2, * knit 3, purl 3 *, work from *-* a total of 11-12-13-14-15-17 times, knit 3, purl 2, knit 2, purl 3, 3 stitches in A.1. Continue this rib for 8-8-8-10-10-10 cm. Cast off a little loosely. The back piece measures approx. 70-70-72-72-74-74 cm. ASSEMBLY-1: Sew the shoulder seams inside the cast-on edge. SLEEVES: Use short circular needle size 8 mm and DROPS Snow. Knit up 44-46-48-50-52-54 stitches from the right side, inside 1 stitch along the armhole. Work stocking stitch back and forth for 2-2-2-4-4-5 cm. Now join the sleeve and finish working in the round. Insert 1 marker-thread mid-under the sleeve and allow it to follow your work onwards. When the sleeve measures 6-6-6-8-7-8 cm from the knitted-up stitches, decrease 2 stitches under the sleeve – read DECREASE TIP-2. Decrease like this every 6-6-4½-4½-3½-3½ cm a total of 5-5-6-6-7-7 times = 34-36-36-38-38-40 stitches. Work until the sleeve measures 36-35-34-33-32-31 cm. There is 10 cm left; try the jumper on and work to desired length. Knit 1 round and increase 14-12-18-16-16-20 stitches evenly spaced = 48-48-54-54-54-60 stitches. Change to double pointed needles size 6 mm. Work rib (knit 3, purl 3) for 10 cm. Cast off a little loosely. Work the other sleeve in the same way. ASSEMBLY-2: Sew the side seams in the outermost loop of the outermost stitch – starting at the armhole and working as far as the rib on the front piece (split of 8-8-8-10-10-10 cm on the front piece and 14-14-14-16-16-16 cm on the back piece). Sew the openings under each sleeve – see sketch. NECK: Use short circular needle size 6 mm and DROPS Snow. Knit up from the right side 72-72-78-84-84-90 stitches, inside 1 edge stitch, around the neckline (stitch number must be divisible by 6). Work rib in the round (knit 3, purl 3) for 20-20-20-22-22-22 cm. Cast off a little loosely. Fold the neck double to the inside and fasten with a couple of stitches on each shoulder. |
||||||||||||||||||||||||||||
Diagram explanations |
||||||||||||||||||||||||||||
|
||||||||||||||||||||||||||||
 |
||||||||||||||||||||||||||||
 |
||||||||||||||||||||||||||||
 |
||||||||||||||||||||||||||||
 |
||||||||||||||||||||||||||||
 |
||||||||||||||||||||||||||||
Have you finished this pattern?Tag your pictures with #dropspattern #cablebeachsweater or submit them to the #dropsfan gallery. Do you need help with this pattern?You'll find 30 tutorial videos, a Comments/Questions area and more by visiting the pattern on garnstudio.com. © 1982-2026 DROPS Design A/S. We reserve all rights. This document, including all its sub-sections, has copyrights. Read more about what you can do with our patterns at the bottom of each pattern on our site. |
||||||||||||||||||||||||||||


With over 40 years in knitting and crochet design, DROPS Design offers one of the most extensive collections of free patterns on the internet - translated to 17 languages. As of today we count 324 catalogues and 12290 patterns translated into English (UK/cm). 12290
We work hard to bring you the best knitting and crochet have to offer, inspiration and advice as well as great quality yarns at incredible prices! Would you like to use our patterns for other than personal use? You can read what you are allowed to do in the Copyright text at the bottom of all our patterns. Happy crafting!
Post a comment to pattern DROPS 243-23
We would love to hear what you have to say about this pattern!
If you want to leave a question, please make sure you select the correct category in the form below, to speed up the answering process. Required fields are marked *.