
Popular categories
Looking for a yarn?


Comments / Questions (85)
![]() Sticka wrote:
Sticka wrote:
Hej! Vilken storlek bär modellen på bilden? ☺️
30.09.2025 - 21:37
![]() Chobelet Marie Chantal wrote:
Chobelet Marie Chantal wrote:
J’aimerais faire ce pull mais je ne sais pas tricoter avec des aiguilles circulaire, comment faire avec des aiguilles droite ? Merci bonne journée
26.09.2025 - 11:24
![]() Chobelet M Chantal wrote:
Chobelet M Chantal wrote:
Je cherche des modèles avec aiguilles droites
25.09.2025 - 10:54DROPS Design answered:
Bonjour Mme Chobelet, nombre de nos modèles peuvent être facilement adaptés pour aiguilles droites; vous trouverez ici quelques astuces. Bon tricot!
26.09.2025 - 07:30
![]() Isabelle wrote:
Isabelle wrote:
Bonjour je voudrais réaliser le modèle infusion en rose taille s comment savoir combien commander de pelote merci
13.09.2025 - 19:30DROPS Design answered:
Bonjour Isabelle, vous trouverez la quantité pour chaque taille sous l'onglet "Explications" en haut de page; si vous voulez le tricoter avec une seule couleur, additionnez les couleurs, il vous en faudra probablement un peu moins. Votre magasin pourra vous assister si besoin, même par mail ou téléphone. Bon tricot!
15.09.2025 - 08:10
![]() Anita wrote:
Anita wrote:
Har dere oppskrift på at genseren strikkes nedenfra og opp? Jeg liker ikke å begynne øverst oppe på en genser, det blir uoversiktlig og rotete
25.08.2025 - 08:25DROPS Design answered:
Hej Anita. Nej det har vi dessvärre inte. Mvh DROPS Design
26.08.2025 - 12:01
![]() Emma wrote:
Emma wrote:
Bonjour, j'aimerais tricoter ce pull mais d'une couleur unie, combien de gramme de drops-kid-silk je vais avoir besoin ? Bonne journée
14.08.2025 - 16:15DROPS Design answered:
Bonjour Emma, vous pouvez additionner le poids de chaque couleur pour avoir le poids total nécessaire, comme on tricote ici des rayures, il vous en faudra peut-être un peu moins, mais comme ce pull a été tricoté ainsi, nous avons pas le poids exact avec une seule couleur (et nous ne l'avons plus). Votre magasin pourra vous aider si besoin, même par mail ou téléphone. Bon tricot!
15.08.2025 - 07:34
![]() Ingeborg wrote:
Ingeborg wrote:
Het aantal bollen klopt niet, en heb moeten bij bestellen
05.08.2025 - 14:06
![]() Esther wrote:
Esther wrote:
Er staat in het patroon: Meerder tegelijkertijd NA de markeerdraad op het begin van de naald (aan de goede kant gezien) Maar bij tips voor meerderen aan de goede kant: Meerder richting rechts VOOR DE MARKEERDRAAD: Richting rechts op de goede kant is toch het begin van de naald? Ik snap dit niet. Terwijl in het patroon staat:
04.08.2025 - 18:48DROPS Design answered:
Dag Esther,
Als het goed is staat bij tip voor het meerderen ook hoe je na de markeerdraad moet meerderen. Dus bij tip voor het meerderen kies je wat op dat moment van toepassing is in het patroon.
09.08.2025 - 18:18
![]() Johanna Liljedahl wrote:
Johanna Liljedahl wrote:
Hej. Om jag vill sticka denna i baby merino hur ska jag då räkna? Är det bara att räkna på längd?
16.05.2025 - 19:54DROPS Design answered:
Hej Johanna, brug vores omregner, vælg DROPS Kid-Silk, vælg 275g (mindste størrelse), vælg 1 tråd, så får du et alternativ op med 629g DROPS Baby Merino, du fordeler det naturligvis som med Kid-Silk ifølge opskriften :)
21.05.2025 - 14:08
![]() Anita Norbäck wrote:
Anita Norbäck wrote:
Tack för snabbt svar Anita
11.02.2025 - 11:32
|
||||||||||
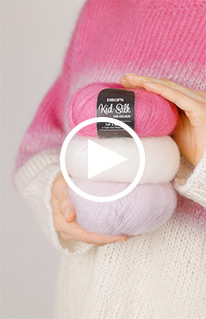
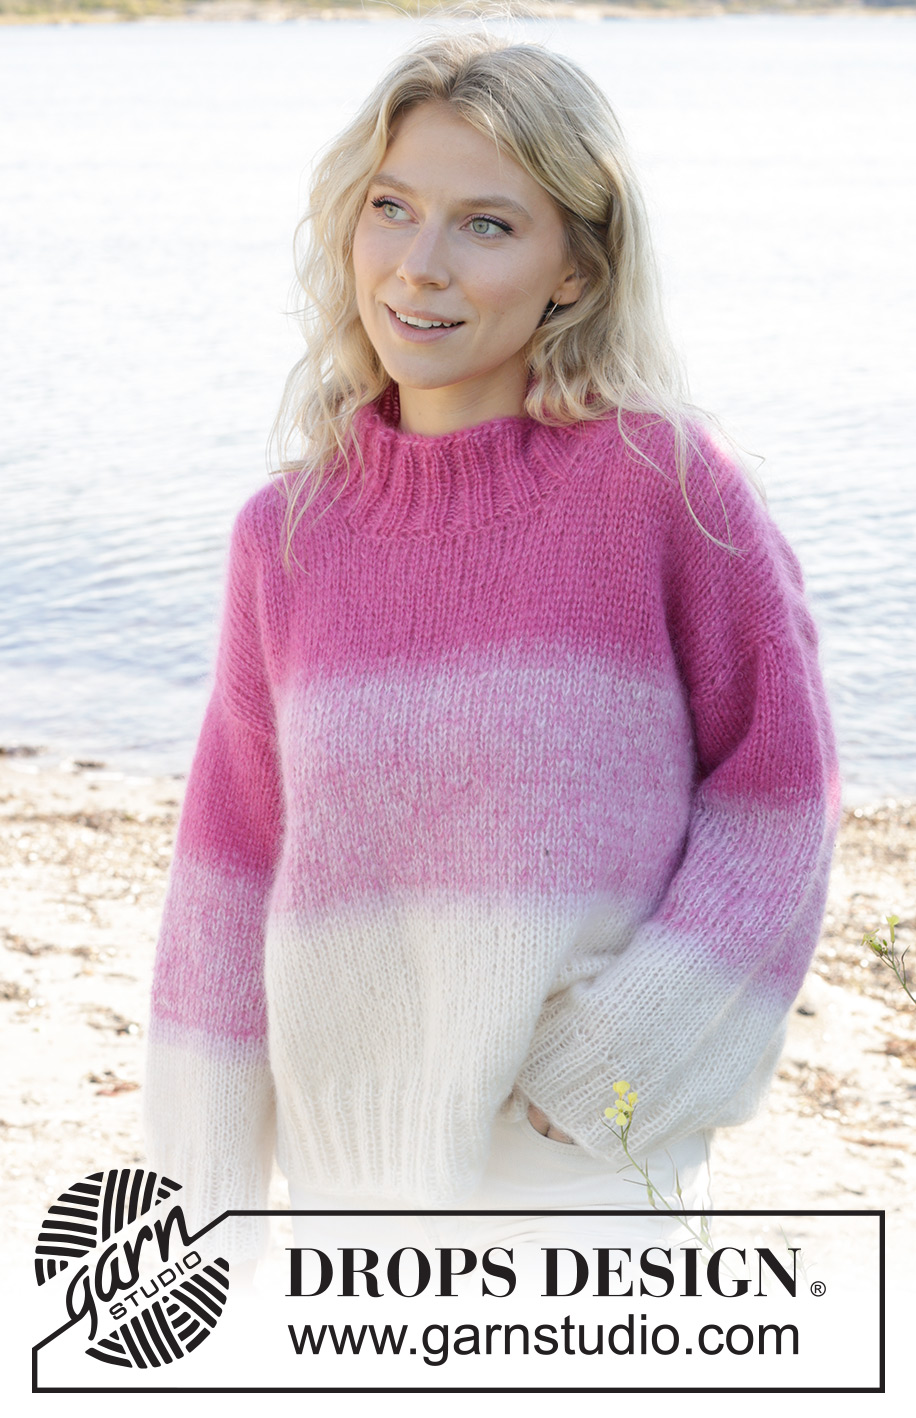
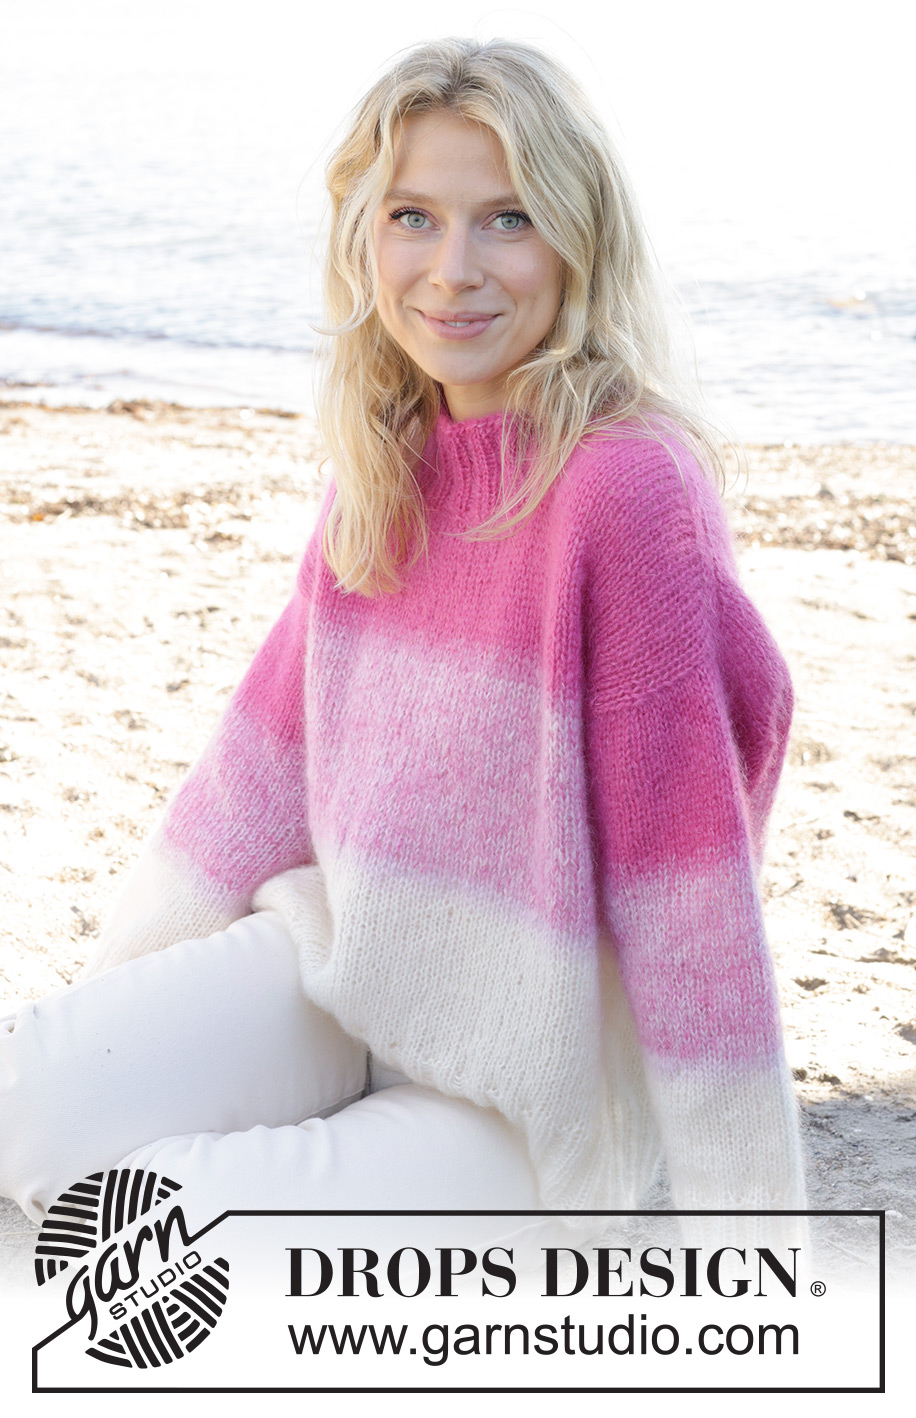
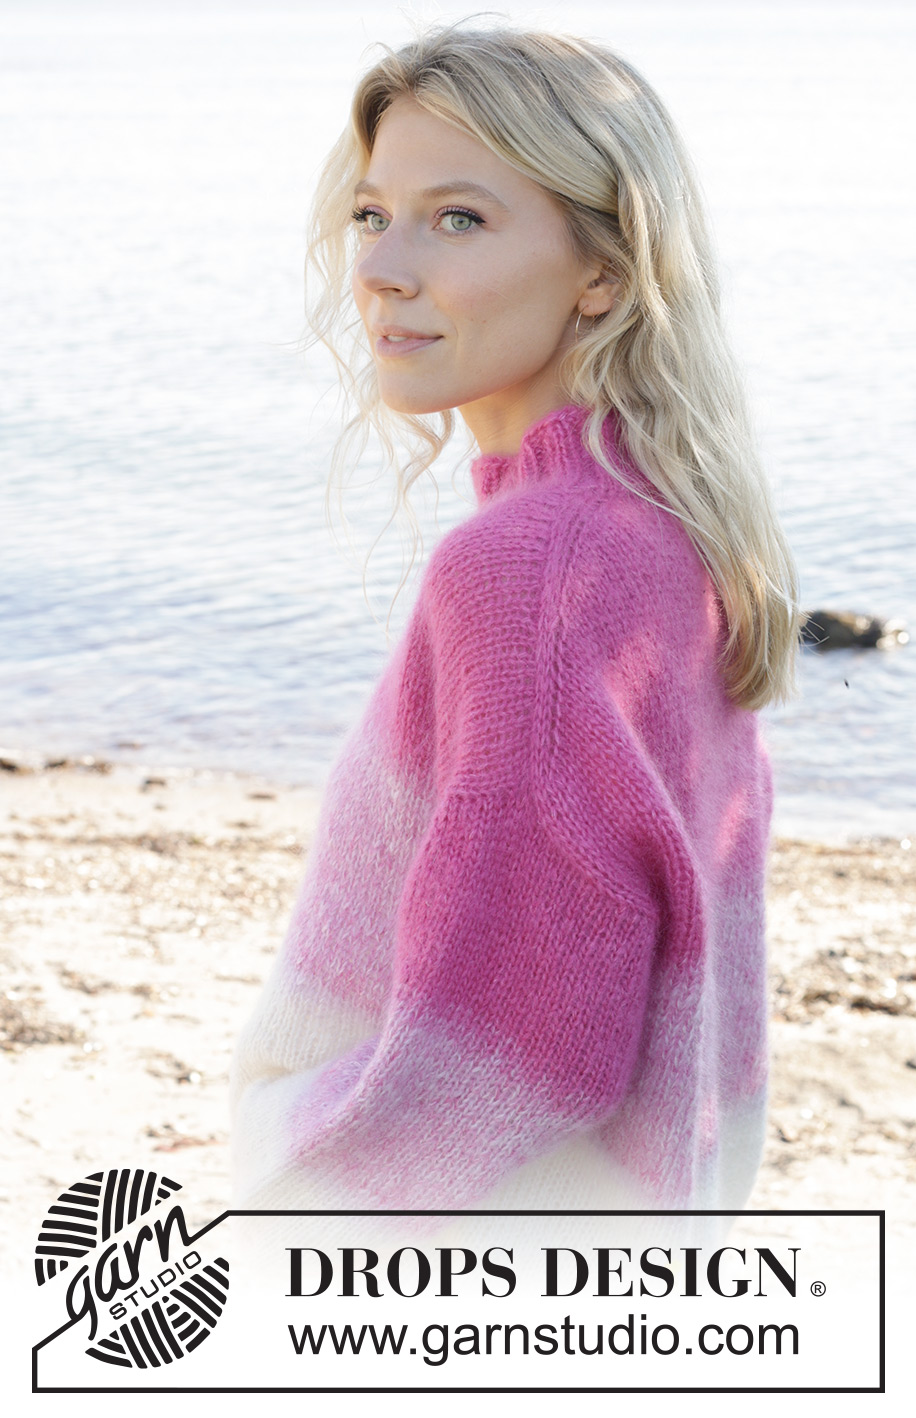
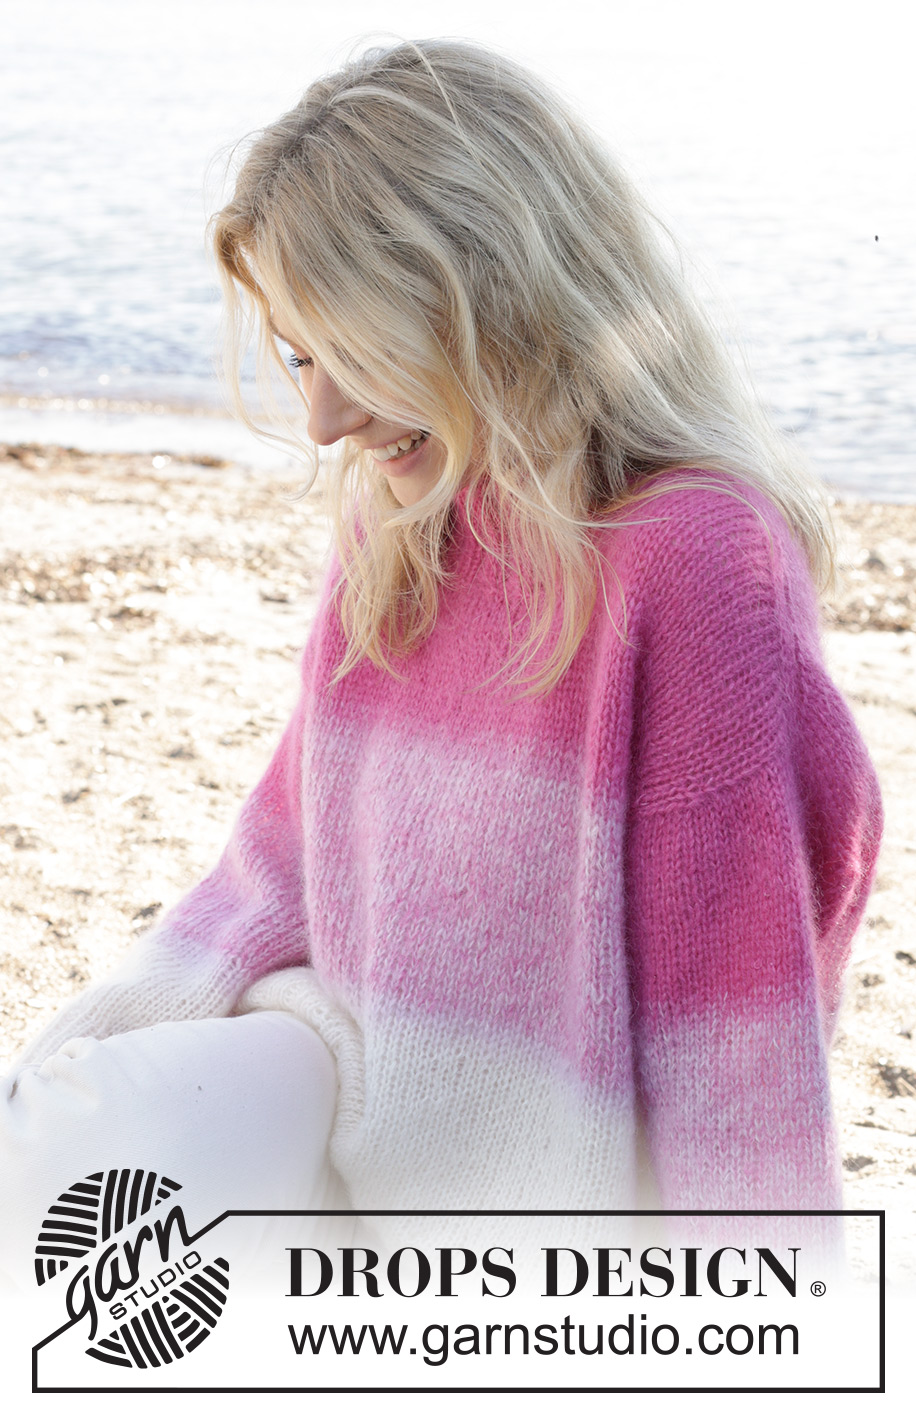
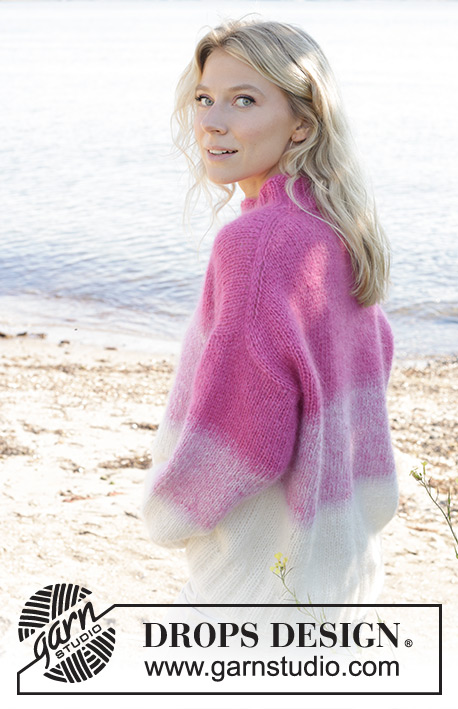
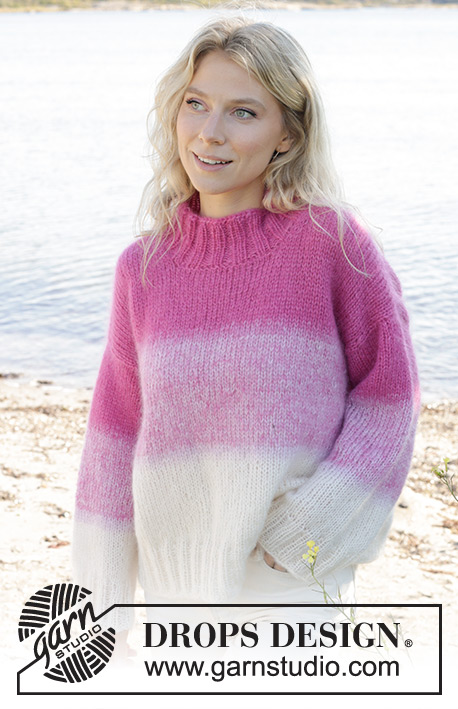
Pink Infusion#pinkinfusionsweater |
||||||||||
 |
 |
|||||||||
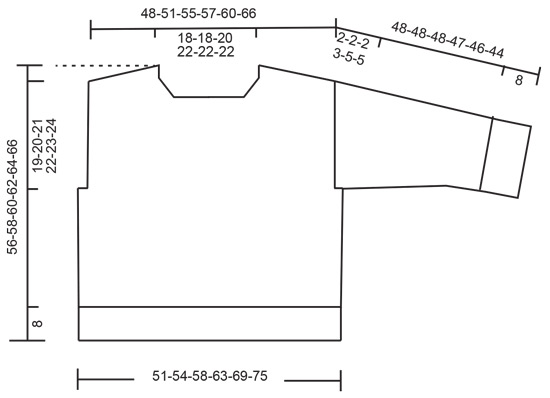
Knitted jumper in 4 strands DROPS Kid-Silk. The piece is worked top down with diagonal/European shoulders and stripes. Sizes XS - XXL.
DROPS 240-1 |
||||||||||
|
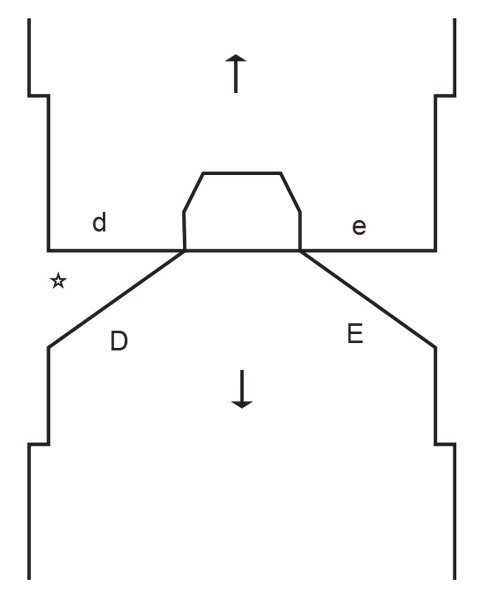
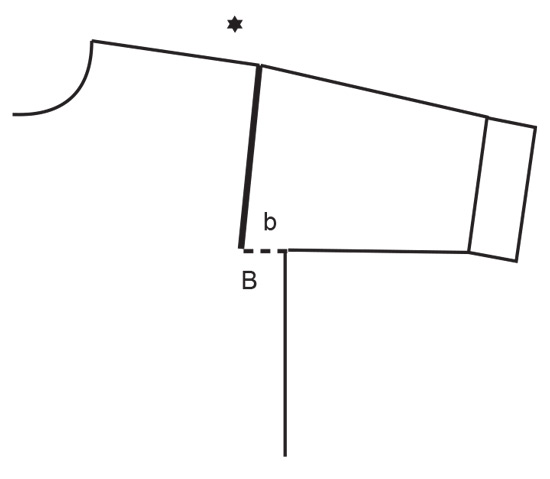
------------------------------------------------------- EXPLANATIONS FOR THE PATTERN: ------------------------------------------------------- RIDGE/GARTER STITCH (worked back and forth): Knit all rows. 1 ridge = knit 2 rows. INCREASE TIP FROM THE RIGHT SIDE: Increase towards the left AFTER MARKER: Use left needle to pick up yarn between 2 stitches from row below, pick up yarn from the front and knit in the stitch loop that is on the back of the needle. Increase towards the right BEFORE MARKER: Use left needle to pick up yarn between 2 stitches from row below, pick up yarn from the back and knit in the stitch loop that is on the front side of the needle. INCREASE TIP FROM THE WRONG SIDE: Increase towards the right AFTER MARKER: Use left needle to pick up yarn between 2 stitches from row below, pick up yarn from the back and purl in the stitch loop that is on the front side of the needle. Increase towards the left BEFORE MARKER: Use left needle to pick up yarn between 2 stitches from row below, pick up yarn from the front and purl in the stitch loop that is on the back side of the needle. DECREASE TIP (for sleeves): Decrease 1 stitch on either side of the marker-thread as follows: Work until there are 3 stitches left before the marker-thread, knit 2 together, knit 2 (marker-thread sits between these 2 stitches), slip 1 stitch as if to knit, knit 1 and pass the slipped stitch over the knitted stitch. STRIPES: 2 rows with 1 strand colour light pink + 3 strands colour pink. 2 rows with 2 strands colour light pink + 2 strands colour pink. Work 14-15-16-17-18-19 cm with 1 strand colour off white + 2 strands colour light pink + 1 strand colour pink. 2 rows with 3 strands colour light pink + 1 strand colour off white 2 rows with 3 strands colour off white + 1 strand colour light pink 4 strands with colour off white to finished length. ------------------------------------------------------- START THE PIECE HERE: ------------------------------------------------------- JUMPER – SHORT OVERVIEW OF THE PIECE: The top of the back piece is worked back and forth, top down as far as the armholes. Stitches are knitted up along each shoulder, then stitches are cast on for the neck and the front piece is worked back and forth, top down as far as the armholes. The front and back pieces are joined and the body worked in the round. Stitches are knitted up around the armholes and the sleeves worked in the round with short circular needle/double pointed needles. The neck is worked to finish. BACK PIECE: Cast on 26-26-28-30-30-30 stitches with circular needle size 7 mm and 4 strands colour pink. Purl 1 row from the wrong side. Insert 1 marker inside 3 stitches on each side. Allow them to follow your work onwards, always inside the outermost 3 stitches. Work stocking stitch back and forth. AT THE SAME TIME increase AFTER the marker at the beginning of the row and BEFORE the marker at the end of the row – read INCREASE TIP FROM RIGHT SIDE. On the next row (wrong side) increase in the same way – read INCREASE TIP FROM WRONG SIDE. Increase both from the right and wrong side a total of 18-20-22-22-24-28 times. After the last increase there are 62-66-72-74-78-86 stitches. The piece is now measured from here! REMEMBER THE KNITTING TENSION! Continue with stocking stitch for 12-13-13-14-15-15 cm along the armhole. Now start to work STRIPES – read description above until the piece measures 14-15-15-16-17-17 cm along the armhole. Cut the yarn, put stitches on a thread or an extra needle and work the front piece. FRONT PIECE: Start with the left shoulder (when the garment is worn). Knit up 18-20-22-22-24-28 stitches inside the outermost stitch along the left shoulder on back piece (i.e. knit up 1 stitch in each row on the top edge of the back piece) with 4 strands colour pink. Work stocking stitch back and forth for 7 cm. Now increase at the beginning of each row from the right side after the 3 stitches - remember INCREASE TIP FROM RIGHT SIDE. Increase 1 stitch 4 times = 22-24-26-26-28-32 stitches. Put aside after the last row from the wrong side. Now work the right shoulder as follows Knit up 18-20-22-22-24-28 stitches inside the outermost stitch along the right shoulder on the back piece. Work stocking stitch back and forth for 7 cm. Now increase at the end of each row from the right side before the 3 stitches - remember INCREASE TIP FROM RIGHT SIDE. Increase 1 stitch 4 times = 22-24-26-26-28-32 stitches. After the last increase, work the last row from the wrong side. On the next row from the right side work as follows: Stocking stitch over the 22-24-26-26-28-32 stitches from the right shoulder, cast on 18-18-20-22-22-22 stitches for the neck at the end of the row and work stocking stitch over the 22-24-26-26-28-32 stitches from the left shoulder = 62-66-72-74-78-86 stitches. When the piece measures 22-23-25-26-27-29 cm, start to work stripes. Work until the piece measures 24-25-27-28-29-31 cm along the armhole. Now join the front and back pieces for the body as follows: BODY: Work the 62-66-72-74-78-86 stitches from the front piece on the needle, cast on 4-4-4-8-12-12 stitches at the end of the row (side), work stocking stitch over the 62-66-72-74-78-86 stitches from the back piece, cast on 4-4-4-8-12-12 stitches at the end of the row = 132-140-152-164-180-196 stitches. Work stocking stitch in the round and continue stripes until the piece measures 48-50-52-54-56-58 cm – measured from the top of the shoulder on the front piece. Knit 1 round and increase 24-24-24-28-32-36 stitches evenly spaced = 156-164-176-192-212-232 stitches. Change to circular needle size 6 mm. Work rib (knit 2, purl 2) for 8 cm. Cast off with knit. LEFT SLEEVE: Use circular needle size 7 mm and 4 strands colour pink, knit up from the right side 32-34-36-38-40-40 stitches from the bottom of the armhole and to the top of the shoulder (along the front piece) and 18-18-18-20-20-22 stitches from the shoulder down to the bottom of the armhole (along the back piece) = 50-52-54-58-60-62 stitches. Work stocking stitch back and forth for 2-2-2-3-5-5 cm. Now join the sleeve using short circular needle/double pointed needles size 7 mm and continue in the round. Insert 1 marker-thread at the beginning of the round (mid-under sleeve). Allow the thread to follow your work onwards. Start at the marker thread and work stocking stitch in the round for 4-4-4-4-5-7 cm. Now decrease 2 stitches under the sleeve – read DECREASE TIP. Decrease like this every 10-10-10-7-7-6 cm a total of 4-4-4-5-5-5 times = 42-44-46-48-50-52 stitches. AT THE SAME TIME, when the sleeve measures 11 cm work stripes in the same way as on the body. Continue working until the sleeve measures 40-40-40-39-38-36 cm. There is 8 cm left; try the jumper on and work to desired length before the rib. Knit 1 round and increase 6-4-6-4-6-4 stitches evenly spaced = 48-48-52-52-56-56 stitches. Change to double pointed needles size 6 mm. Work rib (knit 2, purl 2) for 8 cm. Cast off a little loosely. The sleeve measures approx. 48-48-48-47-46-44 cm. RIGHT SLEEVE: Work the same way as left sleeve, but first knitting up 18-18-18-20-20-22 stitches from the bottom of the armhole to the shoulder along the back piece, then 32-34-36-38-40-40 stitches from the shoulder and down the front piece. Sew the bottom of the armholes together – see sketch. NECK: Start on one shoulder and knit up from the right side, inside 1 edge stitch, 64 to 76 stitches around the neck, using short circular needle size 6 mm and 4 strands colour pink. Work rib in the round (knit 2, purl 2) for 8 cm. Cast off loosely. |
||||||||||
Diagram explanations |
||||||||||
|
||||||||||
 |
||||||||||
 |
||||||||||
 |
||||||||||
Have you finished this pattern?Tag your pictures with #dropspattern #pinkinfusionsweater or submit them to the #dropsfan gallery. Do you need help with this pattern?You'll find 32 tutorial videos, a Comments/Questions area and more by visiting the pattern on garnstudio.com. © 1982-2026 DROPS Design A/S. We reserve all rights. This document, including all its sub-sections, has copyrights. Read more about what you can do with our patterns at the bottom of each pattern on our site. |
||||||||||


With over 40 years in knitting and crochet design, DROPS Design offers one of the most extensive collections of free patterns on the internet - translated to 17 languages. As of today we count 324 catalogues and 12290 patterns translated into English (UK/cm). 12290
We work hard to bring you the best knitting and crochet have to offer, inspiration and advice as well as great quality yarns at incredible prices! Would you like to use our patterns for other than personal use? You can read what you are allowed to do in the Copyright text at the bottom of all our patterns. Happy crafting!
Post a comment to pattern DROPS 240-1
We would love to hear what you have to say about this pattern!
If you want to leave a question, please make sure you select the correct category in the form below, to speed up the answering process. Required fields are marked *.