
Popular categories
Looking for a yarn?


Comments / Questions (18)
![]() Eve wrote:
Eve wrote:
With picking up stitches on the sleeves, where do i begin picking up stitches? From the very bottom of the armhole or a few cm in?
16.06.2025 - 13:02
![]() Eve Hargitai wrote:
Eve Hargitai wrote:
Hi, how would the sleeve ribbing measure 10 cm with only 11 rows when 16 rows is 10 cm in the gauge swatch? Can I add extra rows, and if so where?
03.06.2025 - 13:53DROPS Design answered:
Dear Mrs Hargitai, there is a mistake in the English pattern, decreases should be worked every 3rd round and not every other round, so that you will work a total of 16 rounds ribbing, with needle size 6 mm, tension should be approx. 17 rows for 10 cm, so that the 16 rows will measure approx. 10 cm. A correction will come, thank you. Happy knitting!
04.06.2025 - 07:40
![]() Ann Sofi wrote:
Ann Sofi wrote:
Kan jag använda en tråd Drops brushed alpacka silk och en tråd Drops Nepal istället för Drops Melody?
23.01.2025 - 12:44DROPS Design answered:
Hej Ann Sofi, ja det kan du men sørg for at holde strikkefastheden som står i opskriften, så du får de rigtige mål :)
23.01.2025 - 13:50
![]() Nancy Gianakas wrote:
Nancy Gianakas wrote:
Hello, I'm confused regarding the garter stitch. Under the Explanation of the Pattern, the Garter stitch is listed as K all rows. In the pattern, the Garter stitch is instructed to be worked as K1; P1. This will result in a Seed stitch. So, is the ribbing a Garter Stitch (knit all rows), or a Seed Stitch (k1; p1)? Thank you
23.09.2023 - 22:41DROPS Design answered:
Hi Nancy Gianakas! Only 1 edge stitch on both sides is knitted in garter stitch and it is knitted on every row. A rib is made by repeating K1, P1, always with similar stitches on top of each. Happy knitting!
24.09.2023 - 17:01
![]() Robin wrote:
Robin wrote:
Hi! I started knitting this Snow Kiss jumper pattern and have finished the back piece. I noticed that the instructions for the front piece do not make space for the armholes, is this correct? Is there only an indent for the arms incorporated in the back piece? Thank you!
04.02.2023 - 08:44DROPS Design answered:
Dear Robin, the front is worked as the back until you reach the neck. So, you will cast off for the armholes at the same length as the back. Happy knitting!
06.02.2023 - 00:09
![]() Anna Skogen wrote:
Anna Skogen wrote:
Hei! I oppskriften må det være en feil under «forstykke»-delen. Med antall masker og fellinger går det ikke opp i regnestykket. Skal være 17m igjen på pinnen etter fire fellinger, men det er umulig. Skal det da felles flere ganger, eller skulle det vært satt av flere masker til hals?
11.01.2023 - 13:10
![]() Franca Gualdo wrote:
Franca Gualdo wrote:
Ihre Antwort macht keinen Sinn: im Muster sind Krausrippen beschrieben und in der Anleitung rechts/links-Bündchen und sonst glatt rechts. Auszug aus der Anleitung: EXPLANATION FOR THE PATTERN: GARTER STITCH (back and forth): Knit all rows. 1 ridge vertically = knit 2 rows.
02.01.2023 - 14:50DROPS Design answered:
Liebe Frau Gualdo, dies erklärt nur wie man kraus rechts strickt (das steht in vielen Anleitungen), sonnst lesen Sie: RÜCKENTEIL:...Die nächste Hin-Reihe wie folgt stricken: 1 Masche KRAUS RECHTS – siehe oben, * 1 Masche rechts, 1 Masche links *, von *-* wiederholen bis noch 2 Maschen übrig sind, 1 Masche rechts und 1 Masche kraus rechts. - so am Anfang sind nur die Randmaschen kraus rechts gestrickt. Hoffentlich ist es so etwas klarer. Sonnst sagen Sie uns bescheid. Viel Spaß beim stricken!
02.01.2023 - 16:22
![]() Franca wrote:
Franca wrote:
Laut Anleitung wird in Krausrippen gestrickt, auf den Fotos sehe ich das aber überhaupt nicht: nur rechts/links-Bündchen und glatt rechts.
31.12.2022 - 11:03DROPS Design answered:
Liebe Franca, laut Anleitung stricken Sie Bündchen und glatt rechts mit jeweils 1 Randmasche krausrechts beidseitig. Viel Spaß beim stricken!
02.01.2023 - 13:45
![]() Martine wrote:
Martine wrote:
Bonjour je suis rendu au côte des poignets Si je diminue comme indiqué cela me décale les côte 1/1 est-ce normal ? Merci de votre réponse Cdt Martine
18.12.2022 - 17:42DROPS Design answered:
Bonjour Martine, quand vous diminuez, continuez à tricoter les mailles comme elles se présentent, autrement dit, tous les 2 tours, vous aurez 3 m end/3 m env côte à côte au niveau des diminutions, mais lorsque toutes les diminutions seront faites, les côtes continueront en rond comme avant. Bon tricot!
19.12.2022 - 09:35
![]() Milla wrote:
Milla wrote:
Hi, I would like to knit this Snow Kiss sweater, it looks wonderful. I am very sensitive to wool and I cannot stand other wools than merino and cashmere. The itching is horrible. I am wondering could I switch the Drops Alpaca Boucle to Drops Big Merino (both group C)? And how much would I need the yarn? And what about switching the Drops Melody yarn (group D) to Drops Merino Extra Fine (group B) and use that Drops Merino Extra Fine yarn doubled? And how much would I need that?
16.12.2022 - 20:31DROPS Design answered:
Dear Milla, while Alpaca Bouclé and Big Merino are from the same group the texture is completely different and the thickness too: Alpaca Bouclé (50g/140m) and Big Merino (50g/75m). So it would be better to work another sweater, worked with Big Merino or another group C yarn like Nepal or Alaska. The same happens with Melody; the structure is more spongy with 50g/140m. So, working with 2 threads of DROPS Merino Extra Fine will get a completely different texture and it will feel more heavy. So it would be better to check other sweaters in our collection that use DROPS Merino Extra Fine instead. Happy knitting!
18.12.2022 - 17:58
|
||||
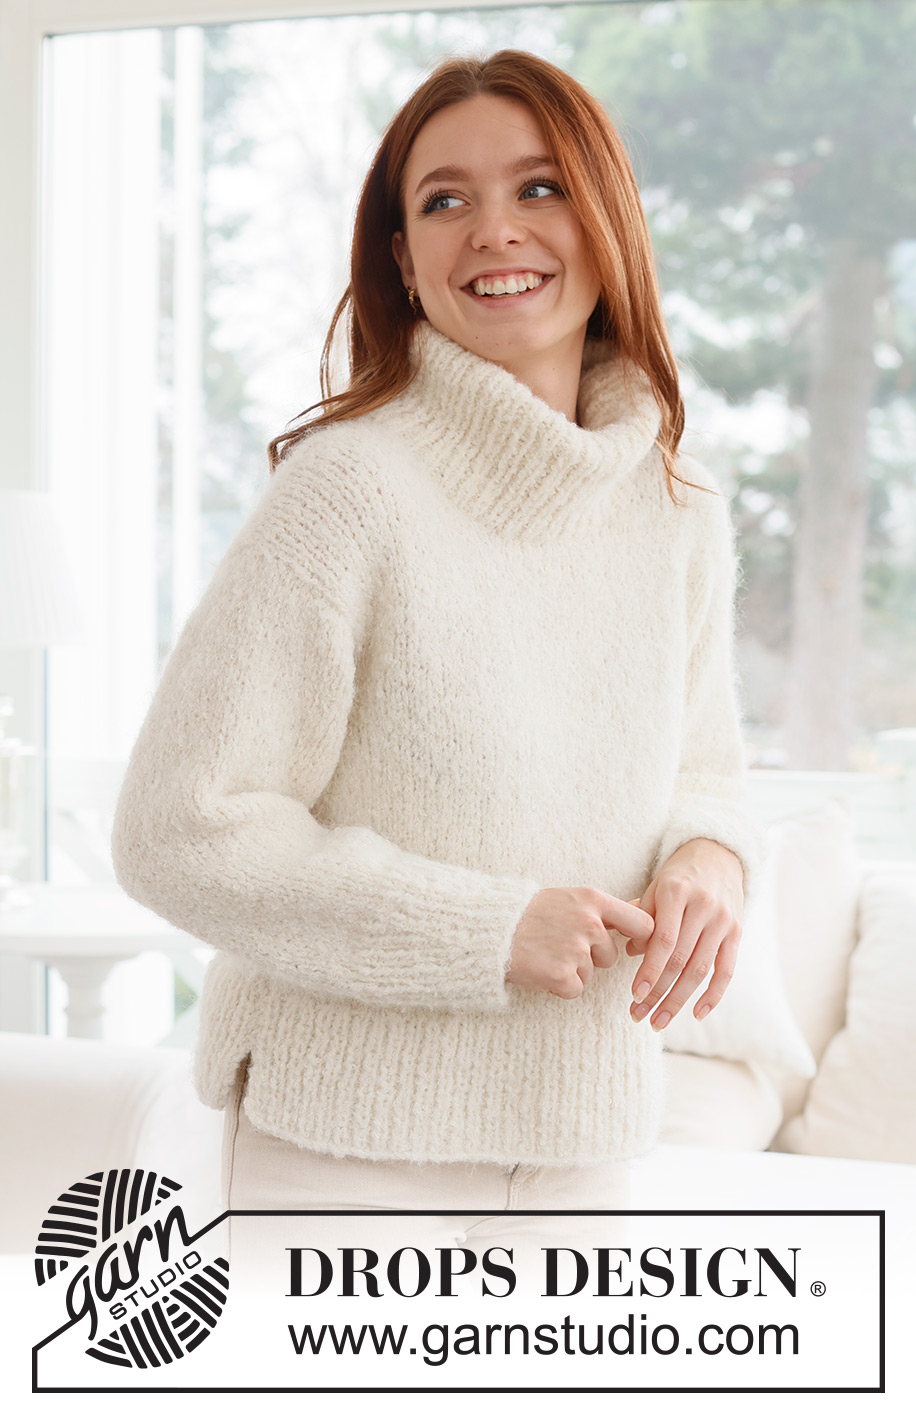
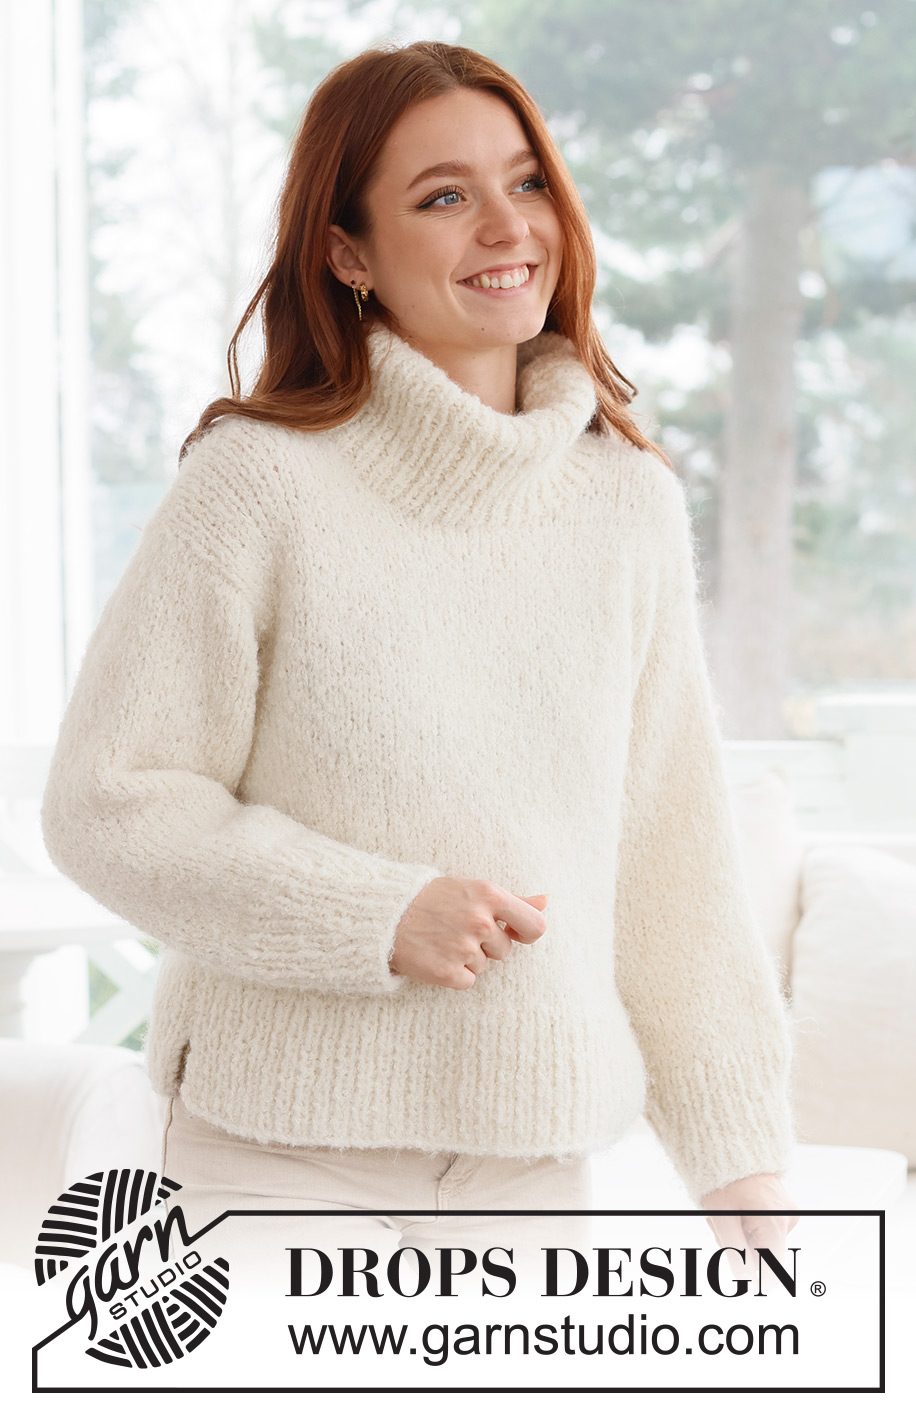
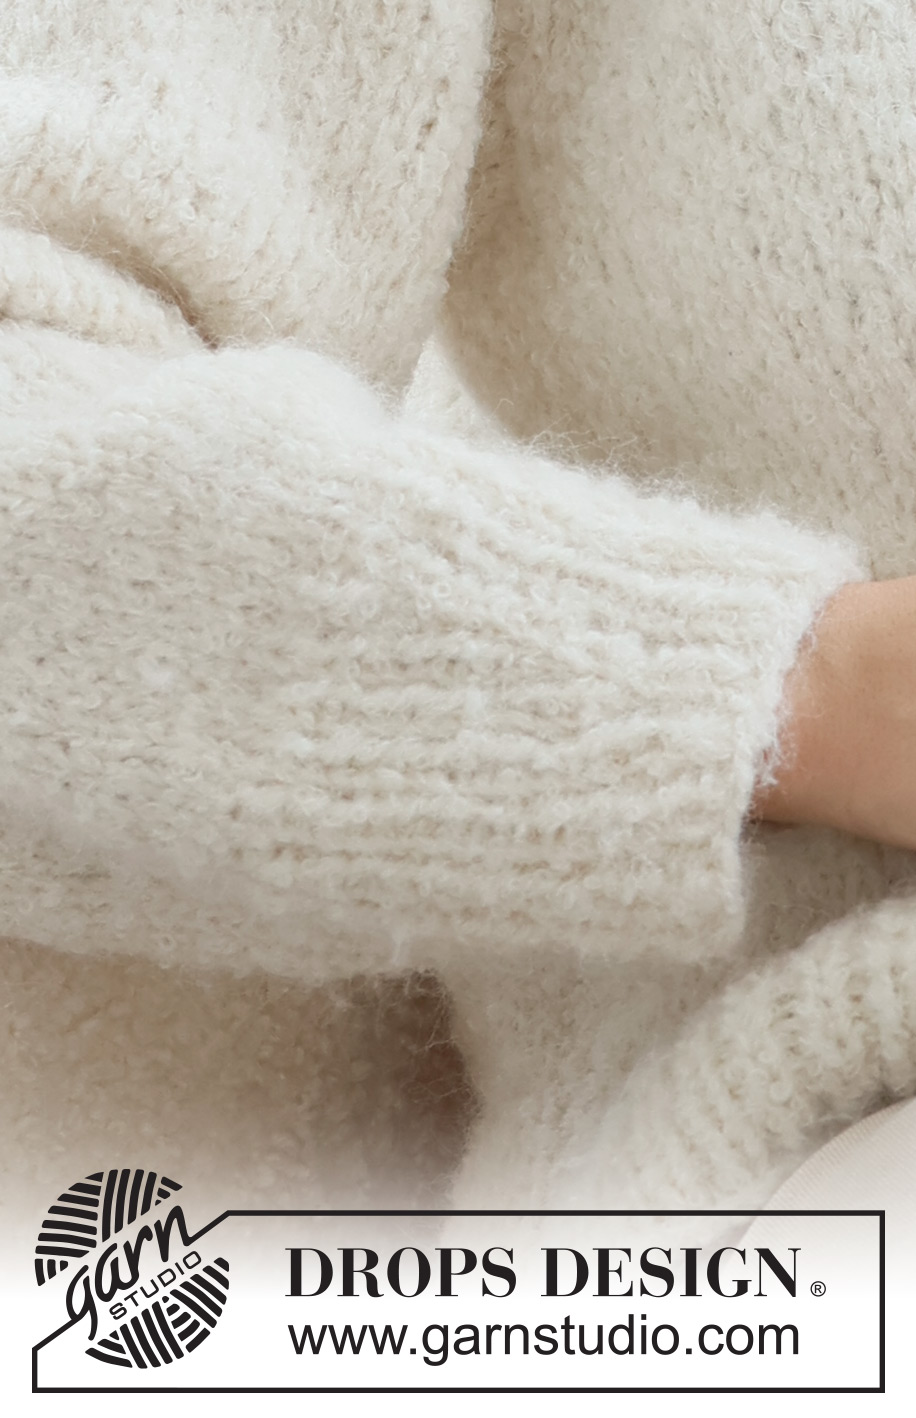
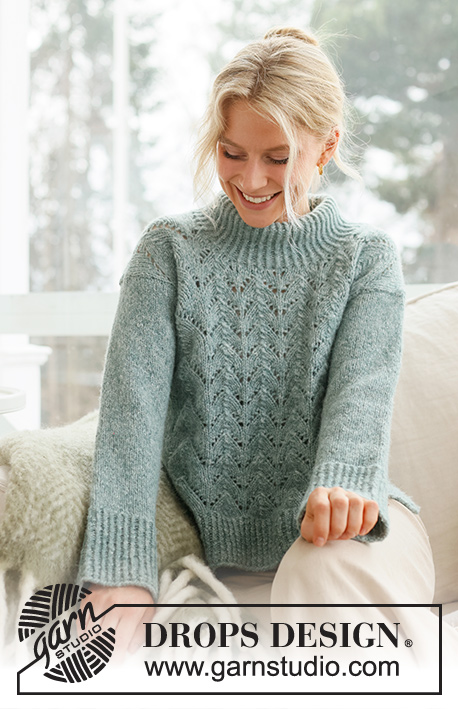
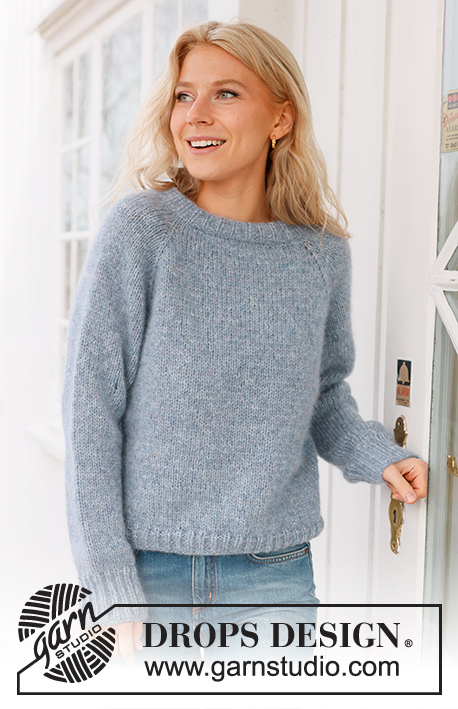
Snow Kiss#snowkisssweater |
||||
 |
 |
|||
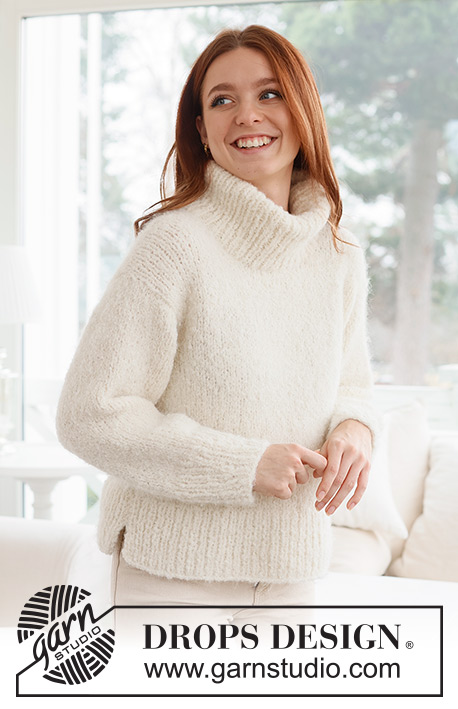
Knitted jumper in DROPS Alpaca Bouclé and DROPS Melody. Piece is knitted bottom up in stocking stitch with high collar and vents in the sides. Size XS – XXL.
DROPS 237-33 |
||||
|
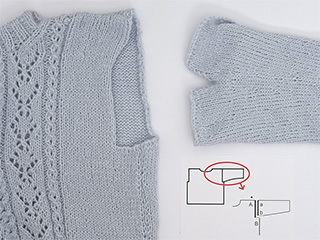
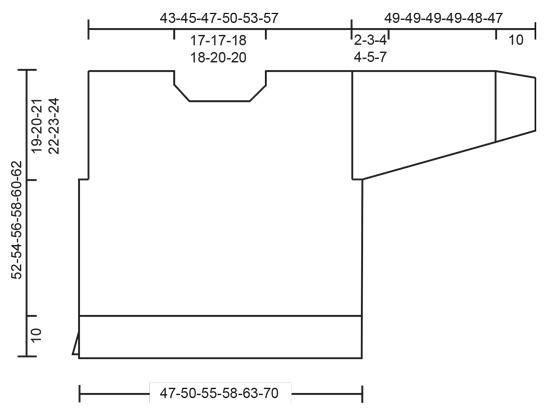
---------------------------------------------------------- EXPLANATION FOR THE PATTERN: ---------------------------------------------------------- GARTER STITCH (back and forth): Knit all rows. 1 ridge vertically = knit 2 rows. DECREASE TIP-1 (applies to neck): All decreases are done from the right side! DECREASE AS FOLLOWS AT BEGINNING OF ROW FROM THE NECK: Knit 1, slip 1 stitch knitwise, knit 1, pass slipped stitch over stitch worked (1 stitch decreased). DECREASE AS FOLLOWS AT THE END OF ROW TOWARDS THE NECK: Work until 3 stitches remain, knit the next 2 together, knit 1 (1 stitch decreased) DECREASE TIP-2 (applies to mid under sleeves): Decrease 1 stitch on each side of marker thread as follows: Work until 4 stitches remain before marker and knit 2 together, knit 4 (marker is between these 4 stitches), slip 1 stitch knitwise, knit 1, pass slipped stitch over stitch worked (2 stitches decreased). DECREASE TIP-3 (applies to edge at the bottom of sleeves): Begin 3 stitches before stitch with marker, knit 2 together, purl 1, knit 1 (stitch with marker), purl 1, slip 1 stitch knitwise, knit 1, pass slipped stitch over stitch worked on to stitch (2 stitches decreased). Decrease the same way on every decrease round. ---------------------------------------------------------- START THE PIECE HERE: ---------------------------------------------------------- JUMPER - SHORT OVERVIEW OF THE PIECE: Work back piece and front piece back and forth on circular needle, bottom up separately. Sew piece together on the shoulders. Then pick up stitches along armholes, and work sleeves are worked back and forth on circular needle, top down until sleeve cap is done, then work the rest of sleeves in the round on a short circular needle/double pointed needles, top down. Sew piece together in the sides. Finish with a high collar folded in. BACK PIECE: Cast on 65-69-75-81-87-97 stitches on circular needle size 6 mm with 1 strand of each quality (2 strands). Purl 1 row from wrong side. Work next row as follows from right side: 1 stitch in GARTER STITCH - read explanation above - * knit 1, purl 1 *, repeat from *-* until 2 stitches remain, knit 1 and 1 stitch in garter stitch. Continue rib back and forth like this for 10 cm. Knit 1 row from right side while decreasing 9-9-9-11-11-13 stitches evenly = 56-60-66-70-76-84 stitches. Switch to circular needle size 7 mm. Then work in stocking stitch with 1 stitch in garter stitch in each side. REMEMBER THE KNITTING TENSION! When piece measures 33-34-35-36-37-38 cm, cast off 2-3-5-5-6-8 stitches for armholes at the beginning of the next 2 rows = 52-54-56-60-64-68 stitches. When piece measures 49-51-53-55-57-59 cm, cast off the middle 18-18-20-20-22-22 stitches for neck and finish each shoulder separately. Continue to work and decrease 1 stitch for neck on next row from the right side - read DECREASE TIP-1 = 16-17-17-19-20-22 stitches remain on shoulder. Work until piece measures 52-54-56-58-60-62 cm. Loosely cast off. Work the other shoulder the same way. FRONT PIECE: Cast on the same number of stitches as on back piece and work the same way as back piece until piece measures 45-47-48-50-51-53 cm. Now slip the middle 14-14-16-16-16-16 stitches on a stitch holder for neck and finish each shoulder separately. Continue to work and decrease 1 stitch for neck on next row from the right side - read DECREASE TIP-1. Decrease for neck like this on every row from right side 3-3-3-3-4-4 times in total = 16-17-17-19-20-22 stitches remain on shoulder. Work until piece measures 52-54-56-58-60-62 cm. Loosely cast off. Work the other shoulder the same way. ASSEMBLY-1: Sew the shoulder seams. SLEEVES: Use circular needle size 7 mm and 1 strand of each quality (2 strands), pick up from right side 23-24-25-26-28-29 stitches from the bottom of armhole up to shoulder and 23-24-25-26-28-29 stitches from the shoulder and down to the bottom of armhole on the other side = 46-48-50-52-56-58 stitches along armhole. Insert 1 marker in the middle of row – measure sleeve from this marker. Work in stocking stitch back and forth until sleeve measures 2-3-4-4-5-7 cm from marker. Now put piece together on a short circular needle or double pointed needles size 7 mm - work the rest of sleeve in the round. Insert 1 marker thread at the beginning of round (mid under sleeve). Move marker thread upwards when working. Begin round at the marker thread and work in stocking stitch. When sleeve measures 6-7-8-8-9-11 cm from marker, decrease 2 stitches mid under sleeve - read DECREASE TIP-2. Decrease like this every 15-15-10-10-6-5 cm 2-2-3-3-5-5 times in total = 42-44-44-46-46-48 stitches. Work until sleeve measures 39-39-39-39-38-37 cm from marker. Approx. 10 cm remain until finished measurements. Try the jumper and work to desired length before rib. Knit 1 round while increasing 6-4-8-6-10-8 stitches evenly = 48-48-52-52-56-56 stitches. Switch to double pointed needles size 6 mm. Insert 1 marker in first stitch on round and 1 marker in 25th-25th-27th-27th-29th-29th stitch on round. There are 23-23-25-25-27-27 stitches between stitches with markers. Work rib (= knit 1/purl 1). AT THE SAME TIME on first round decrease 1 stitch on both each side of stitches with markers – read DECREASE TIP-3 (4 stitches decreased). Decrease like this every 3rd round 6 times in total = 24-24-28-28-32-32 stitches. After last round with decrease, cast off all stitches – make sure to avoid a tight cast-off edge. Sleeve measures approx. 49-49-49-49-48-47 cm. Work the other sleeve the same way. ASSEMBLY-2: Sew side seams from armholes and down - sew edge to edge in outer loop of outermost stitch but stop seam when approx. 6 cm remain at the bottom in each side (vents). Sew bottom of armhole - see chart. DOUBLE NECK EDGE: Begin from right side at one shoulder seam, pick up approx. 64 to 76 stitches around the neck (including stitches on stitch holder at front) on a short circular needle size 6 mm with 1 strand in each quality. Number of stitches must be divisible by 2. Work rib (= knit 1/purl 1). When neck measures 16-16-17-17-18-18 cm, increase every other 1 purl to 2 purl = approx. 80 to 95 stitches. Continue to work until neck edge measures approx. 18-18-19-19-20-20 cm. Loosely cast off. Fold the rib down on inside of garment. Fasten rib with a stitch at each should to keep the rib in place. |
||||
Diagram explanations |
||||
|
||||
 |
||||
 |
||||
Have you finished this pattern?Tag your pictures with #dropspattern #snowkisssweater or submit them to the #dropsfan gallery. Do you need help with this pattern?You'll find 34 tutorial videos, a Comments/Questions area and more by visiting the pattern on garnstudio.com. © 1982-2026 DROPS Design A/S. We reserve all rights. This document, including all its sub-sections, has copyrights. Read more about what you can do with our patterns at the bottom of each pattern on our site. |
||||


With over 40 years in knitting and crochet design, DROPS Design offers one of the most extensive collections of free patterns on the internet - translated to 17 languages. As of today we count 324 catalogues and 12290 patterns translated into English (UK/cm). 12290
We work hard to bring you the best knitting and crochet have to offer, inspiration and advice as well as great quality yarns at incredible prices! Would you like to use our patterns for other than personal use? You can read what you are allowed to do in the Copyright text at the bottom of all our patterns. Happy crafting!
Post a comment to pattern DROPS 237-33
We would love to hear what you have to say about this pattern!
If you want to leave a question, please make sure you select the correct category in the form below, to speed up the answering process. Required fields are marked *.