
Popular categories
Looking for a yarn?


Comments / Questions (77)
![]() Ghezal Soumaya wrote:
Ghezal Soumaya wrote:
Bonsoir, très joli modèle, très agréable à tricoter, merci beaucoup pour les explications qui sont très claires. Bonne continuation
07.02.2026 - 18:37
![]() Mia wrote:
Mia wrote:
Ik zou graag de trui Scent of Sage (Drops 226-62, patroon nr wi-38) breien. Aangezien Drops Wish niet meer te verkrijgen is, zou ik hem willen breien met Drops Air. Begrijp ik het goed dat ik de trui dan brei met dubbele draad ? En zo ja, klopt het dat ik toch maar even zoveel bollen nodig heb ? Als ik toch een dubbele hoeveelheid garen nodig heb, dan wordt dit wel een dure trui. Bestaat er een ander, gelijkaardig garen uit garengroep C (enkele draad) ? Alvast bedankt voor uw antwoord !
03.02.2026 - 15:08DROPS Design answered:
Dag Mia,
Ja, dat klopt, je breit dan met dubbele draad. De totale hoeveelheid wol staat al aangegeven, dus je hebt 550-600-650-700-750-800 gram DROPS Air nodig en niet het dubbele daarvan.
03.02.2026 - 21:33
![]() Courtney wrote:
Courtney wrote:
Hello. What size is the sweater in the pattern sample (pictured above)?
20.01.2026 - 08:14
![]() Geneviève wrote:
Geneviève wrote:
Je vous remercie pour votre réponse rapide. Je comprends par rapport aux torsades, mais 14 mailles de différence pour les côtes??? Cordiales salutations
26.11.2025 - 20:07DROPS Design answered:
Bonjour Geneviève, de la même façon, les côtes sont tricotées différemment sur le devant et le dos, le besoin des mailles sera donc automatiquement aussi différent. Bon tricot!
27.11.2025 - 09:29
![]() Geneviève wrote:
Geneviève wrote:
Bpnjour, je trouve très étonnant la différence de mailles à monter entre le devant et le dos? Pouvez-vous m'éclaircir svpl.?
26.11.2025 - 10:22DROPS Design answered:
Bonjour Geneviève, volontiers, en voici la raison: il faut, pour la même largeur, plus de mailles pour les torsades que pour le jersey, et comme il n'y a pas de torsades dans le dos, on va avoir besoin de moins de mailles. Bon tricot!
26.11.2025 - 16:19
![]() Michele wrote:
Michele wrote:
Par quoi remplacer la laine drops wish qui est épuisée?Merci
19.11.2025 - 13:59DROPS Design answered:
Bonjour MIchele, utilisez le convertisseur pour voir les alternatives possibles et les quantités correspondantes. Bon tricot!
19.11.2025 - 16:31
![]() Ajay wrote:
Ajay wrote:
Sorry forgot to also ask - why is circular needle stated for a back and forth pattern. I' m worried im missing something if I use SPNs. Thank you!
16.03.2025 - 12:00DROPS Design answered:
Dear Ajay, in these cases, if we use circular needles when working back and forth is because the number of stitches is quite big, so it's more confortable to place the stitches in the cable, instead of trying to fit them all in the straight needles. But you can work perfectly fine with the straight needles. Happy knitting!
16.03.2025 - 20:49
![]() Ajay wrote:
Ajay wrote:
Hello - could you tell me what type of Cast on is used in this pattern please? Or what type of cast on is recommended for this sweater? Thank you!
16.03.2025 - 11:58DROPS Design answered:
Dear Ajay, we recommend using the Continental Method but you can use whichever one that you prefer. Happy knitting!
16.03.2025 - 22:45
![]() Ana wrote:
Ana wrote:
Hi, Silly question time but I am confused with the quantity of yarn required - Drops Air states 650g the same as Drops Wish but two different yarn groups. Do I need to double up to 1300 of Air as the pattern requires two strands knitted together. Thanks
14.02.2025 - 16:27DROPS Design answered:
Dear Ana, you need the same amount of yarn in gr, but you need to take into account that each yarn has a different meterage. DROPS Wish is 50gr = 70m; DROPS Air: 50g = 150m. So you have double the meterage in a ball of Air than a ball of Wish. For the indicated size you need 910m (650/50gr per ball = 13 balls x 70m each ball = 910) of DROPS Wish and you would need 910+910 of DROPS Air. Which, according to the gauge, should be: 1820m total/150m per ball = approx. 13 balls of DROPS Air total. Happy knitting!
16.02.2025 - 23:00
![]() Eleanor wrote:
Eleanor wrote:
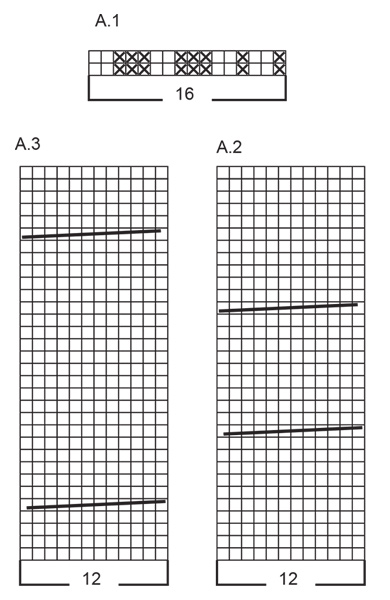
Hello! Silly question: When working on the front piece and beginning the post-ribbing section on the right side, I see that A2 and A3 have their cabling on the wrong side. I've made this before and don't remember being confused then, but I'm a little confused doing these cables on the wrong side. Should I pull 6 stitches to the side, purl them, and then purl the 6 stitches pulled? Thanks!
18.01.2025 - 00:10DROPS Design answered:
Dear Elenor, the diagrams ALWAYS show the pattern as you would see it from the right side. So, if ypu have to "place 6 stitches on cable needle behind the piece, knit 6, knit 6 from cable needle" from the right side, then from the wrong side you will have to : place 6 stitches on cable needle at the front the piece, purl 6, purl 6 from cable needle. Happy Knitting!
18.01.2025 - 01:49
|
||||||||||
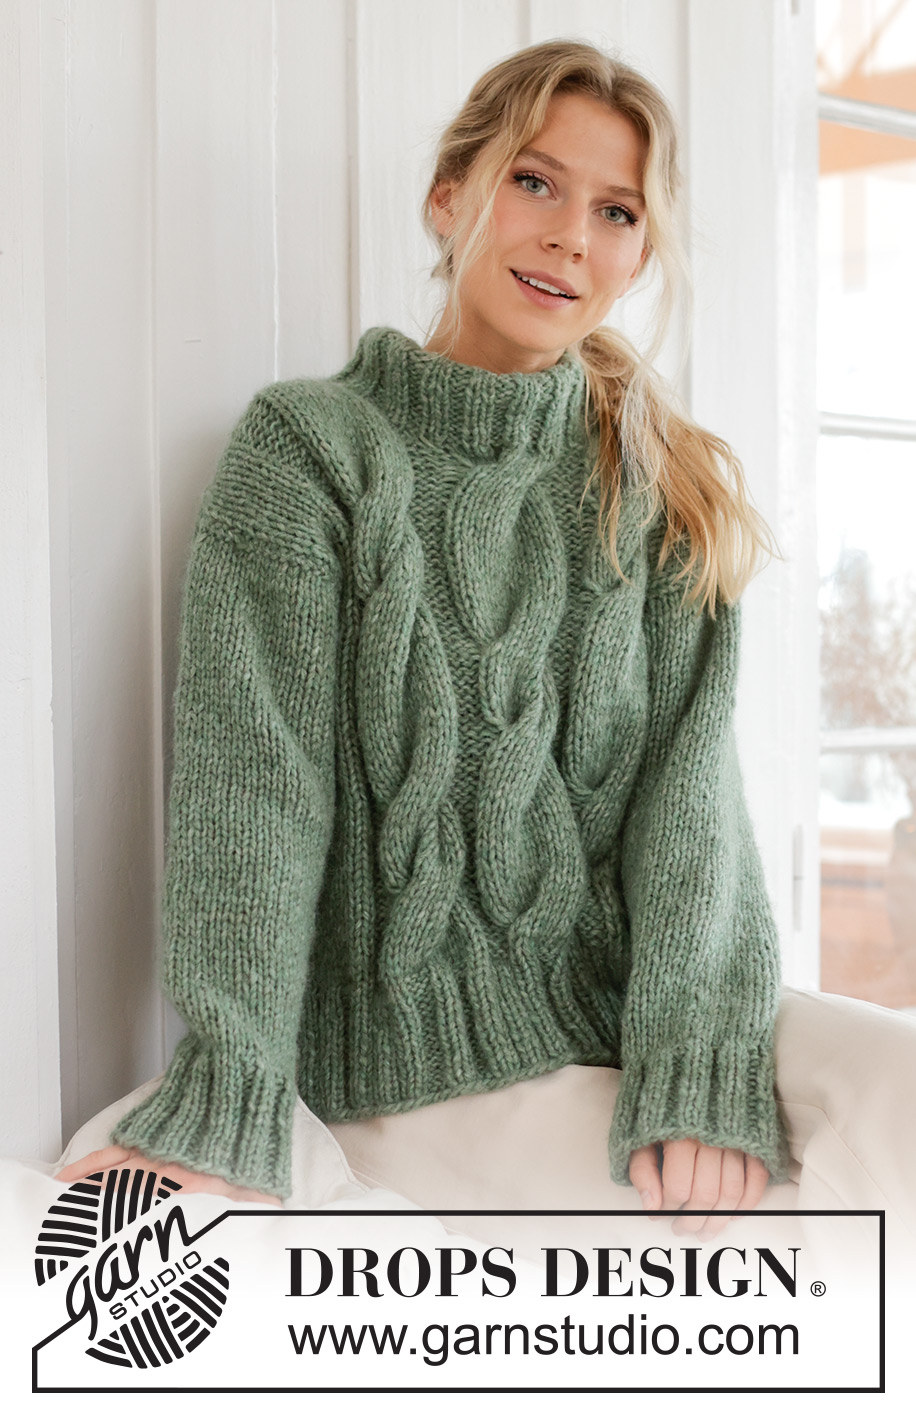
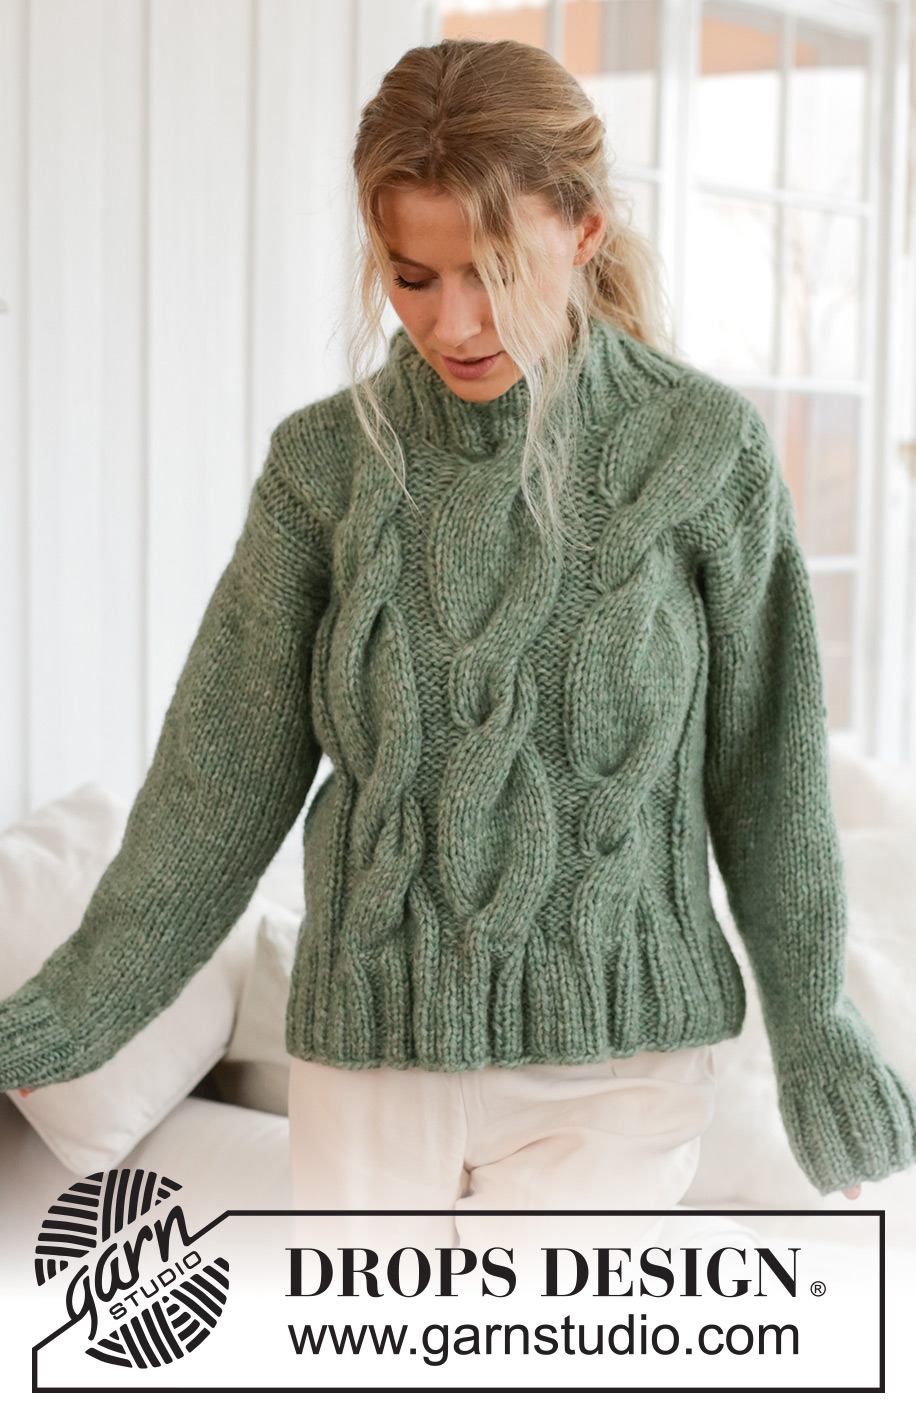
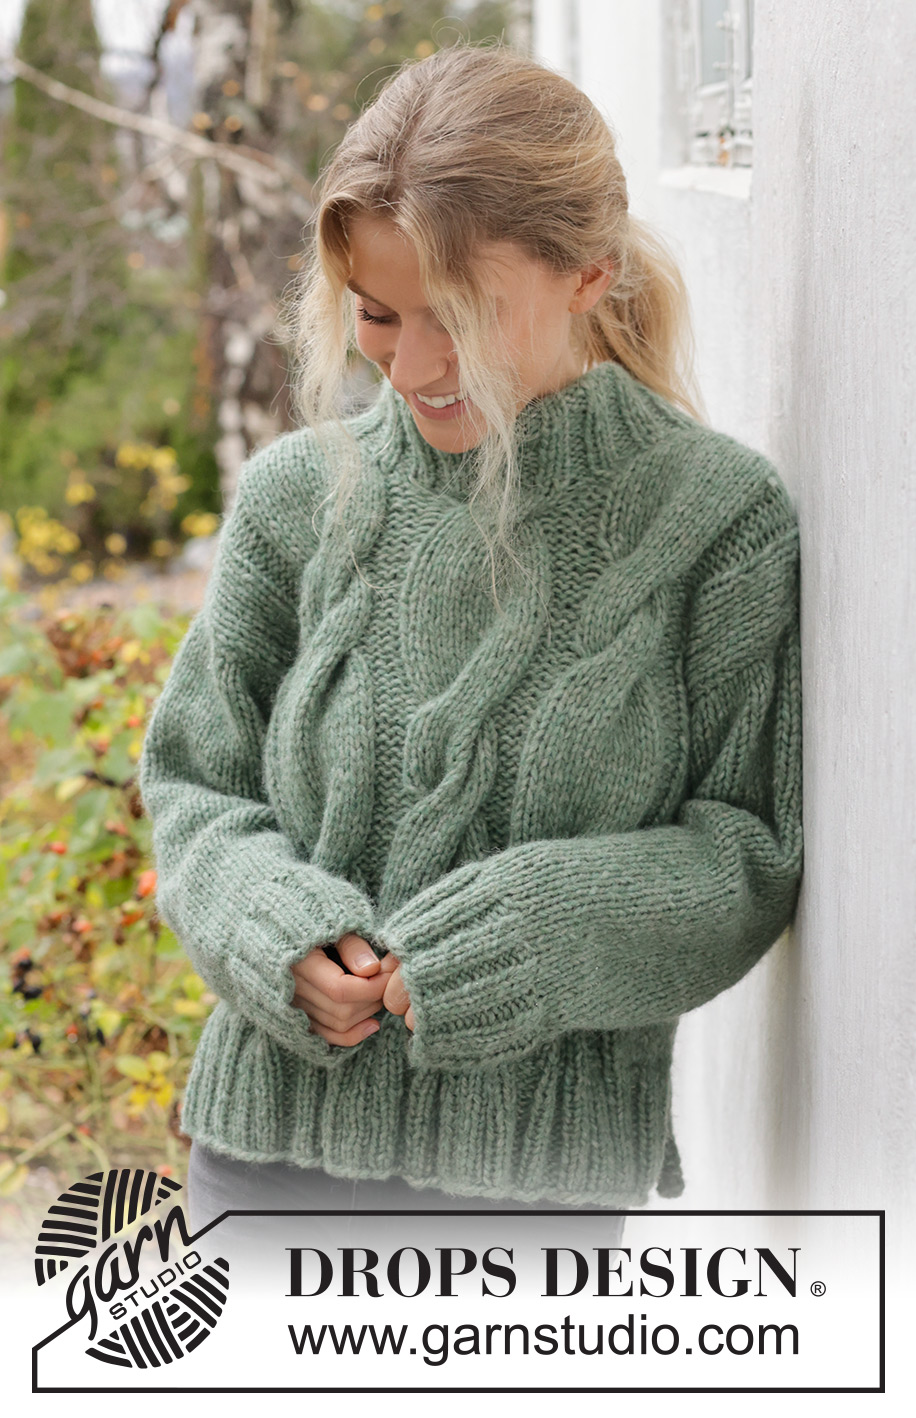
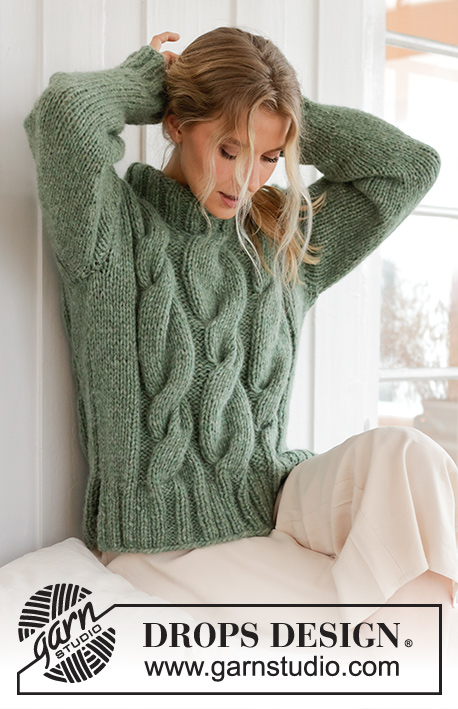
Scent of Sage#scentofsagesweater |
||||||||||
 |
 |
|||||||||
Knitted jumper in 1 strand DROPS Wish or 2 strands DROPS Air. The piece is worked with cables and double neck. Sizes S - XXXL.
DROPS 226-62 |
||||||||||
|
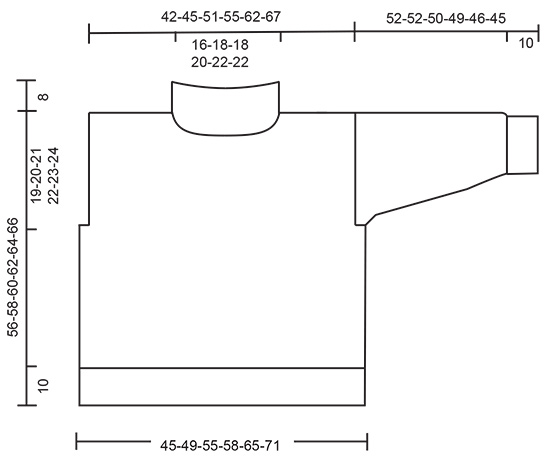
------------------------------------------------------- EXPLANATIONS FOR THE PATTERN: ------------------------------------------------------- RIDGE/GARTER STITCH (worked back and forth): Knit all rows. 1 ridge = knit 2 rows. PATTERN: See diagrams A.1 to A.3. The diagrams show all rows in the pattern from the right side. DECREASE TIP (neck): Decreasing at the beginning of the row (right shoulder): Knit 1, slip 1 stitch as if to knit, knit 2 together and pass the slipped stitch over the knitted-together stitches. Decreasing at the end of the row (left shoulder): Work until there are 4 stitches left, knit 3 together, knit 1. INCREASE TIP (sleeves): Work until there is 1 stitch left before the marker, 1 yarn over, knit 2 (marker sits between these 2 stitches), 1 yarn over. On the next round knit the yarn overs twisted to avoid holes. Then work the new stitches in stocking stitch. ------------------------------------------------------- START THE PIECE HERE: ------------------------------------------------------- JUMPER – SHORT OVERVIEW OF THE PIECE: The back and front pieces are worked separately back and forth and bottom up, with circular needle. The sleeves are worked in the round with double pointed needles/short circular needle. The sections are sewn together and the neck worked to finish. FRONT PIECE: Cast on 74-74-82-90-98-98 stitches with circular needle size 7 mm and 1 strand DROPS Wish or 2 strands DROPS Air. Purl 1 row from the wrong side. Then work as follows from the right side: 1 edge stitch in GARTER STITCH – read description above, knit 2, * purl 2, knit 2 *, work from *-* 2-2-3-4-5-5 times, work A.1 three times, then the first 4 stitches in A.1, knit 2, * purl 2, knit 2 *, work from *-* 2-2-3-4-5-5 times, 1 edge stitch in garter stitch. Continue this rib for 10 cm. Change to circular needle size 8 mm and work as follows from the right side: Work stocking stitch over the first 11-11-15-19-23-23 stitches, AT THE SAME TIME as you decrease 3-1-2-4-4-1 stitches evenly, purl 4, A.2, purl 4, A.3, purl 4, A.2, purl 4, stocking stitch over the last 11-11-15-19-23-23 stitches, AT THE SAME TIME as you decrease 3-1-2-4-4-1 stitches evenly = 68-72-78-82-90-96 stitches. Continue this pattern. REMEMBER THE KNITTING TENSION! When the piece measures 37-38-39-40-41-42 cm, cast off 2 stitches at the beginning of the next 2 rows for the armholes = 64-68-74-78-86-92 stitches. Continue the pattern until the piece measures 50-52-53-55-56-58 cm. On the next row place the middle 20-22-22-24-26-26 stitches on a thread for the neck and finish each shoulder separately. Decrease as follows on each row from the right side by the neck: 2 stitches 4 times – read DECREASE TIP = 14-15-18-19-22-25 stitches on the shoulder. Work stocking stitch over the cables when there is no longer room for the cable in width. Work until the piece measures 56-58-60-62-64-66 cm, cast off. Work the other shoulder in the same way. BACK PIECE: Cast on 56-60-68-72-80-88 stitches with circular needle size 7 mm and 1 strand DROPS Wish or 2 strands DROPS Air. Purl 1 row from the wrong side. Then work as follows from the right side: 1 edge stitch in garter stitch, knit 2, * purl 2, knit 2 *, work from *-* until there is 1 stitch left, 1 edge stitch in garter stitch. Continue this rib for 10 cm. Change to circular needle size 8 mm. Work 1 row where you decrease 6-6-8-8-8-10 stitches evenly spaced = 50-54-60-64-72-78 stitches. Work stocking stitch over all stitches. When the piece measures 37-38-39-40-41-42 cm, cast off 2 stitches at the beginning of the next 2 rows for the armholes = 46-50-56-60-68-74 stitches. Continue stocking stitch until the piece measures 54-56-58-60-62-64 cm. On the next row cast off the middle 16-18-18-20-22-22 stitches for the neck and finish each shoulder separately. Then cast off 1 stitch on the next row from the neck = 14-15-18-19-22-25 stitches on the shoulder. Work until the piece measures 56-58-60-62-64-66 cm, cast off. Work the other shoulder in the same way. SLEEVES: Cast on 36-40-40-44-44-48 stitches with double pointed needles/short circular needle size 7 mm and 1 strand DROPS Wish or 2 strands DROPS Air. Knit 1 round, then work rib (knit 2, purl 2) in the round for 10 cm. Change to double pointed needles size 8 mm. Knit 1 round where you decrease 4-6-4-6-4-6 stitches evenly spaced = 32-34-36-38-40-42 stitches. Insert a marker at the beginning of the round = mid-under sleeve. Work stocking stitch until the piece measures 11 cm. Now increase 1 stitch on either side of the marker – read INCREASE TIP. Increase like this every 9½-9½-9-9-8½-8 cm a total of 5 times = 42-44-46-48-50-52 stitches. Cast off when the sleeve measures 52-52-50-49-46-45 cm. Work the other sleeve in the same way as follows. ASSEMBLY: Sew the shoulder seams. Sew the side seams in the outermost loop of the outermost stitch, as far as the rib (10 cm split at the bottom). Sew in the sleeves. DOUBLE NECK: Start from the right side on the one shoulder and knit up 60 to 76 stitches around the neck (including the stitches on the thread), with short circular needle size 7 mm and 1 strand DROPS Wish or 2 strands DROPS Air. The number of stitches should be divisible by 4. Work rib (knit 2, purl 2) in the round for 16 cm. Cast off. Fold the neck double to the inside and sew down. To avoid the neck being tight and rolling outwards, it is important that the seam is elastic. |
||||||||||
Diagram explanations |
||||||||||
|
||||||||||
 |
||||||||||
 |
||||||||||
Have you finished this pattern?Tag your pictures with #dropspattern #scentofsagesweater or submit them to the #dropsfan gallery. Do you need help with this pattern?You'll find 34 tutorial videos, a Comments/Questions area and more by visiting the pattern on garnstudio.com. © 1982-2026 DROPS Design A/S. We reserve all rights. This document, including all its sub-sections, has copyrights. Read more about what you can do with our patterns at the bottom of each pattern on our site. |
||||||||||


With over 40 years in knitting and crochet design, DROPS Design offers one of the most extensive collections of free patterns on the internet - translated to 17 languages. As of today we count 324 catalogues and 12290 patterns translated into English (UK/cm). 12290
We work hard to bring you the best knitting and crochet have to offer, inspiration and advice as well as great quality yarns at incredible prices! Would you like to use our patterns for other than personal use? You can read what you are allowed to do in the Copyright text at the bottom of all our patterns. Happy crafting!
Post a comment to pattern DROPS 226-62
We would love to hear what you have to say about this pattern!
If you want to leave a question, please make sure you select the correct category in the form below, to speed up the answering process. Required fields are marked *.