
Popular categories
Looking for a yarn?


Comments / Questions (22)
![]() Tereza wrote:
Tereza wrote:
Dobrý den, nemohu se dopočítat u přidávání pro náramenice - dle návodu pro velikost M je počáteční počet ok po dokončení lemu průkrčníku 152 - na náramenice se má přidat celkem 22x 4 oka. Z toho mi vychází výsledný počet 240 ok, v návodu jich je ale psáno 230. Jde o počet ok včetně légy? Nebo jsem někde udělala chybu? Předem děkuji za odpověď.
17.04.2026 - 14:32
![]() Mep wrote:
Mep wrote:
Oczek obszycia przodu ŚCIEGIEM FRANCUSKIM – patrz powyżej, *1 oczko pra*, powtarzać od *-* ponad 12-12-15-15-18-18 następnymi oczkami, 1 oczko prawe, 1 oczko lewe (= lewy przód), A.1a (patrz schemat odpowiedni dla rozmiaru) ponad 27-27-27-33-33-33 następnymi oczkami (= lewe ramię), 1 oczko lewe, *1 oczko prawe, 2 oczka lewe*, powtarzać od *-* ponad 27-27-33-33-36-36 następnymi oczkami, 1 oczko prawe, 1 oczko lewe (= tył), A.1a ponad 27-27-27-33-33-33 następnymi oczkami (= prawe r
15.06.2025 - 01:31DROPS Design answered:
Witam, jakie jest pytanie?
23.06.2025 - 08:55
![]() Marianne wrote:
Marianne wrote:
Bonjour,dans la partie "augmentations manches" il est écrit de continuer comme avant et en même temps augmenter de 4 m sur tous les rangs endroits pour les manches. Mais il faut bien arrêter de faire les augmentations dans les parties dos et devant? Sinon on aura bien plus que 304-382 m a la fin de cette partie... Et du coup \" ne pas oublier Augmentations 2\" veut bien juste dire de faire les augmentations des manches avec l explication 2? Merci d\'avance pour votre retour
28.02.2025 - 21:55DROPS Design answered:
Bonjour Marianne, "continuer comme avant" signifie ici tricoter en jersey et point ajouré avec les mailles de bordure des devants comme avant; effectivement, les augmentations des devants et du dos sont terminées, on va maintenant uniquement augmenter pour les manches. Puis on passera aux augmentations de l'empiècement Et oui tout à fait, il faut augmenter pour les manches comme indiqué sous AUGMENTATIONS-2 ;. Bon tricot!
03.03.2025 - 08:36
![]() Lilia wrote:
Lilia wrote:
Laut Beschreibung: Die Arbeit hat eine Länge von ca. 18-19-19-20-20-20 cm ab dem Markierer nach der Halsblende. Auf dem Bild wird aber die Länge nicht von der Halsblende angezeichnet. Was stimmt nun?
24.08.2024 - 00:03DROPS Design answered:
Liebe Lilia, nach 18 bis 20 cm sind die Zunahmen für die Ärmel fertig, dann wird man für die Passe (wie beim Raglan)1 bis 9 Mal (siehe Grösse) zunehmen, nach allen Zunahmen misst die Arbeit 18 bis 27 cm , genauso wie bei der Maßskizze, dann kommen noch dazu die Sattelschulter (6 bis 7 cm). Viel Spaß beim Stricken!
26.08.2024 - 07:44
![]() Jette Melsen wrote:
Jette Melsen wrote:
Er ved at strikke str L, efter udtagninger til ærmer har jeg 330 masker, men kan ikke få maske antallet til at passe, når jeg har taget 4 x ud på bærestykket, nu har jeg Kantmasker 5-forstykke 47-ærme18-27-18-ryg 100-ærme18-27-18-forstykke47-kantmasker 5. Når jeg har taget ud på bærestykket, vil jeg jo have forstykke 51 ærmer 71, ryg 108, osv, jeg kan simpelthen ikke får maskerne til at passe når jeg skal til delingen
11.08.2024 - 16:32DROPS Design answered:
Hej Jette, har du flyttet mærkerne og taget ud ifølge BÆRESTYKKEØKNING, når du har gjort det har du 362 masker og det er først nu du skal dele arbejdet :)
15.08.2024 - 09:10
![]() Goretti wrote:
Goretti wrote:
Buenas, la labor se empieza a tejer con aguja de 2,5 pero posterior no veo cuando cambia a 3. Esa referencia solo la he visto en las mangas, se cosen endiferentes grosores de aguja? O solo las cenefas en 2.5 y posterioa cambiar a 3? Gracias
11.12.2023 - 22:52DROPS Design answered:
Hola Goretti, se cambia de aguja al final del cuello, antes de empezar el canesú. Se trata de una errata en el patrón en español, la corregiremos lo antes posible.
17.12.2023 - 23:15
![]() Eliana wrote:
Eliana wrote:
Come si esegue un gettato tra due maglie? Grazie
29.05.2023 - 13:53DROPS Design answered:
Buongiorno Eliana, a questo link può trovare un video che le spiega i gettati. Buon lavoro!
31.05.2023 - 16:56
![]() Monika Opočenská wrote:
Monika Opočenská wrote:
Dobrý den, v návodu je chybně uvedené přidávání 3 u trupu, má být přidávání 4. Je to v této větě: Ve výši 11 cm od podpaží přidáme na obou stranách obou značek 1 oko – viz TIP – PŘIDÁVÁNÍ 3 (= přidáme 4 oka). Děkuji za opravu. Monika Opočenská
24.07.2022 - 13:44DROPS Design answered:
Dobrý den, Moniko, děkuji za upozornění - opraveno! Ať se vám hezky plete, Hana
24.07.2022 - 19:32
![]() Amal wrote:
Amal wrote:
Hi the pattern says to increase for the sleeve after and before the markers that surround the lace pattern . Do we increase right after or before the lace stitch pattern or directly after or before the markers. I’m increasing directly after and before the markers and I don’t like how it looks. Would it change the shape of the sweater if I increase directly before the lace pattern and not the marker. Thank you
30.10.2021 - 05:27DROPS Design answered:
Dear Amal, if you really do not like the increases next to the marker, it would not change the shape it much if you do them one stitch away form their original place. Happy Stitching!
30.10.2021 - 12:20
![]() Grace Freese wrote:
Grace Freese wrote:
Why are there no actual symbols in the diagram? All my pattern says is Symbol= and then the stitches. Please send me the symbols and diagrams for each pattern?
05.10.2021 - 21:53DROPS Design answered:
Dear Mrs Freese, we had some worries with displaying the pictures, but it's now solved, this means all diagrams, symbols and chart are visible now. Happy knitting!
06.10.2021 - 07:29
|
||||||||||||||||||||||||||||
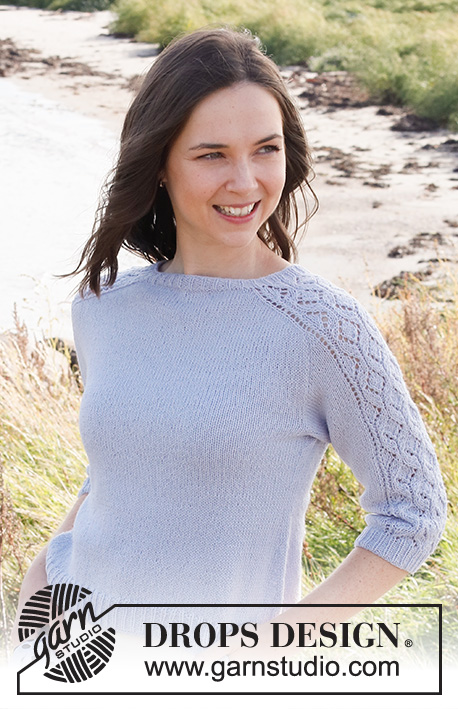
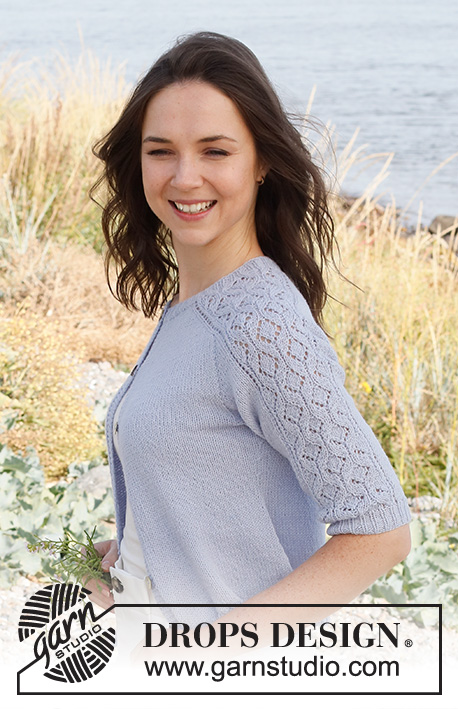
Dancing Diamonds Cardigan#dancingdiamondscardigan |
||||||||||||||||||||||||||||
 |
 |
|||||||||||||||||||||||||||
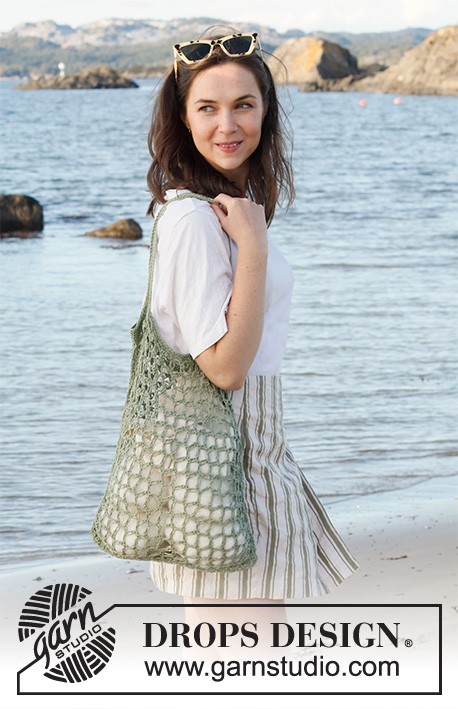
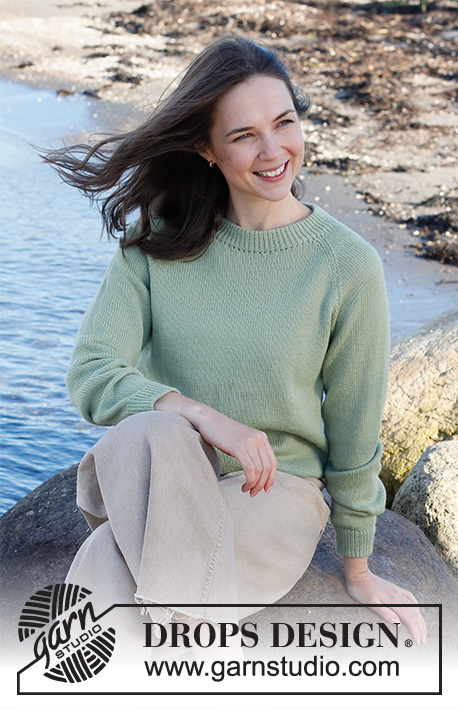
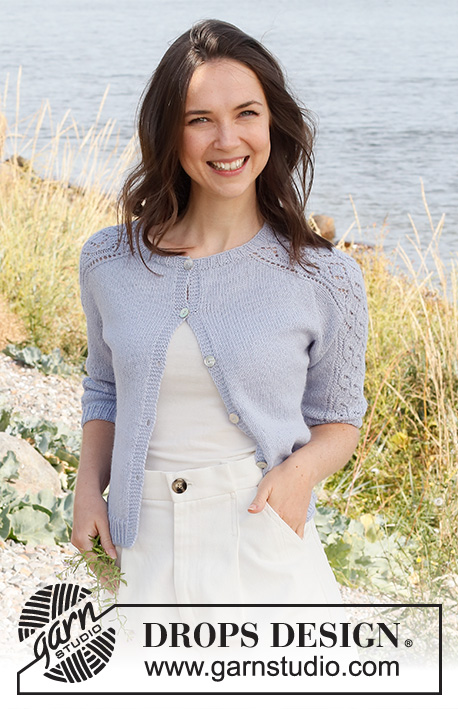
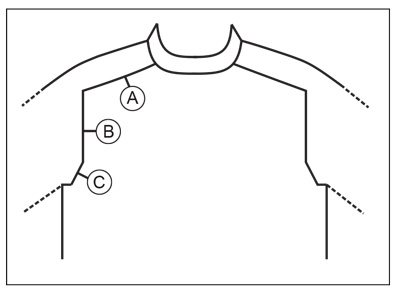
Knitted jacket in DROPS Flora. The piece is worked top down, with saddle shoulders, lace pattern and ¾-length sleeves. Sizes S - XXXL.
DROPS 221-8 |
||||||||||||||||||||||||||||
|
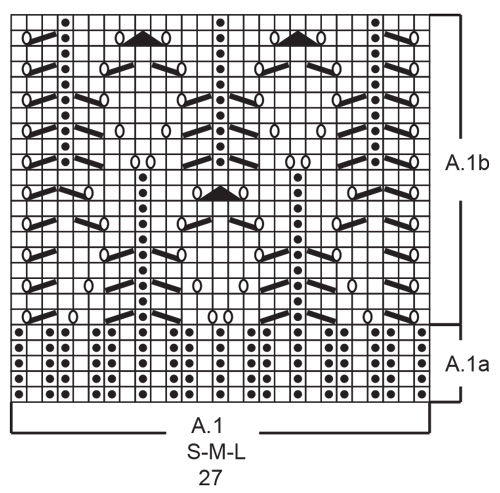
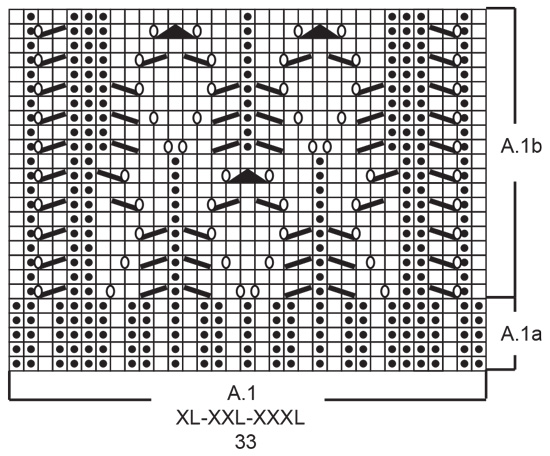
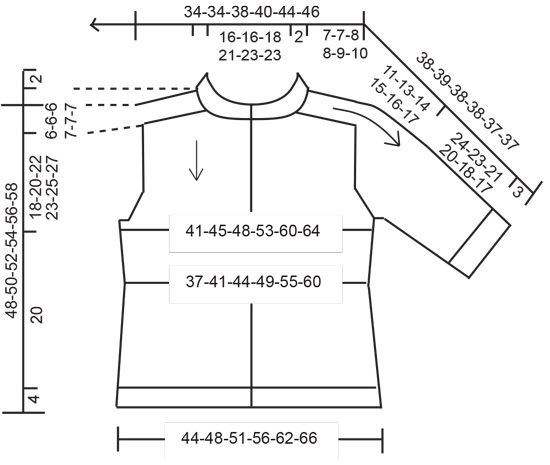
------------------------------------------------------- EXPLANATIONS FOR THE PATTERN: ------------------------------------------------------- RIDGE/GARTER STITCH (worked back and forth): Knit all rows. 1 ridge in height = Knit 2 rows. PATTERN: See diagram A.1. Choose diagram for your size. INCREASE TIP-1 (evenly spaced): To work out how to increase evenly, count the total number of stitches to be increased over (e.g. 14 stitches) and divide by the number of increases to be made (e.g. 6) = 2.3. In this example, increase by making 1 yarn over after alternately each 2nd and 3rd stitch (approx.). On the next row work the yarn overs twisted to avoid holes. INCREASE TIP-2 (from the right side): BEFORE MARKER: The new stitch twists to the right. Use the left needle to pick up the strand between 2 stitches from the previous row, pick up the back strand and knit in the front loop. AFTER MARKER: The new stitch twists to the left. Use the left needle to pick up the strand between 2 stitches from the previous row, pick up the front strand and knit in the back loop. INCREASE TIP-3 (from the wrong side): BEFORE MARKER: The new stitch twists to the right. Use the left needle to pick up the strand between 2 stitches from the previous row, pick up the front strand and purl in the back loop. AFTER MARKER: The new stitch twists to the left. Use the left needle to pick up the strand between 2 stitches from the previous row, pick up the back strand and purl in the front loop. INCREASE TIP-4 (for sides of body): All increases are worked from the right side! Work until there are 3-3-3-4-4-4 stitches left before the marker thread, make 1 yarn over, knit 6-6-6-8-8-8 (marker thread sits in the middle of these stitches) make 1 yarn over. On the next row purl the yarn overs twisted to avoid holes. Then work the new stitches in stocking stitch. DECREASE TIP (for sides of body and sleeves): All increases are worked from the right side! Decrease 1 stitch on either side of the marker thread as follows: Work until there are 4-4-4-5-5-5 stitches left before the marker thread, knit 2 together, knit 4-4-4-6-6-6 (marker thread sits in the middle of these stitches), slip 1 stitch as if to knit, knit 1 and pass the slipped stitch over the knitted stitch. BUTTONHOLES: Work the buttonholes on the right band (when the garment is worn). Decrease from the right side when there are 3 stitches left on the row as follows: Make 1 yarn over, knit 2 together and knit 1. On the next row (wrong side) knit the yarn over to leave a hole. The first buttonhole is worked when the neck measures 1½-2 cm. The remaining 5-5-5-5-5-5 buttonholes are worked with approx. 8-8-8½-9-9-9½ cm between each one. CASTING-OFF TIP: To avoid the cast-off edge being tight you can cast off with a larger size needle. If the edge is still tight, make 1 yarn over after approx. each 3rd or 6th stitch, at the same time as casting off; the yarn overs are cast off as normal stitches. ------------------------------------------------------- START THE PIECE HERE: ------------------------------------------------------- JACKET – SHORT OVERVIEW OF THE PIECE: The neck and yoke are worked back and forth with circular needle from mid front and top down. The yoke is divided for body and sleeves and the body continued back and forth. The sleeves are worked in the round with short circular needle/double pointed needles, top down. NECK: Cast on 122-122-134-146-155-155 stitches (including 5 band stitches on each side towards mid front) with circular needle size 2.5 mm and Flora. Purl 1 row (= wrong side). Now work rib as follows: 5 band stitches in GARTER STITCH – read description above, * knit 1, purl 2 *, work from *-* over the next 12-12-15-15-18-18 stitches, knit 1, purl 1 (= left front piece), work A.1a (choose diagram for your size) over the next 27-27-27-33-33-33 stitches (= left shoulder), purl 1, * knit 1, purl 2 *, work from *-* over the next 27-27-33-33-36-36 stitches, knit 1, purl 1 (= back piece), work A.1a over the next 27-27-27-33-33-33 stitches (= right shoulder), purl 1, knit 1, * purl 2, knit 1 *, work from *-* over the next 12-12-15-15-18-18 stitches and finish with 5 band stitches in garter stitch (= right front piece). A.1a is repeated in height. Continue this rib for 2 cm – adjust so the next row is from the wrong side. Remember the BUTTONHOLES on the right band – read description above. The next row is worked as follows: 5 band stitches in garter stitch, purl 14-14-17-17-20-20 and increase 6-8-3-7-8-8 stitches evenly spaced over these stitches - read INCREASE TIP-1, work pattern as before over the next 27-27-27-33-33-33 stitches, purl 30-30-36-36-39-39 and increase 10-14-10-16-19-19 stitches evenly spaced over these stitches, work pattern as before over the next 27-27-27-33-33-33 stitches, purl 14-14-17-17-20-20 and increase 6-8-3-7-8-8 stitches evenly spaced over these stitches, 5 band stitches in garter stitch = 144-152-150-176-190-190 stitches. Change to circular needles size 3. YOKE: Insert a marker after the band – THE PIECE IS NOW MEASURED FROM HERE! In addition insert 4 other markers as follows – without working the stitches; the markers are inserted between 2 stitches rather than in the stitch and will be used when increasing for the shoulders. Marker 1: Count 25-27-25-29-33-33 stitches (= left front piece), insert marker before the next stitch. Marker 2: Count 27-27-27-33-33-33 stitches from marker 1 (= shoulder), insert marker before the next stitch. Marker 3: Count 40-44-46-52-58-58 stitches from marker 2 (= back piece), insert marker before the next stitch. Marker 4: Count 27-27-27-33-33-33 stitches from marker 3 (= shoulder), insert marker before the next stitch. There are 25-27-25-29-33-33 stitches left after marker 4. Allow the markers to follow your work onwards. INCREASE FOR SADDLE SHOULDERS: Read the whole section before continuing! Continue with A.1b on the shoulders, 5 band stitches in garter stitch on each side and stocking stitch over the remaining stitches. AT THE SAME TIME on the first row from the right side, increase 4 stitches as follows: Increase BEFORE markers 1 and 3 and increase AFTER markers 2 and 4 – read INCREASE TIP-2. You are only increasing on the front and back pieces; the number of shoulder stitches remains the same. On the next row from the wrong side increase 4 stitches as follows: Increase BEFORE markers 4 and 2 and increase AFTER markers 3 and 1 – read INCREASE TIP-3. You increase on EVERY row, in a different way on the right and wrong sides, so the stitches lie neatly. Continue the pattern and increase on every row a total of 22-22-27-27-29-32 times = 232-240-258-284-306-318 stitches (the increased stitches are worked in stocking stitch). REMEMBER THE KNITTING TENSION! After the last increase the piece measures approx. 7-7-8-8-9-10 cm from the marker on the neck. Now increase for the sleeves as described below. INCREASE FOR SLEEVES: Continue the pattern. AT THE SAME TIME on the next row from the right side, increase 4 stitches as follows: Increase AFTER markers 1 and 3 and increase BEFORE markers 2 and 4 – remember INCREASE TIP-2. You are now only increasing on the sleeves and the number of stitches on the front and back pieces remains the same. The increased stitches are worked in stocking stitch. Increase like this every 2nd row (each row from the right side) a total of 18-19-18-19-18-16 times = 304-316-330-360-378-382 stitches. The piece measures approx. 18-19-19-20-20-20 cm from the marker on the neck. Now increase for the yoke as described below. INCREASE FOR YOKE: Move the 4 markers so each marker sits in the outermost sleeve stitches on each side. There are 61-63-61-69-67-63 stitches between the markers on each shoulder. On the next row increase 8 stitches by increasing both before and after each marker-stitch – remember INCREASE TIP-2. You are now increasing on the front and back pieces and on the sleeves, the increased stitches are worked in stocking stitch. Increase like this every 2nd row (each row from the right side) a total of 1-4-4-5-7-9 times = 312-348-362-400-434-454 stitches. When all the increases are finished the piece measures approx. 18-20-22-23-25-27 cm from the marker on the neck. If the piece is shorter than this continue working without further increases to the correct length. Now divide the piece for the body and sleeves on the next row as follows: Work the first 48-53-53-59-66-70 stitches (= front piece), place the next 65-73-77-85-89-91 stitches on a thread for the sleeve, cast on 12-12-16-18-20-22 stitches (= in side under the sleeve), work the next 86-96-102-112-124-132 stitches (= back piece), place the next 65-73-77-85-89-91 stitches on a thread for the sleeve, cast on 12-12-16-18-20-22 stitches (= in side under the sleeve), work the last 48-53-53-59-66-70 stitches (= front piece). Body and sleeves are finished separately. THE PIECE IS NOW MEASURED FROM HERE. BODY: = 206-226-240-266-296-316 stitches. Insert 1 marker thread 54-59-61-68-76-81 stitches in from each side (= sides of body). There are 98-108-118-130-144-154 stitches between the marker threads on the back piece; allow the threads to follow your work onwards, they are used when decreasing and increasing in the sides. Continue with stocking stitch and 5 band stitches in garter stitch on each side. When the piece measures 3 cm from the division, decrease 1 stitch on each side of both marker threads – read DECREASE TIP (= 4 stitches decreased). Decrease like this every 1½ cm a total of 5-5-5-5-5-5 times = 186-206-220-246-276-296 stitches. When the piece measures 11 cm from the division, increase 1 stitch on each side of both marker threads – read INCREASE TIP-4 (= 4 stitches increased). Increase like this every cm a total of 9-9-9-8-8-8 times = 222-242-256-278-308-328 stitches. When the piece measures 20 cm (4 cm left to finished length), increase 11-12-16-21-24-25 stitches evenly spaced = 233-254-272-299-332-353 stitches. Change to circular needle size 2,5. Work rib from the right side as follows: 5 band stitches in garter stitch, * knit 1, purl 2*, work from *-* until there are 6 stitches left, knit 1 and 5 band stitches in garter stitch. When the rib measures 4 cm, cast off with garter stitch over garter stitch, knit over knit and purl over purl – read CASTING-OFF TIP. The jacket measures approx. 48-50-52-54-56-58 cm from the shoulder down. SLEEVES: Place the 65-73-77-85-89-91 stitches from the thread on the one side of the piece on double pointed needles/short circular needle size 3 mm and knit up 1 stitch in each of the 12-12-16-18-20-22 stitches cast on under the sleeve = 77-85-93-103-109-113 stitches. Insert a marker in the middle of the new stitches under the sleeve. Allow the thread to follow your work onwards; it will be used when decreasing under the sleeve. Work pattern as before over the middle 27-27-27-33-33-33 stitches. The other stitches are worked in stocking stitch. When the sleeve measures 3-3-3-3-2-2 cm, decrease 1 stitch on each side of the marker – read DECREASE TIP (= 2 stitches decreased). Decrease like this every 3-2-1½-1-1-1 cm a total of 6-9-12-14-15-15 times = 65-67-69-75-79-83 stitches. Work until the sleeve measures 24-23-21-20-18-17 cm from the division (shorter measurements in larger sizes due to broader shoulders) – or to desired length (3 cm left to finished length). Now increase 1-2-3-3-2-4 stitches evenly over the stocking stitches (stitches in A.1b worked as before) = 66-69-72-78-81-87 stitches. Change to double pointed needles size 2.5 mm. Work A.1a over A.1b, and rib over the remaining stitches (knit 1, purl 2). When the rib measures 3 cm, cast off with knit over knit and purl over purl - remember CASTING-OFF TIP. The sleeve measures approx. 27-26-24-23-21-20 cm from the division. Work the other sleeve in the same way. ASSEMBLY: Sew the buttons onto the left band. |
||||||||||||||||||||||||||||
Diagram explanations |
||||||||||||||||||||||||||||
|
||||||||||||||||||||||||||||
 |
||||||||||||||||||||||||||||
 |
||||||||||||||||||||||||||||
 |
||||||||||||||||||||||||||||
 |
||||||||||||||||||||||||||||
Have you finished this pattern?Tag your pictures with #dropspattern #dancingdiamondscardigan or submit them to the #dropsfan gallery. Do you need help with this pattern?You'll find 33 tutorial videos, a Comments/Questions area and more by visiting the pattern on garnstudio.com. © 1982-2026 DROPS Design A/S. We reserve all rights. This document, including all its sub-sections, has copyrights. Read more about what you can do with our patterns at the bottom of each pattern on our site. |
||||||||||||||||||||||||||||


With over 40 years in knitting and crochet design, DROPS Design offers one of the most extensive collections of free patterns on the internet - translated to 17 languages. As of today we count 324 catalogues and 12290 patterns translated into English (UK/cm). 12290
We work hard to bring you the best knitting and crochet have to offer, inspiration and advice as well as great quality yarns at incredible prices! Would you like to use our patterns for other than personal use? You can read what you are allowed to do in the Copyright text at the bottom of all our patterns. Happy crafting!
Post a comment to pattern DROPS 221-8
We would love to hear what you have to say about this pattern!
If you want to leave a question, please make sure you select the correct category in the form below, to speed up the answering process. Required fields are marked *.