
Popular categories
Looking for a yarn?


Comments / Questions (17)
![]() Karin wrote:
Karin wrote:
Her mangler et diagram!!
14.08.2025 - 09:10
![]() Karin wrote:
Karin wrote:
Hvor er diagrammet? Her er kun tegn🤔
14.08.2025 - 08:11DROPS Design answered:
Hej Karin. Du hittar diagram A.1 längst ned på opskriften, over målskitsen. Mvh DROPS Design
15.08.2025 - 08:30
![]() Annelise wrote:
Annelise wrote:
Jeg forstår ikke udtagningen ved halsen?.. hvad betyder 3-4 ogderefter 21 masker
12.05.2025 - 19:26DROPS Design answered:
Hei Annelise. I str S øker du med 3 masker. I str. M øker du med 4 masker. I str. L øker du med 21 masker. I str. XL øker du med 28 masker. I str. XXL øker du med 29 masker og i str. XXXL øker du med 32 masker = det økes 3-4-21-28-29-32 masker. Maskene økes jevnt fordelt, les ØKETIPS (jevn fordeling), lengre oppe i oppskriften. mvh DROPS Design
19.05.2025 - 13:58
![]() Marianne Madsen wrote:
Marianne Madsen wrote:
Der står at jeg skal tage ud 18 gange. Jeg har 16 masker på hver ærme og 36 på ryg og forstykke. 16+18+18=52 /36+18+18= 72. 52+72=124x 2=248+12 masker imellem giver i alt 260 masker. I opskriften skal jeg have 252. Hvordan hænger det sammen.
02.05.2025 - 10:28DROPS Design answered:
Hej Marianne, du starter med 108 masker, tager 18x8=144 masker ud - 108+144=252 masker
08.05.2025 - 09:05
![]() Krista Knudsen wrote:
Krista Knudsen wrote:
Ang diagram- de første 4 forklaringer er jeg med på. MEN det der er vist lige oven over A. 1 - 2 felter med de skrå streger og runde tegn, hvad betyder det???
14.04.2025 - 14:30DROPS Design answered:
Hei Krista. 1. og 3. rad i diagrammet består av 2 ikoner. A.1 går over 2 masker og 1. rad strikkes slik: Strikk 2 masker rett sammen, lag et kast (ikonet o ). Ved ikonet o er det også tegnet 1 blank firkant på hver side og i beskrivelsen står det at mellom 2 masker lages det 1 kast om pinnen. Dersom man har tegnet A.1 gjentatte ganger har man tydligere sett at det er 1 blank firkant på hver side av o. mvh DROPS Design
28.04.2025 - 09:10
![]() Birthe Teglgaard wrote:
Birthe Teglgaard wrote:
Det ville være dejligt med et nærbillede af det strikkede i diagrammet. Jeg finder det lidt svært at følge, hvor jeg skal begynde mønsterets hulmønster på de nye omgange.
05.12.2024 - 23:31DROPS Design answered:
Hej Birthe, her kan du se hvordan du gør: Enkelt hulmønster det er det øverste diagram :)
06.12.2024 - 15:06
![]() Kate wrote:
Kate wrote:
Hello! I'm having trouble with the raglan increase for the Yoke section - on the 3rd row of the A1 pattern it starts with a yarn over, but we are also supposed to be increasing with a yarn over for the raglan, is that two yarn overs in a row? Thank you!
26.01.2024 - 19:38DROPS Design answered:
Dear Kate, to avoid getting 2 yarn overs next to each other, you can work the first stitches in A.1 in stocking stitch, or make sure that the both yarn overs are not worked too loosely to avoid a large hole on next round. Happy knitting!
29.01.2024 - 11:29
![]() Kety Alì wrote:
Kety Alì wrote:
Come faccio a far tornare il colore delle maniche...maniche con lo stesso motivo di colore..
11.03.2022 - 19:42DROPS Design answered:
Buonasera Kety, deve cercare di iniziare dal punto del gomitolo con la stessa combinazione di colori. Buon lavoro!
13.03.2022 - 14:50
![]() Catherine Ledon wrote:
Catherine Ledon wrote:
Bonjour, je souhaite faire ce modèle sans points fantaisie seulement au point mousse me faut-il davantage de laine? et combien? merci.
14.11.2021 - 11:53DROPS Design answered:
Bonjour Mme Ledon, tout à fait, et, comme votre échantillon sera aussi différent, il vous faudra probablement recalculer aussi les explications; vous trouverez ici quelques pulls raglan au point mousse qui pourront vous inspirer si besoin. Bon tricot!
15.11.2021 - 07:44
![]() Ledon wrote:
Ledon wrote:
Bonjour, concernant le modèle 223-7 je ne trouve pas le diagramme qui lui correspond......merci de m'aider.
30.10.2021 - 18:21DROPS Design answered:
Bonjour Mme Ledon, le diagramme est tout petit et se trouve juste au dessus du schema des mesures en bas de page. Bon tricot!
01.11.2021 - 22:13
|
|||||||||||||
April Love#aprillovesweater |
|||||||||||||
 |
 |
||||||||||||
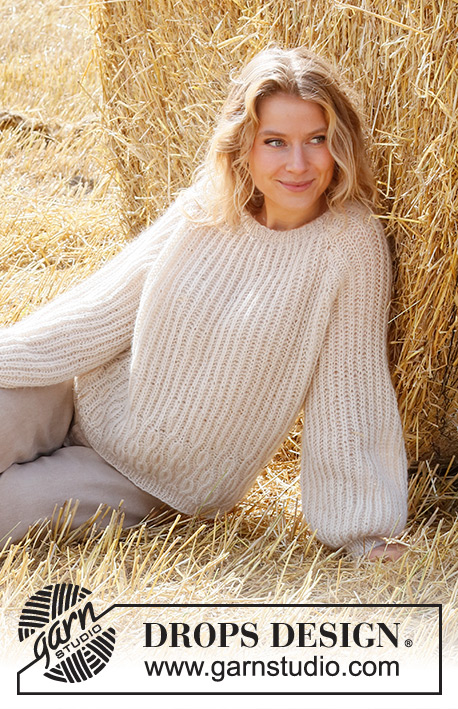
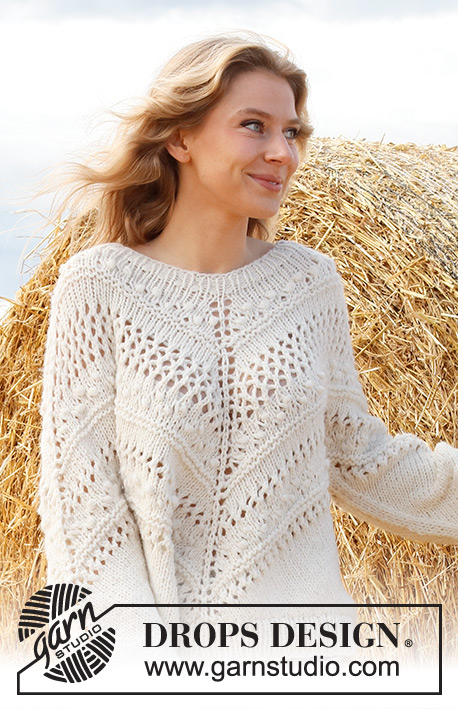
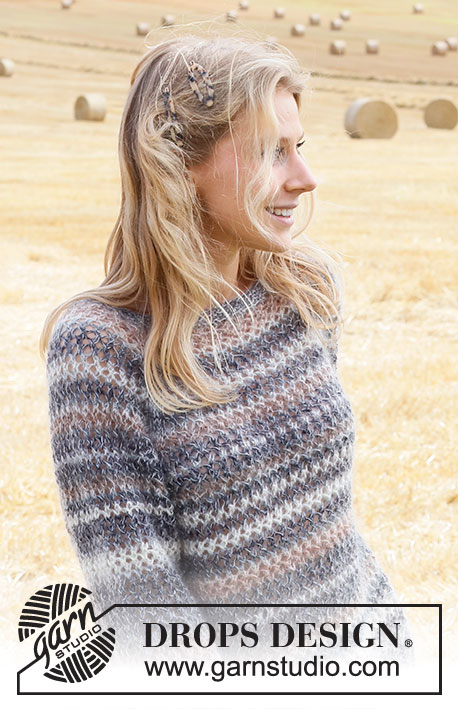
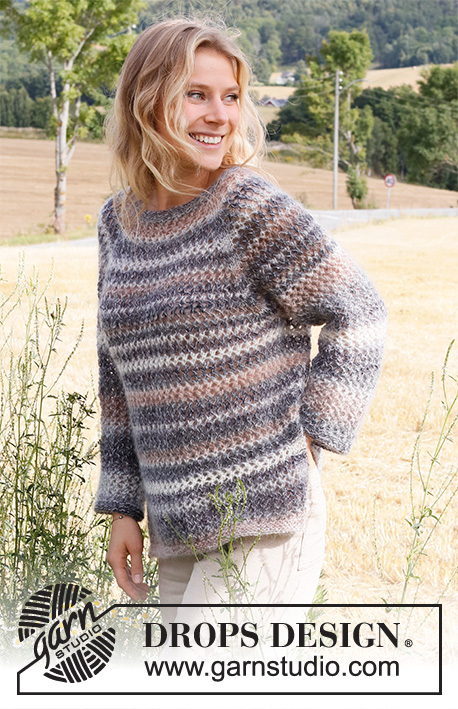
Knitted jumper in DROPS Delight and DROPS Kid-Silk. The piece is worked top down with raglan, lace pattern and split in the sides. Sizes S - XXXL.
DROPS 223-7 |
|||||||||||||
|
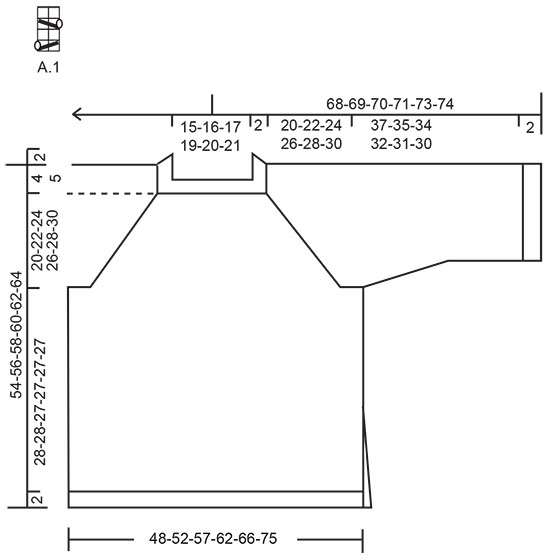
------------------------------------------------------- EXPLANATIONS FOR THE PATTERN: ------------------------------------------------------- RIDGE/GARTER STITCH (worked in the round): 1 ridge in height = 2 rounds; Knit 1 round and purl 1 round. RIDGE/GARTER STITCH (worked back and forth): Knit all rows. 1 ridge in height = Knit 2 rows. PATTERN: See diagram A.1. The diagram shows all the rows in the pattern from the right side. INCREASE TIP (evenly spaced): To work out how to increase evenly, count the total number of stitches on the needle (e.g. 69 stitches) and divide by the number of increases to be made (e.g. 3) = 23. In this example, increase by making 1 yarn over after each 23rd stitch. On the next round work the yarn overs twisted to avoid holes. RAGLAN: Increase to raglan on each side of the marker-stitch as follows: Work until there is 1 stitch left before marker-stitch, 1 yarn over, knit 3 (marker sits in the middle of these 3 stitches), 1 yarn over. On the next round knit the yarn overs twisted to avoid holes. Then work the new stitches in stocking stitch until there are enough stitches to work a new repeat of A.1 in width. DECREASE TIP (for sleeves): Decrease 1 stitch on either side of the marker thread as follows: Work until there are 2 stitches left before the marker thread, knit 2 together, knit 1 (marker thread sits in this stitch), slip 1 stitch as if to knit, knit 1 and pass the slipped stitch over the knitted stitch (2 stitches decreased). The stitches which do not fit into the pattern after decreasing are knitted. CASTING-OFF TIP: To avoid the cast-off edge being tight you can cast off with a larger size needle. If the edge is still tight, make 1 yarn over after approx. each 4th stitch at the same time as casting off; the yarn overs are cast off as normal stitches. ------------------------------------------------------- START THE PIECE HERE: ------------------------------------------------------- JUMPER – SHORT OVERVIEW OF THE PIECE: The neck and yoke are worked in the round with circular needle, top down from the transition between the back piece and the right shoulder. The yoke is divided for body and sleeves and the body continued in the round with circular needle down to the split. Then the body is divided and the front and back pieces finished separately, back and forth on the needle. The sleeves are worked in the round with short circular needle/double pointed needles. NECK: Cast on 69-72-75-80-83-88 stitches with short circular needle size 5.5 mm and 1 strand Delight and 1 strand Kid-Silk (= 2 strands). Work 3 RIDGES – read description above. Knit 1 round where you increase 3-4-21-28-29-32 stitches evenly spaced – read INCREASE TIP = 72-76-96-108-112-120 stitches. Knit 1 round (yarn overs knitted twisted to avoid holes). Insert 1 marker here; the yoke is measured from this marker! YOKE: Change to circular needle size 6 mm. Now insert 4 more markers without working the stitches. Use a different colour to separate them from the marker on the neck. Insert a marker in the first stitch on the round (= transition between back piece and right sleeve), skip 12-12-16-16-16-16 stitches, insert a marker in the next stitch (= transition between right sleeve and front piece), skip 22-24-30-36-38-42 stitches, insert a marker in the next stitch (= transition between front piece and left sleeve), skip 12-12-16-16-16-16 stitches, insert a marker in the next stitch (= transition between left sleeve and back piece), there are 22-24-30-36-38-42 stitches left on the round after the last marker. Now work pattern as follows: Work A.1 in the round, with 3 knitted stitches in each transition between body and sleeves (i.e. each marker stitch and 1 stitch either side). AT THE SAME TIME, on the first round, start to increase to RAGLAN – read description above. Increase like this every 2nd round a total of 16-18-18-18-20-24 times = 200-220-240-252-272-312 stitches. REMEMBER THE KNITTING TENSION! Continue the pattern until the piece measures 20-22-24-26-28-30 cm. Now divide for the body and sleeves on the next round as follows: Place the first 44-48-52-52-56-64 stitches on a thread for the sleeve, cast on 6 new stitches (= in side under the sleeve), work the next 56-62-68-74-80-92 stitches with pattern as before (= front piece), place the next 44-48-52-52-56-64 stitches on a thread for the sleeve, cast on 6 new stitches (= in side under the sleeve), work the last 56-62-68-74-80-92 stitches with pattern as before (= back piece). Body and sleeves are finished separately. THE PIECE IS NOW MEASURED FROM HERE. BODY: = 124-136-148-160-172-196 stitches. Insert a marker thread at the beginning of the round = before the 6 cast-on stitches. Continue in the round with A.1. The pattern should match the pattern on the yoke. When the piece measures 13-13-12-12-12-10 cm from the division, work garter stitches over the 8 stitches in the middle of each side of the body. When you have worked 2 ridges over these 8 stitches, divide for the front and back pieces in the middle of the 8 stitches in each side = 62-68-74-80-86-98 stitches on the front piece and 62-68-74-80-86-98 stitches on the back piece. Continue each piece back and forth separately (splits in each side), with pattern as before and 4 stitches in garter stitch on each side. When the split measures 13 cm – adjust so you finish after a row from the wrong side, knit 1 row from the right side where you increase 10-10-12-13-15-15 stitches evenly spaced (do not increase over the 4 edge stitches on each side) = 72-78-86-93-101-113 stitches. Change to circular needle size 5.5 mm and work garter stitch back and forth for 2 cm. Cast off – read CASTING-OFF TIP. The jumper measures approx. 54-56-58-60-62-64 cm from the shoulder down. Work the other piece in the same way. SLEEVE: Place the 44-48-52-52-56-64 stitches from the thread on the one side of the piece on double pointed needles/short circular needle size 6 mm and knit up 1 stitch in each of the 6 stitches cast on under the sleeve = 50-54-58-58-62-70 stitches. Start the round between knitted-up stitches 2 and 3 under the sleeve and work the first round as follows: Knit stitches 3 and 4 together (= 1 stitch decreased), knit 1, work pattern as before over the next 46-50-54-54-58-66 stitches, knit 1 = 49-53-57-57-61-69 stitches. There are now 3 knitted stitches under the sleeve. Continue in the round with A.1 and 3 knitted stitches under the sleeve. Insert a marker in the middle of the 3 knitted stitches. When the sleeve measures 4 cm from the division, decrease 2 stitches under the sleeve – read DECREASE TIP. Decrease like this every 2-2-1½-1½-1-1 cm a total of 4-6-6-5-7-10 times = 41-41-45-47-47-49 stitches. Continue working until the sleeve measures 37-35-34-32-31-30 cm from the division – adjust so you finish after a knitted round; you can try the jumper on and work to desired length (there is 2 cm left to finished length). Knit 1 round where you increase 5-7-7-7-7-7 stitches = 46-48-52-54-54-56 stitches. Change to double pointed needles size 5.5 mm and work garter stitch for 2 cm. Cast off – remember CASTING-OFF TIP. The sleeve measures approx. 39-37-36-34-33-32 cm from the division. Work the other sleeve in the same way. |
|||||||||||||
Diagram explanations |
|||||||||||||
|
|||||||||||||
 |
|||||||||||||
Have you finished this pattern?Tag your pictures with #dropspattern #aprillovesweater or submit them to the #dropsfan gallery. Do you need help with this pattern?You'll find 32 tutorial videos, a Comments/Questions area and more by visiting the pattern on garnstudio.com. © 1982-2026 DROPS Design A/S. We reserve all rights. This document, including all its sub-sections, has copyrights. Read more about what you can do with our patterns at the bottom of each pattern on our site. |
|||||||||||||


With over 40 years in knitting and crochet design, DROPS Design offers one of the most extensive collections of free patterns on the internet - translated to 17 languages. As of today we count 324 catalogues and 12290 patterns translated into English (UK/cm). 12290
We work hard to bring you the best knitting and crochet have to offer, inspiration and advice as well as great quality yarns at incredible prices! Would you like to use our patterns for other than personal use? You can read what you are allowed to do in the Copyright text at the bottom of all our patterns. Happy crafting!
Post a comment to pattern DROPS 223-7
We would love to hear what you have to say about this pattern!
If you want to leave a question, please make sure you select the correct category in the form below, to speed up the answering process. Required fields are marked *.