
Popular categories
Looking for a yarn?


Comments / Questions (95)
![]() Lorelie Miller wrote:
Lorelie Miller wrote:
Hi. How many stitches is in the front piece, the cables and the back piece and the f sleeves. I want to place the markers at the correct places before starting the yoke. I find that easiest. I’m doing the 5/6 size. So I have 68 stitches on my needles
03.04.2026 - 01:04DROPS Design answered:
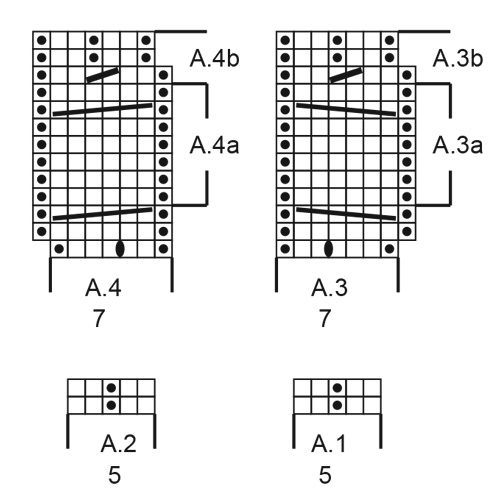
Dear Mrs Miller, piece is divided like that: Half back piece = 13 sts: * Knit 2, purl 2 *, work from *-* 8 sts, A.1 (= 5 sts). Right sleeve = 10 sts: * Purl 2, knit 2 *, work from *-* over the next 10 sts. Front piece (24sts): A.2 (= 5 sts), * purl 2, knit 2 *, work from *-* over the next 14 sts, A.1 over 5 sts. Left sleeve (= 10 sts): * Purl 2, knit 2 *, work from *-* over the next 10 sts. Half back piece (= 11 sts): A.2 over 5 sts, * purl 2, knit 2 *, over the last 6 sts. So that you have: 13+10+24+10+11= 68 sts. Happy knitting!
08.04.2026 - 07:31
![]() Min wrote:
Min wrote:
Hi, nadat ik de eerste ronde na de pas heb gedaan heb ik inderdaad 72 steken op mijn naald (voor 6-9 maanden). Als ik hierna nog 9 keer de omslagen erbij doe zou ik inderdaad op 144 steken zitten, alleen moet ik in het patroon van A3 / A4 ook nog minderen, dus dan zou ik op 140 steken komen. Zie ik iets over het hoofd? Het meerderen in de mouwen hoeft na de eerste keer niet meer toch? Alvast bedankt!
18.01.2026 - 23:11DROPS Design answered:
Dag Min,
Je meerdert inderdaad in totaal 10 keer, dus als je op 72 steken zit meerder je nog 9 keer. Je herhaalt A.3a en A.4a in de hoogte. Daar zitten geen minderingen in.
21.01.2026 - 20:21
![]() Kirsten Petersen wrote:
Kirsten Petersen wrote:
Er raglanudtagningerne de omslag man laver i A3 og A4
17.01.2026 - 16:58DROPS Design answered:
Hej Kristen. Nej, omslagen till raglan är inte utritade i diagrammen. Mvh DROPS Design
23.01.2026 - 11:25
![]() Jeanne wrote:
Jeanne wrote:
Wordt er elke toer voor en na A3 en A4 een omslag gemaakt om de gaatjes aan weerszijde van de kabel te maken of alleen de eerste keer? Alvast dank voor t antwoord!
26.12.2025 - 16:53DROPS Design answered:
Dag Jeanne,
Je maakt steeds om de naald gaatjes aan beide kanten van A.3 en A.4. Dus de ene naald wel en en de andere naald niet. Dus niet alleen de eerste naald. Op de foto kun je ook zien dat er steeds gaatjes zitten naast de kabels.
27.12.2025 - 11:29
![]() Christine wrote:
Christine wrote:
Hej, Jeg strikker str 6-9 mdr. Jeg forstår ikke, at der i opskriften står, at det halve venstre bagstykke i halskanten er 9 masker. Men når jeg starter på bærestykket skal jeg strikke 3 ret, slå om og så 7 masker A.3 - det giver jo 10 masker?
10.12.2025 - 22:53DROPS Design answered:
Hej Christine, jeg finder ikke de 9 masker du skriver om nogle steder i opskrifter. Vil du skrive hvor du er i opskriften :)
12.12.2025 - 09:53
![]() Torunn wrote:
Torunn wrote:
Hei, jeg har tellet over mange ganger men får det ikke til å stemme i str 2. Der skal det være 60 masker i halskant, men når man følger instruksjonene for vrangbord blir summen av maskene ikke 60, men 72 (uten at man her skal ha øket noe) HalveBakstk=2+2+4 +5=13, H erme=4+10=14, Forstykke=5+2+2+10+5=24, V erme=2+2+10=14, Halve Bakstk=5+6=11 og 13+14+24+11=72
30.11.2025 - 17:04DROPS Design answered:
Hei Torunn. Ser ut som du har tolket oppskriften feil, når det står: Strikk * 2 rett, 2 vrang *, strikk fra *-* over 4-4 (4-4-8-8) masker, betyr det 2 rett / 2 vrang over 4 masker, ikke 4 masker i tillegg. Halve bakstykket: Du skal strikke 2 rett - 2 vrang over 4 masker + A.1 (5 masker) = 9 masker. Høyre erme: 2 vrang - 2 rett over 10 masker. Forstykke: A.2 (= 5 masker) + 2 vrang - 2 rett over 10 masker+ A.1 (5 masker) = 5+10+5= 20 masker. Venstre erme: 2 vrang - 2 rett over 10 masker. Halve bakstykket: A.2 (5 masker) + 2 vrang - 2 rett over 6 maskene = 11 masker. Bare maskeantall: 9+10+20+10+11= 60 masker. mvh DROPS Design
01.12.2025 - 09:38
![]() Jadranka Meins wrote:
Jadranka Meins wrote:
Hallo, ich möchte diesen Pulli in Gr. 98/104 stricken, aber aus einem anderem Garn. Er soll später waschbar sein (Superwasch?). Ausserdem hätte ich gerne einen Verlaufsgarn, d. h. mit mehreren Farben. Welche Wolle kann man noch dafür nehmen? Vielen Dank
09.10.2025 - 16:36DROPS Design answered:
Hi, Jadranka, this pattern is knitted in Yarn Group C or A + A, so you can choose yarns that are either groud C or 2 threads of group A. Regards, DROPS Design
21.10.2025 - 12:02
![]() Louise Boisvert wrote:
Louise Boisvert wrote:
Je veux faire le modèle Baby Leaf Sweater et je ne comprends pas le commencement comment diviser les mailles du début (col) S.V.P. me dire combien de mailles pour le demi-dos - manche - devant - manche et demi-dos. J'attends votre réponse à ce sujet. Merci
20.08.2025 - 16:48DROPS Design answered:
Bonjour Mme Boisvert, tout dépend de la taille tricoté, retrouvez la répartition des mailles juste au début du paragraphe EMPIÈCEMENT; vous allez tricoter les mailles des demi-dos, des manches, et du devant en jersey en augmentant des mailles à intervalles réguliers (cf taille), et en même temps, tricoter A.3/A.4 à chaque raglan (transition entre le devant/le dos et les manches = vous augmentez ainsi 1 m dans chaque A.3/A.4) et vous commencez dès ce tour à augmenter pour le raglan de chaque côté de chaque A.3/A.4. Bon tricot!
22.08.2025 - 14:48
![]() María José Ayala wrote:
María José Ayala wrote:
Hola! Estoy tejiendo patrón de 5/6 años, ya tejí 1 vez diagrama en vertical de A3 y A4 ( termina con 5 puntos), pero ahora debo seguir con A3a y A4a pero estos tienen un 6 puntos, ósea 1 punto más que no sé de dónde sacarlo, porfavor si me ayudan Gracias
25.06.2025 - 04:42DROPS Design answered:
Hola María José, se trataba de un error en la versión española del patrón; ya está corregida. Tejes el diagrama solo hasta el final de A.3a/A.4a y después repites solo la sección de A.3a/ A.4a en vertical.
29.06.2025 - 18:08
![]() Annabel wrote:
Annabel wrote:
Thank you very much. That's really helpful.
02.06.2025 - 11:53
|
|||||||||||||||||||
Baby Leaf Sweater#babyleafsweater |
|||||||||||||||||||
 |
 |
||||||||||||||||||
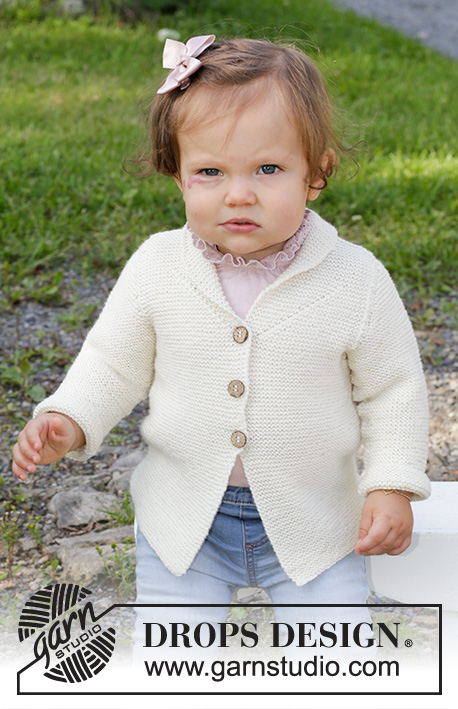
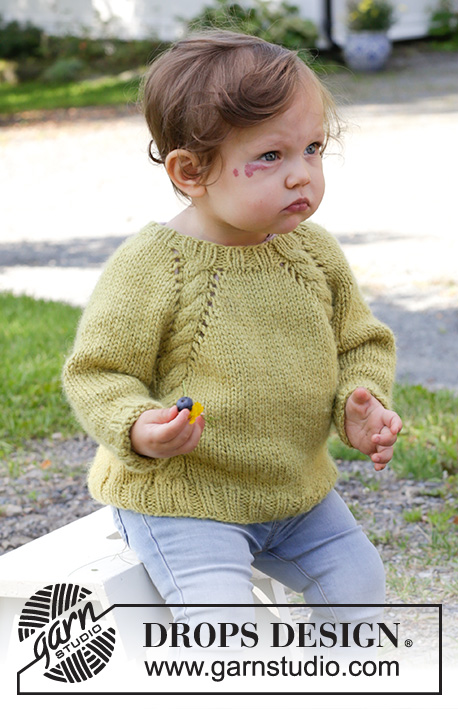
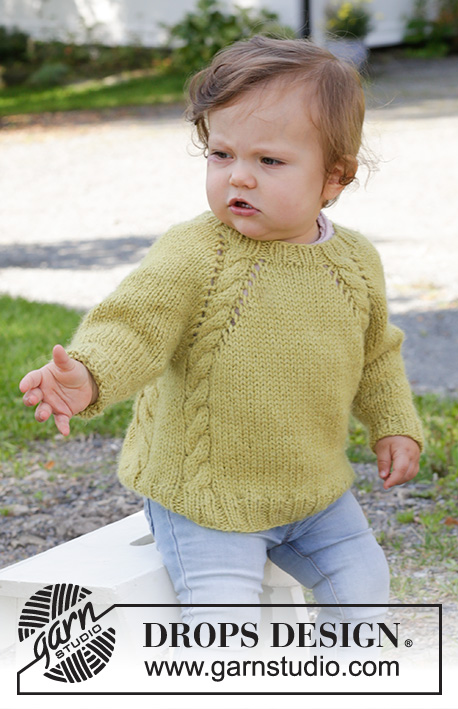
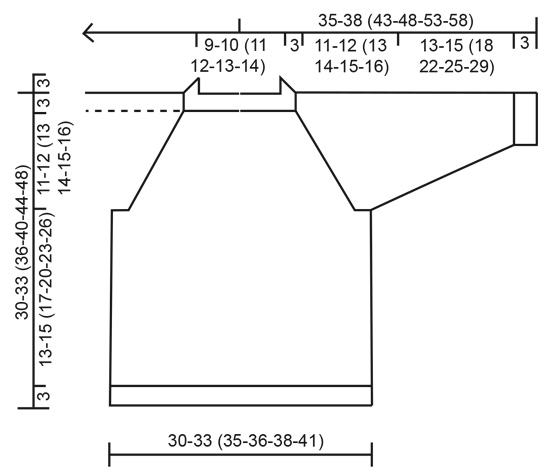
Knitted jumper for baby and kids in DROPS Alaska. Piece is knitted with raglan and cables, top down. Size 6 month - 8 years
DROPS Baby & Children 38-9 |
|||||||||||||||||||
|
------------------------------------------------------- EXPLANATION FOR THE PATTERN: ------------------------------------------------------- PATTERN: See diagrams A.1 to A.4. DECREASE TIP (applies to sleeves): Decrease 1 stitch on each side of marker as follows: Work until 3 stitches remain before marker, knit 2 together, knit 2 (marker is between these stitches), slip 1 stitch knitwise, knit 1, pass slipped stitch over stitch worked. CAST-OFF TIP: To avoid a tight cast-off edge you may use a larger needle size. If this also is too tight, work a 1 yarn over after approx. every 4th stitch while casting off (cast off yarn overs as regular stitches). ------------------------------------------------------- START THE PIECE HERE: ------------------------------------------------------- JUMPER - SHORT OVERVIEW OF THE PIECE: Worked top down. Work neck edge in the round on double pointed needles/a short circular needle. Work yoke with cables and raglan increase on circular needle. Divide piece for body and sleeves. Continue body in the round on circular needle with cables. Work sleeves in the round on double pointed needles. NECK EDGE: Cast on 52-52 (60-60-68-68) stitches on double pointed needles/circular needle size 4.5 mm with Alaska. Knit 1 round. Round starts approx. mid back. Then work rib as follows: Half back piece: * Knit 2, purl 2 *, work from *-* over 4-4 (4-4-8-8) stitches, A.1 (= 5 stitches). Right sleeve: * Purl 2, knit 2 *, work from *-* over the next 6-6 (10-10-10-10) stitches (i.e. begin and end with purl 2). Front piece: A.2 (= 5 stitches), * purl 2, knit 2 *, work from *-* over the next 10-10 (10-10-14-14) stitches (i.e. begin and end with purl 2), A.1 over 5 stitches. Left sleeve: * Purl 2, knit 2 *, work from *-* over the next 6-6 (10-10-10-10) stitches (i.e. begin and end with purl 2). Half back piece: A.2 over 5 stitches, * purl 2, knit 2 *, over the last 6 stitches (i.e. begin and end with purl 2). Continue with knit over knit and purl over purl until piece measures 3 cm. Insert 1 marker at the beginning of round, measure from this marker! Switch to circular needle size 5.5 mm and work yoke as follows: YOKE: Work next round as follows: Half back piece: Knit 3-3 (3-3-7-7) while increasing 0-1 (2-3-1-3) stitches evenly, 1 yarn over, A.3 (= 7 stitches). Right sleeve: 1 yarn over, knit 4-4 (8-8-8-8) while increasing 4-4 (0-2-2-2) stitches evenly, 1 yarn over. Front piece: A.4 (= 7 stitches), 1 yarn over, knit 8-8 (8-8-12-12) while increasing 0-2 (4-6-2-6) stitches evenly, 1 yarn over, A.3 over 7 stitches. Left sleeve: 1 yarn over, knit 4-4 (8-8-8-8) while increasing 4-4 (0-2-2-2) stitches evenly, 1 yarn over. Half back piece: A.4 over 7 stitches, 1 yarn over, knit 5 while increasing 0-1 (2-3-1-3) stitches evenly. 8-12 (8-16-8-16) stitches have been increased evenly in total, 1 yarn over on each side of A.3/A.4 (= 8 stitches increased in total for raglan) and 1 stitch in every A.3/A.4 (= 4 stitches) = 72-76 (80-88-88-96) stitches in total on row. Knit yarn overs on each side of A.3/A.4 on next round to make holes. Do work the other yarn overs twisted to avoid holes. Continue with A.3 and A.4 and stocking stitch over the remaining stitches and increase every other round 10-11 (12-12-13-14) times in total (including the first increase explained above)= 144-156 (168-176-184-200 ) stitches. When A.3a and A.4a have been worked 1 time vertically, repeat A.3a and A.4a vertically. REMEMBER THE KNITTING TENSION! After all increases piece measures approx. 10-11 (12-12-13-14) cm from marker. Then work as before without increases until piece measures 11-12 (13-14-15-16) cm. Now divide the piece for body and sleeves on next round as follows: Work over the first 21-23 (25-26-29-32) stitches as before, slip the next 28-30 (32-34-36-38) stitches on a stitch holder for sleeve and cast on 6 stitches under sleeve, work as before over the next 44-48 (52-54-56-62) stitches, slip the next 28-30 (32-34-36-38) stitches on a stitch holder for sleeve and cast on 6 stitches under sleeve and work the last 23-25 (27-28-27-30) stitches as before. BODY: = 100-108 (116-120-124-136) stitches. Continue in the round with stocking stitch and A.3/A.4 as before. Work stitches cast on under sleeve in in stocking stitch. When piece measures 13-15 (17-20-23-26) cm from division (approx. 3 cm remain), work next round as follows: Knit 13-15 (17-18-21-24) while increasing 0-2 (4-3-4-1) stitches evenly, A.3a as before, knit 6 while increasing 2 stitches evenly, A.4a as before, knit 28-32 (36-38-40-46) while increasing 4-4 (4-6-4-6) evenly, A.3a as before, knit 6 while increasing 2 stitches evenly, A.4a as before, knit 15-17 (19-20-19-22) while increasing 4-2 (0-3-0-5) stitches evenly = 112-120 (128-136-136-152) stitches. Switch to circular needle size 4.5 mm. Then work rib as follows: * Purl 2, knit 2 *, work from *-* over the first 12-16 (20-20-24-24) stitches, purl 1, A.3b over A.3a, purl 1, * knit 2, purl 2 *, work from *-* over 6 stitches, purl 1, A.4b over A.4a, purl 1, * knit 2, purl 2 *, work from *-* over 30-34 (38-42-42-50) stitches, purl 1, A.3b over A.3a, purl 1, * knit 2, purl 2 *, work from *-* over 6 stitches, purl 1, A.4b over A.4a, purl 1, * knit 2, purl 2 *, work from *-* over 18-18 (18-22-18-26) stitches (i.e. begin and end with knit 2). Continue with knit over knit and purl over purl until piece measures 16-18 (20-23-26-29) cm from division. Cast off with knit over knit and purl over purl - read CAST-OFF TIP. Jumper measures approx. 30-33 (36-40-44-48) cm from shoulder and down. SLEEVES: Slip the 28-30 (32-34-36-38) stitches from stitch holder in one side of piece on double pointed needles size 5.5 mm and pick up 1 stitch in each of the 6 stitches cast on under sleeve = 34-36 (38-40-42-44) stitches. Insert 1 marker in the middle of the 6 new stitches under the sleeve. Decrease on each side of this marker later. Work in stocking stitch in the round. When sleeve measures 3 cm from division, decrease 1 stitch on each side of marker - read DECREASE TIP (= 2 stitches decreased). Decrease like this every 3-2½ (3½-5-5½-6) cm 3-4 (4-4-4-4) times in total = 28-28 (30-32-34-36) stitches. When piece measures 13-15 (18-22-25-29) cm from division, increase 0-0 (2-0-2-0) stitches evenly = 28-28 (32-32-36-36) stitches. Switch to double pointed needles size 4.5 mm. Work rib (= knit 2/purl 2). Cast off with knit over knit and purl over purl when sleeve measures 16-18 (21-25-28-32) cm from division. Work the other sleeve the same way. |
|||||||||||||||||||
Diagram explanations |
|||||||||||||||||||
|
|||||||||||||||||||
 |
|||||||||||||||||||
 |
|||||||||||||||||||
Have you finished this pattern?Tag your pictures with #dropspattern #babyleafsweater or submit them to the #dropsfan gallery. Do you need help with this pattern?You'll find 21 tutorial videos, a Comments/Questions area and more by visiting the pattern on garnstudio.com. © 1982-2026 DROPS Design A/S. We reserve all rights. This document, including all its sub-sections, has copyrights. Read more about what you can do with our patterns at the bottom of each pattern on our site. |
|||||||||||||||||||


With over 40 years in knitting and crochet design, DROPS Design offers one of the most extensive collections of free patterns on the internet - translated to 17 languages. As of today we count 324 catalogues and 12290 patterns translated into English (UK/cm). 12290
We work hard to bring you the best knitting and crochet have to offer, inspiration and advice as well as great quality yarns at incredible prices! Would you like to use our patterns for other than personal use? You can read what you are allowed to do in the Copyright text at the bottom of all our patterns. Happy crafting!
Post a comment to pattern DROPS Baby & Children 38-9
We would love to hear what you have to say about this pattern!
If you want to leave a question, please make sure you select the correct category in the form below, to speed up the answering process. Required fields are marked *.