DROPS Cotton Merino
DROPS Cotton Merino
50% Wool, 50% Cotton
from 19.00 RON /50g
Get the yarn to make this pattern from 76.00RON.

The yarn cost is calculated from the pattern’s smallest size and the yarn’s cheapest product type. Looking for an even better price? You might find it on the DROPS Deals!

DROPS SS24

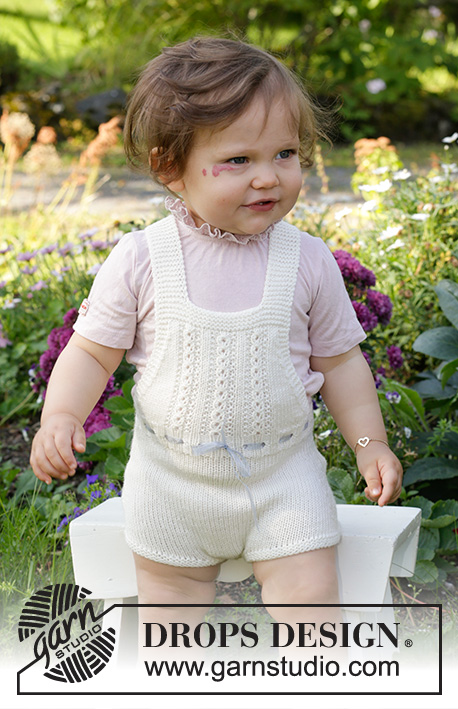
Enchanted Time Dress

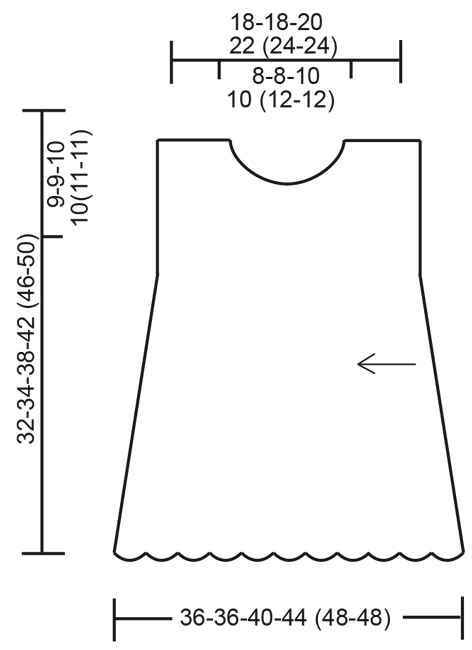
Knitted dress for baby and kids in DROPS Cotton Merino. Piece is knitted sideways in garter stitch with lace edge. Size 0 - 4 years

DROPS Baby & Children 38-3
DROPS design: Pattern no cm-005-by
Yarn group B
----------------------------------------------------------

SIZE:
0/1 - 1/3 - 6/9 - 12/18 months (2 - 3/4) years
Size equals approx. kid’s height in cm:
48/52 - 56/62 - 68/74 - 80/86 (92 - 98/104)

MATERIALS:
DROPS COTTON MERINO from Garnstudio (belongs to yarn group B)
150-200-200-200 (250-250) g colour 05, powder pink
50-50-50-50 (50-50) g colour 01, off white

KNITTING TENSION:
21 stitches in width and 28 rows vertically in stocking stitch = 10 x 10 cm.

NEEDLES:
DROPS CIRCULAR NEEDLE SIZE 4 mm : Length 60 or 80 cm.
DROPS CROCHET HOOK SIZE 3.5 mm - for edges.
Needle size is only a suggestion! If you have too many stitches on 10 cm switch to a larger needle size. If you have too few stitches on 10 cm switch to a smaller needle size.

DROPS MOTHER-OF-PEARL BUTTON ARCHED (white), NO 521: 1 piece for all sizes

-------------------------------------------------------

Alternative Yarn – See how to change yarns here
Yarn Groups A to F – Use the same pattern and change the yarn here
Yarn usage using an alternative yarn – Use our yarn converter here

-------------------------------------------------------

DROPS Cotton Merino
DROPS Cotton Merino
50% Wool, 50% Cotton
from 19.00 RON /50g
Get the yarn to make this pattern from 76.00RON.

The yarn cost is calculated from the pattern’s smallest size and the yarn’s cheapest product type. Looking for an even better price? You might find it on the DROPS Deals!

Pattern instructions

-------------------------------------------------------

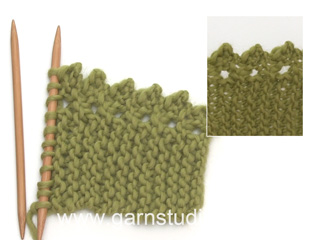
EXPLANATION FOR THE PATTERN:

-------------------------------------------------------

GARTER STITCH (back and forth):
1 ridge = knit 2 rows.

PICOT EDGE (back and forth on needle):
ROW 1 (= right side): Knit all stitches. 
ROW 2 (= wrong side): Knit until 4 stitches remain, work these stitches as follows: Knit 2 together, 1 yarn over, then work 2 stitches in each of the last 2 stitches = 2 new stitches on needle.
ROW 3 (= right side): Slip first stitch knitwise, knit 1, pass slipped stitch over stitch worked, knit 1, and pass the back stitch on right needle over the front stitch, 2 stitches have been decreased - then knit the rest of row.
ROW 4 (= wrong side): Knit all stitches.
Repeat rows 1 to 4.

CAST-OFF TIP:
To avoid a tight cast-off edge you may use a larger needle size. If this also is too tight, work a 1 yarn over after approx. every 4th stitch while casting off (cast off yarn overs as regular stitches).

-------------------------------------------------------

START THE PIECE HERE:

-------------------------------------------------------

DRESS - SHORT OVERVIEW OF THE PIECE:
Work front and back piece separately. Piece is knitted sideways with short rows in garter stitch with lace edge. 

BACK PIECE:
Cast on 68-72-80-89 (97-105) stitches on circular needle size 4 mm with powder pink.

SHORT ROWS:
Insert 1 marker inside the first 4 stitches at beginning of row seen from right side (= marker-1). Then work PICOT EDGE - read explanation above, over these stitches AT THE SAME TIME as working short rows in GARTER STITCH - read explanation above, as follows:
* Work 46-50-56-62 (68-74) stitches (work picot edge until marker 1 - (picot edge varies from 4 to 6 stitches), insert 1 new marker (= marker 2), turn piece, tighten yarn and work back. Work over all stitches, turn piece and work back *, work from *-* (i.e. 1 repetition = 2 ridges/4 rows over the bottom stitches and picot edge and 1 ridge/2 rows over the top stitches).
REMEMBER THE KNITTING TENSION!

NECK LINE:
When piece measures 5-5-5-6 (6-6) cm on the most narrow part, cast off stitches for neck line at the beginning of every row from wrong side when working back over all stitches as follows (continue short rows as before):
Cast off 3 stitches 1 time, 2 stitches 1 time and 1 stitch 1 time = 62-66-74-83 (91-99) stitches.
Continue short rows as before.

LACE PATTERN AND VENT MID BACK:
When piece measures approx. 9-9-10-11-12-12 cm in total on the most narrow part (= mid back) – adjust so that next row is from right side over all stitches, work as follows:
Work picot edge until marker-1, * knit 2 together, 1 yarn over *, work from *-* until 12-12-12-13 (13-13) stitches remain, knit the rest of row, turn piece, cast off the first 10 stitches at beginning of row and knit the rest of row.
Continue short rows as before, but at the end of row worked over all stitches, cast on 10 new stitches = 62-66-74-83 (91-99) stitches. Continue short rows as before.

NECK LINE:
When piece measures approx. 1½ cm from where new stitches were cast on for vent, cast on new stitches at the end of every row from right side when working over all stitches (continue short rows as before):
Cast on 1 stitch 1 time, 2 stitches 1 time and then 3 stitches 1 time = 68-72-80-89 (97-105) stitches.
Continue short rows as before.
Work as before until piece measures 9-9-10-11 (12-12) cm on the most narrow part, insert 1 marker after 18-18-20-23 (25-27) stitches from wrong side - this marker shows end of side seam. Cast off - read CAST-OFF TIP. Piece measures 18-18-20-22 (24-24) cm on the most narrow part and 36-36-40-44 (48-48) cm on the widest part.

FRONT PIECE:
Cast on and work as back piece but do not decrease for neck vent, i.e. cast off for neckline as on back piece when piece measures 5-5-5-6 (6-6) cm.
When piece measures approx. 9-9-10-11 (12-12) cm – adjust so that next row is from right side over all stitches, work as follows:
Work picot edge until marker-1, * knit 2 together, 1 yarn over *, work from *-* until 2-2-2-3 (3-3) stitches remain on row, knit the rest of row, turn piece, tighten yarn and work over all stitches.
When piece measures 11½-11½-13½-14½ (16½-16½) cm in total, cast on new stitches for neckline as on back piece at the end of every row from right side over all stitches.
Continue short rows as before.
Work until piece measures 18-18-20-22 (24-24) cm in total on the most narrow part and 36-36-40-44 (48-48) cm on the widest part. Insert 1 marker after 18-18-20-23 (25-27) stitches from wrong side - this marker shows end of side seam. Cast off.

ASSEMBLY:
Sew shoulder seams in outer loops of edge stitches.
Sew side seams in front loop of outermost stitch, sew up to markers.

ARM HOLE:
Crochet an edge around the armhole on hook size 3.5 mm with off white as follows:
Begin mid under sleeve, work 1 slip stitch in first stitch, work 1 chain stitch, * 1 double crochet in next stitch, 1 chain stitch, skip approx. 1 cm *, work from *-* and finish 1 slip stitch in first chain stitch. Make sure that crochet edge is not tight around the armhole, work if needed more chain stitches between double crochets.

AROUND THE NECK:
Begin at the bottom of vent and work around the neck and down along the other side of vent. Work with off white on hook size 3.5 mm as follows: Work 1 slip stitch at the bottom of vent, 1 chain stitch, * 1 double crochet in next stitch/row, 3 chain stitches, 1 treble crochet in double crochet, skip approx. 1 cm *, work from *-* and finish with 1 double crochet at the bottom of vent.
Sew on a button at the top of vent, button through crochet edge.

Diagram

symbols = knitting direction
diagram

Each of our patterns has specific tutorial videos to help you.

Do you have a question? See a list of frequently asked questions (FAQ)

Knitting tension is what determines the final measurements of your work, and is usually measured per 10 x 10 cm. It is provided like so: number of stitches in width x number of rows in height - eg: 19 stitches x 26 rows = 10 x 10 cm.

The knitting tension is very individual; some people knit/crochet loosely while others work tightly. You adjust the knitting tension with the needle size, which is why the suggested needle size is only meant as a guide! You need to adjust this (up or down) to ensure that YOUR knitting tension matches the knitting tension provided in the pattern. If you work with a different knitting tension than provided you will have a different yarn consumption, and your work will have different measurements than what the pattern suggests.

The knitting tension also determines which yarns can replace each other. As long as you achieve the same knitting tension you can replace one yarn with another.

See DROPS lesson: How to measure your tension/gauge

See DROPS video: How to make a gauge tension swatch

The required amount of yarn is provided in grams, eg: 450 g. To calculate how many balls you’ll need you first need to know how many grams are in 1 ball (25g, 50g or 100g). This information is available if you click on the individual yarn quality on our pages. Divide the amount required with the amount of each ball. For example, if each ball is 50g (the most common amount), the calculation will be as follows: 450 / 50 = 9 balls.

The important thing when changing from one yarn to another is that the knitting/crochet tension remains the same. This is so that the measurements of the finished piece will be the same as on the sketch provided. It is easier to achieve the same knitting tension using yarns from the same yarn group. It is also possible to work with multiple strands of a thinner yarn to achieve the knitting tension of a thicker one. Please try our yarn converter. We recommend you to always work a test swatch.

Please NOTE: when changing yarn the garment might have a different look and feel to the garment in the photo, due to individual properties and qualities of each yarn.

See DROPS lesson: Can I use a different yarn than the one mentioned in the pattern?

All our yarns are categorised into yarn groups (from A to F) according to thickness and knitting tension – group A contains the thinnest yarns and group F the thickest. This makes it easier for you to find alternative yarns to our patterns, should you wish to switch yarn. All yarns within the same group have a similar knitting tension and can easily replace each other. However, different yarn qualities have different structures and properties which will give the finished work a unique look and feel.

Click here for an overview of the yarns in each yarn group

At the top of all our patterns you’ll find a link to our yarn calculator, which is a helpful tool should you wish to use a different yarn than suggested. By filling in the yarn quality you wish to replace, the amount (in your size) and number of strands, the calculator will present good alternative yarns with the same knitting tension. Additionally it will tell you how much you’ll require in the new qualities and whether you’ll need to work with multiple strands. Most skeins are 50g (some are 25g or 100g).

If the pattern is worked with multiple colours, every colour will have to be calculated separately. Similarly, if the pattern is worked with several strands of different yarns (for example 1 strand Alpaca and 1 strand Kid-Silk) you will have to find alternatives for each, individually.

Click here to see our yarn calculator

Since different yarns have different qualities and textures we have chosen to keep the original yarn in our patterns. However, you can easily find options among our available qualities by using our yarn calculator, or simply pick a yarn from the same yarn group.

It is possible that some retailers still have discontinued yarns in stock, or that someone has a few skeins at home that they would like to find patterns for.

The yarn calculator will provide both alternative yarn as well as required amount in the new quality.

If you think it's hard to decide what size to make, it can be a good idea to measure a garment you own already and like the size of. Then you can pick the size by comparing those measures with the ones available in the pattern's size chart.

You'll find the size chart at the bottom of the pattern.

See DROPS lesson: How to read size chart

The needle size provided in the pattern serves only as a guide, the important thing is to follow the knitting tension. And since knitting tension is very individual, you will have to adjust the needle size to ensure that YOUR tension is the same as in the pattern – maybe you’ll have to adjust 1, or even 2 needle sizes, up or down to achieve the correct tension. For this, we recommend that you work test swatches.

Should you work with a different knitting tension than the one provided, the measurements of the finished garment might deviate from the measurement sketch.

See DROPS lesson: How to measure your tension/gauge

See DROPS video: How to make a tension/gauge swatch

Working a garment top-down provides more flexibility and room for personal adjustment. For example it is easier to try the garment on while working, as well as making adjustments to length of yoke and shoulder caps.

The instructions are carefully explaining every step, in the correct order. Diagrams are adjusted to the knitting direction and are worked as usual.

The diagram depicts all rows/rounds, and every stitch seen from the right side. It is read from bottom to top, from right to left. 1 square = 1 stitch.

When working back and forth, every other row is worked from the right side and every other row is worked from the wrong side. When working from the wrong side, the diagram will have to be worked reversed: from left to right, knit stitches are purled, purl stitches are knit etc.

When working in the round every round is worked from the right side and the diagram are worked from right to left on all rounds.

See DROPS lesson: How to read knitting diagrams

The diagram depicts all rows/rounds, and every stitch seen from the right side. It is worked from bottom to top, from right to left.

When working back and forth every other row is worked from the right side: from right to left and every other row is worked from the wrong side: from left to right.

When working in the round, every row in the diagram are worked from the right side, from right to left.

When working a circular diagram you start in the middle and work your way outwards, counter clockwise, row by row.

The rows usually start with a given number of chain stitches (equivalent to the height of the following stitch), this will either be depicted in the diagram or explained in the pattern.

See DROPS lesson: How to read crochet diagrams

Instructions for working several diagrams after each other on the same row/round, will often be written like so: “work A.1, A.2, A.3 a total of 0-0-2-3-4 times". This means you work A.1 once, then A.2 is worked once, and A.3 is repeated (in width) the number of times provided for your size – in this case like so: S = 0 times, M = 0 times, L=2 times, XL= 3 times and XXL = 4 times.

The diagrams are worked as usual: begin with the first row in A.1, then work the first row in A.2 etc.

See DROPS lesson: How to read knitting diagrams

See DROPS lesson: How to read crochet diagrams

The total width of the garment (from wrist-to-wrist) will be larger in the larger sizes, despite the actual sleeves being shorter. The larger sizes have longer sleeve caps and wider shoulders, so there will be a good fit in all sizes.

The measurement sketch/schematic drawing provides information regarding the full length of the garment. If it’s a jumper or a jacket the length is measured from the highest point on the shoulder closest to the neckline, and straight down to the bottom of the garment. It is NOT measured from the tip of shoulder. Similarly, the length of yoke is measured from the highest point on the shoulder and down to where yoke is split into body and sleeves.

On a jacket measures are never taken along bands, unless specifically stated. Always measure inside band stitches when measuring the length.

See DROPS lesson: How to read a schematic drawing

Diagrams are often repeated on the round or in height. 1 repeat is the diagram the way it appears in the pattern. If it says to work 5 repeats of A.1 in the round, then you work A.1 a total of 5 times after/next to each other in the round. If it says to work 2 repeats of A.1 vertically/in height you work the entire diagram once, then begin again at the start and work the entire diagram one more time.

Chain stitches are slightly narrower than other stitches and to avoid working the cast-on edge too tight, we simply chain more stitches to begin with. The stitch count will be adjusted on the following row to fit the pattern and measurement sketch.

The rib edge is more elastic and will contract slightly compared to, for example, stocking stitch. By increasing before the rib edge, you avoid a visible difference in width between the rib edge and the rest of the body.

It’s very easy to cast off too tightly, and by making yarn overs while casting off (and simultaneously casting these off) you avoid a too tight cast off edge.

See DROPS video: How to bind off with yarn overs (yo)

To achieve an even increase (or decrease) you can increase on, for example: every 3rd and 4th row alternately, like so: work 2 rows and increase on the 3rd row, work 3 rows and increase on the 4th. Repeat this until the increase is complete.

See DROPS lesson: Increase or decrease 1 st on every 3rd and 4th row alternately

Should you prefer to work in the round instead of back and forth, you may of course adjust the pattern. You’ll need to add steeks mid-front (usually 5 stitches), and follow the instructions. When you would normally turn and work from the wrong side, simply work across the steek and continue in the round. At the end you’ll cut the piece open, pick up stitches to work bands, and cover the cut edges.

See DROPS video: How to knit steeks and cut open

Should you prefer to work back and forth instead of in the round, you may of course adjust the pattern so you work the pieces separately and then assemble them at the end. Divide the stitches for the body in 2, add 1 edge stitch in each side (for sewing) and work the front and back pieces separately.

See DROPS lesson: Can I adapt a pattern for circular needles into straight needles?

Pattern repeats can vary slightly in the different sizes, in order to get the correct proportions. If you’re not working the exact same size as the garment in the photo, yours might deviate slightly. This has been carefully developed and adjusted so that the complete impression of the garment is the same in all sizes.

Make sure to follow instructions and diagrams for your size!

If you have found a pattern you like which is available in women’s size it’s not very difficult to convert it to men’s size. The biggest difference will be the length of sleeves and body. Start working on the women size that you think would fit across the chest. The additional length will be worked right before you cast off for the armhole/sleeve cap. If the pattern is worked top-down you can add the length right after the armhole or before the first decrease on sleeve.

Regarding additional yarn amount, this will depend on how much length you add, but it is better with a skein too many than too few.

All yarns will have excess fibres (from production) that might come off as lint or shedding. Brushed yarns (ie hairier yarns) have more of these loose, excess fibres, causing more shedding.

Shedding also depends on what is worn under or over the garment, and whether this pulls at the yarn fibres. It’s therefore not possible to guarantee that there will be no shedding

Below are some tips on how to get the best result when working with hairier yarns:

1. When the garment is finished (before you wash it) shake it vigorously so the looser hairs come off. NOTE: do NOT use a lint roller, brush or any method that pulls at the yarn.

2. Place the garment in a plastic bag and put it in your freezer - the temperature will cause the fibres to become less attached to each other, and excess fibres will come off easier.

3. Leave in the freezer for a few hours before taking it out and shaking it again.

4. Wash the garment according to the instructions on the yarn label.

Pilling is a natural process that happens to even the most exclusive of fibers. It's a natural sign of wear and tear that is hard to avoid, and that is most visible in high friction areas of your garment like a sweater's arms and cuffs.

You can make your garment look as new by removing the pilling, using a fabric comb or a pill/lint remover.

Still can't find the answer you need? Then scroll down and leave your question so one of our experts can try to help you. This will be done normally within 5 to 10 working days.
In the meantime, you can read the questions and answers that others have left to this pattern or join the DROPS Workshop on Facebook to get help from fellow knitters/crocheters!

You might also like...

Post a comment to pattern DROPS Baby & Children 38-3

We would love to hear what you have to say about this pattern!

If you want to leave a question, please make sure you select the correct category in the form below, to speed up the answering process. Required fields are marked *.

Comments / Questions (5)

country flag Thea Stormorken wrote:

Som Lena har nevnt over, virker det som mønsteret er feil mtp at økning av masker etter splittet på bakstykke kommer på 1,5cm. Jeg strikket dette først, men andre siden er det ca 4cm fra splittet til halsavrunning. Så dette ble helt feil

31.08.2022 - 22:07

country flag Stefania wrote:

Ho già lavorato tantissimi dei vostri schemi ai ferri, anche di tecnicamente più complessi di questo. Ma la spiegazione di questo vestito non è comprensibile, non si capisce l'esatta sequenza delle azioni da svolgere. Credo che la spiegazione corretta è *lavorare il bordo a picot, posizionare il segnapunti-1, lavorare x-x-x-x-x maglie, posizionare il segnapunti-2, girare il lavoro eccetera eccetera * . Datemi conferma se è corretto.

25.11.2021 - 19:27

DROPS Design answered:

Buonasera Stefania, il segnapunti va posizionato prima perchè il bordo a picot si lavora durante la lavorazione a ferri accorciati. Buon lavoro!

28.11.2021 - 19:38

country flag Nieves Espallargas-Sanz wrote:

Hola, me pierdo un poco al hacer las lavores, vivo wn Alemania. Hay posibilidad de tener los patrones en papel?

04.11.2021 - 22:04

DROPS Design answered:

Hola Nieves, ya no se publican las revistas pero puedes imprimir los patrones, pulsando el botón de imprimir bajo la foto. También puedes ver los patrones en otros idiomas, incluyendo alemán, si te sientes más cómoda en otro idioma; puedes seleccionar el idioma bajo la foto.

07.11.2021 - 13:55

country flag Marcela wrote:

Hello, I am working on the Enchanted time pattern. I have knit the dress and am wondering how to do the crochet around the neck. The pattern reads …” 3 chain stitches, 1 treble crochet in double crochet”. I am really confused as what to do after I do the 3 chain stitches. Am I going into one of those chain stitches for the next stitch. Also, I don’t understand what 1 treble crochet in double crochet means. Thank you for your help.

23.09.2021 - 21:34

DROPS Design answered:

Dear Marcela, this video shows how to crochet such a crocheted edge, but for this edge you will insert the crochet hook in the double crochet (UK-English)/single crochet (US-English) to make the treble crochet (UK-English)/double crochet (US-English) . Happy crocheting!

24.09.2021 - 07:39

country flag Lena Falck wrote:

Hej. På bakstycket börjar man maska av för halsen efter 5cm. Sedan stickar man till 9cm,maskar av 10m, läger sedan upp 10 ny m. Men ska börja maska av för halsen efter 1 1/2 cm efter man lagt upp dom nya 10 m. Är det rätt? Då blir dom ju inte lika eller? Tacksam för hjälp. Mvh Lena Falck

19.09.2021 - 13:17

DROPS Design answered:

Hej Lena. Jo jag tror det ska bli riktigt. Du börjar då att lägga upp nya maskor till halsringningen ca 1,5 cm efter sprundet i mitten. Sedan fortsätter du att lägga upp maskor på varven efter så att när när du lagt upp färdigt så kommer det vara ca 5 cm kvar att sticka på axeln som på den andra sidan. Hoppas du förstår vad jag menar. Mvh DROPS Design

23.09.2021 - 09:56