
Popular categories
Looking for a yarn?


Comments / Questions (40)
![]() Claudia Carolina wrote:
Claudia Carolina wrote:
Spett.le Drops, grazie per i modelli splendidi... vorrei sapere qual 'è il diametro in mm dei bottoni Marmo 630. Grazie mille. Claudia
22.03.2021 - 16:45DROPS Design answered:
Buonasera Claudia, il diametrodei bottoni è di 25 mm. Buon lavoro!
23.03.2021 - 18:12
![]() Susan England wrote:
Susan England wrote:
Am I correct when I swop 6 (25g)x Alpaca silk for 8x Kid silk i will get the same result on the pattern above
18.03.2021 - 23:10DROPS Design answered:
Dear Mrs England, you can use here 2 strands Brushed Alpaca Silk or 4 strands Kid-Silk to get the same tension - read more about alternatives and groups here - but remember to check your tension and the texture will be different since the yarns have different texture. Happy knitting!
19.03.2021 - 07:30
![]() Sabine Adam wrote:
Sabine Adam wrote:
Mein Vorschlag: in der Mitte der Halsblende eine Reihe links stricken, damit sie sich beim nach innen-Nähen besser falten lässt (wie es im Video auch angegeben ist, aber leider nicht in der Anleitung, sodass ich es zu spät gesehen habe). Viele Grüße
14.03.2021 - 14:37
![]() Sabine Adam wrote:
Sabine Adam wrote:
Danke
01.03.2021 - 17:13
![]() Sabine Adam wrote:
Sabine Adam wrote:
Vielen Dank für Ihre schnelle Antwort! Bedeutet das, dass ich am Ende der Zunahmen füe die Passe (dort, wo 'Maschenprobe beachten' im Text steht) evtl. meine Maschenanzahl jetzt noch ändern soll, falls sie nicht der Maschenprobe entspricht?
01.03.2021 - 16:03DROPS Design answered:
Liebe Frau Adam, es bedeutet, daß die Maßen in der Höhe/in der Breite nicht stimmen werden wenn Ihre Maschenprobe beim stricken nicht in der Höhe/in der Breite stimmt - dann sollen Sie die Anleitung anpassen - hier lesen Sie mehr über Maschenprobe. Viel Spaß beim stricken!
01.03.2021 - 16:14
![]() Sabine Adam wrote:
Sabine Adam wrote:
Unter 'Passe' steht nach den Zunahmen 'Maschenprobe beachten' - was bedeutet das? Die Maße/Breite der Jacke sind doch durch das bereits gestrickte Stück bereits vorgegeben und können jetzt nicht geändert werden, oder? Danke
01.03.2021 - 14:11DROPS Design answered:
Liebe Frau Adams, es bedeutet, daß die Maschenprobe immer stimmen muss, auch wenn Sie die Jacke stricken, damit die fertige Maßen immer stimmen (genauso eng/locker stricken damit Sie die ganze Zeit immer 11 M x 15 R glatt rechts =10 x 10 cm haben/behalten). Viel Spaß beim stricken!
01.03.2021 - 14:44
![]() Maria Carmen wrote:
Maria Carmen wrote:
Buenos días, Me encanta este modelo y voy a hacerlo, mi pregunta es ¿Puedo usar hilo Nepal en vez de Air, ¿sería en doble y la misma cantidad de hilo? Muchas gracias y que paseis buen día.
05.02.2021 - 13:16DROPS Design answered:
Hola Maria, puedes usar DROPS Nepal, en doble, pero necesitas mas hilo que esta escrito en el patron. Como calcular esto puedes ver AQUI. Buen trabajo!
05.02.2021 - 18:21
![]() Pernilla Stake wrote:
Pernilla Stake wrote:
Så fin :)
21.01.2021 - 13:20
![]() Carme Capdevila Albor wrote:
Carme Capdevila Albor wrote:
Jaquelin Cardigan
19.01.2021 - 22:04
![]() Gabriela Cervantes wrote:
Gabriela Cervantes wrote:
Es muy bonito este diseño
12.01.2021 - 17:18
|
|
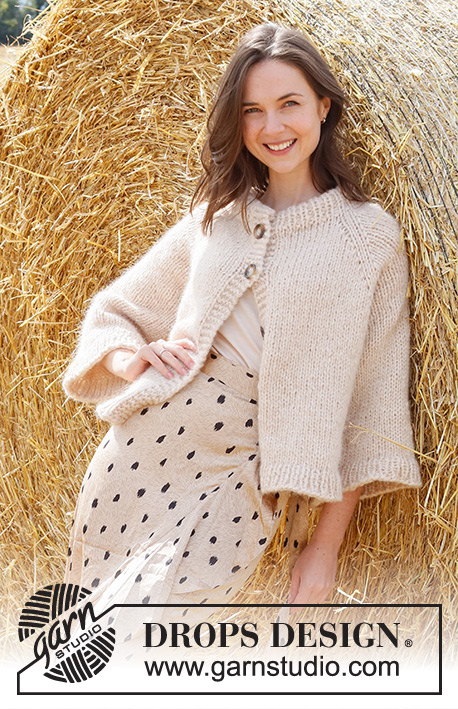
Joy of the Harvest Jacket#joyoftheharvestjacket |
|
 |
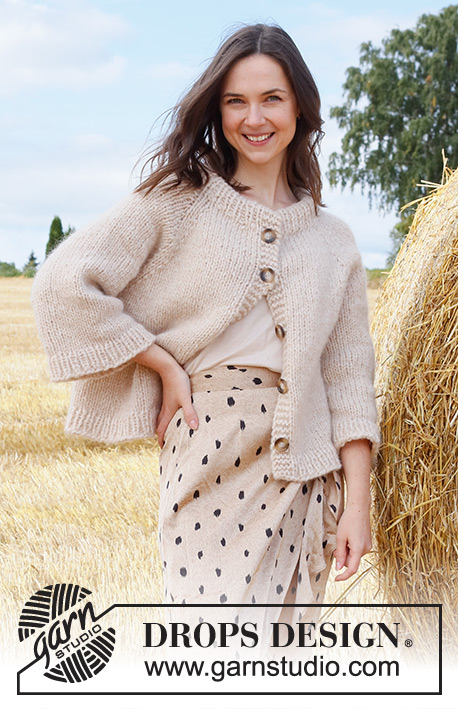 |
Knitted jacket in 2 strands DROPS Air or 1 strand Wish. The piece is worked top down with raglan, double neck and wide, ¾-length sleeves. Sizes S - XXXL.
DROPS 223-9 |
|
|
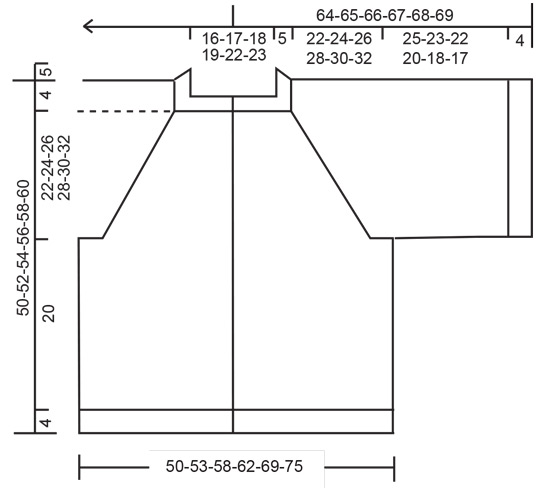
------------------------------------------------------- EXPLANATIONS FOR THE PATTERN: ------------------------------------------------------- RIDGE/GARTER STITCH (worked back and forth): Knit all rows. 1 ridge in height = Knit 2 rows. INCREASE TIP (evenly spaced): To work out how to increase evenly, count the total number of stitches on the needle (e.g. 61 stitches), minus bands (e.g. 8 stitches) and divide the remaining stitches by the number of increases to be made (e.g. 2) = 26.5. In this example, increase by making 1 yarn over after alternately each 26th and 27th stitch. Do not increase on bands. On the next row work the yarn overs twisted to avoid holes. RAGLAN: All increases are worked from the right side! Increase on each side of all marker threads in the transitions between body and sleeves as follows: Work until there is 1 stitch left before marker thread, 1 yarn over, knit 2 (marker thread sits between these 2 stitches), 1 yarn over (= 2 stitches increased). On the next row purl the yarn overs twisted to avoid holes. Then work the new stitches in stocking stitch. A total of 8 stitches are increased on the row. BUTTONHOLES: Work buttonholes on right band (when garment is worn). Work from the right side when there are 4 stitches left on row as follows: Make 1 yarn over, knit 2 together and knit the last 2 stitches. On the next row (wrong side) knit the yarn over to leave a hole. The first buttonhole is worked when the neck measures 11 cm. Then work the other 4-4-5-5-5-5 buttonholes with approx. 10-10½-9-9½-9½-10 cm between each one. CASTING-OFF TIP: To avoid the cast-off edge being tight you can cast off with a larger size needle. If the edge is still tight, make 1 yarn over after approx. each 6th stitch at the same time as casting off; the yarn overs are cast off as normal stitches. ------------------------------------------------------- START THE PIECE HERE: ------------------------------------------------------- JACKET – SHORT OVERVIEW OF THE PIECE: The neck and yoke are worked back and forth with circular needle from mid front and top down. The yoke is divided for body and sleeves and the body continued back and forth. The sleeves are worked in the round with short circular needle, top down. NECK: Cast on 61-63-65-67-73-75 stitches (including 4 band stitches on each side towards mid front) with circular needle size 7 mm and 2 strands Air or 1 strand Wish. Purl 1 row (= wrong side). The next row is worked as follows from the right side: Work 4 band stitches in GARTER STITCH – see description above, * knit 1, purl 1 *, work from *-* until there are 5 stitches left, knit 1 and finish with 4 band stitches in garter stitch. Continue this rib for 11 cm. When the rib is finished, knit 1 row from the right side where you increase 2-4-5-4-5-7 stitches evenly spaced – read INCREASE TIP = 63-67-70-71-78-82 stitches. Purl 1 row from the wrong side (yarn overs purled twisted and the bands in garter stitch) – remember the BUTTONHOLES on the right band – read description above. Change to circular needle size 8 mm. Insert a marker after the band at the beginning of the row, the yoke is measured from this marker! YOKE: Now insert 4 marker threads in the piece as follows: Skip the first 13-14-15-15-17-18 stitches, insert a marker thread here (= transition between left front piece and left sleeve), skip the next 9 stitches, insert a marker thread here (= transition between left sleeve and back piece), skip the next 19-21-22-23-26-28 stitches, insert a marker thread here (= transition between back piece and right sleeve), skip the next 9 stitches, insert a marker thread here (= transition between right sleeve and right front piece). There are 13-14-15-15-17-18 stitches left after the last marker thread. Work stocking stitch back and forth with 4 band stitches in garter stitch on each side. On the first row from the right side, start to increase to RAGLAN – read description above. Increase like this every 2nd row (= each row from the right side) a total of 14-15-17-18-20-22 times, then increase 1 more time on the front and back pieces (= 4 stitches increased; do not increase on the sleeves) = 179-191-210-219-242-262 stitches. REMEMBER THE KNITTING TENSION! Continue working until the piece measures 22-24-26-28-30-32 cm from the marker below the neck. Now divide for the body and sleeves on the next row as follows: Work the first 28-30-33-34-38-41 stitches (= front piece), place the next 37-39-43-45-49-53 stitches on a thread for the sleeve, cast on 6-6-6-8-8-8 stitches (= in side under the sleeve), work the next 49-53-58-61-68-74 stitches (= back piece), place the next 37-39-43-45-49-53 stitches on a thread for the sleeve, cast on 6-6-6-8-8-8 stitches (= in side under the sleeve), work the last 28-30-33-34-38-41 stitches (= front piece). Body and sleeves are finished separately. THE PIECE IS NOW MEASURED FROM HERE. BODY: = 117-125-136-145-160-172 stitches. Work stocking stitch back and forth with 4 band stitches in garter stitch on each side. When the piece measures 20 cm from the division in all sizes, knit 1 row from the right side where you increase 16-18-21-20-23-25 stitches evenly spaced (do not increase on the bands) = 133-143-157-165-183-197 stitches. Purl 1 row from the wrong side (bands in garter stitch). Change to circular needle size 7 mm and work rib as follows: 4 band stitches in garter stitch * knit 1, purl 1 *, work from *-* until there are 5 stitches left, knit 1 and 4 band stitches in garter stitch. Continue this rib for 4 cm. Cast off with knit over knit and purl over purl – read CASTING-OFF TIP. The jacket measures approx. 50-52-54-56-58-60 cm from the shoulder down. SLEEVES: Place the 37-39-43-45-49-53 stitches from the thread on the one side of the piece on short circular needle size 8 mm and knit up 1 stitch in each of the 6-6-6-8-8-8 stitches cast on under the sleeve = 43-45-49-53-57-61 stitches. Work stocking stitch in the round. When the sleeve measures 25-23-22-21-18-17 cm from the division (shorter measurements in larger sizes due to wider neck and longer yoke), knit 1 round where you increase 7-7-7-7-9-9 stitches evenly spaced = 50-52-56-60-66-70 stitches. Change to short circular needle size 7 mm and work rib (knit 1, purl 1) for 4 cm. Cast off with knit over knit and purl over purl – remember CASTING-OFF TIP. The sleeve measures approx. 29-27-26-25-22-21 cm from the division. Work the other sleeve in the same way. ASSEMBLY: Fold the neck double to the inside and sew down. To avoid the neck being tight og rolling outwards, it is important that the seam is elastic. Sew the openings at both ends of the neck with small stitches. Sew the buttons onto the left band. |
|
 |
|
Have you finished this pattern?Tag your pictures with #dropspattern #joyoftheharvestjacket or submit them to the #dropsfan gallery. Do you need help with this pattern?You'll find 30 tutorial videos, a Comments/Questions area and more by visiting the pattern on garnstudio.com. © 1982-2026 DROPS Design A/S. We reserve all rights. This document, including all its sub-sections, has copyrights. Read more about what you can do with our patterns at the bottom of each pattern on our site. |
|


With over 40 years in knitting and crochet design, DROPS Design offers one of the most extensive collections of free patterns on the internet - translated to 17 languages. As of today we count 324 catalogues and 12290 patterns translated into English (UK/cm). 12290
We work hard to bring you the best knitting and crochet have to offer, inspiration and advice as well as great quality yarns at incredible prices! Would you like to use our patterns for other than personal use? You can read what you are allowed to do in the Copyright text at the bottom of all our patterns. Happy crafting!
Post a comment to pattern DROPS 223-9
We would love to hear what you have to say about this pattern!
If you want to leave a question, please make sure you select the correct category in the form below, to speed up the answering process. Required fields are marked *.