
Popular categories
Looking for a yarn?


Comments / Questions (42)
![]() Véronique wrote:
Véronique wrote:
Bonjour, je ne comprend comment augmenter les manches. Je n'arrive pas à mettre en pratique les explications. *Tricoter une maille, une jetée* , tricoter de *-* 2 fois au total ( jusque là ça va, mais après ) dans la même maille ( quelle maille ?)et tricoter encore une dans la même ???!!! Là , je comprend plus . D'avance merci.
21.02.2021 - 20:12DROPS Design answered:
Bonjour Véronique cette vidéo montre comment augmenter (pour un autre modèle) 4 mailles en tricotant 4 fois la même maille de cette façon. Rappelez-vous juste qu'au tour suivant, vous devez tricoter ces mailles en suivant A.2 et pas comme dans la vidéo. Bon tricot!
22.02.2021 - 09:23
![]() Ina wrote:
Ina wrote:
Vielen Dank für die schnelle Antwort. Ich denke, ich habe es hinbekommen. Allerdings haben mich die Antworten zu den Fragen von Emma Müller und Ana verwirrt. Da beschreiben sie die Reihenfolge anders: A1- A1- A3 - A3. Hat sich dort ein Fehler eingeschlichen?
19.02.2021 - 15:24
![]() Ina wrote:
Ina wrote:
Hallo Drops Team, könnten sie vielleicht nochmal klarstellen, an welchen Stellen A1 und A3 gestrickt werden? Die Angaben in ihren bisherigen Antworten widersprechen sich mit denen in der Anleitung. Lt. Anleitung habe ich A1 - A3- A1- A3 gestrickt.
19.02.2021 - 11:49DROPS Design answered:
Liebe Ina, A.1 und A.3 werden für die Raglanzunahmen an den Vorderteile und Rückenteil gestrickt: A.1 bei dem linken Vorderteil, A.3 - glatt rechts, A.1 beim Rückenteil und A.3 bei dem rechten Vorderteil. Kann das Ihnen weiterhelfen? Viel Spaß beim stricken!
19.02.2021 - 12:19
![]() Monika wrote:
Monika wrote:
Ich bin eigentlich eine sehr geübte Strickerin und habe schon viele Anleitungen gelesen, verstanden und nachgearbeitet. Diese hier finde ich sehr schwierig nach zu arbeiten, da nicht nicht wirklich eindeutig beschrieben. Versuche schon zum x-ten Mal den Übergang zwischen Halsblende und Passe einzuteilen. Ist die erste Masche A1 noch VT oder Ärmel? Welches ist die erste Masche für das RT? etc Ich kenne solche Probleme bei Anleitungen, die vom Dänischen ins Deutsche übersetzt wurden.
29.11.2020 - 17:10DROPS Design answered:
Liebe Monika, A.1 und A.3 zeigen die Raglanzunahmen beim Vorder- und Rückenteile, Markierer soll entweder nach A.1 (= Li. Vorderteil), vor A.3 und nach A.1 (Rückentil) und vor A.3 (re Vorderteil) sein -Welche Größe stricken Sie, vielleicht kann man Ihnen die Beschreibung in Ihre Größe mal hier schreiben, wenn es Ihnen helfen kann. Viel Spaß beim stricken!
30.11.2020 - 10:30
![]() Géraldine wrote:
Géraldine wrote:
Bonsoir. Quand on commence l\'empiècement, doit-on commencer A1 par le bas de la grille ou par le haut de la grille? merci.
04.10.2020 - 21:53DROPS Design answered:
Bonjour Géraldine, les diagrammes se lisent toujours (sauf indication clairement explicite) de haut en bas - vous trouverez ici plus d'infos sur les diagrammes. Bon tricot!
05.10.2020 - 11:10
![]() Géraldine wrote:
Géraldine wrote:
Bonjour. j'ai des difficultés pour l'empiècement:et A.1/A/3+jersey sur les mailles restantes des devants et du dos.Faut-il faire A1 entre le jersey du devant et A2 des manches et A3 entre A2 des manches et jersey du dos?. Merci de votre aide.
04.10.2020 - 17:13DROPS Design answered:
Bonjour Géraldine, on tricote A.1 et A.3 sur les devants et le dos = en jersey pour les augmentations du raglan, les manches se tricotent en point fantaisie A.2 (= sur un nombre impair de mailles, on répète A.2 et on termine par la 1ère m de A.2). Bon tricot!
05.10.2020 - 11:05
![]() Emma Müller wrote:
Emma Müller wrote:
Hallo liebes Garnstudio-Team, ich habe Probleme mit der Strickanleitung in Größe S. Ich habe wie angegeben 109 Maschen aufgenommen und die Halsblende gestrickt. Nun wollte ich die erste Hinreihe der Passe stricken, allerdings die Anzahl der zu strickenden Maschen nicht auf. Zählt man alle in der Hinreihe zu strickenden Maschen zusammen, kommt man auf 124 Maschen. Damit werden meiner Meinung nach 2 Maschen nicht berücksichtigt, die am Ende übrig bleiben.
25.09.2020 - 22:28DROPS Design answered:
Liebe Frau Müller, so stricken Sie die 109 M; 5 kraus re, 3+3 M re, A.1 (1 M + 1 Zun.) + 40+1 (A.2) + A.1 (1+1)+ 7+7+ A.3(1+1) + 40+1 (A.2) + A.3(1+1)+3+3+5 =13+41+18+41+13= 126 Maschen. Viel Spaß beim stricken!
28.09.2020 - 08:31
![]() SOULET wrote:
SOULET wrote:
Bonjour, j'ai débuté ce tricot magnifique avec le col. Mais arrivée à l'empiècement je ne comprends pas les consignes.tricoter les 3 mailles suivantes à l'endroit en augmentant en même temps 3 mailles à intervalles réguliers, c'est à dire qu'on doit avoir combien de maille à la fin des augmentations? merci beaucoup pour votre réponse car je suis coincée!! Cordialement Chrissps
08.07.2020 - 11:05DROPS Design answered:
Bonjour Mme Soulet, vous tricotez 3 mailles et augmentez 3 m = vous avez maintenant 6 mailles - vous tricotez ensuite 7 mailles en augmentant 7 mailles = vous avez maintenant 14 mailles etc. Bon tricot!
08.07.2020 - 13:08
![]() Ana wrote:
Ana wrote:
Hola cuando leo el patrón para comenzar con el canesú la suma de puntos me da 124 y no 126 para un talle S ...si leí correctamente los 3 diagramas todos equivalen a dos puntos puede ser? Y después hay otros aumentos de 3 y 7 puntos correcto ? Si es correcto la suma llega a 124 y si esta mal quiero saber que es lo que no estoy interpretando? Gracias
21.06.2020 - 01:09DROPS Design answered:
Hola Ana, hay 126 puntos. 5 pts en pt musgo, 3+3 derechos, A.1 (=1 pt + 1 hebra) + 40+A.2 (=1pt) + A.1 (=1+1)+ 7+7+ A.3(1+1) + 40+A.2 (=1pt) + A.3(=1+1)+3+3+5 =13+41+18+41+13= 126 puntos.
22.11.2020 - 12:17
![]() Mary O'Rafferty wrote:
Mary O'Rafferty wrote:
This is my first time working a top down pattern. I followed the neck bit and now am beginning the Yoke and I am totally confused - I have read all your wonderful tutorials and still do not understand how to work A.1, A.2 and A 3. as the squares increase from 1 to 5 in number for A.1 and A.3 I may not be even asking the question correctly!
19.05.2020 - 10:50DROPS Design answered:
Dear Mrs O'Rafferty, A.1 is worked at the end of left front piece and at the beg of back piece, A.3 is worked at the end of back piece and at the beg of right front piece -these diagrams show the increases for the raglan. A.2 is worked with alternately 1 stitch in stocking st/1 stitch in garter stitch. Since the number of sts is uneven, you finish with the first st in A.2 so that pattern is symetrical on each side. Read more here about diagrams. Happy knitting!
19.05.2020 - 11:00
|
||||||||||
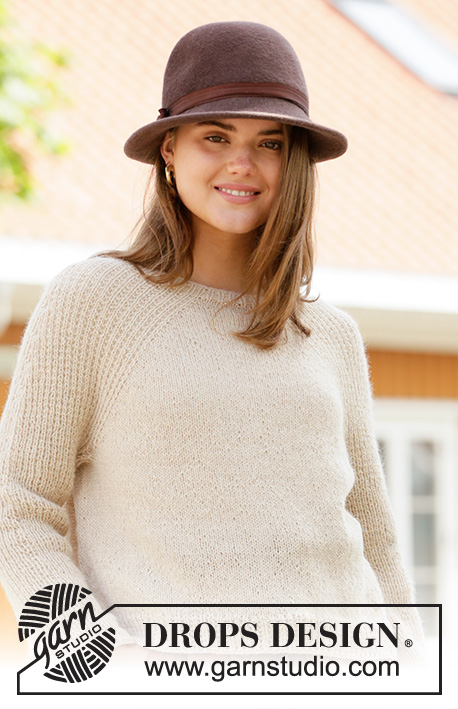
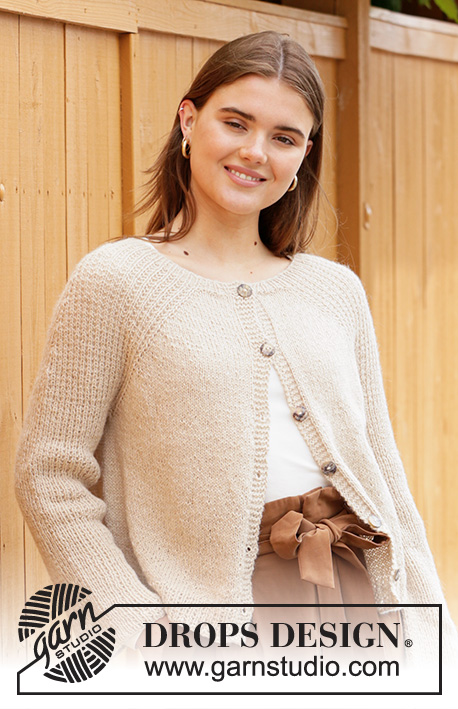
Winter Wheat Jacket#winterwheatjacket |
||||||||||
 |
 |
|||||||||
Knitted jacket with raglan in DROPS Puna or DROPS Soft tweed. The piece is worked top down with textured pattern on the sleeves. Sizes S - XXXL.
DROPS 206-47 |
||||||||||
|
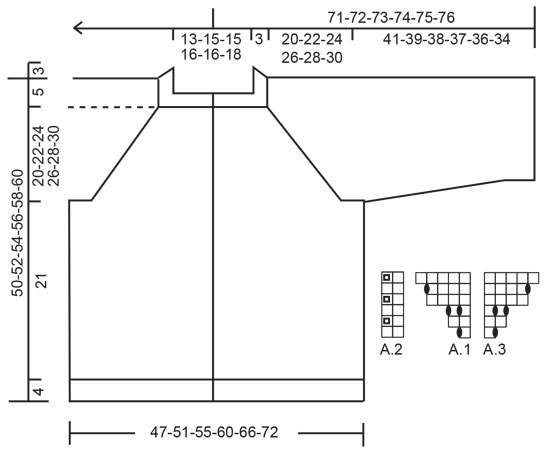
------------------------------------------------------- EXPLANATIONS FOR THE PATTERN: ------------------------------------------------------- RIDGE/GARTER STITCH (worked back and forth): Knit all rows. 1 ridge in height = Knit 2 rows. PATTERN: See diagrams A.1 to A.3. The diagrams show all rows in the pattern seen from the right side. INCREASE TIP (evenly spaced): To work out how to increase evenly, count the total number of stitches to be increased over (e.g. 3 stitches) and divide by the number of increases to be made (e.g. 3) = 1. In this example, increase by making 1 yarn over after each stitch. On the next row work the yarn overs twisted to avoid holes. INCREASE SLEEVES: All increases are worked from the right side! Work as far as the mid-stitch on the sleeve (= stitch with marker), * knit 1, make 1 yarn over *, work from *-* a total of 2 times in the same stitch, knit 1 in the same stitch (= 4 stitches increased in the same stitch). Repeat on the other sleeve. The new stitches are worked into pattern A.2. DECREASE TIP (for sleeves): Decrease in the different sizes as follows: Sizes L and XXXL: Work until there are 2 stitches left before the stitch with the marker, knit 2 together, purl 1 (marker in this stitch), slip 1 stitch as if to knit, knit 1 and pass the slipped stitch over (= 2 stitches decreased). Sizes XL and XXL: Work until there are 3 stitches left before the stitch with the marker, knit 2 together, knit 3 (marker in the middle stitch of these 3), slip 1 stitch as if to knit, knit 1 and pass the slipped stitch over (= 2 stitches decreased). BUTTONHOLES: Work buttonholes on the right band (when the garment is worn). Work from the right side when there are 3 stitches left on the row as follows: Make 1 yarn over, knit 2 together and knit 1. On the next row (wrong side), knit the yarn over to leave a hole. The first buttonhole is worked when the rib on the neck measures approx. 1½-2 cm. Then work the other 5-5-5-5-5-5 buttonholes with approx. 8½-9-9-9½-10-10 cm between each one. ------------------------------------------------------- START THE PIECE HERE: ------------------------------------------------------- JACKET – SHORT OVERVIEW OF THE PIECE: The piece is worked back and forth, top down. The sleeves are worked in the round with double pointed needles/short circular needle. Stocking stitch is worked on the front and back pieces, textured pattern on the sleeves. NECK: Cast on 109-117-117-125-125-133 stitches with circular needle size 3 mm and Puna. Purl 1 row from the wrong side then work rib from the right side as follows: 5 band stitches in GARTER STITCH – read description above, (knit 1 / purl 1) until there are 6 stitches left on the row, knit 1 and finish with 5 band stitches in garter stitch. Continue back and forth like this. Remember BUTTONHOLES on the right band – read description above. When the rib measures approx. 3 cm – adjust so the next row is from the right side, insert a marker. THE PIECE IS NOW MEASURED FROM HERE! YOKE: Change to circular needle size 4.5 mm and work the next row as follows: 5 band stitches in garter stitch, knit the next 3-5-5-7-7-9 stitches and increase at the same time 3-1-3-1-4-3 stitches evenly spaced – read INCREASE TIP, work A.1 over the next stitch, insert a marker thread here, (= transition between left front piece and left sleeve), work A.2 over the next 40 stitches, work the first stitch in A.2, insert a marker thread here (= transition between left sleeve and back piece), A.3 over the next stitch, knit the next 7-11-11-15-15-19 stitches and increase at the same time increase 7-4-7-3-9-7 stitches evenly spaced, A.1 over the next stitch, insert a marker thread here (= transition between back piece and right sleeve), work A.2 over the next 40 stitches, work the first stitch in A.2, insert a marker thread here (= transition between right sleeve and right front piece), work A.3 over the next stitch, knit the next 3-5-5-7-7-9 stitches and increase at the same time 3-1-3-1-4-3 stitches evenly spaced, 5 band stitches in garter stitch = 126-127-134-134-146-150 stitches on the needle. There is now 1 marker thread in each transition between body and sleeves (= 4 marker threads). Insert 1 marker in the mid-stitch on each sleeve (= knitted stitch). REMEMBER THE KNITTING TENSION! Continue back and forth with pattern A.2 between the marker threads on the sleeve, with 5 band stitches in garter stitch on each side towards mid front and A.1/A.3 + stocking stitch on the remaining stitches on the front and back pieces – AT THE SAME TIME on the next row from the right side (row 3 in A.1/A.3) start INCREASE SLEEVES – read description above (= 4 stitches increased on each sleeve). Increase like this every 8th-8th-6th-6th-4th-4th row a total of 6-7-10-11-13-14 times. When A.1 and A.3 have been completed in height continue to repeat towards the raglan-lines 7-8-9-10-11-12 more times (a total of 8-9-10-11-12-13 times), then work the first 3-3-1-1-0-0 rows in the diagrams. When all the increases to sleeves and front and back pieces are finished there are 310-335-374-398-438-466 stitches on the needle (increased 24-28-40-44-52-56 stitches on each sleeve and 35-39-41-45-48-52 stitches on each side of the back piece and the one side of the front pieces). The piece now measures approx. 20-22-24-26-28-30 cm from the marker on the neck. If the piece is shorter than this continue working to the right length. The next row from the wrong side is worked as follows: Work the first 47-51-55-59-65-70 stitches (= right front piece), place the next 65-69-81-85-93-97 stitches on 1 thread for sleeve and cast on 9-9-9-11-11-13 new stitches on the needle (= in side under sleeve), work the next 86-95-102-110-122-132 stitches (= back piece), place the next 65-69-81-85-93-97 stitches on 1 thread for sleeve and cast on 9-9-9-11-11-13 new stitches on the needle (= in side under sleeve) and work the remaining 47-51-55-59-65-70 stitches (= left front piece). Body and sleeves are finished separately. THE PIECE IS NOW MEASURED FROM HERE! BODY: There are 198-215-230-250-274-298 stitches on the body. Continue back and forth with stocking stitch and 5 band stitches in garter stitch on each side. When the piece measures 21 cm increase 1-0-1-1-1-1 stitch = 199-215-231-251-275-299 stitches. Work an edge as follows: 5 band stitches in garter stitch, A.2 until there are 6 stitches left on the row, work the first stitch in A.2 and finish with 5 band stitches in garter stitch. Continue back and forth until the edge measures 4 cm. Cast off with knit over knit and purl over purl. The jacket measures approx. 50-52-54-56-58-60 cm from the shoulder down. SLEEVE: Place the 65-69-81-85-93-97 stitches from the thread on the one side of the piece on short circular needle size 4.5 mm and knit up 1 stitch in each of the 9-9-9-11-11-13 stitches cast on under the sleeve = 74-78-90-96-104-110 stitches. Work pattern A.2 in the round as before. The pattern should fit on the round. Work as follows in the different sizes: Sizes S, M: Work textured pattern until the sleeve measures 41-39 cm from the division. Cast off with knit over knit and purl over purl. Sizes L, XL, XXL and XXXL: Work textured pattern until the sleeve measures 4 cm from the division. Insert a marker in the middle stitch under the sleeve. On the next round begin to decrease under the sleeve – read DECREASE TIP. Decrease like this every 2nd round a total of 4-4-4-4 times = 82-88-96-102 stitches. Continue with textured pattern until the sleeve measures 38-37-36-34 cm. Cast off with knit over knit and purl over purl. Work the other sleeve in the same way. ASSEMBLY: Sew buttons onto left band. |
||||||||||
Diagram explanations |
||||||||||
|
||||||||||
 |
||||||||||
Have you finished this pattern?Tag your pictures with #dropspattern #winterwheatjacket or submit them to the #dropsfan gallery. Do you need help with this pattern?You'll find 27 tutorial videos, a Comments/Questions area and more by visiting the pattern on garnstudio.com. © 1982-2026 DROPS Design A/S. We reserve all rights. This document, including all its sub-sections, has copyrights. Read more about what you can do with our patterns at the bottom of each pattern on our site. |
||||||||||


With over 40 years in knitting and crochet design, DROPS Design offers one of the most extensive collections of free patterns on the internet - translated to 17 languages. As of today we count 324 catalogues and 12290 patterns translated into English (UK/cm). 12290
We work hard to bring you the best knitting and crochet have to offer, inspiration and advice as well as great quality yarns at incredible prices! Would you like to use our patterns for other than personal use? You can read what you are allowed to do in the Copyright text at the bottom of all our patterns. Happy crafting!
Post a comment to pattern DROPS 206-47
We would love to hear what you have to say about this pattern!
If you want to leave a question, please make sure you select the correct category in the form below, to speed up the answering process. Required fields are marked *.