
Popular categories
Looking for a yarn?


Comments / Questions (42)
![]() Donatella wrote:
Donatella wrote:
Salve, ho completato i diagrammi A1-A2 e A3 (6 ferri fra dritto e rovescio) con un aumento per le maniche. Non capisco come proseguire ora, dovrei ricominciare i diagrammi? Se sì, quante volte dovrei ripeterli? Ho dubbi anche per gli aumenti per le maniche:vanno fatto al centro come i primi aumenti o verso i segnapunti laterali? Grazie!
31.10.2025 - 16:41DROPS Design answered:
Buonasera Donatella, si deve ripetere i diagrammi verso le linee del raglan per il numero totale di volte indicato per la sua taglia. Buon lavoro!
31.10.2025 - 18:09
![]() Patricia wrote:
Patricia wrote:
Bonjour Quand vous dites à la fin de l’empiècement de rajouter après les 8 fois au total A1/A3 (taille S) les 3 premiers rangs des diagrammes, cela signifie que l’on fait une 9e fois la double augmentation, c’est bien cela ? Merci pour vos beaux modèles !
20.09.2025 - 23:59DROPS Design answered:
Bonjour Patricia, quand vous avez tricoté 8 fois A.1 et A.3 en hauteur, vous tricotez encore 1 fois les 3 premiers rangs du diagramme, à chaque fois que vous tricotez A.1 / A.3. vous augmentez 4 mailles, lorsque vous aurez tricoté les 3 premiers rangs, vous aurez augmenté encore 3 mailles (1 au 1er rang et 2 au 3ème rang). Bon tricot!
24.09.2025 - 07:30
![]() Mel wrote:
Mel wrote:
Hi. Having worked out A1 & A3 how do I increase sleeves? Is it k1 make1 by yarn over twice in the same stitch? Then k1 and repeat giving 4 increases in total or 4 each side of the centre stitch? Sorry I just can’t get my head round it
08.09.2025 - 21:48DROPS Design answered:
Hi Mel, Yes, as you say you work in the same stitch (the mid-stitch on the sleeve): Knit 1, then make 1 yarn over, knit 1 in same stitch and make 1 yarn over, then knit 1 in the same stitch once more to finish. This gives you a total of 4 increased stitches. The new stitches are then worked into the pattern. Hope this helps. Regards Drops team.
09.09.2025 - 06:40
![]() Lynn Martin wrote:
Lynn Martin wrote:
Hello. I am getting ready to knit the sleeves and am confused about the A2 pattern in the round. How do I do that? Does it work the same way as when it is back and forth stockinette?
16.03.2025 - 21:36DROPS Design answered:
Dear Lynn, since you are working in the round, all rounds of the chart are worked as seen from the right side. So it should be: Knit 1 round, work 1 round in rib (knit 1, purl1). Alternate between the knit round and round in rib. Happy knitting!
16.03.2025 - 22:35
![]() Lynn Martin wrote:
Lynn Martin wrote:
I am just beginning this sweater and am asking if A1 is on the left side of the sweater and A3 on the right side?
06.03.2025 - 00:50DROPS Design answered:
Hi Lynn, Yes, A.1 is on the left front piece and A.3 on the right front piece as well as both diagrams being worked on the back piece. Happy knitting!
06.03.2025 - 06:14
![]() Zanne wrote:
Zanne wrote:
De omslag man laver på ærmet til udtagning,- skal de på den efterfølgende pind, strikkes alm vrang så der kommer hul, eller drejet vrang så der ikke kommer hul??
02.02.2025 - 23:34DROPS Design answered:
Hei Zanne. Man øker ikke når ermene strikkes, men det felles masker i størrelse L, XL, XXL og XXXL. mvh DROPS Design
10.02.2025 - 14:25
![]() Elena wrote:
Elena wrote:
Buon giorno ,per una taglia M nella manica non servono diminuzioni?
21.01.2025 - 13:33DROPS Design answered:
Buonasera Elena, per la taglia M può procedere come indicato. Buon lavoro!
21.01.2025 - 22:55
![]() Vicky wrote:
Vicky wrote:
Hallo. Es ist von Strukturmuster die Rede, doch wo ist die Anleitung dazu? Es gibt viele Strukturmuster. Können Sie mir sagen, wie das Muster der Ärmel zu stricken ist? Es geht nicht um die Jacke, sondern das Muster. Leider gibt es auch kein großes Bild, um das Muster besser zu erkennen. Danke.
20.11.2024 - 21:44DROPS Design answered:
Liebe Vicky, die Ärmel werden im Struckturmuster gestrickt, wie beim Diagram A.2 gezeigt, dh ein Rippenmuster (1 Masche glatt rechts, 1 Masche Krausrechts). Viel Spaß beim Stricken!
21.11.2024 - 08:41
![]() Vicky wrote:
Vicky wrote:
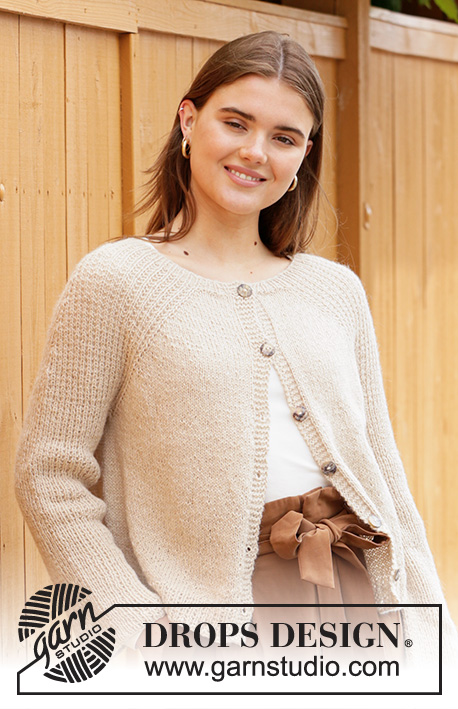
Ist die Strickjacke auf dem Bild mit DROPS PUNA , Farbe 02, beige gestrickt oder mit DROPS Soft Tweed Farbe 02, marzipan? Ich suche ein Bild von einem gestrickten Drops Puna beige.
29.10.2024 - 23:14DROPS Design answered:
Liebe Vicky, die Jacke auf dem Foto wurde mit Puna Farbe 02 gestrickt. Viel Spaß beim Stricken!
30.10.2024 - 08:34
![]() Kimmie Sangill wrote:
Kimmie Sangill wrote:
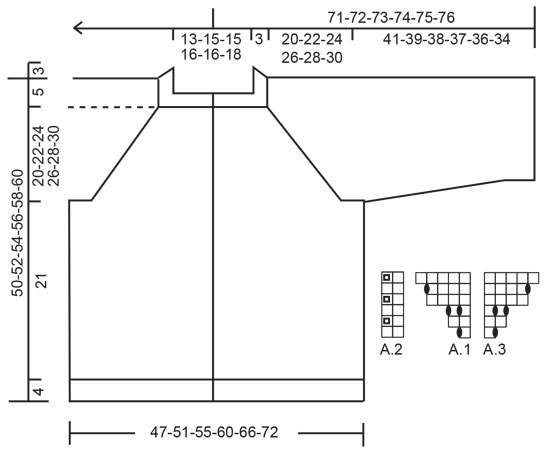
"Når A.1 og A.3 er strikket færdig i højden, gentages rapporten mod raglanlinjen totalt 8 gange derefter strikkes de første 3 pinde i diagrammerne." vil det sige at diagrammerne skal gentages fra bund til top 8 gange i alt? I så fald slutter man diagrammet med 5 masker, vil det så sige man bare strikker glatstrik indtil der er 1 maske tilbage inden mærketråd og så strikker første linje af A1?
20.10.2024 - 15:26DROPS Design answered:
Hej Kimmie, ja alle de nye masker strikkes i glatstrik, så du tager ud ifølge de yderste omslag i diagram A.1 og A.3
23.10.2024 - 14:52
|
||||||||||
Winter Wheat Jacket#winterwheatjacket |
||||||||||
 |
 |
|||||||||
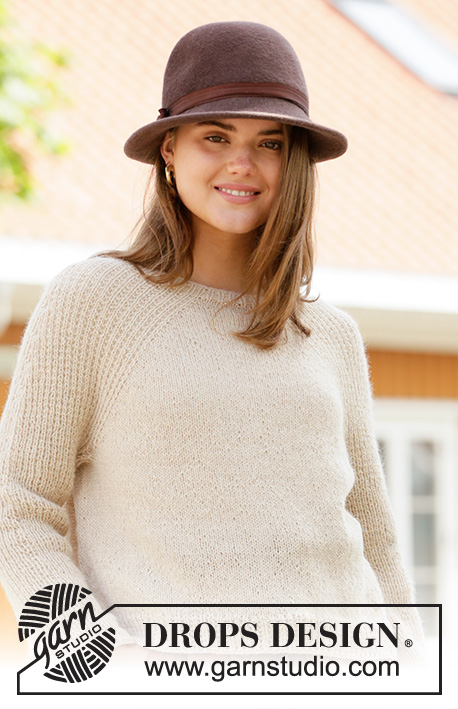
Knitted jacket with raglan in DROPS Puna or DROPS Soft tweed. The piece is worked top down with textured pattern on the sleeves. Sizes S - XXXL.
DROPS 206-47 |
||||||||||
|
------------------------------------------------------- EXPLANATIONS FOR THE PATTERN: ------------------------------------------------------- RIDGE/GARTER STITCH (worked back and forth): Knit all rows. 1 ridge in height = Knit 2 rows. PATTERN: See diagrams A.1 to A.3. The diagrams show all rows in the pattern seen from the right side. INCREASE TIP (evenly spaced): To work out how to increase evenly, count the total number of stitches to be increased over (e.g. 3 stitches) and divide by the number of increases to be made (e.g. 3) = 1. In this example, increase by making 1 yarn over after each stitch. On the next row work the yarn overs twisted to avoid holes. INCREASE SLEEVES: All increases are worked from the right side! Work as far as the mid-stitch on the sleeve (= stitch with marker), * knit 1, make 1 yarn over *, work from *-* a total of 2 times in the same stitch, knit 1 in the same stitch (= 4 stitches increased in the same stitch). Repeat on the other sleeve. The new stitches are worked into pattern A.2. DECREASE TIP (for sleeves): Decrease in the different sizes as follows: Sizes L and XXXL: Work until there are 2 stitches left before the stitch with the marker, knit 2 together, purl 1 (marker in this stitch), slip 1 stitch as if to knit, knit 1 and pass the slipped stitch over (= 2 stitches decreased). Sizes XL and XXL: Work until there are 3 stitches left before the stitch with the marker, knit 2 together, knit 3 (marker in the middle stitch of these 3), slip 1 stitch as if to knit, knit 1 and pass the slipped stitch over (= 2 stitches decreased). BUTTONHOLES: Work buttonholes on the right band (when the garment is worn). Work from the right side when there are 3 stitches left on the row as follows: Make 1 yarn over, knit 2 together and knit 1. On the next row (wrong side), knit the yarn over to leave a hole. The first buttonhole is worked when the rib on the neck measures approx. 1½-2 cm. Then work the other 5-5-5-5-5-5 buttonholes with approx. 8½-9-9-9½-10-10 cm between each one. ------------------------------------------------------- START THE PIECE HERE: ------------------------------------------------------- JACKET – SHORT OVERVIEW OF THE PIECE: The piece is worked back and forth, top down. The sleeves are worked in the round with double pointed needles/short circular needle. Stocking stitch is worked on the front and back pieces, textured pattern on the sleeves. NECK: Cast on 109-117-117-125-125-133 stitches with circular needle size 3 mm and Puna. Purl 1 row from the wrong side then work rib from the right side as follows: 5 band stitches in GARTER STITCH – read description above, (knit 1 / purl 1) until there are 6 stitches left on the row, knit 1 and finish with 5 band stitches in garter stitch. Continue back and forth like this. Remember BUTTONHOLES on the right band – read description above. When the rib measures approx. 3 cm – adjust so the next row is from the right side, insert a marker. THE PIECE IS NOW MEASURED FROM HERE! YOKE: Change to circular needle size 4.5 mm and work the next row as follows: 5 band stitches in garter stitch, knit the next 3-5-5-7-7-9 stitches and increase at the same time 3-1-3-1-4-3 stitches evenly spaced – read INCREASE TIP, work A.1 over the next stitch, insert a marker thread here, (= transition between left front piece and left sleeve), work A.2 over the next 40 stitches, work the first stitch in A.2, insert a marker thread here (= transition between left sleeve and back piece), A.3 over the next stitch, knit the next 7-11-11-15-15-19 stitches and increase at the same time increase 7-4-7-3-9-7 stitches evenly spaced, A.1 over the next stitch, insert a marker thread here (= transition between back piece and right sleeve), work A.2 over the next 40 stitches, work the first stitch in A.2, insert a marker thread here (= transition between right sleeve and right front piece), work A.3 over the next stitch, knit the next 3-5-5-7-7-9 stitches and increase at the same time 3-1-3-1-4-3 stitches evenly spaced, 5 band stitches in garter stitch = 126-127-134-134-146-150 stitches on the needle. There is now 1 marker thread in each transition between body and sleeves (= 4 marker threads). Insert 1 marker in the mid-stitch on each sleeve (= knitted stitch). REMEMBER THE KNITTING TENSION! Continue back and forth with pattern A.2 between the marker threads on the sleeve, with 5 band stitches in garter stitch on each side towards mid front and A.1/A.3 + stocking stitch on the remaining stitches on the front and back pieces – AT THE SAME TIME on the next row from the right side (row 3 in A.1/A.3) start INCREASE SLEEVES – read description above (= 4 stitches increased on each sleeve). Increase like this every 8th-8th-6th-6th-4th-4th row a total of 6-7-10-11-13-14 times. When A.1 and A.3 have been completed in height continue to repeat towards the raglan-lines 7-8-9-10-11-12 more times (a total of 8-9-10-11-12-13 times), then work the first 3-3-1-1-0-0 rows in the diagrams. When all the increases to sleeves and front and back pieces are finished there are 310-335-374-398-438-466 stitches on the needle (increased 24-28-40-44-52-56 stitches on each sleeve and 35-39-41-45-48-52 stitches on each side of the back piece and the one side of the front pieces). The piece now measures approx. 20-22-24-26-28-30 cm from the marker on the neck. If the piece is shorter than this continue working to the right length. The next row from the wrong side is worked as follows: Work the first 47-51-55-59-65-70 stitches (= right front piece), place the next 65-69-81-85-93-97 stitches on 1 thread for sleeve and cast on 9-9-9-11-11-13 new stitches on the needle (= in side under sleeve), work the next 86-95-102-110-122-132 stitches (= back piece), place the next 65-69-81-85-93-97 stitches on 1 thread for sleeve and cast on 9-9-9-11-11-13 new stitches on the needle (= in side under sleeve) and work the remaining 47-51-55-59-65-70 stitches (= left front piece). Body and sleeves are finished separately. THE PIECE IS NOW MEASURED FROM HERE! BODY: There are 198-215-230-250-274-298 stitches on the body. Continue back and forth with stocking stitch and 5 band stitches in garter stitch on each side. When the piece measures 21 cm increase 1-0-1-1-1-1 stitch = 199-215-231-251-275-299 stitches. Work an edge as follows: 5 band stitches in garter stitch, A.2 until there are 6 stitches left on the row, work the first stitch in A.2 and finish with 5 band stitches in garter stitch. Continue back and forth until the edge measures 4 cm. Cast off with knit over knit and purl over purl. The jacket measures approx. 50-52-54-56-58-60 cm from the shoulder down. SLEEVE: Place the 65-69-81-85-93-97 stitches from the thread on the one side of the piece on short circular needle size 4.5 mm and knit up 1 stitch in each of the 9-9-9-11-11-13 stitches cast on under the sleeve = 74-78-90-96-104-110 stitches. Work pattern A.2 in the round as before. The pattern should fit on the round. Work as follows in the different sizes: Sizes S, M: Work textured pattern until the sleeve measures 41-39 cm from the division. Cast off with knit over knit and purl over purl. Sizes L, XL, XXL and XXXL: Work textured pattern until the sleeve measures 4 cm from the division. Insert a marker in the middle stitch under the sleeve. On the next round begin to decrease under the sleeve – read DECREASE TIP. Decrease like this every 2nd round a total of 4-4-4-4 times = 82-88-96-102 stitches. Continue with textured pattern until the sleeve measures 38-37-36-34 cm. Cast off with knit over knit and purl over purl. Work the other sleeve in the same way. ASSEMBLY: Sew buttons onto left band. |
||||||||||
Diagram explanations |
||||||||||
|
||||||||||
 |
||||||||||
Have you finished this pattern?Tag your pictures with #dropspattern #winterwheatjacket or submit them to the #dropsfan gallery. Do you need help with this pattern?You'll find 27 tutorial videos, a Comments/Questions area and more by visiting the pattern on garnstudio.com. © 1982-2026 DROPS Design A/S. We reserve all rights. This document, including all its sub-sections, has copyrights. Read more about what you can do with our patterns at the bottom of each pattern on our site. |
||||||||||


With over 40 years in knitting and crochet design, DROPS Design offers one of the most extensive collections of free patterns on the internet - translated to 17 languages. As of today we count 324 catalogues and 12290 patterns translated into English (UK/cm). 12290
We work hard to bring you the best knitting and crochet have to offer, inspiration and advice as well as great quality yarns at incredible prices! Would you like to use our patterns for other than personal use? You can read what you are allowed to do in the Copyright text at the bottom of all our patterns. Happy crafting!
Post a comment to pattern DROPS 206-47
We would love to hear what you have to say about this pattern!
If you want to leave a question, please make sure you select the correct category in the form below, to speed up the answering process. Required fields are marked *.