
Popular categories
Looking for a yarn?
































Comments / Questions (24)
 Aniko wrote:
Ez az első felülről kötött darabom. Úgy érzem, a karöltő alatti szaporítás felesleges számomra. Jó sokat visszabontottam, mert túl bő lett az alja. De ez tanulságos volt, hogy előbb mérjek, és merjek eltérni a leírástól.
30.09.2026 - 06:00
Aniko wrote:
Ez az első felülről kötött darabom. Úgy érzem, a karöltő alatti szaporítás felesleges számomra. Jó sokat visszabontottam, mert túl bő lett az alja. De ez tanulságos volt, hogy előbb mérjek, és merjek eltérni a leírástól.
21.09.2026 - 17:27
 Dorte wrote:
Jeg synes mine mælkebøtter bliver trukket skæve fordi det er svært at holde garnet/omslagene på samme længde (2,5 cm) hele tiden. Ydermere skal jeg hele tiden finde målebåndet fem for at finde de 2,5 cm. Er der nogle fif til disse 2 udfordringer?
06.06.2026 - 13:26DROPS Design answered:
Hei Dorte. Har dessverre ingen gode tips, bortsett fra det du gjør (måle), men prøv å dra litt i plagget etter hver gang det strikkes en "vifte", slik at det jevner seg ut og blir like. mvh DROPS Design
08.06.2026 - 10:39
 Valton Delphine wrote:
Rangsraccourcis pour le dos seraient preferable
18.04.2026 - 20:58
Valton Delphine wrote:
Rangsraccourcis pour le dos seraient preferable
18.04.2026 - 20:56DROPS Design answered:
Bonjour Mme Valton, si vous voulez en ajouter, vous pouvez vous inspirer de cette vidéo. Bon tricot!
20.04.2026 - 09:47
 Jaan wrote:
Ik heb een black-out geloof ik , Hoe meerder ik nadat ik steken op hulpnaald heb gezet? Doe ik dat breiend? En zo ja hoe en als het anders moet ook hoe? Bedankt
27.04.2024 - 18:07DROPS Design answered:
Dag Jaan,
Je meerdert inderdaad tijdens het breien door omslagen te maken die je op de volgende naald gedraaid breit.
28.04.2024 - 10:05
 Chantal wrote:
C’est la première fois que sa m’ arrive , pas mal de pet défaut dans la pelote de Drops Belle uni colour . Dommage .
20.07.2023 - 19:38
 Wendy wrote:
My apologies. In my previous comment on July 4, 2022, I should have clarified that the yarn was Drops Belle and given an email address to enable you to reply. Many thanks.
05.07.2022 - 00:37DROPS Design answered:
Dear Wendy, we are sorry to hear your experience, please contact any other DROPS Store in your country sending them all informations. Thank you. Happy knitting!
05.07.2022 - 15:49
Wendy wrote:
I have used many Drops patterns and yarns for several years and always been satisfied and pleased with the results. 3/4 of the way into my current project, the ball of yarn is badly flawed. 8 grams of broken threads and loops of extra threads had to be cut off. l am now hoping to have enough yarn to finish. I knew I was cutting it close. The store I purchased the yarn in, Yarn2 in Kamloops BC has closed. Can send a photo to show yarn, brand band, and weight to verify. Thank you
04.07.2022 - 22:54
Anna wrote:
Bonjour, j'ai commencé à tricoter ce projet du grandeur S. Mais je ne comprends pas la partie: ... Tricoter maintenant 13-14-14-15-16-17 fois A.1 (= 10 mailles) au total tout le tour. - 13 fois de toute la grille A.1 ?? au total toute le tour (10 mailles) ? j'ai hâte de les comprendre pour pouvoir continuer à tricoter ;) Merci Impatiente
08.04.2021 - 21:22DROPS Design answered:
Bonjour Anna, A.1 est le nom du diagramme à tricoter en premier; il se tricote sur 10 m au 1er rang; il y a 13 m dans chaque A.1 à la fin du diagramme; autrement dit, vous augmentez le nombre de mailles. Cette leçon devrait vous aider à comprendre comment tricoter les diagrammes. Bon tricot!
09.04.2021 - 07:43
|
||||||||||||||||||||||||||||
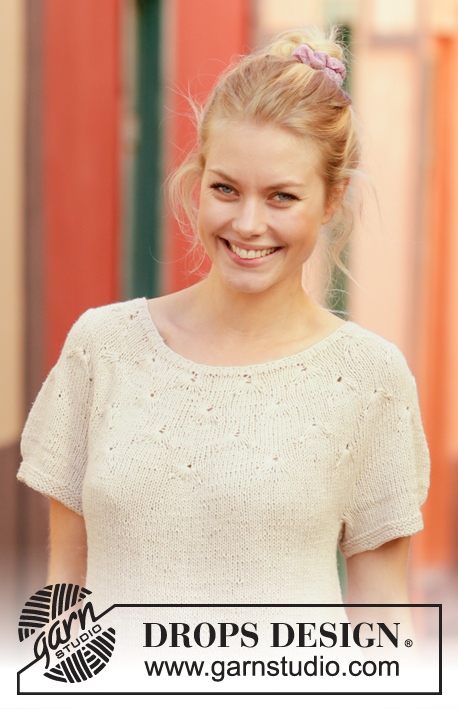
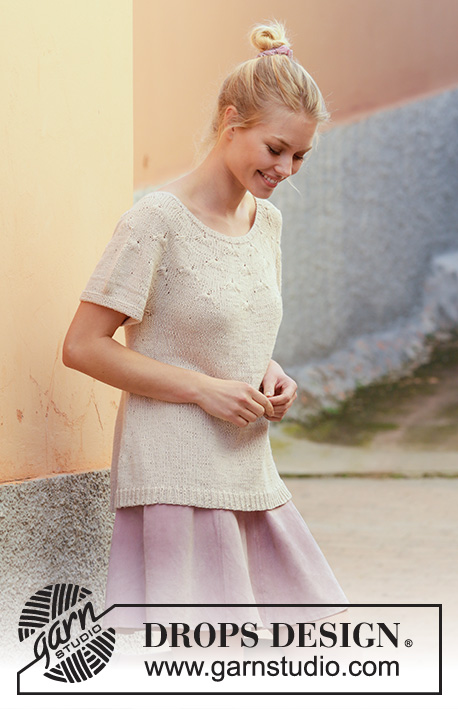
Dandelion Dreams#dandeliondreamstop |
||||||||||||||||||||||||||||
 |
 |
|||||||||||||||||||||||||||
Knitted top with round yoke in DROPS Belle. Piece is knitted top down with fan pattern. Size: S - XXXL
DROPS 201-37 |
||||||||||||||||||||||||||||
|
---------------------------------------------------------- EXPLANATION FOR THE PATTERN: ---------------------------------------------------------- GARTER STITCH (worked in the round): 1 ridge vertically = 2 rounds, i.e. knit 1 round and purl 1 round. PATTERN: See diagrams A.1 to A.4. INCREASE TIP-1 (evenly): To calculate how to increase evenly, use the total number of stitches on row (e.g. 123 stitches) and divide stitches by number of increases to be done (e.g. 7) = 17.6. In this example increase by making 1 yarn over after alternately every 17th and 18th stitch. On next round knit yarn overs twisted to avoid holes. INCREASE TIP-2 (applies to sides of body): Work until 2 stitches remain before marker thread, 1 yarn over, knit 4 (marker thread is in the middle of these stitches), 1 yarn over. On next round knit yarn overs twisted to avoid holes. Then work the new stitches in stocking stitch. ---------------------------------------------------------- START THE PIECE HERE: ---------------------------------------------------------- TOP - SHORT OVERVIEW OF THE PIECE: Worked in the round on circular needle, top down. Work sleeves in the round on double pointed needles/a short circular needle. NECK EDGE: Cast on 123-126-129-135-144-150 stitches on circular needle size 3 mm with Belle. Knit 1 round, then work rib = knit 1/purl 2 until 4 round rib have been worked. Knit 1 round. Knit 1 more round while increasing 7-14-11-15-16-20 stitches evenly - read INCREASE TIP-1 = 130-140-140-150-160-170 stitches. YOKE: Switch to circular needle size 4 mm. Insert a marker thread at beginning of round. Move the marker thread upwards when working. Now work pattern A.1 (= 10 stitches) 13-14-14-15-16-17 times in total on round. When entire A.1 has been worked vertically, there are 169-182-182-195-208-221 stitches on round (and there is a marker thread in every repetition A.1). Knit 5, remove marker thread at the beginning of round and insert it here (i.e. beginning of round is now displaced 5 stitches towards the left). Remove the rest of the marker threads in piece. Now work pattern A.2 (= 13 stitches) 13-14-14-15-16-17 times in total on round. NOTE: Fans should be in the middle of fans from previous row. When entire A.2 has been worked vertically, there are 208-224-224-240-256-272 stitches on round (and there is a marker thread in every repetition A.2). Knit 7, remove marker thread at the beginning of round and insert it here (i.e. beginning of round is now displaced 7 stitches towards the left). Remove the rest of the marker threads in piece. REMEMBER THE KNITTING TENSION! Now work pattern A.3 (= 16 stitches) 13-14-14-15-16-17 times in total on round. NOTE: Fans should be in the middle of fans from previous row. When entire A.3 has been worked vertically, there are 221-238-238-255-272-289 stitches on round (and there is a marker thread in every repetition A.3). Knit 7, remove marker thread at the beginning of round and insert it here (i.e. beginning of round is now displaced 7 stitches towards the left). Remove the rest of the marker threads in piece. Now work pattern A.4 (= 17 stitches) 13-14-14-15-16-17 times in total on round. NOTE: Fans should be in the middle of fans from previous row. When entire A.4 has been worked vertically, there are 286-308-308-330-352-374 stitches on round (and there is a marker thread in every repetition A.4). Piece measures approx. 16 cm from cast-on edge and down. Now continue with stocking stitch in the round for 1-3-5-7-9-11 cm, at the same time increase 14-13-27-30-34-38 stitches evenly – remember INCREASE TIP-1. Increase like this every 1-1-2-3-4-5 cm 1-2-2-2-2-2 times in total = 300-334-362-390-420-450 stitches. When piece measures 17-19-21-23-25-27 cm, work next round as follows: Work the first 42-46-49-55-60-65 stitches (= half back piece), slip the next 66-74-82-85-90-94 stitches on a stitch holder (= sleeve), cast on 8-8-10-10-12-14 new stitches on needle (= in the side under sleeve), work the next 84-93-99-110-120-131 stitches (= front piece), slip the next 66-74-82-85-90-94 stitches on a stitch holder (= sleeve), cast on 8-8-10-10-12-14 new stitches on needle (= in the side under sleeve), work the remaining 42-47-50-55-60-66 stitches (= half back piece). NOW MEASURE PIECE FROM HERE! BODY: = 184-202-218-240-264-290 stitches. Insert a marker thread in each side, in the middle of the 8-8-10-10-12-14 new stitches cast-on under sleeves in each side (= 4-4-5-5-6-7 new stitches on each side of marker thread). Work in stocking stitch in the round. When piece measures 4 cm from division, increase 1 stitch on each side of marker thread - read INCREASE TIP-2. Increase like this approx. every 7 cm 4 times in total = 200-218-234-256-280-306 stitches. When piece measures 30 cm from division, increase 31-31-36-38-41-45 stitches evenly = 231-249-270-294-321-351 stitches. Switch to circular needle size 3 mm. Work rib (knit 1/purl 2) in the round for 3 cm. Cast off. Make sure that the cast-off edge is not too tight. Use a larger needle size when casting off. Top measures approx. 56-58-60-62-64-66 cm from shoulder and down. SLEEVES: Slip the 66-74-82-85-90-94 stitches from stitch holder in one side of piece on a short circular needle or double pointed needles size 4 mm and pick in addition up 1 stitch in each of the 8-8-10-10-12-14 stitches cast on under sleeve = 74-82-92-95-102-108 stitches. Insert 1 marker thread in the middle of the 8-8-10-10-12-14 stitches under sleeve. Marker thread is the beginning of round. Work in stocking stitch in the round until piece measures 3 cm. Work next round as follows: Knit 27-31-34-34-37-38, knit the next 20-20-24-26-28-32 stitches together 2 by 2 (= 10-10-12-13-14-16 stitches decreased), work the remaining 27-31-34-35-37-38 stitches on round = 64-72-80-82-88-92 stitches. Knit 2 rounds. Switch to double pointed needles size 3 mm. Work 4 ridges in GARTER STITCH - read explanation above. Cast off. Work the other sleeve the same way. |
||||||||||||||||||||||||||||
Diagram explanations |
||||||||||||||||||||||||||||
|
||||||||||||||||||||||||||||
 |
||||||||||||||||||||||||||||
 |
||||||||||||||||||||||||||||
 |
||||||||||||||||||||||||||||
Have you finished this pattern?Tag your pictures with #dropspattern #dandeliondreamstop or submit them to the #dropsfan gallery. Do you need help with this pattern?You'll find 15 tutorial videos, a Comments/Questions area and more by visiting the pattern on garnstudio.com. © 1982-2026 DROPS Design A/S. We reserve all rights. This document, including all its sub-sections, has copyrights. Read more about what you can do with our patterns at the bottom of each pattern on our site. |
||||||||||||||||||||||||||||






With over 40 years in knitting and crochet design, DROPS Design offers one of the most extensive collections of free patterns on the internet - translated to 17 languages. As of today we count 333 catalogues and 12525 patterns translated into English (UK/cm). 12525
We work hard to bring you the best knitting and crochet have to offer, inspiration and advice as well as great quality yarns at incredible prices! Would you like to use our patterns for other than personal use? You can read what you are allowed to do in the Copyright text at the bottom of all our patterns. Happy crafting!
Post a comment to pattern DROPS 201-37
We would love to hear what you have to say about this pattern!
If you want to leave a question, please make sure you select the correct category in the form below, to speed up the answering process. Required fields are marked *.