
Popular categories
Looking for a yarn?


|
||||||||||||||||||||||||||||
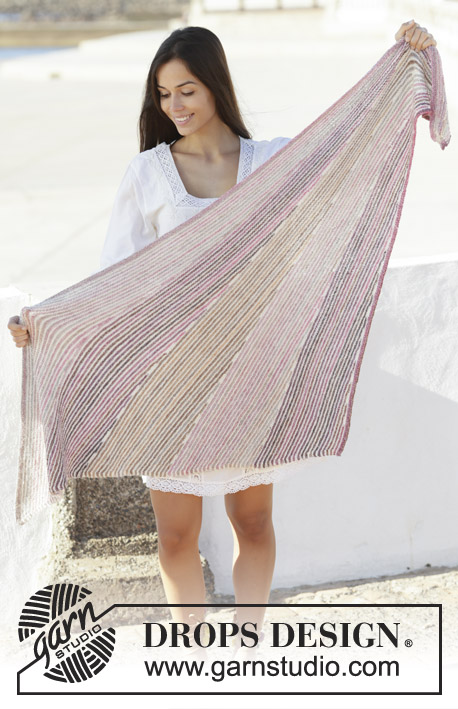
Dandelion Dreams |
||||||||||||||||||||||||||||
 |
 |
|||||||||||||||||||||||||||
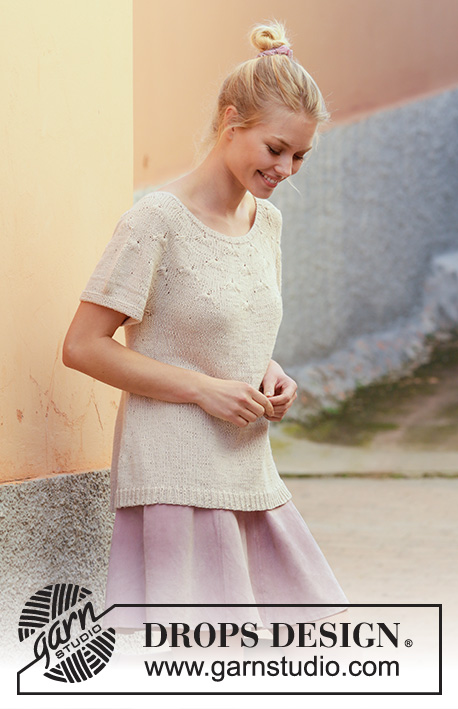
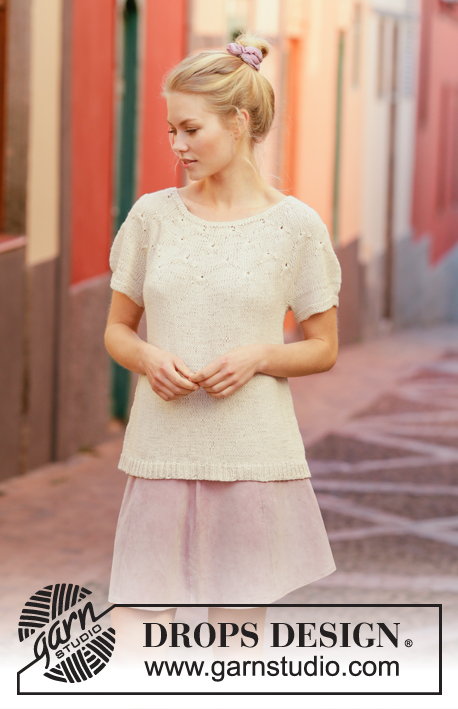
Knitted top with round yoke in DROPS Belle. Piece is knitted top down with fan pattern. Size: S - XXXL
DROPS 201-37 |
||||||||||||||||||||||||||||
|
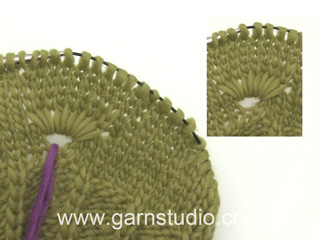
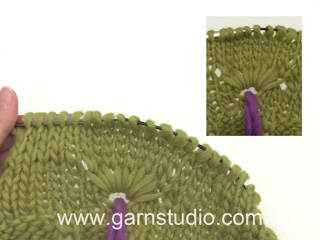
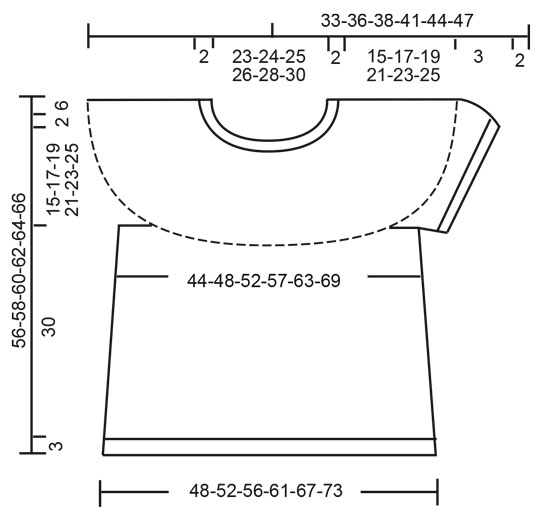
---------------------------------------------------------- EXPLANATION FOR THE PATTERN: ---------------------------------------------------------- GARTER STITCH (worked in the round): 1 ridge vertically = 2 rounds, i.e. knit 1 round and purl 1 round. PATTERN: See diagrams A.1 to A.4. INCREASE TIP-1 (evenly): To calculate how to increase evenly, use the total number of stitches on row (e.g. 123 stitches) and divide stitches by number of increases to be done (e.g. 7) = 17.6. In this example increase by making 1 yarn over after alternately every 17th and 18th stitch. On next round knit yarn overs twisted to avoid holes. INCREASE TIP-2 (applies to sides of body): Work until 2 stitches remain before marker thread, 1 yarn over, knit 4 (marker thread is in the middle of these stitches), 1 yarn over. On next round knit yarn overs twisted to avoid holes. Then work the new stitches in stocking stitch. ---------------------------------------------------------- START THE PIECE HERE: ---------------------------------------------------------- TOP - SHORT OVERVIEW OF THE PIECE: Worked in the round on circular needle, top down. Work sleeves in the round on double pointed needles/a short circular needle. NECK EDGE: Cast on 123-126-129-135-144-150 stitches on circular needle size 3 mm with Belle. Knit 1 round, then work rib = knit 1/purl 2 until 4 round rib have been worked. Knit 1 round. Knit 1 more round while increasing 7-14-11-15-16-20 stitches evenly - read INCREASE TIP-1 = 130-140-140-150-160-170 stitches. YOKE: Switch to circular needle size 4 mm. Insert a marker thread at beginning of round. Move the marker thread upwards when working. Now work pattern A.1 (= 10 stitches) 13-14-14-15-16-17 times in total on round. When entire A.1 has been worked vertically, there are 169-182-182-195-208-221 stitches on round (and there is a marker thread in every repetition A.1). Knit 5, remove marker thread at the beginning of round and insert it here (i.e. beginning of round is now displaced 5 stitches towards the left). Remove the rest of the marker threads in piece. Now work pattern A.2 (= 13 stitches) 13-14-14-15-16-17 times in total on round. NOTE: Fans should be in the middle of fans from previous row. When entire A.2 has been worked vertically, there are 208-224-224-240-256-272 stitches on round (and there is a marker thread in every repetition A.2). Knit 7, remove marker thread at the beginning of round and insert it here (i.e. beginning of round is now displaced 7 stitches towards the left). Remove the rest of the marker threads in piece. REMEMBER THE KNITTING TENSION! Now work pattern A.3 (= 16 stitches) 13-14-14-15-16-17 times in total on round. NOTE: Fans should be in the middle of fans from previous row. When entire A.3 has been worked vertically, there are 221-238-238-255-272-289 stitches on round (and there is a marker thread in every repetition A.3). Knit 7, remove marker thread at the beginning of round and insert it here (i.e. beginning of round is now displaced 7 stitches towards the left). Remove the rest of the marker threads in piece. Now work pattern A.4 (= 17 stitches) 13-14-14-15-16-17 times in total on round. NOTE: Fans should be in the middle of fans from previous row. When entire A.4 has been worked vertically, there are 286-308-308-330-352-374 stitches on round (and there is a marker thread in every repetition A.4). Piece measures approx. 16 cm from cast-on edge and down. Now continue with stocking stitch in the round for 1-3-5-7-9-11 cm, at the same time increase 14-13-27-30-34-38 stitches evenly – remember INCREASE TIP-1. Increase like this every 1-1-2-3-4-5 cm 1-2-2-2-2-2 times in total = 300-334-362-390-420-450 stitches. When piece measures 17-19-21-23-25-27 cm, work next round as follows: Work the first 42-46-49-55-60-65 stitches (= half back piece), slip the next 66-74-82-85-90-94 stitches on a stitch holder (= sleeve), cast on 8-8-10-10-12-14 new stitches on needle (= in the side under sleeve), work the next 84-93-99-110-120-131 stitches (= front piece), slip the next 66-74-82-85-90-94 stitches on a stitch holder (= sleeve), cast on 8-8-10-10-12-14 new stitches on needle (= in the side under sleeve), work the remaining 42-47-50-55-60-66 stitches (= half back piece). NOW MEASURE PIECE FROM HERE! BODY: = 184-202-218-240-264-290 stitches. Insert a marker thread in each side, in the middle of the 8-8-10-10-12-14 new stitches cast-on under sleeves in each side (= 4-4-5-5-6-7 new stitches on each side of marker thread). Work in stocking stitch in the round. When piece measures 4 cm from division, increase 1 stitch on each side of marker thread - read INCREASE TIP-2. Increase like this approx. every 7 cm 4 times in total = 200-218-234-256-280-306 stitches. When piece measures 30 cm from division, increase 31-31-36-38-41-45 stitches evenly = 231-249-270-294-321-351 stitches. Switch to circular needle size 3 mm. Work rib (knit 1/purl 2) in the round for 3 cm. Cast off. Make sure that the cast-off edge is not too tight. Use a larger needle size when casting off. Top measures approx. 56-58-60-62-64-66 cm from shoulder and down. SLEEVES: Slip the 66-74-82-85-90-94 stitches from stitch holder in one side of piece on a short circular needle or double pointed needles size 4 mm and pick in addition up 1 stitch in each of the 8-8-10-10-12-14 stitches cast on under sleeve = 74-82-92-95-102-108 stitches. Insert 1 marker thread in the middle of the 8-8-10-10-12-14 stitches under sleeve. Marker thread is the beginning of round. Work in stocking stitch in the round until piece measures 3 cm. Work next round as follows: Knit 27-31-34-34-37-38, knit the next 20-20-24-26-28-32 stitches together 2 by 2 (= 10-10-12-13-14-16 stitches decreased), work the remaining 27-31-34-35-37-38 stitches on round = 64-72-80-82-88-92 stitches. Knit 2 rounds. Switch to double pointed needles size 3 mm. Work 4 ridges in GARTER STITCH - read explanation above. Cast off. Work the other sleeve the same way. |
||||||||||||||||||||||||||||
Diagram explanations |
||||||||||||||||||||||||||||
|
||||||||||||||||||||||||||||

|
||||||||||||||||||||||||||||

|
||||||||||||||||||||||||||||
|
||||||||||||||||||||||||||||
|
Have you made this or any other of our designs? Tag your pictures in social media with #dropsdesign so we can see them! Do you need help with this pattern?You'll find tutorial videos, a Comments/Questions area and more by visiting the pattern on garnstudio.com. © 1982-2024 DROPS Design A/S. We reserve all rights. This document, including all its sub-sections, has copyrights. Read more about what you can do with our patterns at the bottom of each pattern on our site. |
||||||||||||||||||||||||||||


With over 40 years in knitting and crochet design, DROPS Design offers one of the most extensive collections of free patterns on the internet - translated to 17 languages. As of today we count 304 catalogues and 11422 patterns - 11422 of which are translated into English (UK/cm).
We work hard to bring you the best knitting and crochet have to offer, inspiration and advice as well as great quality yarns at incredible prices! Would you like to use our patterns for other than personal use? You can read what you are allowed to do in the Copyright text at the bottom of all our patterns. Happy crafting!
Comments / Questions (19)
C’est la première fois que sa m’ arrive , pas mal de pet défaut dans la pelote de Drops Belle uni colour . Dommage .
20.07.2023 - 19:38My apologies. In my previous comment on July 4, 2022, I should have clarified that the yarn was Drops Belle and given an email address to enable you to reply. Many thanks.
05.07.2022 - 00:37DROPS Design answered:
Dear Wendy, we are sorry to hear your experience, please contact any other DROPS Store in your country sending them all informations. Thank you. Happy knitting!
05.07.2022 - 15:49I have used many Drops patterns and yarns for several years and always been satisfied and pleased with the results. 3/4 of the way into my current project, the ball of yarn is badly flawed. 8 grams of broken threads and loops of extra threads had to be cut off. l am now hoping to have enough yarn to finish. I knew I was cutting it close. The store I purchased the yarn in, Yarn2 in Kamloops BC has closed. Can send a photo to show yarn, brand band, and weight to verify. Thank you
04.07.2022 - 22:54Bonjour, j'ai commencé à tricoter ce projet du grandeur S. Mais je ne comprends pas la partie: ... Tricoter maintenant 13-14-14-15-16-17 fois A.1 (= 10 mailles) au total tout le tour. - 13 fois de toute la grille A.1 ?? au total toute le tour (10 mailles) ? j'ai hâte de les comprendre pour pouvoir continuer à tricoter ;) Merci Impatiente
08.04.2021 - 21:22DROPS Design answered:
Bonjour Anna, A.1 est le nom du diagramme à tricoter en premier; il se tricote sur 10 m au 1er rang; il y a 13 m dans chaque A.1 à la fin du diagramme; autrement dit, vous augmentez le nombre de mailles. Cette leçon devrait vous aider à comprendre comment tricoter les diagrammes. Bon tricot!
09.04.2021 - 07:43Are there more tutorials for this pattern? I have difficulty following the diagrams. Has anyone made this pattern? If so maybe you can help me. Thank you!
18.08.2020 - 00:09DROPS Design answered:
Dear Mrs Matt, you will read more about diagrams here - and find 2 videos showing how to work diagrams and fans in diagram A.1 and A.3 and in diagram A.2 and A.4. Happy knitting!
18.08.2020 - 09:00I think there may be an error on Chart A3 and stitch counts after this section (XL size lists 252 sts but should be 304 if following pattern consistently) All the other charts increase by 3 stitches. A3 only has an increase of 2 stitches. That makes chart A4 increase by 5 stitches. The problem seems to be in the 7th row of chart A3 where 5 stitches should be on either side of the decreases made on either side of the fan instead of 4 as shown. That error throws off all the numbers.
09.03.2020 - 12:38DROPS Design answered:
Dear MissT, you increase 3 sts in each A.1 (= 195 sts after A.1), 3 sts in each A.2 (= 240 sts after A.2), 1 st in each A.3 (= you increase 5 sts and decrease 4 sts) (= 255 sts after A.3) and 5 sts in each A.4 (= 330 sts after A.4). Happy knitting!
09.03.2020 - 13:04Bonjour, J’aimerai faire une rehausse pour le dos. Pouvez-vous me préciser si le début du tour correspond au milieu du dos. Merci
11.08.2019 - 16:09DROPS Design answered:
Bonjour Mme Father, le début des tours au tout début de l'empiècement ne se trouve pas au milieu dos, on sera au milieu dos seulement quand on aura terminé l'empiècement (on décale le fil marqueur entre chaque diagramme en hauteur pour que les éventails soient intercalés). Bon tricot!
12.08.2019 - 08:29I would love to read the comments in English. Also I plan to make this top in plain knitting in the round, without the fan pattern. Hopefully it will be possible to do this! Can you confirm or advise against this? If possible, perhaps you have a pattern for a plain top, from the top, short sleeves, for sizes 3X and 4X. Hard to find! I want to make several for myself - I've been given some lovely yarns and plan to use them. Thank you for your help!!
25.06.2019 - 08:31DROPS Design answered:
Dear Mrs Reed, we are unfortunately not able to adjust every pattern to every single request, you are welcome to contact your store for any individual assistance - you will find here some other top patterns with round yoke. Happy knitting!
25.06.2019 - 08:36Sendte dessverre spørsmålet som kommertar. Jeg fikk ikke til "vifta" Skal den virkelig være 2,5 cm? Finnes det en video for dette?
22.06.2019 - 13:41DROPS Design answered:
Hei Helga. Ja, tråden skal trekkes lik at den blir 2,5 cm lang. Det ligger 2 videoer av viftene til venstre for oppskriften, fekse denne: . God fornøyelse
24.06.2019 - 08:24Skjønner ikke hvordan vifta blir laget Kastet skal være 2,5 cm. Brukes det en ekstra pinne? Prøvde å se om det var en video.
22.06.2019 - 13:38