
Popular categories
Looking for a yarn?


Comments / Questions (23)
![]() Μαρια Κασσαλια wrote:
Μαρια Κασσαλια wrote:
Hallo liebes team meine frage lautet wie oft muß ich A1b in der höhe stricken in rücken und vorderteil vielen dank
24.04.2024 - 19:23DROPS Design answered:
Liebe Frau Κασσαλια, nach A.1a gestrickt wurde, stricken Sie 10 , 11 oder 12 cm (siehe Größe) A.1b, dh die 4 Reihen A.1b wiederholen bis 10, 11 oder 12 cm mit diesem Muster gestrickt wurden. Viel Spaß beim Stricken!
25.04.2024 - 07:55
![]() Leny Reijerse wrote:
Leny Reijerse wrote:
Ik heb gisteren een opmerking/vraag beschreven, krijg ik daar antwoord op? Geen haast bij hoor, maar ik zie 'm nergens staan...
25.10.2023 - 18:00DROPS Design answered:
Dag Leny,
Je vraag stond bij de algemene opmerkingen, vandaar dat ik hem over het hoofd had gezien. Katoen en linnen is inderdaad zwaarder, waardoor het, door het gewicht sneller uitrekt. Het kan ook van patroon tot patroon verschillend zijn. Om het weer terug in vorm te brengen kun je hem een beetje nat maken en plat laten drogen. in de juiste afmetingen.
26.10.2023 - 20:01
![]() Leny Reijerse wrote:
Leny Reijerse wrote:
Met heel veel geduld heb ik deze trui gebreid, met hetzelfde garen als vermeld staat: Bomull Lin, ik vond het een heel groot werk, het is een mooie trui geworden, maar rekt zo erg uit, de trui wordt per dag centimeters langer, zo zonde, zo jammer. Hebben jullie dit vaker gehoord?
24.10.2023 - 13:38
![]() Caroline wrote:
Caroline wrote:
I note for the sleeves is says explicitly that you use 5.5mm when working lace and 6mm when working ss. It is not specified for the body. As they both have lace patterns ans ss, do we change needles for the body?
07.08.2023 - 10:50DROPS Design answered:
Dear Caroline, it's not necessary on sleeves, just work with the same needles all the way. Happy knitting!
07.08.2023 - 11:19
![]() Loredana Cardinale wrote:
Loredana Cardinale wrote:
Buongiorno, volevo un suggerimento per realizzare questa maglia senza maniche, grazie
12.06.2022 - 07:17DROPS Design answered:
Buonasera Loredana, per un aiuto così personalizzato può rivolgersi al suo rivenditore DROPS di fiducia. Buon lavoro!
15.06.2022 - 21:44
![]() Agneta Stocklasssa wrote:
Agneta Stocklasssa wrote:
Hej! varför ska man sticka på rundsticka när man ändås tickar fram och tillbaka?
05.04.2022 - 11:24DROPS Design answered:
Hej Agneta. Det är för att du lättare ska få plats med alla maskor, men du kan självklart sticka på vanliga parstickor om du hellre vill det. Mvh DROPS Design
05.04.2022 - 11:55
![]() Mariechristine wrote:
Mariechristine wrote:
Buonasera Sto facendo le diminuzioni per il dietro taglia S . Dunque ho avviato 72 me dopo avere diminuito 2m sui 2 Ferri successivi mi rimangono 64m . Come faccio ad avere 68 m facendo il diagramma A3.grazie per il vostro aiuto.
16.01.2021 - 22:40DROPS Design answered:
Buongiorno MarieChristine, dopo aver avviato 72 maglie per il dietro deve lavorare a maglia legaccio per 5 cm er poi lavorare A.1a con 1 maglia di vivagno a maglia legaccio a ogni lato del lavoro. Sul ferro indicato con una stella nera, diminuire 4 maglie in modo uniforme per arrivare a 68 maglie. Buon lavoro!
17.01.2021 - 14:40
![]() Eleonora Van Ditmars wrote:
Eleonora Van Ditmars wrote:
Mouwen breien op rondbreinaald betekent dit in de rondte of heen en terug?
11.05.2020 - 13:32DROPS Design answered:
Dag Eleonora,
Je breit de mouwen inderdaad in de rondte.
13.05.2020 - 11:35
![]() Kari Frey Solvik wrote:
Kari Frey Solvik wrote:
Strikket str L. Strikkefastheten ble overholdt, og brukte da 2 nøster mindre enn angitt i oppskriften. Opplever at genseren siger ut både i bredde og lengde, slik at den blir veldig stor etter en gangs bruk etter vask (vasket med Milo i kaldt vann, ikke brukt skyllemiddel). Str S ville vært mer enn stor nok til meg, og jeg bruker normalt str 40-42. Jeg vil prøve å klippe av genseren i bredden og montere den på nytt slik at den blir brukbar, for mønsteret liker jeg veldig godt.
17.09.2019 - 23:41
![]() Manon wrote:
Manon wrote:
Mon pull est terminé et il est magnifique. J'aimerais ajouter une capuche combien de mailles me conseillez vous de relever sur l'encolure et est-il préférable d'ajout des augmentations Merci
25.05.2019 - 12:58DROPS Design answered:
Bonjour Manon, nous ne sommes malheureusement pas en mesure de pouvoir adapter chacun de nos modèles à chaque demande. Pour toute assistance complémentaire, merci de bien vouloir contacter votre magasin, même par mail ou téléphone, et/ou un forum tricot. Bon tricot!
27.05.2019 - 09:58
|
||||||||||||||||||||||||||||
Mahala#mahalasweater |
||||||||||||||||||||||||||||
 |
 |
|||||||||||||||||||||||||||
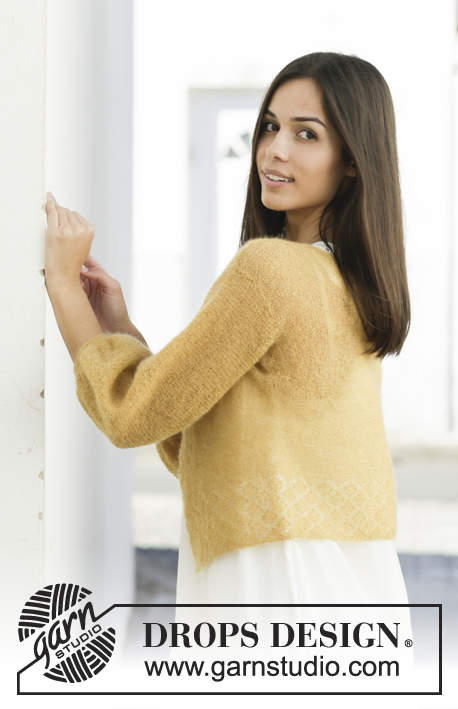
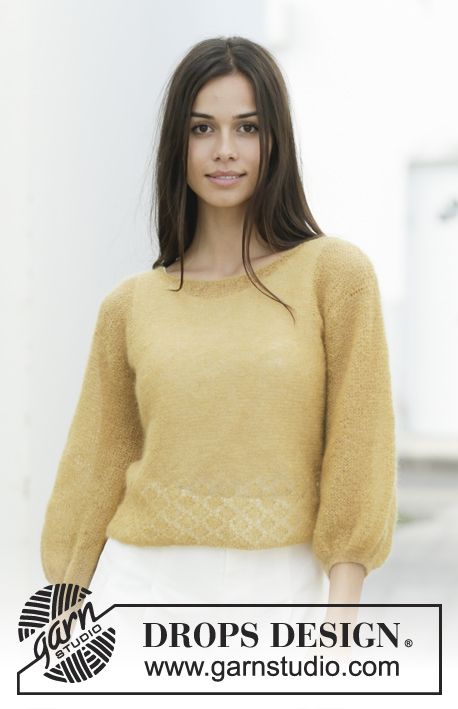
Knitted jumper in DROPS Bomull-Lin or DROPS Paris. The piece is worked with lace pattern and garter stitch. Sizes S – XXXL.
DROPS 200-20 |
||||||||||||||||||||||||||||
|
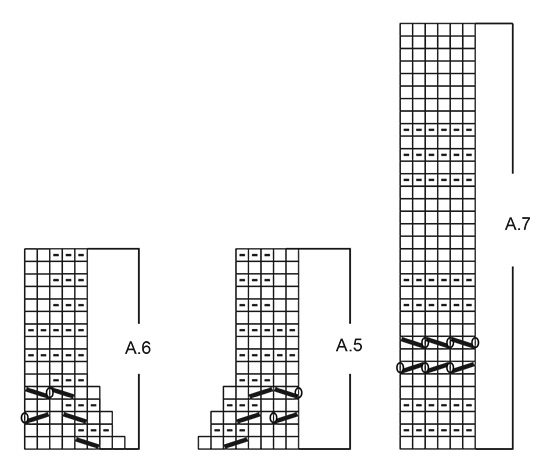
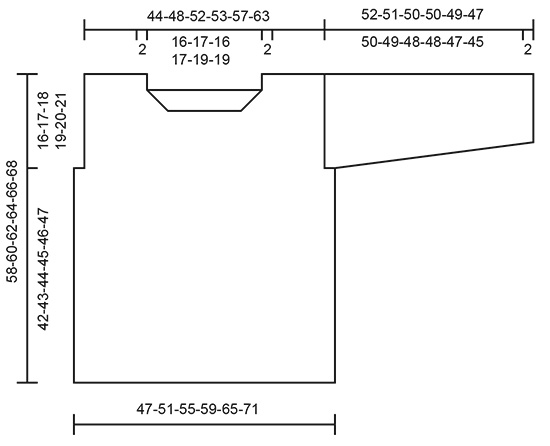
------------------------------------------------------- EXPLANATIONS FOR THE PATTERN: ------------------------------------------------------- RIDGE/GARTER STITCH (worked back and forth): Knit all rows. 1 ridge in height = Knit 2 rows. PATTERN: See diagrams A.1 to A.7. The diagrams show all the rows in the pattern seen from the right side. DECREASE/INCREASE TIP-1 (evenly spaced): To work out how to decrease/increase evenly, count the total number of stitches on the needle (e.g. 72 stitches) minus edge stitches (e.g. 2 stitches) and divide remaining stitches by the number of decreases/increases to be made (e.g. 4) = 17.5. In this example, decrease by alternately knitting together each 16th and 17th stitch and each 17th and 18th stitch. When increasing make 1 yarn over after alternately each 17th and 18th stitch. On the next row work the yarn overs twisted to avoid holes. DECREASE TIP-2 (for neck): All decreases are made from the right side! Decrease 1 stitch after the 3 stitches in garter stitch from the neck as follows: slip 1 stitch as if to knit, knit 1 and pass the slipped stitch over (= 1 stitch decreased). Decrease 1 stitch before the 3 stitches in garter stitch from the neck as follows: work until there are 5 stitches left before the neck, knit 2 together and work 3 stitches in garter stitch (= 1 stitch decreased). INCREASE TIP-2 (for sleeves): Increase 1 stitch by making 1 yarn over inside the 1 edge stitch on each side. On the next round work the yarn overs twisted to avoid holes. Then work the new stitches into pattern A.7. ------------------------------------------------------- START THE PIECE HERE: ------------------------------------------------------- JUMPER - SHORT OVERVIEW OF THE PIECE: The piece is worked back and forth in sections and sewn together to finish. The sleeves are worked back and forth with circular needle. Bomull-Lin becomes more even and neater after washing. When the garment is finished rinse it and place in right measurements(see sketch), and dry flat. BACK PIECE: Cast on 72-78-84-90-100-108 stitches with circular needle size 5.5 mm and Bomull-Lin or Paris. Work GARTER STITCH – read description above, back and forth for 5-6-6-7-7-8 cm. Now work pattern A.1a with 1 edge stitch in garter stitch on each side of the piece. On the row with a black star, decrease 4-4-4-6-6-6 stitches evenly spaced – read DECREASE/INCREASE TIP-1 = 68-74-80-84-94-102 stitches. On the row with a white star, increase 4-4-4-6-6-6 stitches evenly spaced – remember DECREASE/INCREASE TIP -1 = 72-78-84-90-100-108 stitches. Continue the same decreases on each row with a black star and increases on each row with a white star. This is to compensate for the different knitting tensions in the different structures. The edge stitch on each side is continued to finished length. REMEMBER THE KNITTING TENSION. When A.1a has been completed in height, continue with A.1b for 10-10-11-11-12-12 cm, then work A.1c. Now work pattern A.2a. When A.2a has been completed in height work A.2b for 10-10-11-11-12-12 cm; at the same time when the piece measures 42-43-44-45-46-47 cm (if your knitting tension is correct you are still working A.2b) cast off 2-2-2-4-6-6 stitches at the beginning of the next 2 rows for the armholes = 64-70-76-76-82-90 stitches. Continue with pattern as before and 1 edge stitch in garter stitch on each side. When A.2b has been worked for 10-10-11-11-12-12 cm continue with A.2c, then work the first 10 rows in A.3. There are now 68-74-80-82-88-96 stitches on the needle. Now cast off the middle 22-24-22-24-26-26 stitches for neck and each shoulder is finished separately. Continue with stocking stitch and 3 stitches in garter stitch towards the neck; at the same time on the next row from the neck decrease 1 stitch inside the 3 edge stitches in garter stitch – read DECREASE TIP-2 = 22-24-28-28-30-34 stitches. When you have worked 6 rows of stocking stitch, continue with garter stitch for approx. 2-3-3-4-4-5 cm. The piece measures a total of 58-60-62-64-66-68 cm from the shoulder down. Cast off. Work the other shoulder in the same way. FRONT PIECE: Cast on and work pattern in the same way as the back piece. Cast off stitches for the armholes in the same way as well. When there is 1 row left in A.2c there are 68-74-80-82-88-96 stitches on the needle. The next row is worked as follows from the wrong side: Work as before over the first 25-27-31-31-33-37 stitches before placing them on 1 thread for right shoulder, cast off the next 18-20-18-20-22-22 stitches for neck and work as before over the remaining 25-27-31-31-33-37 stitches = left shoulder. Work pattern as follows: 1 edge stitch in garter stitch, A.4 until there are 8 stitches left, A.5 over the next 8 stitches. On the row with the black circle decrease 2 stitches evenly spaced over A.4 in all sizes (you also decrease 1 stitch in A.5) = 22-24-28-28-30-34 stitches. On the row with the white circle increase 2 stitches evenly spaced over A.4 in all sizes (there are, additionally, 2 more stitches decreased in A.5, ie a total of 3 stitches decreased in A.5) = 22-24-28-28-30-34 stitches. Continue working until A.4 and A.5 have been completed in height. Then continue with garter stitch for approx. 2-3-3-4-4-5 cm; adjust to match the back piece. Cast off. The piece measures a total of 58-60-62-64-66-68 cm from the shoulder down. The right shoulder is worked as follows: Start from the right side (= from neck) and work A.6 over the first 8 stitches, A.4 until there is 1 stitch left and 1 edge stitch in garter stitch. On the row with the black circle decrease 2 stitches evenly spaced in all sizes (you also decrease 1 stitch in A.6) = 22-24-28-28-30-34 stitches. On the row with the white circle increase 2 stitches evenly spaced in all sizes (there are, additionally, 2 more stitches decreased in A.6, ie a total of 3 stitches decreased in A.6) = 22-24-28-28-30-34 stitches. Continue working until A.4 and A.6 have been completed in height. Then continue with garter stitch for 2-3-3-4-4-5 cm – adjust to match the left shoulder and the back piece. Cast off. SLEEVE: You use circular needle size 5.5 mm when working lace pattern and garter stitch and circular needle size 6 mm when working stocking stitch (i.e. rows 15-20 and 27-34 in A.7). This compensates for the different knitting tension when working stocking stitch and lace pattern/garter stitch. Cast on 34-36-36-38-40-42 stitches with circular needle size 5.5 mm and Bomull-Lin or Paris. Work 2 ridges. Then work pattern A.7 with 1 edge stitch in garter stitch on each side to finished length. When the piece measures 6-6-7-7-7-8 cm increase 1 stitch on each side of the piece – read INCREASE TIP-2 (for sleeves). Increase in the different sizes as follows: Size S: Increase approx. every 7 cm a total of 7 times. Size M: Increase every 5 cm a total of 9 times. Size L: Increase approx. every 4 cm a total of 10 times. Size XL: Increase approx. every 4 cm a total of 10 times. Size XXL: Increase alternately every 3 cm and every 4 cm a total of 11 times. Size XXXL: Increase approx. every 3 cm a total of 11 times. When all increases are finished there are 50-54-56-58-62-64 stitches on the needle. Continue working until the piece measures 52-51-50-50-49-47 cm – adjust so that you finish after a garter stitch or a stocking stitch section. Cast off. Work the other sleeve in the same way. ASSEMBLY: Sew shoulder steams with grafting stitches. Make sure the seam is not tight. Sew sleeves to body inside the edge stitch on body and the cast-off edge on sleeves. Sew sleeve seams inside the 1 edge stitch on each side and continue down the side seams. You can leave approx.10-15 cm for split at the bottom of body if you wish. Repeat on the other side. |
||||||||||||||||||||||||||||
Diagram explanations |
||||||||||||||||||||||||||||
|
||||||||||||||||||||||||||||
 |
||||||||||||||||||||||||||||
 |
||||||||||||||||||||||||||||
 |
||||||||||||||||||||||||||||
Have you finished this pattern?Tag your pictures with #dropspattern #mahalasweater or submit them to the #dropsfan gallery. Do you need help with this pattern?You'll find 24 tutorial videos, a Comments/Questions area and more by visiting the pattern on garnstudio.com. © 1982-2026 DROPS Design A/S. We reserve all rights. This document, including all its sub-sections, has copyrights. Read more about what you can do with our patterns at the bottom of each pattern on our site. |
||||||||||||||||||||||||||||


With over 40 years in knitting and crochet design, DROPS Design offers one of the most extensive collections of free patterns on the internet - translated to 17 languages. As of today we count 324 catalogues and 12290 patterns translated into English (UK/cm). 12290
We work hard to bring you the best knitting and crochet have to offer, inspiration and advice as well as great quality yarns at incredible prices! Would you like to use our patterns for other than personal use? You can read what you are allowed to do in the Copyright text at the bottom of all our patterns. Happy crafting!
Post a comment to pattern DROPS 200-20
We would love to hear what you have to say about this pattern!
If you want to leave a question, please make sure you select the correct category in the form below, to speed up the answering process. Required fields are marked *.