
Popular categories
Looking for a yarn?


Comments / Questions (56)
![]() Nina wrote:
Nina wrote:
Je ne comprend pas bien pour la finition au commencement de l'encolure d'un coté doit ton le coudre au niveau du dos car je ne comprend pas bien les explication merci
02.04.2026 - 21:00DROPS Design answered:
Bonjour Nina, les devants se tricotent de bas en haut, puis on va reprendre les mailles des deux devants pour tricoter le dos de haut en bas, autrement dit, lorsque vous avez terminé le devant droit, mettez les mailles en attente comme indiqué et tricotez le devant gauche. À la fin du devant gauche, vous monterez les mailles de l'encolure et vous tricoterez le devant droit pour tricoter le dos de haut en bas. Bon tricot!
08.04.2026 - 07:22
![]() Nina wrote:
Nina wrote:
Comment faire les liens merci
30.03.2026 - 15:30DROPS Design answered:
Bonjour Nina, faire un lien ainsi: Crocheter 1 maille serrée dans le coin, crocheter ensuite des mailles en l'air pendant environ 20-25 cm, tourner et crocheter 1 maille coulée dans chaque maille en l'air, puis de nouveau 1 maille serrée dans le coin du devant. Bon tricot!
30.03.2026 - 16:10
![]() Nina wrote:
Nina wrote:
Quand on commence le devant combien mesure t'il merci
27.03.2026 - 20:12DROPS Design answered:
Bonjour Nina, le devant mesure un peu moins que la largeur du bas du nid d'ange (c'est la largeur du dos qui est indiqué dans le schéma en bas de page), pour avoir la largeur correspondant à la taille tricotée, divisez votre nombre de mailles à monter par 2,4 (car la tension est de 24 m pour 10 cm). Bon tricot!
07.04.2026 - 08:19
![]() Nina wrote:
Nina wrote:
Je voulais savoir quand on commence a diminuer sur le devant doit ton diminuer sur les deux coté ouun seul merci
27.03.2026 - 14:47DROPS Design answered:
Bonjour Nina, pour le devant droit, on diminue en fin de rang sur l'endroit, autrement dit 1 seule maille d'un seul côté (pour le devant gauche, vous ferez cette diminution en début de rang sur l'endroit). Bon tricot!
27.03.2026 - 16:09
![]() Jannet Gutiérrez wrote:
Jannet Gutiérrez wrote:
Hermoso
03.01.2026 - 18:04
![]() Diane wrote:
Diane wrote:
Can you please email this pattern to me
29.06.2025 - 23:48DROPS Design answered:
Dear Diane, you can directly print this pattern from our website, or choosing a virtual printer you can save it as a .pdf. Happy knitting!
30.06.2025 - 09:36
![]() Petra wrote:
Petra wrote:
Bei mir wellt sich der Häkelrand leider, was kann ich dagegen tun.? Und in der Anleitung steht lediglich man soll Stäbchen häkeln.macht man das mit 2 Umschlägen wird das sehr löcherig. Ich habe jetzt einfache Stäbchen mit nur einem Umschlag gehäkelt. Ist das korrekt?
12.04.2025 - 22:29
![]() Petra wrote:
Petra wrote:
Mir ist nicht klar, wie die Vorderteile zusammen genäht werden. Nur an der Unterkante?
08.04.2025 - 09:23DROPS Design answered:
Liebe Petra, die Vorderseiten werden nicht zusammengenäht, sie sind beide am Rückenteil genäht (Seiten) - unten wird man die Häkelkante durch beide Vorderteile häkeln, so nicht zusammengenäht sonder nur zusammengehäkelt. Viel Spaß beim Weiterstricken!
08.04.2025 - 14:40
![]() Josephine wrote:
Josephine wrote:
Hallo, ik ben bijna aan het eind van het rechter voorpand. Het stukje van waar de markeerdraad komt en de steken opzetten, hoe ik dat moet doen. Kun je dat uitleggen?
28.12.2024 - 21:55
![]() Josephine wrote:
Josephine wrote:
Dankjewel voor de snelle reactie. Ik snap het.
11.12.2024 - 11:08
|
|
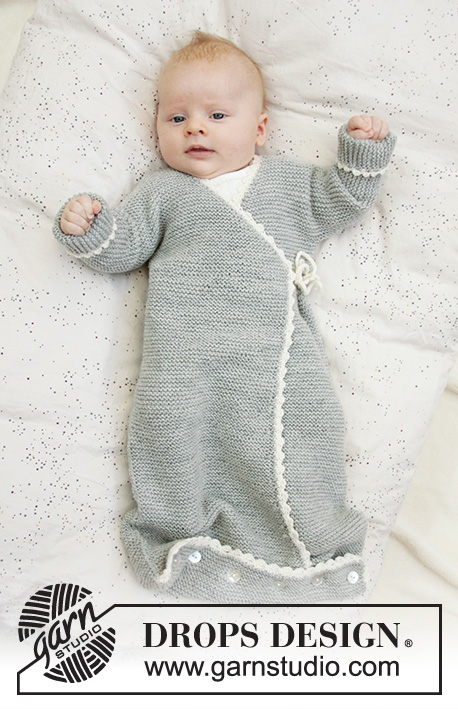
Catch a Wink#catchawinkbuntingbag |
|
 |
 |
Knitted bag for babies in DROPS BabyMerino. The piece is worked in garter stitch with wrap-around, crocheted edges and ties. Sizes premature - 4 years.
DROPS Baby 33-6 |
|
|
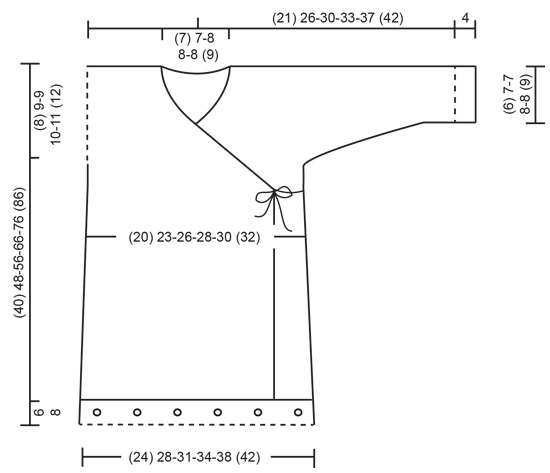
EXPLANATIONS FOR THE PATTERN: ------------------------------------------------------- RIDGE/GARTER STITCH (worked back and forth): 1 ridge = Knit 2 rows. DECREASE TIP (for sides of front piece and along neckline): All decreases are made from the right side! Decrease on the inside of the 1 edge stitch in garter stitch. Decrease as follows after the 1 edge stitch: Slip 1 stitch as if to knit, knit 1 and pass the slipped stitch over. Decrease as follows before the 1 edge stitch: Start 2 stitches before the 1 edge stitch and knit 2 together. INCREASE TIP (for sides of back piece): All increases are made from the right side! Increase on the inside of the 1 edge stitch in garter stitch. Increase 1 stitch by making 1 yarn over; on the next row knit the yarn over twisted to avoid a hole. KNITTING TIP: There are 10 extra stitches cast on at the bottom of each sleeve for turn up. If you do not want these turn ups, cast on only (9) 9-12-12-10 (13) stitches at the bottom of each sleeve instead of (19) 19-22-22-20 (23) stitches. Remember that you will then have 10 fewer stitches on each side when counting the total number of stitches. BUTTONHOLES (for fold at bottom of bag): 1 buttonhole = cast off 2 stitches, on the next row cast on 2 new stitches over the cast-off stitches. The outermost buttonholes are worked approx. 2 cm in from each side. Then work the other buttonholes with approx. (7) 6-5½-6-7 (8) cm between each one. ------------------------------------------------------- START THE PIECE HERE: ------------------------------------------------------- BAG – SHORT OVERVIEW OF THE PIECE: The piece is worked back and forth with circular needle. You start with one of the front pieces, cast on stitches for sleeve and continue to the shoulder. Then work the other front piece in the same way, but reversed. The 2 front pieces are worked together and then work down the back piece to finished length. The back piece is longer than the front pieces and is folded over them – see photo. Extra stitches are cast on for the turn up at the bottom of each sleeve. If you do not want a turn up, take these stitches away from the total number of stitches cast on for the sleeves – read KNITTING TIP! RIGHT FRONT PIECE: Cast on (44) 49-52-60-67 (71) stitches (including 1 edge stitch in the side) with circular needle size 3 mm and light grey. Work GARTER STITCH – read description above (first row = right side and is worked from mid front). When the piece measures (6) 6-6-8-8 (8) cm decrease 1 stitch in the side (i.e. at the end of the row from the right side) – read DECREASE TIP. Decrease like this every (5) 5½-7-7-5½ (5½) cm a total of (5) 6-6-7-10 (12) times = (39) 43-46-53-57-59 stitches. NECKLINE: When the piece measures (29) 36-43-52-61 (70) cm decrease 1 stitch for the neck at the beginning of the row from the right side – read DECREASE TIP. Decrease like this every 2nd row (i.e. each row from the right side) a total of (20) 20-22-26-28 (29) times and then every 4th row (i.e. every other row from the right side) a total of 2 times in all sizes. SLEEVE: AT THE SAME TIME when the piece measures (32) 39-47-56-65 (74) cm cast on new stitches for the sleeve at the end of the row from the right side as follows: Cast on (4) 6-7-8-7 (8) stitches a total of (4) 4-4-4-6 (6) times and then (19) 19-22-22-20 (23) stitches 1 time. After all decreases and increases there are (52) 64-72-79-89 (99) stitches on the row for shoulder/sleeve. Continue back and forth with garter stitch until the piece measures (40) 48-56-66-76 (86) cm. Insert 1 marker at the beginning of the row from the right side (i.e. towards neck). The marker marks mid top of shoulder and the piece will later be folded here. The marker will also be used to measure from. Continue with garter stitch and cast on 2 new stitches at the end of the next 2 rows from the wrong side (i.e. towards the neck) = (56) 68-76-83-93 (103) stitches on the needle and the last row is worked from the wrong side. Place all stitches on a thread or leave them on the needle. Work the left front piece as described below. LEFT FRONT PIECE: Cast on (44) 49-52-60-67 (71) stitches (including 1 edge stitch in the side) with circular needle size 3 mm and light grey. Work garter stitch (first row = right side and is worked from the side). When the piece measures (6) 6-6-8-8 (8) cm decrease 1 stitch in the side (i.e. at the beginning of each row from the right side) – read DECREASE TIP. Decrease like this every (5) 5½-7-7-5½ (5½) cm a total of (5) 6-6-7-10 (12) times = (39) 43-46-53-57-59 stitches. NECKLINE: When the piece measures (29) 36-43-52-61 (70) cm decrease 1 stitch for the neck at the end of each row from the right side – read DECREASE TIP. Decrease like this every 2nd row (i.e. every row from the right side) a total of (20) 20-22-26-28 (29) times and then every 4th row (i.e. every other row from the right side) a total of 2 times in all sizes. SLEEVE: AT THE SAME TIME when the piece measures (32) 39-47-56-65 (74) cm cast on new stitches for the sleeve at the end of the row from the wrong side as follows: Cast on (4) 6-7-8-7 (8) stitches a total of (4) 4-4-4-6 (6) times and then (19) 19-22-22-20 (23) stitches 1 time. After all decreases and increases there are (52) 64-72-79-89 (99) stitches on the needle for shoulder/sleeve. Continue back and forth with garter stitch until the piece measures (40) 48-56-66-76 (86) cm. Insert 1 marker at the end of the row from the right side (i.e. towards neck). The marker marks mid top of shoulder and the piece will later be folded here. The marker will also be used to measure from. Continue with garter stitch and cast on 2 new stitches at the end of the next 2 rows from the right side (i.e. towards neck) = (56) 68-76-83-93 (103) stitches on needle. Knit 1 row from the wrong side. Now work the back piece as described below. BACK PIECE: From the right side knit over all the (56) 68-76-83-93 (103) stitches on the left front piece, cast on (8) 8-12-12-12 (14) new stitches on the needle for the neck at the back and then knit from the right side over all the (56) 68-76-83-93 (103) stitches from the right front piece = (120) 144-164-178-198 (220) stitches. THE PIECE S NOW MEASURED FROM THE MARKERS ON SHOULDERS! Continue back and forth with garter stitch over all stitches. When the piece measures (6) 7-7-8-8 (9) cm from the markers cast off the sleeve stitches as follows: Cast off at the beginning of each row on each side (19) 19-22-22-20 (23) stitches 1 time and then (4) 6-7-8-7 (8) stitches a total of (4) 4-4-4-6 (6) times on each side = (50) 58-64-70-74 (78) stitches left on needle. Continue working until the piece measures (14) 14-15-16-18 (17) cm from the markers. Now increase 1 stitch on each side - read INCREASE TIP (= 2 stitches increased). Increase like this every (5) 5½-7-7-5½ (5½) cm a total of (5) 6-6-7-10 (12) times on each side = (60) 70-76-84-94 (102) stitches. Continue working until the piece measures (40) 48-56-66-76 (86) cm from the markers. Now insert 1 new marker in each side of the back piece. These markers mark the folding edge at the bottom of the bag; the piece is now measured from the new markers. Continue with garter stitch until the piece measures (4) 4-4-6-6 (6) cm from the new markers. On the next row from the right side, work (4) 5-6-6-6 (6) BUTTONHOLES evenly spaced – read description above. Continue working until the piece measures (6) 6-6-8-8 (8) cm from the new markers (the whole bag measures approx. (46) 54-62-74-84 (94) cm from the markers on the shoulders). Loosely cast off with knit from the right side. ASSEMBLY: Fold the piece double at the markers on the shoulders. Sew the under-sleeve seams and side seams in one go, inside the 1 edge stitch. CROCHET EDGE ALONG OPENING OF BAG: Start from the wrong side at the bottom left corner of the left front piece and crochet with hook size 2.5 mm and off white along the opening of the bag as follows: ROW 1 (= wrong side): 1 double crochet in first stitch, * 1 chain stitch, skip approx. 1-2 stitches (try this out; the edge should lie flat), work 1 double crochet in next stitch *, work from *-* up the whole of the left front piece, but at the corner where the decreases for the neck start, work a tie as follows: Work 1 double crochet in the corner, then work chain stitches for approx. 20-25 cm, turn and work back with 1 slip stitch in each chain stitch, then work 1 double crochet in the corner of the front piece again. Continue the crochet edge around the neck as far as the corner after the decreases for neck on the other front piece. Work a tie in the same way as on the left front piece and then continue down the whole right front piece and finish with 1 slip stitch in the corner, turn the piece. ROW 2 (= right side): Work 2 chain stitches, 1 double crochet around the first chain stitch, * 4 chain stitches, 1 treble crochet in the 4th chain stitch from the hook, skip 1 double crochet + 1 chain stitch + 1 double crochet, work 1 double crochet around the next chain stitch *, work from *-* to end of row (make sure that you work over the ties so that they lie underneath) and finish with 1 slip stitch in the first double crochet at the beginning of the previous row. Cut and fasten the strands. Work a similar edge along the bottom of the front pieces as follows: Lay the right front piece over the left front piece. Start from the wrong side and crochet along the bottom edge, but where the front pieces overlap work through both layers. Cut and fasten the strands. CROCHET EDGE ALONG THE TURN-UP AT BOTTOM OF BAG: Start from the wrong side and work a similar edge along the turn up in the same way as described above. Fold the edge up at the markers. Sew buttons onto front piece. CROCHET EDGE AROUND SLEEVES: Start from the wrong side and work as follows: ROUND 1: Work 1 double crochet in first stitch, * 1 chain stitch, skip approx. 1 ridge, work 1 double crochet in next stitch *, work from*-* around the whole sleeve and finish with 1 slip stitch in the first double crochet at the beginning of the round. ROUND 2: Work 2 chain stitches, 1 double crochet around the first chain stitch, * 4 chain stitches, 1 treble crochet in the 4th chain stitch from the hook, skip 1 double crochet + 1 chain stitch + 1 double crochet, work 1 double crochet around the next chain stitch *, work from *-* to end of round and finish with 1 slip stitch in the 2nd chain stitch at the beginning of the round. Cut and fasten strands. Work a similar edge around the other sleeve. Turn up the sleeves. TIES: Work 1 tie on each side of the bag equivalent to each corner on the front pieces. The tie on the right side is worked inside the seam (i.e. on wrong side of the piece) and the tie on the left side is worked on the outside of the seam (i.e. on the right side of the piece) – make sure that these ties are at the same height as the other two. |
|
 |
|
Have you finished this pattern?Tag your pictures with #dropspattern #catchawinkbuntingbag or submit them to the #dropsfan gallery. Do you need help with this pattern?You'll find 22 tutorial videos, a Comments/Questions area and more by visiting the pattern on garnstudio.com. © 1982-2026 DROPS Design A/S. We reserve all rights. This document, including all its sub-sections, has copyrights. Read more about what you can do with our patterns at the bottom of each pattern on our site. |
|


With over 40 years in knitting and crochet design, DROPS Design offers one of the most extensive collections of free patterns on the internet - translated to 17 languages. As of today we count 324 catalogues and 12290 patterns translated into English (UK/cm). 12290
We work hard to bring you the best knitting and crochet have to offer, inspiration and advice as well as great quality yarns at incredible prices! Would you like to use our patterns for other than personal use? You can read what you are allowed to do in the Copyright text at the bottom of all our patterns. Happy crafting!
Post a comment to pattern DROPS Baby 33-6
We would love to hear what you have to say about this pattern!
If you want to leave a question, please make sure you select the correct category in the form below, to speed up the answering process. Required fields are marked *.