
Popular categories
Looking for a yarn?
































Comments / Questions (212)
 Lind wrote:
Hallo nochmal, ich habe den unteren Rücken gestrickt und beginne jetzt mit der Teilung rechter Teil/linker Teil… von wo aus beginne ich meine Hinreihe? Stricke ich bis zum Anfang der verkürzten Reihen oder beginne ich da ,wo ich mit den verkürzten Reihen aufgehört habe ? Danke für Unterstützung
26.10.2026 - 14:34DROPS Design answered:
Liebe Frau Lind, wenn Sie die 42 Reihen gestrickt haben, dann stricken Sie zuerst die linke Seite, den Faden nicht abschneiden aber wie beschrieben mit verkürzten Reihen mit einer Hinreihe beginnen und immer weniger Maschen am Ende jeder Reihe (Hin- sowie Rückreihe) stricken gleichzeitig wie zuvor zunehmen. Nach den 18 Reihen Faden abschneiden und dann die rechte Seite mit einer Hin-Reihe nach A.4 (hintere Mitte) beginnen und verkürzte Reihen hin und zurück über den unteren Teil des rechten Vorderteils ebenso stricken. Viel Spaß beim Stricken!
27.10.2026 - 08:20
Lind wrote:
Hi, werden die Ärmel in der Runde gestrickt ? Ich soll auf der Rundnadeldie Maschen anschlagen, dann heißt es hin und her stricken und am Ende der Reihe… wie ist das gemeint? Herzlichen Dank 🙃
26.10.2026 - 14:12DROPS Design answered:
Liebe Frau Lind, die Ärmel werden in Hin- und Rückreihen von oben nach unten gestrickt, am Anfang schlagen Sie beidseitig neue Maschen für die Armkugel an; dann wird man beidseitig abnehmen. Viel Spaß beim Stricken!
27.10.2026 - 08:17
 Jocelyn wrote:
Hi there! I am about to knit the very last short rows (18 rows A.4) for the last (RIGHT) side of the jacket, starting from the A4 mid back marker. Instructions consist of knitting the short rows in symmetry, got it! But what about the increase to make every 4th row for each cable ? should it also be symmetric, or do we keep the pattern as it is, i.e. 1 inc. AFTER the cable on the WS = 1 inc. BEFORE the cable on the RS ? Thanks in advance for your support!
23.10.2026 - 18:55DROPS Design answered:
Dear Jocelyn, yes, in the last 18 rows, where you work the "reflection" of the other 18 rows, you increase before the cable on the RS. Happy knitting!
25.10.2026 - 19:47
 Christine wrote:
Rebonjour, merci pour la réponse ci-dessous, mais elle ne répond pas à ma question, je vais essayer de la reformuler : après avoir fait les 18 rgs A4 pour le devant GAUCHE, j'ai coupé le fil, et là où j'en suis avec mes aiguilles, je suis bien loin du marqueur milieu A4 dos. Comment je fais pour attaquer le devant DROIT ? Dois-je tricoter les mailles de là où je suis (côté gauche) pour atteindre ce marqueur, ou est-ce que je dois glisser ces mailles ? Je ne comprends rien ! Merci
22.10.2026 - 09:16DROPS Design answered:
Bonjour Christine, désolée pour la méprise, oui tout à fait, vous allez simplement glisser les mailles sur de l' aiguille droite sur la gauche, sans les tricoter, jusqu'à arriver à votre repère pour commencer le devant droit, sur l'endroit après le A.4/le milieu dos (en effet miroir par rapport au devant gauche, si cela peut vous aider). Bon tricot!
23.10.2026 - 06:10
Maud wrote:
Hi! Is there a way to make the sleeves by picking up stitches around the armhole and work in reverse stockinette stitch in the round? I thought I could just pick up as many sts as needed around the armhole and move forward with stch decreases till the ribbing, but it seems that the sleeve top is kind of rounded to shape the shoulders, if I recall correctly, and I don't know how to translate this shaping while knitting in the round. Thank you!
21.10.2026 - 18:40DROPS Design answered:
Dear Maud, you can probably adjust sleeves as you would like them to work but note that here we are working sleeves top down increasing sts on each side for sleeve cap, then decrease mid under sleeve. But feel free to take inspiration from a similar pattern to make your adjustments. Your Yarn store can probably help you even per mail or telephone. Happy knitting!
22.10.2026 - 08:56
Christine wrote:
Hello! Je viens de terminer les 18 rgs (= 3 x A4) pour le devant GAUCHE, j'ai coupé le fil comme indiqué. Maintenant je dois faire de même (symétrie) pour le devant DROIT. Mais comment faire pour remettre mes aiguilles au bon endroit, càd au début du devant DROIT? Il y a forcément des mailles à mettre en attente, si on veut atteindre le début du devant droit, non ? Merci
21.10.2026 - 16:31DROPS Design answered:
Bonjour Christine, commencez le devant droit sur l'endroit après A.4/après le milieu dos et procédez de la même façon que pour le devant gauche, vous tricotez 3 et 4 m en moins tous les rangs, en symétrie par rapport au devant gauche soit: 4 m en moins en fin de rang sur l'envers et 3 m en moins en fin de rang sur l'endroit - en même temps, pensez à bien augmenter comme vous l'avez fait pour le devant gauche. Bon tricot!
22.10.2026 - 08:46
Solene wrote:
Bonjour J'arrive à la partie des côtés et du dos Les rang raccourci ce fond uniquement au début de chaque tours ? (Sur les bord du projet) ou à chaque sections ou ce trouve la torsade? Et il faut enlevé 3mailles, 6 mailles, et 3 maille à chaque tours jusqu'à la fin? Pour le xxxl ça fait un total de combien de maille quand c est fini Cordialement
01.10.2026 - 09:09DROPS Design answered:
Bonjour Solène, vous tricotez vos 276 mailles ainsi: tricotez comme avant augmentez comme avant pour continuer le cercle) jusqu'à ce qu'il reste 3 mailles (d'abord avant la fin des 276 m, puis toujours 3 mailles en moins à la fin de chaque rang, de chaque côté) jusqu'à ce que vous ayez tricoté 42 rangs au total = 84 cm environ depuis le milieu du cercle. Terminez par un rang sur l'envers et tricotez désormais le devant gauche seulement avec des rangs raccourcis (sur l'endroit, on tricote 4 m en moins et sur l'envers, on tricote 3 m en moins) en même temps que vous continuez à augmenter comme avant pendant 18 rangs. Puis mettez en attente et tricotez le devant droit de la même façon (mais 4 m en moins sur l'envers et 3 m en moins sur l'endroit). Bon tricot!
01.10.2026 - 17:13
Solene wrote:
Bonjour pouvez vous m'expliquer le diagramme A1 car comment je peux commencer par 1 maille endroit alors que j'en es déjà 2 par aiguilles? Comment le rang 2 peux être 1 augmentation Alors qu'il y a 2 mailles au départ Et le rang 3 avoir 3 mailles Alors que ont commence déjà avec 2 mailles J'aime ce modèle et j'ai vraiment envie de le faire mais pour moi ce n'est pas claire du tout le diagramme Cordialement
22.09.2026 - 00:21DROPS Design answered:
Bonjour Solene, vous avez 8 mailles au total sur les aiguilles, et vous répétez 8 fois le diagramme A.1, autrement dit, si vous avez 2 m par aiguille, vous répétez 2 fois A.1 sur chaque aiguille = au 1er tour de A.1 vous tricotez ainsi 2 fois toutes les mailles = vous avez 16 mailles. Au 2ème tour, vous répétez 8 fois (1 jeté, 2 m end) et vous continuez ainsi en répétant 8 fois le diagramme tout le tour. Bon tricot!
22.09.2026 - 09:23
Christine wrote:
Hi, Ready to start the front pieces and down the body. About the increase to make after each A4 cable and every 4 rows, what increase method should I use ? Is it the same as for previous diagram (A3), i.e. with the yarn-over method, or should we use another one ? Thanks in advance for your reply
20.09.2026 - 13:08DROPS Design answered:
Dear Christine, if there is no increase type specified in the pattern, then you can work whatever type of increase that you prefer. That can be yarn overs, or picking up the thread between the stitches from the previous row, to make tighter increases with smaller holes. Happy knitting!
21.09.2026 - 00:37
 Bente Kjelsrud wrote:
Forkortede pinner A4: stemmer det at det vil måtte snus også i en flette? Etter 7rapporter: tar man høyre forstykket av pinne, mens man strikker venstre ? Etter alle rapporter- tar man alle masker på pinnen og strikker riller? Hvor mange masker skal det da være i str M?
29.08.2026 - 15:19DROPS Design answered:
Hej Bente, nej vi snur ikke midt i en flette, har du startet det rigtige sted? Hvilken pind er du kommet til?
08.09.2026 - 11:11
|
|||||||||||||||||||||||||||||||
Empress#empressjacket |
|||||||||||||||||||||||||||||||
 |
 |
||||||||||||||||||||||||||||||
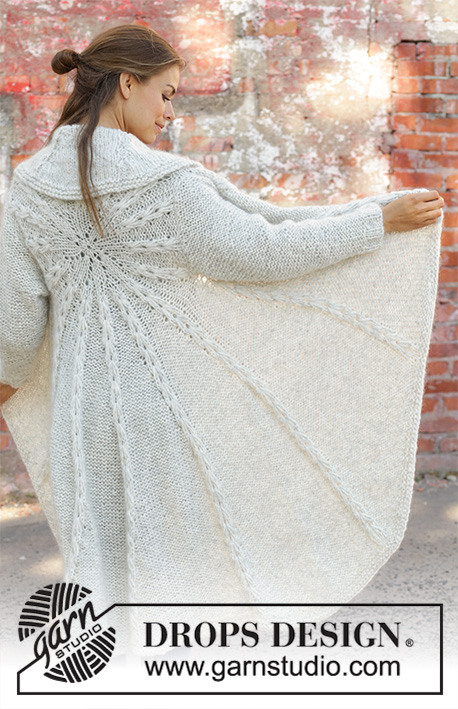
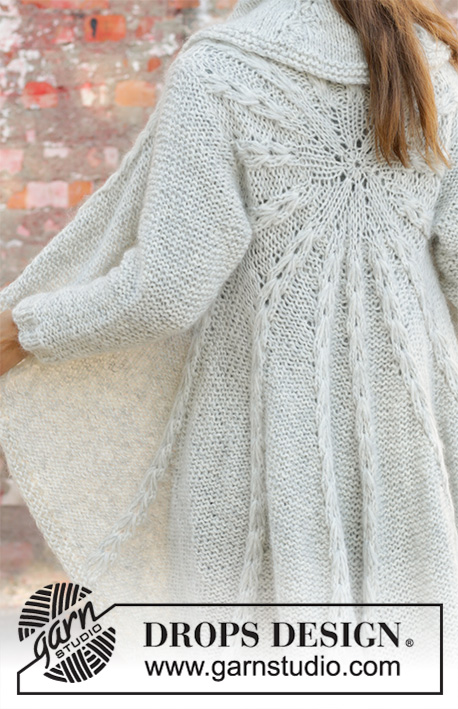
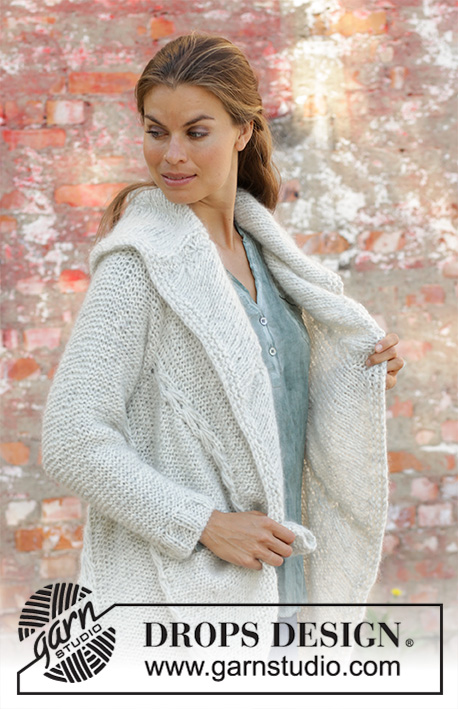
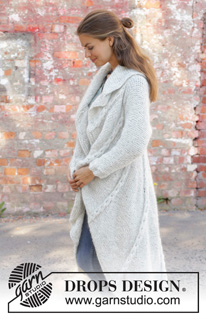
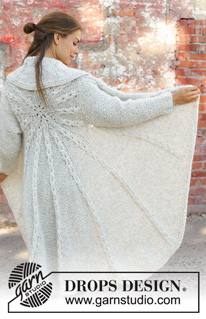
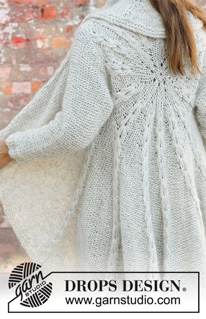
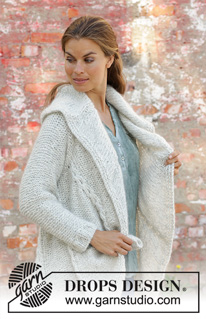
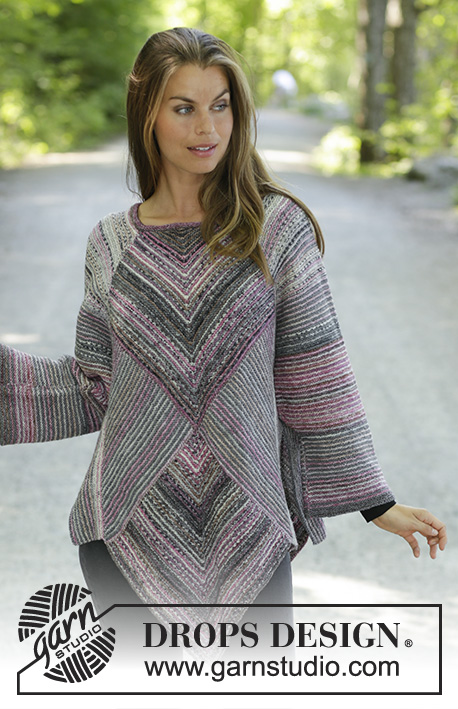
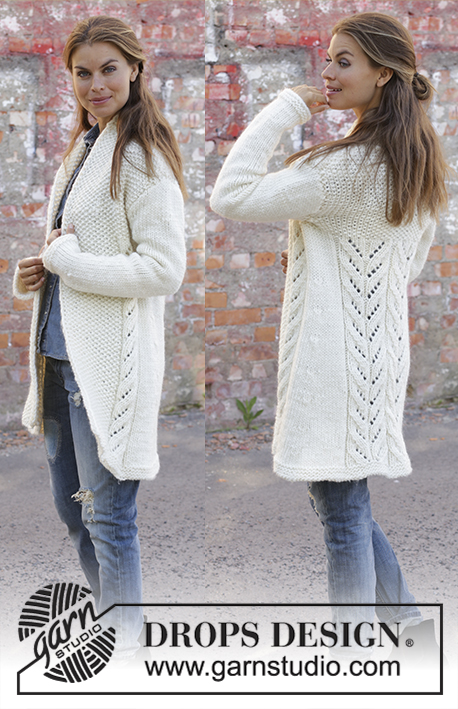
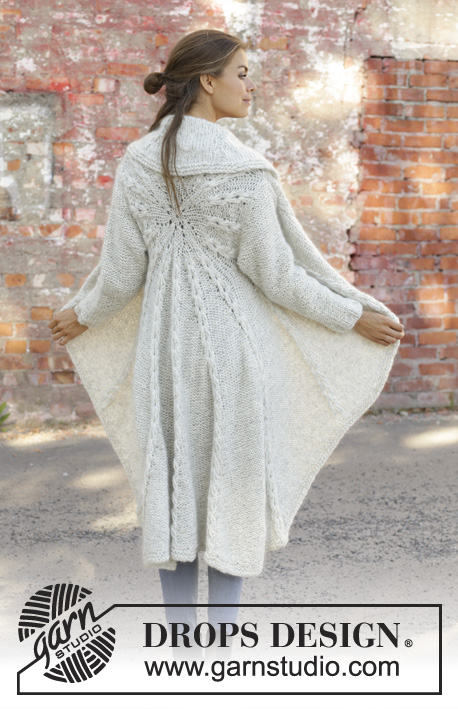
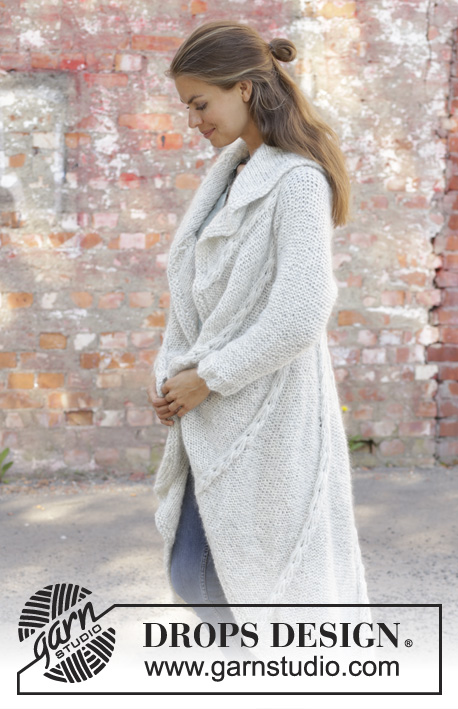
Knitted long circle jacket in 1 strand DROPS Air and 1 strand DROPS Brushed Alpaca Silk. The piece is worked in the round in a circle with texture. Sizes S - XXXL.
DROPS 194-17 |
|||||||||||||||||||||||||||||||
|
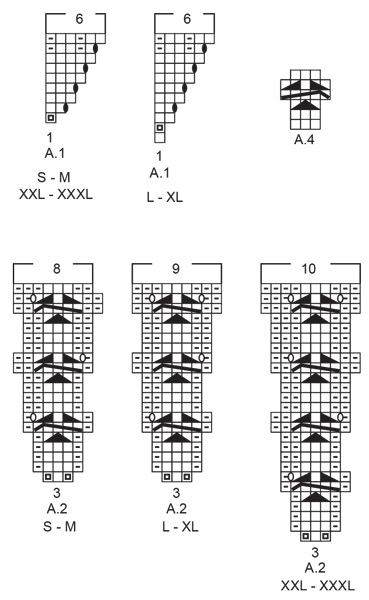
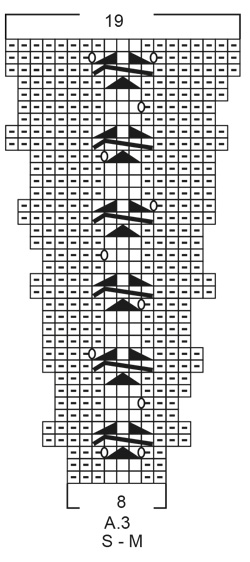
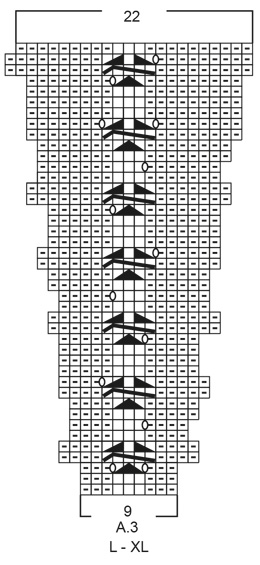
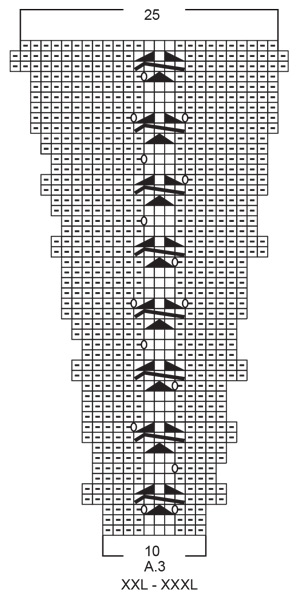
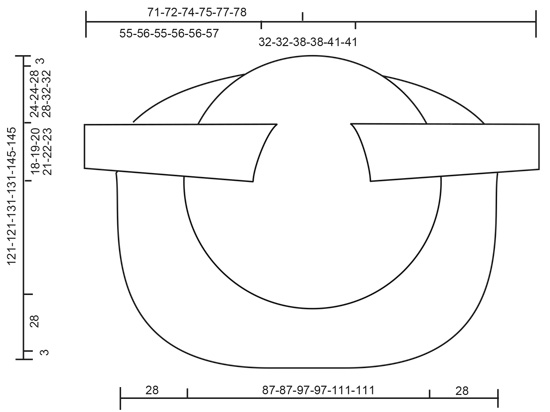
------------------------------------------------------- EXPLANATIONS FOR THE PATTERN: ------------------------------------------------------- RIDGE/GARTER STITCH (worked in the round): 1 ridge = 2 rounds. Knit 1 round and purl 1 round. RIDGE/GARTER STITCH (worked back and forth): 1 ridge = knit 2 rows. PATTERN: See diagrams A.1 to A.4. Choose diagram for your size. The diagrams show all the rows in the pattern seen from the right side! DECREASE TIP (for sleeves): All decreases are made from the side in purl! Decrease 1 stitch by purling 2 stitches together ------------------------------------------------------- START THE PIECE HERE: ------------------------------------------------------- CIRCLE JACKET - SHORT OVERVIEW OF THE PIECE: The piece is worked in the round in a circle from the middle of the back outwards. Change to circular needle(s) when necessary. Then work back and forth with short rows for the front pieces and down the back. The sleeves are worked top down in stocking stitch with the wrong side out. Because of the weight of the yarn, the garment will stretch somewhat after use. CIRCLE JACKET: CIRCLE: Cast on 8 stitches with double pointed needles size 8 mm and 1 strand Air and 1 strand Brushed Alpaca Silk (= 2 strands). Divide the stitches between 4 needles so that there are 2 stitches on each. Insert a marker thread at the beginning of the round. Allow the marker thread to follow your work onwards. Work pattern in the round according to A.1 – choose diagram for your size, a total of 8 times on the round. REMEMBER THE KNITTING TENSION! When A.1 is finished, there are 48 stitches on the round. Now work pattern as follows: Work A.2 – choose diagram for your size, a total of 16 times on the round. After the next-to-last round in A.2 there are 128-128-144-144-160-160 stitches on the round. The last round in A.2 is worked as follows: Work the first 39-39-45-45-49-49 stitches (there is now 1-1-0-0-1-1 stitch left in the last repeat of A.2 worked), insert a new marker thread here (follows your work onwards and is later used when you work short rows from the front pieces and down the body on the back piece), cast off the next 20-21-22-23-24-25 stitches (= armhole), work the next 49-47-55-53-63-61 stitches, cast off the last 20-21-22-23-24-25 stitches (= armhole). The piece measures approx. 39-39-41-41-47-47 cm in diameter. The next round is worked as follows: Work A.3 – choose diagram for your size (= 8-8-9-9-10-10 stitches on the first round in the diagram) a total of 16 times on the round and at the same time cast on 20-21-22-23-24-25 new stitches on the needle where the stitches were cast off for the armholes = 128-128-144-144-160-160 stitches. Continue in the round with A.3 until the whole diagram has been completed in height. There are now 304-304-352-352-400-400 stitches on the round. The piece measures approx. 87-87-97-97-111-111 cm in diameter. Cut the strand. Place the first 94-94-110-110-124-124 stitches on the round (= stitches between the 2 marker threads) on a thread. FRONT PIECES AND DOWN THE BODY: There are now 210-210-242-242-276-276 stitches for the front pieces and down the body on the back piece. Start from the right side after the second marker thread and work short rows back and forth for the front pieces and down the body on the back piece as follows: ROW 1 (right side): Purl over purl and work A.4 (= 3 stitches) over each cable until there are 3 stitches left before the next marker thread (i.e. start of round), turn. ROW 2 (wrong side): Work back until there are 3 stitches left before the marker thread, turn. ROW 3: Purl over purl and work A.4 over each of the cables until there are 6 stitches left before the marker thread, AT THE SAME TIME increase 1 purled stitch after each cable/A.4, turn. ROW 4: Work back until there are 6 stitches left before the marker thread, turn. Continue back and forth like this by working 3 fewer stitches than the previous row and increase 1 stitch after each cable/A.4 every 4th row until you have worked 7 repeats of A.4 in height (= 42 rows). The piece measures approx. 72-72-77-77-84-84 cm from the middle of the circle and down mid back. The last row is worked from the wrong side. Do not cut the strand. Insert a marker thread in the middle cable/A.4 mid back of jacket. Continue back and forth with pattern as before over the bottom of the left front piece as follows: ROW 1 (right side): Work until there are 4 stitches left before the cable/A.4 with the marker thread mid back, turn. ROW 2 (wrong side): Work until there are 3 more stitches left before the marker thread than the previous row (start of round), AT THE SAME TIME increase 1 purled stitch after each cable/A.4, turn. ROW 3 (right side): Work until there are 4 more stitches than last time left before the cable/A.4 with the marker thread mid back, turn. ROW 4 (wrong side): Work until there are 3 more stitches before the marker thread than the previous row, turn. Continue back and forth with pattern and increase after each cable/A.4 every 4th row until you have worked 3 repeats of A.4 in height (= 18 rows). Cut the strand. Start from the right side and after A.4/mid back and work short rows back and forth over the bottom of the right front piece in the same way, but reversed, i.e. each row from the wrong side is turned when there are 4 more stitches before the cable/A.4 with the marker thread mid back than the previous time and on each row from the right side is turned when there are 3 more stitches left than the previous time. EDGE: Place all stitches on the circle back on circular needle and work 2 RIDGES – read description above, around the whole circle. Cast off, but to avoid the cast-off edge being tight you can make 1 yarn over after approx. each 5th stitch - the yarn overs are cast off as normal stitches. SLEEVE: The sleeve is worked in stocking stitch with the wrong side out (reversed stocking stitch). Cast on 11-11-12-12-14-14 stitches with circular needle size 8 mm and 1 strand Air and 1 strand Brushed Alpaca Silk (= 2 strands). Work stocking stitch back and forth, AT THE SAME TIME cast on new stitches at the end of each row in each side as follows: Cast on 2 stitches 2 times, 1 stitch 3-4-5-6-6-7 times, 2 stitches 1 time and 4 stitches 1 time = 37-39-42-44-46-48 stitches. THE PIECE IS NOW MEASURED FROM HERE. Continue back and forth with stocking stitch and 1 edge stitch in GARTER STITCH – read description above, in each side. When the piece measures 4 cm decrease 1 stitch inside the 1 edge stitch in garter stitch in each side – read DECREASE TIP. Decrease like this every 7-6-6-5-5-4 cm a total of 6-7-7-8-8-9 times = 25-25-28-28-30-30 stitches. When the piece measures 42-42-40-40-39-39 cm increase 7-7-4-9-7-7 stitches evenly on row = 32-32-32-37-37-37 stitches. Change to circular needle size 7 mm. Work rib, starting from the side with purl (reversed stocking stitch/the wrong side out) as follows: 1 edge stitch in garter stitch (knit 2, purl 3) until there is 1 stitch left, 1 edge stitch in garter stitch. When the rib measures 5 cm cast off with knit over knit and purl over purl. The sleeve measures approx. 55-56-55-56-56-57 cm from the sleeve cap down. Work the other sleeve in the same way. ASSEMBLY: Sew sleeves to body inside the cast-off/cast-on edge. Sew sleeve seams. Make sure that the seam is not tight. |
|||||||||||||||||||||||||||||||
Diagram explanations |
|||||||||||||||||||||||||||||||
|
|||||||||||||||||||||||||||||||
 |
|||||||||||||||||||||||||||||||
 |
|||||||||||||||||||||||||||||||
 |
|||||||||||||||||||||||||||||||
 |
|||||||||||||||||||||||||||||||
 |
|||||||||||||||||||||||||||||||
Have you finished this pattern?Tag your pictures with #dropspattern #empressjacket or submit them to the #dropsfan gallery. Do you need help with this pattern?You'll find 22 tutorial videos, a Comments/Questions area and more by visiting the pattern on garnstudio.com. © 1982-2026 DROPS Design A/S. We reserve all rights. This document, including all its sub-sections, has copyrights. Read more about what you can do with our patterns at the bottom of each pattern on our site. |
|||||||||||||||||||||||||||||||






With over 40 years in knitting and crochet design, DROPS Design offers one of the most extensive collections of free patterns on the internet - translated to 17 languages. As of today we count 333 catalogues and 12525 patterns translated into English (UK/cm). 12525
We work hard to bring you the best knitting and crochet have to offer, inspiration and advice as well as great quality yarns at incredible prices! Would you like to use our patterns for other than personal use? You can read what you are allowed to do in the Copyright text at the bottom of all our patterns. Happy crafting!
Post a comment to pattern DROPS 194-17
We would love to hear what you have to say about this pattern!
If you want to leave a question, please make sure you select the correct category in the form below, to speed up the answering process. Required fields are marked *.